
- SAP Community
- Products and Technology
- Technology
- Technology Blogs by SAP
- Using Job Scheduler in SAP Cloud Platform [2]: sim...
Technology Blogs by SAP
Learn how to extend and personalize SAP applications. Follow the SAP technology blog for insights into SAP BTP, ABAP, SAP Analytics Cloud, SAP HANA, and more.
Turn on suggestions
Auto-suggest helps you quickly narrow down your search results by suggesting possible matches as you type.
Showing results for
Product and Topic Expert
Options
- Subscribe to RSS Feed
- Mark as New
- Mark as Read
- Bookmark
- Subscribe
- Printer Friendly Page
- Report Inappropriate Content
02-17-2020
12:17 PM
This tutorial is part of a little series about SAP Job Scheduler
In the present tutorial we're going to learn how to create a Node app that exposes a REST endpoint that is protected with OAuth 2.0
And it shows that Jobscheduler is able to trigger that endpoint
It is a simple tutorial that focuses on small portions:
Do the minimum steps in our app, to enforce authentication based on OAuth 2.0
We don't require authorization
Configure JobScheduler to call the protected application
** Create instances of Jobscheduler service and XSUAA service **
** Create and deploy application **
** Create Job to call that application **
** Background information **
Access to SAP Cloud Platform, Trial or productive landscape
To create the simple application, Node.js is required
For deploying the application, it makes sense to use the Cloud Foundry Command Line Client.
The previous blog of our series is not required, but of course recommended
First, create an instance of JobScheduler service.
Both service plans, lite or standard, can be used
If you’ve already created an instance, e.g. because you’ve followed my great previous blog, you can just use it
If you really don’t want to follow the first tutorial, see here to create an instance with name, e.g. jobschedulerinstance
Create simple xsuaa instance:
no params
service plan: broker
name e.g. xsuaa_default
In this tutorial, we’re again using a very simple app, which allows us to focus on the essential part:
enabling authentication
With other words: protect our endpoint with OAuth 2.0
Following steps are required
Note:
See appendix for full content of all files
1. XSUAA binding
As usual, create manifest.yml file in the project root folder
Add a name for the app, I’ve chosen a name to identify our app: appauthnoscope
(the app requires authentication, but no specific scope/no authorization)
Now to add authentication, we need to specify the name of the XSUAA service instance which we created above:
2. Dependencies
Additional dependencies required for OAuth authentication, to be added to package.json
* We use passport, a standard middleware for express server, used for authentication
* We need the @Sap/xssec module provided by SAP. It is used to configure passport with a specific JWT strategy. This is required to validate OAuth tokens issued by SAP XSUAA
* And the @Sap/xsenv module to parse the app environment variables. A convenience library, to avoid doing it manually.
Don't forget to execute npm install
3. Code
The essential line of code is this one:
Here we’re adding a middleware to our express server.
This middleware will be called before our endpoint gets invoked
The middleware ensures that authentication is done, otherwise our endpoint doesn’t get invoked
We specify ‘JWT’ as authentication strategy
This means that a JWT token is required
With other words: basic authentication is not possible, you cannot authenticate with your username and password
In addition, the passport middleware itself needs to be configured
It needs an implementation of the authentication strategy
So the following line is required previously:
Here, an instance of JWTStrategy (module @Sap/xssec) is passed to passport
This implementation takes care of validating the JWT token, which is sent by the user who calls the endpoint of our app
One last (first) step:
The JWTStrategy has to be configured as well
It has to know how to validate, it needs the “sensitive” information.
I mean, in order to validate a user, it would need the user and password.
As such, in order to validate a JWT token, it needs the OAuth info
So before creating the JWTStrategy, we need to find this OAuth info
Remember:
When our app is bound to XSUAA, it receives an environment variable for XSUAA (see next chapter)
This variable is a json object and it contains OAuth info (Remember that XSUAA acts as OAuth-Resource-Server)
That json object contains a nested object called “credentials” which contains all info required for following the OAuth flow
We can manually parse the environment variables of our service, but it is more convenient to use @Sap/xsenv module
The method call shown below will return the “credentials” object (see below for screenshot), which we store as “xsuaaCredentials”
That’s all.
Now we can again have a look at all the relevant code, this time in the correct order, from top to bottom:
4. Configure ACL
For some reasons (explained below), we need to open our app for foreign users.
It is like adding a “White List” to our app
Remember: ACL stands for “Access Control List”
The XSUAA will look at the environment of our app for a variable containing the ACL
As such, we need to add the following snippet to our manifest.yml
For the sake of simplicity, we just allow all client IDs and all identity zones.
We’ll enhance it later
Now we’re done with changes to our app, to enforce protection with OAuth 2.0
As you know, you can find the complete content of all files in the appendix section
Now we can deploy our app to the SAP Cloud Platform
Yep, deploy it
See here or here for help
After deployment, you can find the app url in the cloud cockpit, in the app "overview" section
After appending the REST endpoint (as defined in our app code), the final URL will look similar like this:
https://appauthnoscope.cfapps.eu10.hana.ondemand.com/doSomething
Since we defined the endpoint to be invoked with GET request, we can go ahead and call it, as usual, with our favorite browser.
However, the response is an error: Unauthorized
Second, we can try to use a REST client (e.g. Postman), such that we can pass our user credentials (those which we use when logging into the SAP Cloud Platform)
However, for basic authentication, the response is the same error: Unauthorized with status code 401
At this point you would usually start to panic
BUT: you can safely follow my tutorial - and all will be good 😉
Last attempt: use REST client with authentication type OAuth 2.0
See here for detailed description.
Short description:
In postman, enter the endpoint URL, switch to the “Authorization” tab and specify OAuth 2.0
Then press “Get New Access Token” and fill the subsequent dialog with information which you get from the app environment (your xsuaa credentials. See section below for more information)

Press “Request Token”, then scroll down and click “Use Token”
Back in Postman screen, you can see that the token is entered and you can press “Send”
The result should be success

Last step of our little simple tutorial is to call our endpoint with Job Scheduler
Note:
this section is NOT optional.
Users who skip this chapter won’t be rewarded
(users who continue till the very end – won’t get a reward either, I’m afraid)
Creating jobs is described in previous blog
For your convenience and my entertainment (note that I won’t get a reward either…) I’m adding few clickable screenshots
Open Job Scheduler dashboard with little action icon at the right side:

Create Job
Specify action name, e.g.
https://appauthnoscope.cfapps.eu10.hana.ondemand.com/doSomething

Create Schedule

After job finishes, check result

The screenshot has proven:
We’ve finished our simple tutorial with a green success message, so it wasn’t totally useless (even without rewards)
What is so amazing about it???
We’ve protected our app with OAuth – but Jobscheduler was still able to successfully invoke the endpoint
We didn’t have to specify clientsecret and similar tedious stuff in Jobscheduler –
Remember how tedious it was in postman? (just in case that you went through that section…)
How is that possible?
If you’re familiar with security and need deeper understanding:
-> this chapter will be useless for you
If you’ve no clue about security and need basic understanding of OAuth:
-> you can follow this blog
If you’d like to waste some time:
-> you can continue reading
About Job Scheduler:
Job Scheduler contacts XSUAA and receives a JWT token which is sent to our app endpoint
About our application:
We’ve created an application and since we’re proud of it, we want everybody to use it
On the other side, since we’re also little selfish, we want only registered users to use it
The SAP Cloud Platform offers the service Authorization & Trust Management (XSUAA) to support such scenarios
We’ve bound our app to that service (xsuaa) and in the implementation code, we’ve added authentication middleware, to ensure (or enforce) the authentication
When binding our app to XSUAA, then the XSUAA provides our app with OAuth information which is required to call our app, following the so-called OAuth flow
This OAuth information, provided as environment variables, contains e.g.
A client ID: it represents a user who wants to call the app (endpoint)
A client secret: that’s like a password
URL: this URL is called with clientid/clientsecret and it responds with a JWT token
The content of environment variables can be viewed
on command line (cf env <appname>)
or in the cloud cockpit (application details screen)

So, from now on, the flow to call our endpoint is as follows:
1. The user calls the <URL> and uses <clientid> and <clientsecret>
That <URL> has to be composed as follows:
url + /oauth/token
where url is the value of the property url from the credentials section (see above)
e.g. https://subaccount.authentication.eu10.hana.ondemand.com/oauth/token
2. The response is a JWT token (that’s just a long string with silly characters, e.g. abcxyz)
3. The users calls the endpoint of our app and uses the token in a header:
Authorization: Bearer abcxyz
This is better than using: Authorization = user/password e.g. with a technical user
Our app receives that Bearer token in the “Authorization” header of the req object which is passed into our callback
The authentication is done as follows:
Our app had configured the authentication middleware with the same “credentials” section which we can see in the screenshot above
The bearer token contains exactly the same information, encoded in the silly string (JWT token)
BTW, this is only the case if the user has properly called the xsuaa server and received a valid JWT token
If this is the case, then the JWT Strategy will allow access to our app endpoint
Now, in our case, the <user> is the Jobscheduler
That makes things a bit more complicated
When Jobscheduler calls our app-endpoint, it sends a JWT token which is valid, but not valid for our app.
The reason is that the JWT token contains a client ID which is not the one we’ve seen in the screenshot above.
Why?
JobScheduler is an existing application, it has its own binding to xsuaa, so it receives its own clientid.
We can see it:
It is the one from different VCAP_SERVICE, like shown in screenshot below:

This is rejected in our app code, by our JWT Strategy, because we configured it with the previous xsuaa-credentials, not the jobscheduler-credentials. Which is correct
Remember:
In my example, the xsuaaCredentials contains this clientid:

As such, the clientid starting with sb-na-cff … is a good one
But the Jobscheduler sends the clientid starting with sb-20db... which is a bad one
Again:
As per default, the xssec lib accepts only tokens containing the same client running in the same subaccount.
So the jobscheduler-clientid is rejected.
How can this be fixed?
We need to explicitly allow that bad clientid
That’s done with an environment variable called SAP_JWT_TRUST_ACL
In our sample application we’ve added this variable in the manifest.yml
Remember:
Here we simply allow all bad clients
We can see this setting in the cloud cockpit:
App details -> User-Provided Variables:
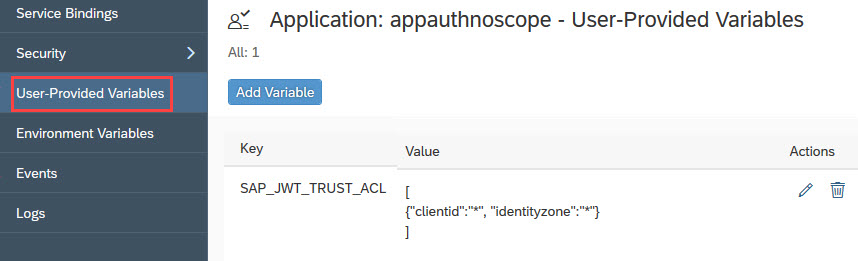
If you were bad and didn’t follow my tutorial, then you can enter the ACL here in the cockpit as well
Third way of adding an environment variable is using the command line
You can use this command:
Note:
This command doesn’t work under windows.
Windows users should try with escape:
For those of you who feel good with opening your app to all clients and identity zones:
You can skip this chapter and still feel good:
because you save time
And because you’re still quite safe because any client still will be issued by an XSUAA, so not completely coming from wilderness
Nevertheless, if you continue reading, you are free to stop at any time.
Good.
So if we want to replace the asterisk, as seen above:

With anything concrete, that at the end would look similar like this:

Then you need to know how to get the client id and the indentity zone
1. client id: You already have it, you take it from the environment variables, jobscheduler section

Note: don't forget to make sure you're copying from "jobscheduler" section
2. the identity zone is also taken from the screenshot but there’s a little trick:
Don’t use the identityzone….
The value of the ACL-property “identityzone” has to be the identityzoneID….
See screenshot above
Note:
if you’re unsure about which client id is being sent by JobScheduler, you can check it programmatically.
See appendix for code snippet
Now you have 2 possibilities:
Restrict the identity zone or restrict the client id or both (actually 3 possibilities)
1. Identity zone
This means that you trust all JobScheduler instances which are living in the same subaccount like your app.
Doesn’t sound wrong
1. clientid
Only trust one client which has foreign client id.
Can be our jobscheduler.
Can also be another consuming application which is bound to different xsuaa and which you want to add to whitelist
This option is more restricted thus more safe
OK, you can try both options, change the property values of SAP_JWT_TRUST_ACL
e.g. in the cockpit by using the “Edit” button
Or use the command line
Or change the manifest.yml and redeploy the application
Note: in first 2 cases, it is required to restart or restage the application
If any value is invalid, the JobScheduler run will terminate with error “Forbidden”
In this little tutorial we’ve learned how to write a simple Node.js application which is protected with Oath 2.0
We only need to add few lines of code to use libraries which do all the work for us.
Not complicated
And we’ve learned that JobScheduler supports OAuth 2.0 authentication flow without further configuration
The next blog will explain how to enhance the OAuth protection by adding authorization requirement to our application
That will require special handling for JobScheduler
Previous blog and Intro blog
Previous blog and Intro blog
SAP Help Portal: Job Scheduler documentation
SAP Help Portal Job Scheduler: Security chapter
SAP Help Portal XSUAA documentation
OAuth
Specification: https://oauth.net/2
And rfc: https://tools.ietf.org/html/rfc6749
JWT
Specification https://jwt.io
And rfc: https://tools.ietf.org/html/rfc7519
A tool to view token content: https://devtoolzone.com/decoder/jwt
Node
Passport module and documentation http://www.passportjs.org
Advertising my own blogs
How to call OAuth protected endpoint with REST client
Some basic simple introduction to OAuth protection and OAuth grant type
Sample to call protected API from Node.js application, and one more sample in cloud
Using command line client for cloud
About reading JWT token and more
In this appendix you can find all files required to run the described sample application.
For your convenience, see here again the folder structure:

Find below the content of all 3 requried files
manifest.yml
package.json
server.js
We want to retrieve the JWT token which is sent to our app in the authorization header.
The token contains sensitive information about client id etc
In case of our sample app, we need to add an own middleware, which has to be invoked before passport-middleware.
Because if passport would reject the incoming call, we wouldn't be invoked, thus no chance to read the JWT token
Quicklinks:
Intro Blog
Previous Blog
Project Files
In the present tutorial we're going to learn how to create a Node app that exposes a REST endpoint that is protected with OAuth 2.0
And it shows that Jobscheduler is able to trigger that endpoint
It is a simple tutorial that focuses on small portions:
Do the minimum steps in our app, to enforce authentication based on OAuth 2.0
We don't require authorization
Configure JobScheduler to call the protected application
Overview
** Create instances of Jobscheduler service and XSUAA service **
** Create and deploy application **
** Create Job to call that application **
** Background information **
Prerequisites
Access to SAP Cloud Platform, Trial or productive landscape
To create the simple application, Node.js is required
For deploying the application, it makes sense to use the Cloud Foundry Command Line Client.
The previous blog of our series is not required, but of course recommended
Create instance of JobScheduler service
First, create an instance of JobScheduler service.
Both service plans, lite or standard, can be used
If you’ve already created an instance, e.g. because you’ve followed my great previous blog, you can just use it
If you really don’t want to follow the first tutorial, see here to create an instance with name, e.g. jobschedulerinstance
Create instance of xsuaa service
Create simple xsuaa instance:
no params
service plan: broker
name e.g. xsuaa_default
Create Application
In this tutorial, we’re again using a very simple app, which allows us to focus on the essential part:
enabling authentication
With other words: protect our endpoint with OAuth 2.0
Following steps are required
- Bind app to XSUAA
- Add dependencies to package.json
- Add some lines of code
- Add trust ACL to app environment
Note:
See appendix for full content of all files
1. XSUAA binding
As usual, create manifest.yml file in the project root folder
Add a name for the app, I’ve chosen a name to identify our app: appauthnoscope
(the app requires authentication, but no specific scope/no authorization)
applications:

- name: appauthnoscope

  host: appauthnoscope
Note:
you might need to change the host name to something unique
Now to add authentication, we need to specify the name of the XSUAA service instance which we created above:
  services:

    - xsuaa_default

    - jobschedulerinstance
2. Dependencies
Additional dependencies required for OAuth authentication, to be added to package.json
"passport": "latest",

"@sap/xssec": "latest",

"@sap/xsenv": "latest"
* We use passport, a standard middleware for express server, used for authentication
* We need the @Sap/xssec module provided by SAP. It is used to configure passport with a specific JWT strategy. This is required to validate OAuth tokens issued by SAP XSUAA
* And the @Sap/xsenv module to parse the app environment variables. A convenience library, to avoid doing it manually.
Don't forget to execute npm install
3. Code
The essential line of code is this one:
app.use(passport.authenticate('JWT', { session: false }));Here we’re adding a middleware to our express server.
This middleware will be called before our endpoint gets invoked
The middleware ensures that authentication is done, otherwise our endpoint doesn’t get invoked
We specify ‘JWT’ as authentication strategy
This means that a JWT token is required
With other words: basic authentication is not possible, you cannot authenticate with your username and password
In addition, the passport middleware itself needs to be configured
It needs an implementation of the authentication strategy
So the following line is required previously:
const jwtStrategy = new JWTStrategy(xsuaaCredentials)

passport.use(jwtStrategy);
Here, an instance of JWTStrategy (module @Sap/xssec) is passed to passport
This implementation takes care of validating the JWT token, which is sent by the user who calls the endpoint of our app
One last (first) step:
The JWTStrategy has to be configured as well
It has to know how to validate, it needs the “sensitive” information.
I mean, in order to validate a user, it would need the user and password.
As such, in order to validate a JWT token, it needs the OAuth info
So before creating the JWTStrategy, we need to find this OAuth info
Remember:
When our app is bound to XSUAA, it receives an environment variable for XSUAA (see next chapter)
This variable is a json object and it contains OAuth info (Remember that XSUAA acts as OAuth-Resource-Server)
That json object contains a nested object called “credentials” which contains all info required for following the OAuth flow
We can manually parse the environment variables of our service, but it is more convenient to use @Sap/xsenv module
The method call shown below will return the “credentials” object (see below for screenshot), which we store as “xsuaaCredentials”
const xsuaaService = xsenv.getServices({ myXsuaa: { tag: 'xsuaa' }});

const xsuaaCredentials = xsuaaService.myXsuaa;
That’s all.
Now we can again have a look at all the relevant code, this time in the correct order, from top to bottom:
const xsuaaService = xsenv.getServices({ myXsuaa: { tag: 'xsuaa' }});

const xsuaaCredentials = xsuaaService.myXsuaa;


const jwtStrategy = new JWTStrategy(xsuaaCredentials)

passport.use(jwtStrategy);


const app = express();

app.use(passport.initialize());

app.use(passport.authenticate('JWT', { session: false }));
4. Configure ACL
For some reasons (explained below), we need to open our app for foreign users.
It is like adding a “White List” to our app
Remember: ACL stands for “Access Control List”
The XSUAA will look at the environment of our app for a variable containing the ACL
As such, we need to add the following snippet to our manifest.yml
applications:

- name: appauthnoscope

  . . .

  env:

    SAP_JWT_TRUST_ACL: >

      [

        {"clientid":"*", "identityzone":"*"}

      ]
For the sake of simplicity, we just allow all client IDs and all identity zones.
We’ll enhance it later
Now we’re done with changes to our app, to enforce protection with OAuth 2.0
Small recap:
In manifest, we’ve bound our app to xsuaa + added ACL to env
In code, we’ve added and configured passport with JWT
Of course, we’ve also added the required dependencies to package.json
As you know, you can find the complete content of all files in the appendix section
Now we can deploy our app to the SAP Cloud Platform
Deploy sample app
Yep, deploy it
See here or here for help
Optional: Test the endpoint of our app
After deployment, you can find the app url in the cloud cockpit, in the app "overview" section
After appending the REST endpoint (as defined in our app code), the final URL will look similar like this:
https://appauthnoscope.cfapps.eu10.hana.ondemand.com/doSomething
Since we defined the endpoint to be invoked with GET request, we can go ahead and call it, as usual, with our favorite browser.
However, the response is an error: Unauthorized
Second, we can try to use a REST client (e.g. Postman), such that we can pass our user credentials (those which we use when logging into the SAP Cloud Platform)
However, for basic authentication, the response is the same error: Unauthorized with status code 401
At this point you would usually start to panic
BUT: you can safely follow my tutorial - and all will be good 😉
Last attempt: use REST client with authentication type OAuth 2.0
See here for detailed description.
Short description:
In postman, enter the endpoint URL, switch to the “Authorization” tab and specify OAuth 2.0
Then press “Get New Access Token” and fill the subsequent dialog with information which you get from the app environment (your xsuaa credentials. See section below for more information)

Press “Request Token”, then scroll down and click “Use Token”
Back in Postman screen, you can see that the token is entered and you can press “Send”
The result should be success

Create job in Job Scheduler Dashboard
Last step of our little simple tutorial is to call our endpoint with Job Scheduler
Note:
this section is NOT optional.
Users who skip this chapter won’t be rewarded
(users who continue till the very end – won’t get a reward either, I’m afraid)
Creating jobs is described in previous blog
For your convenience and my entertainment (note that I won’t get a reward either…) I’m adding few clickable screenshots
Open Job Scheduler dashboard with little action icon at the right side:
Create Job
Specify action name, e.g.
https://appauthnoscope.cfapps.eu10.hana.ondemand.com/doSomething

Create Schedule

After job finishes, check result

The screenshot has proven:
We’ve finished our simple tutorial with a green success message, so it wasn’t totally useless (even without rewards)
What is so amazing about it???
We’ve protected our app with OAuth – but Jobscheduler was still able to successfully invoke the endpoint
We didn’t have to specify clientsecret and similar tedious stuff in Jobscheduler –
Remember how tedious it was in postman? (just in case that you went through that section…)
How is that possible?
Optional: Understanding the authentication mechanism
If you’re familiar with security and need deeper understanding:
-> this chapter will be useless for you
If you’ve no clue about security and need basic understanding of OAuth:
-> you can follow this blog
If you’d like to waste some time:
-> you can continue reading
About Job Scheduler:
Job Scheduler contacts XSUAA and receives a JWT token which is sent to our app endpoint
About our application:
We’ve created an application and since we’re proud of it, we want everybody to use it
On the other side, since we’re also little selfish, we want only registered users to use it
The SAP Cloud Platform offers the service Authorization & Trust Management (XSUAA) to support such scenarios
We’ve bound our app to that service (xsuaa) and in the implementation code, we’ve added authentication middleware, to ensure (or enforce) the authentication
When binding our app to XSUAA, then the XSUAA provides our app with OAuth information which is required to call our app, following the so-called OAuth flow
This OAuth information, provided as environment variables, contains e.g.
A client ID: it represents a user who wants to call the app (endpoint)
A client secret: that’s like a password
URL: this URL is called with clientid/clientsecret and it responds with a JWT token
The content of environment variables can be viewed
on command line (cf env <appname>)
or in the cloud cockpit (application details screen)
So, from now on, the flow to call our endpoint is as follows:
1. The user calls the <URL> and uses <clientid> and <clientsecret>
That <URL> has to be composed as follows:
url + /oauth/token
where url is the value of the property url from the credentials section (see above)
e.g. https://subaccount.authentication.eu10.hana.ondemand.com/oauth/token
2. The response is a JWT token (that’s just a long string with silly characters, e.g. abcxyz)
3. The users calls the endpoint of our app and uses the token in a header:
Authorization: Bearer abcxyz
This is better than using: Authorization = user/password e.g. with a technical user
Our app receives that Bearer token in the “Authorization” header of the req object which is passed into our callback
app.get('/doSomething', function(req, res){ The authentication is done as follows:
Our app had configured the authentication middleware with the same “credentials” section which we can see in the screenshot above
The bearer token contains exactly the same information, encoded in the silly string (JWT token)
BTW, this is only the case if the user has properly called the xsuaa server and received a valid JWT token
If this is the case, then the JWT Strategy will allow access to our app endpoint
Now, in our case, the <user> is the Jobscheduler
That makes things a bit more complicated
When Jobscheduler calls our app-endpoint, it sends a JWT token which is valid, but not valid for our app.
The reason is that the JWT token contains a client ID which is not the one we’ve seen in the screenshot above.
Why?
JobScheduler is an existing application, it has its own binding to xsuaa, so it receives its own clientid.
We can see it:
It is the one from different VCAP_SERVICE, like shown in screenshot below:
This is rejected in our app code, by our JWT Strategy, because we configured it with the previous xsuaa-credentials, not the jobscheduler-credentials. Which is correct
Remember:
const xsuaaService = xsenv.getServices({ myXsuaa: { tag: 'xsuaa' }});

const xsuaaCredentials = xsuaaService.myXsuaa;

const jwtStrategy = new JWTStrategy(xsuaaCredentials)
In my example, the xsuaaCredentials contains this clientid:

As such, the clientid starting with sb-na-cff … is a good one
But the Jobscheduler sends the clientid starting with sb-20db... which is a bad one
Again:
As per default, the xssec lib accepts only tokens containing the same client running in the same subaccount.
So the jobscheduler-clientid is rejected.
How can this be fixed?
We need to explicitly allow that bad clientid
That’s done with an environment variable called SAP_JWT_TRUST_ACL
In our sample application we’ve added this variable in the manifest.yml
Remember:
  env:

    SAP_JWT_TRUST_ACL: >

      [

        {"clientid":"*", "identityzone":"*"}

      ]
Here we simply allow all bad clients
We can see this setting in the cloud cockpit:
App details -> User-Provided Variables:
If you were bad and didn’t follow my tutorial, then you can enter the ACL here in the cockpit as well
Third way of adding an environment variable is using the command line
You can use this command:
cf set-env <application-name> SAP_JWT_TRUST_ACL "[{"clientid":"*","identityzone":"*"}]"Note:
This command doesn’t work under windows.
Windows users should try with escape:
cf set-env <application-name> SAP_JWT_TRUST_ACL "[{\"clientid\":\"*\",\"identityzone\":\"*\"}]"Optional: fine-tuning the ACL
For those of you who feel good with opening your app to all clients and identity zones:
You can skip this chapter and still feel good:
because you save time
And because you’re still quite safe because any client still will be issued by an XSUAA, so not completely coming from wilderness
Nevertheless, if you continue reading, you are free to stop at any time.
Good.
So if we want to replace the asterisk, as seen above:
With anything concrete, that at the end would look similar like this:
Then you need to know how to get the client id and the indentity zone
1. client id: You already have it, you take it from the environment variables, jobscheduler section
Note: don't forget to make sure you're copying from "jobscheduler" section
2. the identity zone is also taken from the screenshot but there’s a little trick:
Don’t use the identityzone….
The value of the ACL-property “identityzone” has to be the identityzoneID….
See screenshot above
Note:
if you’re unsure about which client id is being sent by JobScheduler, you can check it programmatically.
See appendix for code snippet
Now you have 2 possibilities:
Restrict the identity zone or restrict the client id or both (actually 3 possibilities)
1. Identity zone
This means that you trust all JobScheduler instances which are living in the same subaccount like your app.
Doesn’t sound wrong
1. clientid
Only trust one client which has foreign client id.
Can be our jobscheduler.
Can also be another consuming application which is bound to different xsuaa and which you want to add to whitelist
This option is more restricted thus more safe
OK, you can try both options, change the property values of SAP_JWT_TRUST_ACL
e.g. in the cockpit by using the “Edit” button
Or use the command line
Or change the manifest.yml and redeploy the application
Note: in first 2 cases, it is required to restart or restage the application
If any value is invalid, the JobScheduler run will terminate with error “Forbidden”
Summary
In this little tutorial we’ve learned how to write a simple Node.js application which is protected with Oath 2.0
We only need to add few lines of code to use libraries which do all the work for us.
Not complicated
And we’ve learned that JobScheduler supports OAuth 2.0 authentication flow without further configuration
Next Steps
The next blog will explain how to enhance the OAuth protection by adding authorization requirement to our application
That will require special handling for JobScheduler
Previous Steps
Previous blog and Intro blog
Links
Previous blog and Intro blog
SAP Help Portal: Job Scheduler documentation
SAP Help Portal Job Scheduler: Security chapter
SAP Help Portal XSUAA documentation
OAuth
Specification: https://oauth.net/2
And rfc: https://tools.ietf.org/html/rfc6749
JWT
Specification https://jwt.io
And rfc: https://tools.ietf.org/html/rfc7519
A tool to view token content: https://devtoolzone.com/decoder/jwt
Node
Passport module and documentation http://www.passportjs.org
Advertising my own blogs
How to call OAuth protected endpoint with REST client
Some basic simple introduction to OAuth protection and OAuth grant type
Sample to call protected API from Node.js application, and one more sample in cloud
Using command line client for cloud
About reading JWT token and more
Appendix 1: All Project Files
In this appendix you can find all files required to run the described sample application.
For your convenience, see here again the folder structure:
Find below the content of all 3 requried files
manifest.yml
---

applications:

- name: appauthnoscope

  host: appauthnoscope

  path: myapp

  memory: 128M

  buildpacks:

    - nodejs_buildpack

  services:

    - xsuaa_default

    - jobschedulerinstance

  env:

    SAP_JWT_TRUST_ACL: >

      [

        {"clientid":"*", "identityzone":"*"}

      ]
package.json
{

  "main": "server.js",

  "dependencies": {

    "@sap/xsenv": "latest",

    "@sap/xssec": "latest",

    "express": "^4.16.3",

    "passport": "^0.4.1"

  }

}
server.js
const express = require('express');

const passport = require('passport');

const xsenv = require('@sap/xsenv');

const JWTStrategy = require('@sap/xssec').JWTStrategy;


//configure passport

const xsuaaService = xsenv.getServices({ myXsuaa: { tag: 'xsuaa' }});

const xsuaaCredentials = xsuaaService.myXsuaa;

const jwtStrategy = new JWTStrategy(xsuaaCredentials)

passport.use(jwtStrategy);


// configure express server with authentication middleware

const app = express();

app.use(passport.initialize());

app.use(passport.authenticate('JWT', { session: false }));


// app endpoint which will be called by jobscheduler

app.get('/doSomething', function(req, res){

   res.send('App endpoing finished doing something');

});


const port = process.env.PORT || 3000;

app.listen(port, function(){})
Appendix 2: Retrieve client id programmatically
We want to retrieve the JWT token which is sent to our app in the authorization header.
The token contains sensitive information about client id etc
In case of our sample app, we need to add an own middleware, which has to be invoked before passport-middleware.
Because if passport would reject the incoming call, we wouldn't be invoked, thus no chance to read the JWT token
// Middleware to read JWT sent by JobScheduler

function jwtLogger(req, res, next) {

    console.log('===> [JWT-LOGGER]  decoding auth header' )

    let authHeader = req.headers.authorization;

    if (authHeader){

       var theJwtToken = authHeader.substring(7);

       if(theJwtToken){

          let jwtBase64Encoded = theJwtToken.split('.')[1];

          if(jwtBase64Encoded){

             let jwtDecoded = Buffer.from(jwtBase64Encoded, 'base64').toString('ascii');

             let jwtDecodedJson = JSON.parse(jwtDecoded);

             console.log('===> [JWT-LOGGER]: JWT contains scopes: ' + jwtDecodedJson.scope);

             console.log('===> [JWT-LOGGER]: JWT contains client_id sent by Jobscheduler: ' + jwtDecodedJson.client_id);

          }

       }

    }

    next()

 }

app.use(jwtLogger)


app.use(passport.initialize())

    .use(passport.authenticate('JWT', { session: false }));

// . . . etc- SAP Managed Tags:
- Node.js,
- SAP BTP, Cloud Foundry runtime and environment,
- Security
Labels:
14 Comments
You must be a registered user to add a comment. If you've already registered, sign in. Otherwise, register and sign in.
Labels in this area
-
ABAP CDS Views - CDC (Change Data Capture)
2 -
AI
1 -
Analyze Workload Data
1 -
BTP
1 -
Business and IT Integration
2 -
Business application stu
1 -
Business Technology Platform
1 -
Business Trends
1,658 -
Business Trends
91 -
CAP
1 -
cf
1 -
Cloud Foundry
1 -
Confluent
1 -
Customer COE Basics and Fundamentals
1 -
Customer COE Latest and Greatest
3 -
Customer Data Browser app
1 -
Data Analysis Tool
1 -
data migration
1 -
data transfer
1 -
Datasphere
2 -
Event Information
1,400 -
Event Information
66 -
Expert
1 -
Expert Insights
177 -
Expert Insights
293 -
General
1 -
Google cloud
1 -
Google Next'24
1 -
Kafka
1 -
Life at SAP
780 -
Life at SAP
12 -
Migrate your Data App
1 -
MTA
1 -
Network Performance Analysis
1 -
NodeJS
1 -
PDF
1 -
POC
1 -
Product Updates
4,577 -
Product Updates
340 -
Replication Flow
1 -
RisewithSAP
1 -
SAP BTP
1 -
SAP BTP Cloud Foundry
1 -
SAP Cloud ALM
1 -
SAP Cloud Application Programming Model
1 -
SAP Datasphere
2 -
SAP S4HANA Cloud
1 -
SAP S4HANA Migration Cockpit
1 -
Technology Updates
6,873 -
Technology Updates
417 -
Workload Fluctuations
1
Related Content
- Onboarding Users in SAP Quality Issue Resolution in Technology Blogs by SAP
- ABAP Cloud Developer Trial 2022 Available Now in Technology Blogs by SAP
- SAP HANA Cloud Vector Engine: Quick FAQ Reference in Technology Blogs by SAP
- CAP LLM Plugin – Empowering Developers for rapid Gen AI-CAP App Development in Technology Blogs by SAP
- Adversarial Machine Learning: is your AI-based component robust? in Technology Blogs by SAP
Top kudoed authors
| User | Count |
|---|---|
| 34 | |
| 25 | |
| 12 | |
| 7 | |
| 7 | |
| 6 | |
| 6 | |
| 6 | |
| 5 | |
| 4 |