
- SAP Community
- Products and Technology
- Technology
- Technology Blogs by Members
- Kotlin Application with SAP Gateway
Technology Blogs by Members
Explore a vibrant mix of technical expertise, industry insights, and tech buzz in member blogs covering SAP products, technology, and events. Get in the mix!
Turn on suggestions
Auto-suggest helps you quickly narrow down your search results by suggesting possible matches as you type.
Showing results for
former_member50
Explorer
Options
- Subscribe to RSS Feed
- Mark as New
- Mark as Read
- Bookmark
- Subscribe
- Printer Friendly Page
- Report Inappropriate Content
02-17-2020
9:46 PM
Introduction
As a software developer, it is always good to step out of your area of expertise and learn a new language. This is especially good for ABAP developers, in order to stay fluent in Object-Oriented concepts, and to get a head start on where the language may be headed. For example, if you were familiar with Java when ABAP Objects was introduced, you would have been able to quickly adopt it, because ABAP Objects was modelled after Java. When the ABAP language was re-written in version 7.40+, familiarity with Java would have given you a great head start and enable you to quickly take advantage of the productivity gain. With the introduction of Fiori, familiarization with web development concepts would have also been very beneficial. Once familiar with Java, exploring other powerful languages, which are compatible with the Java Virtual Machine (JVM), will only make you a better ABAP developer. This is because languages like Groovy and Kotlin can teach you about higher level, advanced design concepts which are popular with today’s leading-edge web development community. Large software corporations, like SAP and Microsoft will keep an eye on these concepts which are rising quickly in popularity, and eventually adopt them into their products (i.e. HTML5 > Fiori, Java > C#, XML > OData). So, why not see the future, and keep your skills sharp!
Kotlin is rising very quickly in popularity and Google announced it was their preferred language for Android Development.
Interestingly, Kotlin is interoperable with both Java and JavaScript. Also, one goal of Kotlin is to be able to run anywhere and compile into many different native binaries.
This Blog is useful for ABAPers who want to get familiar with Kotlin, or Kotlin developers who want to understand SAP Gateway. Understanding the connectivity lessons learned in this Blog, should give you a jump start with your application. From there, add your own UI development and any ABAP code on the back end to accomplish any update in SAP (i.e. Sales Order Create BAPI call, etc.). This application is a simple console application to demonstrate all of the CRUD (Create, Read, Update, Delete) operations for a custom table in SAP. While I’m not sharing the code on GitHub, all of the code is in a single file (TableMaintenance.kt), so is easily used in your own project.
This Blog is organized as follows:
Application Overview
End User Walk through
Create an SAP Gateway Service
Create the Custom Table
Create a new SAP Gateway Project
Read Records
Read all Records
Read a Single Record
Testing the SAP Gateway
Create Record
Fetch Authorization Data
Database Change (CUD Operation)
Update Record
Delete Record
Create a Kotlin Application
Project Creation
Gradle
Jackson and Fuel
Read Records
Data Classes
Date and Time Formats
Create Record
Update Record
Delete Record
Complete Kotlin Program
References
Software Versions:
- Application Server ABAP 7.54 SP00, S/4HANA, SAPGUI Version 760.
- Eclipse Version: 2019-03 (4.11.0), ABAP Development Tools 3.4.4
- Version 2019.3.2 (Ultimate Edition) of the JetBrains IntelliJ IDEA.
Application Overview
Here is an overview of how the application will work, representing the classical CRUD operations (Create, Read, Update, Delete) on a table:

Options 1-6 will be displayed with the following User Menu in a simple console application:

End User Walk through
Before diving into the code, let’s do a walk through of exactly what the simple console application will do.
Option 1 – Display All Data:
Enter option 1, and press enter, will display all data in the custom SAP Table ZTEST_KOTLIN.

After each option, the main menu is displayed again. Until you enter option 6 (Exit the Program), the main menu will continue to display.
Option 2 – Display a Record:
In order to display a single record, highlight and copy one of the Guid keys for a record, as below.


Option 3 – Create a Record:
Our intent is to maintain records for Customer Memos for a particular Order and Customer. To create a record, we’ll need to enter an Order Number, Customer Number and the Memo. A Guid key is auto-generated for us.

Option 4 – Update a Record:
To update a record, highlight and copy the Guid key first, then enter the new Customer Memo.

Until you hit option 6 to exit, you can continue to work…

Option 5 – Delete a Record:
Just like with an Update, copy the Guid key first, in order to delete a record. Let’s delete the above record we just created and updated.

Option 6 – Exit the Program:
Option 6 simply ends the program.

Now that we see how the program works, let’s write the code to accomplish all of the above…
Create an SAP Gateway Service
Create the Custom Table
First, we will create our custom table in SAP named ZTEST_KOTLIN. You can either perform the below steps, or follow this SAP Excel Blog, which will also allow you to create some test records using Excel.
First, let’s create a new String Data Element, which we will use for our Customer Memo field.
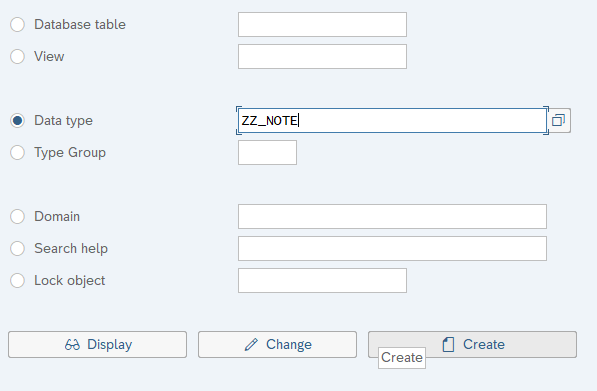
Enter the SAP Transaction SE11, and enter the Data type “ZZ_NOTE”, and click the “Create” button:
Select “Data Element” and continue:

Enter the following, then Save and Activate:


Activate -

Execute the SAP Transaction SE11, and enter table name “ZTEST_KOTLIN”, then click on the “Create” button:

Enter the following fields for ZTEST_KOTLIN, and Save and Activate:

If you prefer Eclipse, we can create the table by entering the following DDL for our Table:
@EndUserText.label : 'Kotlin Tester'

@AbapCatalog.enhancementCategory : #EXTENSIBLE_ANY

@AbapCatalog.tableCategory : #TRANSPARENT

@AbapCatalog.deliveryClass : #A

@AbapCatalog.dataMaintenance : #ALLOWED

define table ztest_kotlin {

  key mandt        : mandt not null;

  key guid         : /aif/exp_guid not null;

  date_updated     : sydatum;

  time_updated     : syuzeit;

  last_updated_by  : syuname;

  order_number     : vbeln;

  customer_number  : kunag;

  customer_message : zz_note;


}
Create a new SAP Gateway Project
Execute the SAP Transaction SEGW and click on the “Create Project” button:

Enter the following and continue:

We now have the following tree structure:

At this point, there are many ways to setup a basic CRUD Gateway Service. Among them is BOPF, which auto-generates code that allows you to easily maintain a Z Table via CDS View Annotations. Another method, is to setup a CDS View, which we expose as a service to quickly enable a "GET" or Read operation. As I recently witnessed at SAP Teched on newer versions of SAP, you can even right-click on your service, and auto-generate a Fiori App which displays your table. If your application evolves into something complicated, the road will lead to a more “custom” approach I will show in this Blog. It’s usually not long, before you need to start doing a “Deep Entity” POST, for example a Sales Order create with header and line item information, where the code generation method quickly reaches it’s limitation. Plus, if you are using Kotlin, let’s say to write a native Android Application, you may not be using Fiori at all. SAP is marketing a “Bring Your Own Language” (BYOL) approach with HANA. Yes, there are many plug-and-play options for a CRUD application, but the entire point of BYOL, is so organizations can utilize their existing pool of software engineers. For example, if you have a team of Kotlin developers, you may want to utilize them with your SAP installation. So, let’s proceed with a bare bones custom approach that gives us maximum flexibility, without the use of any code generation restrictions…
Let’s define our Entity, which represents the attributes of the ZTEST_KOTLIN table. Right-click on the “Data Model” node, and choose “Import > DDIC Structure”:

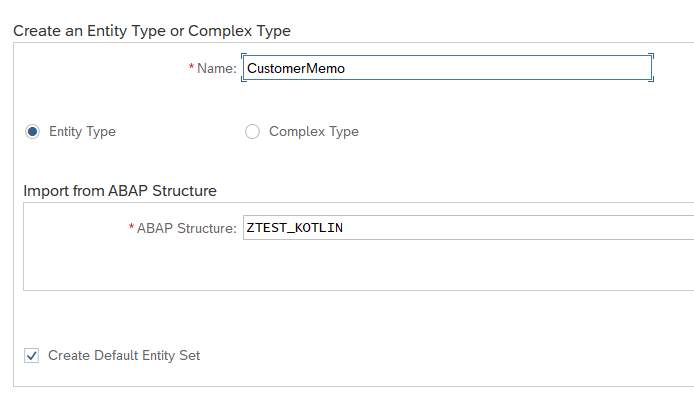
Let’s give our Entity an intuitive name, like “CustomerMemo”. Enter the following, and click “Next”:
Select all of the fields, except “MANDT”, and click “Next”:

Select the GUID field as the key, then click “Finish”:


Now if you expand out the Entity node, you can see your newly defined Properties, and the auto-generated Entity Set:

Save your new Data Model, and click on the “Generate Runtime Objects” button:

Accept the proposed defaults for our class names, and click Continue (Enter):

Click on the “Local Object” button on the next pop-up to complete (assuming you don't want to transport it).

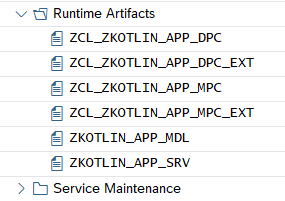
Now, navigate to the below node, to see the new Runtime Artifacts which were generated by the SAP Gateway Service Builder:
The *MPC* classes handle the data model definition and setup. The *DPC* classes handle the population of the entities with data. To keep it simple, you will always write code in the *DPC_EXT class. In the following sections, we will write code in the methods of our ZCL_ZKOTLIN_APP_DPC_EXT class to perform all of the CRUD operations.
Read Records
In order to setup our table Read operations, it would be nice to have some test data in the ZTEST_KOTLIN table. Because the Guid key field is auto-generated, that could be a little complicated. The easiest way, would be to use the ABAP code from this Blog, and enter some test data using Excel.
For this example, I’ve created the following 4 records displayed in Eclipse, below:

Alternatively, you can display the table records in the SAP transaction SE16. You will see the above 4 records used in the remainder of this Blog.
Read all Records
In order to read the complete table, and pass it back, we will implement the “GetEntitySet” Service. Navigate to the node “Service Implementation > GetEntitySet” and right-click and select “Go to ABAP Workbench”:

You’ll get a pop-up, which tells you that you still have to write some code in the method:

Hit Enter to continue.
This will take us to the ABAP Class Editor, where you can see lots of methods that were created by the SAP Gateway Service Builder:

In order to write our custom code, we need to do a Redefinition on the SAP generated methods. This is would be similar to a method Override in Java.
Page down to the bottom of the method list, and you will see the methods we will implement to support all of our CRUD operations:

To summarize, we will Redefine the following methods:
- CUSTOMERMEMOSET_CREATE_ENTITY: Create a record, HTTP POST
- CUSTOMERMEMOSET_DELETE_ENTITY: Delete a record, HTTP DELETE
- CUSTOMERMEMOSET_GET_ENTITY: Read a single record, HTTP GET
- CUSTOMERMEMOSET_GET_ENTITYSET: Read the entire table, and return all records
- CUSTOMERMEMOSET_UPDATE_ENTITY: Update a record, HTTP PUT
Click on the Change button, to change the class:

Click on the CUSTOMERMEMOSET_GET_ENTITYSET method to place your cursor there, then click on the “Redefine Method” button on the upper-right:

This will open up the method as editable, where you will see some commented out template code:

Delete this code, and insert the following code:
  method CUSTOMERMEMOSET_GET_ENTITYSET.

    SELECT * FROM ztest_kotlin INTO TABLE et_entityset.

    SORT et_entityset BY date_updated DESCENDING time_updated DESCENDING.

  endmethod.
This simply selects all records in the table and returns them in the et_entityset internal table.
Save and Activate this code.


Read a Single Record
The above method will select all records. We’ll also need a method to select individual records. Go back to the method list, and place your cursor in the CUSTOMERMEMOSET_GET_ENTITY method, and click on the “Redefine Method” button, just as we did above:


Delete the commented code in the method:

Replace it with the following code:
  method CUSTOMERMEMOSET_GET_ENTITY.

    DATA: ls_entity LIKE er_entity.


    io_tech_request_context->get_converted_keys( IMPORTING es_key_values = ls_entity ).


    SELECT SINGLE * FROM ztest_kotlin INTO er_entity

       WHERE guid  = ls_entity-guid.

  endmethod.
Save and Activate this code.
The above code will pull out the key passed from the application, and fetch a single record from the ZTEST_KOTLIN table.
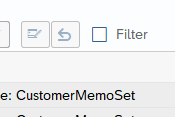
Now that we have redefined a couple of methods, note the “Filter” checkbox in the upper-right:

Click on this checkbox, to filter out all of the other methods in the class, and show only those we’ve redefined thus far:

Testing the SAP Gateway
At this point, we have our first 2 methods for retrieving all records or a single record, so let’s pause for a moment and walk through how we can test them using the SAP Gateway Client. After all, we don’t want to toss this over the wall to our Kotlin developers, without first unit testing it.
Go back to the SAP Gateway Service Builder, and expand the node “Service Maintenance”:

We have a Gateway Hub defined as “GW_HUB”. If there is nothing under your “Service Maintenance” folder, this means that the SAP Gateway has not yet been setup for your SAP instance. You will need to set this up first. There are many good blogs out there that walk-through a setup.
Right-click on the Gateway defined for your system, in this case GW_HUB and select “Register”:

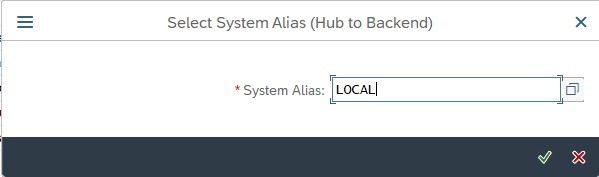
A typical test setup uses the “LOCAL” Alias, which we will use here:
In the center of the next screen, click the button “Local Object”, to avoid creating a transport:

Hit the Enter key, to accept all of the proposed defaults:

Back to our first screen, right click on the Gateway hub again, and select “SAP Gateway Client”:

Click “Yes” to be redirected to the system:

This brings us to our SAP Gateway Client, where we may test our new service:

Click on the “EntitySets” button:

This will bring up our Entity Set that we defined:

Double-click on it, to fetch the URI string for our Entity:

If you previously created test data in the ZTEST_KOTLIN table, you’ll get some data. Click on the “Execute” button:

I have 4 records in my table, and all records will be retrieved in OData XML Format on the right-hand pane:

Click on the button “Add URI Option”:

Double-click on “$format=json”:

This will append a JSON uri option to the end of our request:

Execute again, and our data is now in JSON Format (rather than standard default OData xml):

For our Kotlin application, because JSON is the most Java and Kotlin friendly format, we’ll be fetching our data in JSON format by appending this URI option.
Next, let’s test the GET for a single Record. Notice when we fetch all records, each record has it’s own “__metadata” attribute:

We can get the URI for that individual record, by copying that string, starting with “/sap/opu/”:

Paste the following string into the Request URI, to fetch a single record:
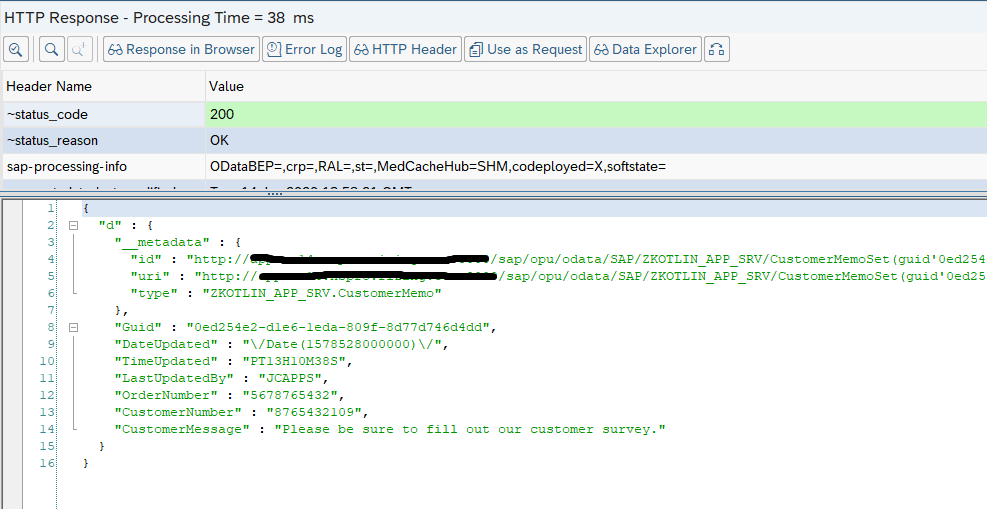
/sap/opu/odata/SAP/ZKOTLIN_APP_SRV/CustomerMemoSet(guid'0ed254e2-d1e6-1eda-809f-8d77d746d4dd')?$format=json
Execute, and the results will contain a single record:

One thing I wanted to point out, which you could get stuck on. Typically, if you are selecting a single record, and the key is a string, you can simply specify it. For example:
VendorGetSet/?$filter=(Matnr eq '10000030')
If you tried to say (Guid eq ‘<your guid>’), you would get an error. If we go back to our Gateway Project, and double-click on “Properties” for our CustomerMemo Entity:

Properties:

Notice our key field Guid, is of type “Edm.Guid”:

The internal ABAP Type is TYPEKIND_HEX. When specifying this data type, you must place “guid” within the GET string – “CustomerMemoSet(guid'0ed254e2-d1e6-1eda-809f-8d77d746d4dd')”.
One other feature of the SAP Gateway Client, is the ability to save our test cases. For example, if we’d like to save this GET test case, which retrieves this single record, we can go to the lower-right of the screen and click “Save Test Case”:

We can also setup Test Groups:

Now, we can retrieve this test case anytime, by clicking on the “Select” button:

Enter my Test Group:
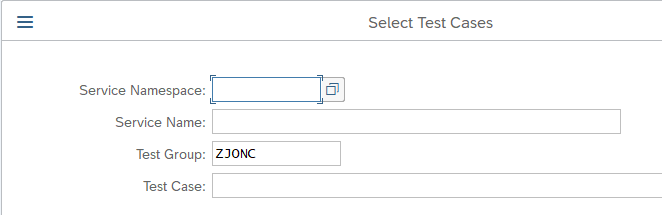
Lists all tests in this test group:

Clicking on the “Test Case” link, will auto-populate the URI, with your previous test case:

You can now re-execute this test.
Testing a “GET” is pretty straightforward. Testing is a little trickier for create and update operations, so each section, below, includes testing instructions and how to include a payload with the HTTP Request. See the below section “Create Record” for the most detailed testing instructions on testing with a payload, and some recommended testing tools.
Create Record
To enable the HTTP POST method, right-click on the “Create” operation under the “Service Implementation” node and click “Go to ABAP Workbench”:

You’ll get a message that this operation has not yet been implemented, hit Enter to continue:

Ensure the “Filter” on the upper-right is unchecked, so we can find our CUSTOMERMEMOSET_CREATE_ENTITY method:
Switch to Change Mode to make the class editable.
Click on this method, to place your cursor into the row for method CUSTOMERMEMOSET_CREATE_ENTITY:

Next, click on the “Redefine Method” button:

This brings you into the code for this method:

Replace the above commented code with the following:
  METHOD customermemoset_create_entity.

    DATA: lw_record TYPE zcl_zkotlin_app_mpc=>ts_customermemo.


    io_data_provider->read_entry_data( IMPORTING es_data = lw_record ).

    IF lw_record-order_number     IS INITIAL OR

       lw_record-customer_number  IS INITIAL OR

       lw_record-customer_message IS INITIAL.

      RAISE EXCEPTION TYPE /iwbep/cx_mgw_busi_exception.

    ENDIF.


    "Create a record in the database...

    CLEAR: lw_record-date_updated, lw_record-time_updated, lw_record-last_updated_by,

           lw_record-guid.

    lw_record-date_updated    = sy-datum.

    lw_record-time_updated    = sy-uzeit.

    lw_record-last_updated_by = sy-uname.

    "Generate a unique key (guid)...

    TRY.

        lw_record-guid = cl_system_uuid=>if_system_uuid_static~create_uuid_x16( ).

      CATCH cx_uuid_error INTO DATA(lo_guid_error).

        RAISE EXCEPTION TYPE /iwbep/cx_mgw_busi_exception.

    ENDTRY.


    INSERT ztest_kotlin FROM lw_record.

    COMMIT WORK AND WAIT.

    IF sy-subrc = 0.

      "New record was created successfully...

      er_entity = lw_record.

    ELSE.

      "Entity not found

      RAISE EXCEPTION TYPE /iwbep/cx_mgw_busi_exception

        EXPORTING

          textid      = /iwbep/cx_mgw_busi_exception=>resource_not_found

          entity_type = iv_entity_name.

    ENDIF.

  ENDMETHOD.
Save and Activate the above code.
The above code does the following:
Fetch the incoming record from the Gateway:
io_data_provider->read_entry_data( IMPORTING es_data = lw_record ).
For a creation, the fields we need from the user are order number, customer number and customer message (i.e. Memo). Aside from that, we will auto-populate all other fields:
- date_updated = Date the user created or last updated the record.
- time_updated = Time the user created or last updated the record.
- last_updated_by = The SAP user name of the user who last created or updated the record.
SAP provides a class to auto-generate a unique GUID, which will represent the new key for our new record:
    "Generate a unique key (guid)...

    TRY.

        lw_record-guid = cl_system_uuid=>if_system_uuid_static~create_uuid_x16( ).

      CATCH cx_uuid_error INTO DATA(lo_guid_error).

        RAISE EXCEPTION TYPE /iwbep/cx_mgw_busi_exception.

    ENDTRY.
Finally, we do the insert and commit into the database.
Now, to test takes a bit of effort. You can easily waste a couple of days figuring this one out, so I hope the following steps will save you some time!
When testing with the SAP Gateway Client, some authorization items are handled for you, so keep this in mind. Let’s first test with the SAP Gateway Client, to start with the easiest approach.
Go back to our project, and right click on your Gateway hub, then “SAP Gateway Client”:

There is a feature, whereas you can perform an HTTP GET, then turn this data into an update method (i.e. POST, PUT, DELETE, etc.). This is the easiest way to get the properly formatted data, etc. Let’s use our URI from earlier, to get a single record. Enter the following into the Request URI or click “Select” and retrieve the earlier test case:
/sap/opu/odata/SAP/ZKOTLIN_APP_SRV/CustomerMemoSet(guid'0ed254e2-d1e6-1eda-809f-8d77d746d4dd')?$format=jsonNow, execute the above:

On the top of the HTTP Response section, click on the “Use as Request” button:

This moves the data into the left-hand pane for an HTTP Request:

Next, remove the JSON URI Option and the GUID at the end of the string. You now have the following URI:
/sap/opu/odata/SAP/ZKOTLIN_APP_SRV/CustomerMemoSet

In looking at our custom code in the method, we recall that the required fields are Order Number, Customer Number and Customer Message (Memo). Let’s overwrite those fields in the HTTP Request, with our new data:

Even though we are doing a “Create”, you still need to specify a GUID and all fields in the payload request. The GUID could be all zeros, but must be in the same format. Since our method will generate a GUID and ignore the one that is passed in, we’ll just leave ours as-is in the request.
Next, change the HTTP Method to “POST”, instead of “GET”:

Now execute and you should see the following, with a success code 201, plus your newly generated data in the response:

Notice our new record has a new GUID of “0ed254e2-d1e6-1eea-8dfa-d2e289485cae”:

Notice when you execute the POST, a X-CSRF-Token appears in the upper left “HTTP Request” section:

The SAP Gateway handles some steps for us, but when we call the service from an external application or testing tool, we’ll need to handle this ourselves. More on this later.
At this point, you may want to save this as a test case for later use, by clicking on the “Save Test Case” button in the lower right corner.

To prove that this worked, copy your newly generated GUID, and do a GET in the test tool, with the URI:
/sap/opu/odata/SAP/ZKOTLIN_APP_SRV/CustomerMemoSet(guid'0ed254e2-d1e6-1eea-8dfa-d2e289485cae')?$format=jsonSwitch the HTTP Method back to “GET” and execute:

This will fetch our new record:

Because we will be building a Kotlin application which will be calling the Gateway Service externally, now is a good time to test with another tool, unrelated to the SAP Gateway Client.
2 tools that you could use to test RESTful web services:
Postman: https://www.getpostman.com/
Advanced REST Client: https://install.advancedrestclient.com/install
Let’s walkthrough a test with the Advanced Rest Client (ARC). There are 3 important items that the SAP Gateway handles for us, which we must do ourselves if calling the service from an external application:
- Authorization – This is the same as your SAP Login ID and password. Since we are already logged into SAP when we use the SAP Gateway Client, nothing was needed.
- X-CSRF-Token – Cross-Site Request Forgery to prevent malicious attacks on your website or service.
- Set Cookie – The SAP Gateway can also generate a cookie, which you can use to call-back the service. This assures the SAP Gateway, that the request is coming from the same browser or application. Another level of security that you get, along with the X-CSRF-Token.
Only a login (Authorization) is required for a GET operation, because it is Read only. Because the other activities (Create, Update and Delete, a.k.a. “CUD”) are performing changes in your backend system, more robust authentication is required. If you search on the community websites for the above, you’ll see lots of confusion, and people trying to disable it. Don’t disable it, just play by the rules and figure it out. Hopefully this section will save you some time and hardship. Here is an overview of what we will need to do:

Here is the detailed information, for each process step, above, when using the “Advanced REST Client” software:
Fetch Authorization Data
First, we need to obtain an encrypted Basic Authorization string, which will contain our SAP Logon ID and Password. This allows us to auto-login to the SAP Gateway programmatically. In addition to the below instructions, I’ve also included instructions on obtaining the Authorization string using IntelliJ IDE in the Reference section at the end of this blog.
Open the ARC (Advanced REST Client) testing tool. Enter the same URL, which we were testing for our GET earlier:
http://<your server name>/sap/opu/odata/SAP/ZKOTLIN_APP_SRV/CustomerMemoSetIn your ARC tool, select the menu path “File > New tab”:

Choose the Method “GET” and enter the url:

Click on the “Authorization” Tab and choose “Basic authentication”:

Enter your SAP ID and password:

Click on the “HEADERS” tab, and you will see how this encrypted string will be passed in the header of the HTTP request:

Click “ADD HEADER” to add another header, and enter the following:
Name: X-CSRF-Token
Value: Fetch

Now, click on the “SEND” button to perform the HTTP GET. Expand out the “DETAILS” on the right-hand side:

Note the RESPONSE HEADERS will contain the Cookie and Token:

Copy the string from the second “set-cookie”:
SAP_SESSIONID_S4R_100=4Ctq0h<blah, blah, blah>lRU4rxHqilwO0lTi0eY%3d; path=/
Copy the string for the “x-csrf-token”:
ehAczq<blah, blah, blah>Zv0-g==
These are the 3 bits of information we need, to perform the database update operations (Create, Update or Delete), below:
- Basic Auth String
- Cookie String
- CSRF Token String
Copy the 3 above strings, then proceed below…
Database Change (CUD Operation)
Using our 3 HTTP header strings we obtained with the GET (Fetch), above, lets perform the same steps we did with the SAP Gateway Client to do a Create (HTTP POST) operation.
Note! The token and cookie can expire on the server, so if it’s been a while since you did the above GET, then run it again and get a new token and cookie, before proceeding.
Add a new Tab (Request Editor) in the ARC:

Copy our 3 strings, from the above GET and add them as new Headers. Also, add the below additional “Content-Type” and “Accept” strings. Here is the complete HTTP Header set:

The strings above are:
X-CSRF-Token: <your token from the above GET result>
Authorization: <your Basic auth string, used in the above GET section>
cookie: <your cookie from the above GET result>
Content-Type: application/json
Accept: application/json
Now, switch the Method to “POST” and enter the following URL, same as the one earlier when testing on the SAP Gateway Client:

Now, go to the “Body” tab, and enter the following JSON:
{

  "d": {

    "Guid": "00000000-0000-0000-0000-000000000000",

    "OrderNumber": "8888",

    "CustomerNumber": "9999",

    "CustomerMessage": "This is a new Memo from the Advanced REST Client!"

  }

}
Since the Guid will be ignored, we could place all zeros in it, but be sure to follow the exact same format, including the dashes (-) and the same length.
Press the “SEND” button to execute the HTTP POST to create our new record:

If all goes well, you should see the following success result, including the newly created record:

To see the above record, you can copy the newly created Guid Key, from the above results, and do another GET from either the SAP Gateway Client or ARC. Here is a complete table listing, from Eclipse, with our new record:

At this point, we’ve tested first with the SAP Gateway Client, to prove our GET and POST methods worked correctly. Next, we used a REST tool, called “Advanced REST Client” (ARC) to ensure our methods worked when calling from an external application, with necessary authorization tokens. We can now confidently tell our Kotlin developers that our SAP Gateway service is ready to be called and has been unit tested. Before giving them the green light, let’s complete the Update and Delete operations.
Update Record
Go back to the SAP Gateway Service Builder (Transaction SEGW), and go to the following node and right-click on the “Update” method, then “Go to ABAP Workbench”:

You’ll get the warning that it’s not yet implemented:

Enter to continue.
Uncheck the “Filter” checkbox, if it’s on:

Go into Change Mode for the Class:

Single click into the row for the method CUSTOMERMEMOSET_UPDATE_ENTITY:

Click on the “Redefine Method” button:

Overwrite the commented code in the method, with the following code:
  method CUSTOMERMEMOSET_UPDATE_ENTITY.

    DATA: lw_record TYPE zcl_zkotlin_app_mpc=>ts_customermemo.


    io_data_provider->read_entry_data( IMPORTING es_data = lw_record ).


    "The key is "guid"...

    READ TABLE it_key_tab INTO DATA(lw_key) INDEX 1.


    "Make sure the value matches the one in the OData payload...

    IF lw_key-value = lw_record-guid.

      "Update the record in the database...

      CLEAR: lw_record-date_updated, lw_record-time_updated, lw_record-last_updated_by.

      lw_record-date_updated    = sy-datum.

      lw_record-time_updated    = sy-uzeit.

      lw_record-last_updated_by = sy-uname.

      UPDATE ztest_kotlin FROM lw_record.

      COMMIT WORK AND WAIT.

      IF sy-subrc = 0.

        "Entity was found and updated...

        er_entity = lw_record.

      ELSE.

        "Entity not found

        RAISE EXCEPTION TYPE /iwbep/cx_mgw_busi_exception

          EXPORTING

            textid      = /iwbep/cx_mgw_busi_exception=>resource_not_found

            entity_type = |{ iv_entity_name } ('{ lw_key-value }')|.

      ENDIF.

    ENDIF.

  endmethod.
Save and Activate your code.
For testing, we will repeat the same steps as shown in the above “Create Record” section, except we will do an HTTP PUT, instead of an HTTP POST. Plus, we’ll have to pass the complete record in the HTTP payload, along with the Guid key for the record we want to update. The testing steps in this section are more summarized. For a very detailed explanation of the steps to test an HTTP operation with a database update, see the “Create Record” section, above.
Go to the SAP Gateway Client:

Retrieve the Guid key, for any existing record you want to update.
Enter the request URI:
/sap/opu/odata/SAP/ZKOTLIN_APP_SRV/CustomerMemoSet(Guid=guid'0ed254e2-d1e6-1eda-8fb0-2a4781e3b5c5')Select the PUT method:

Enter your JSON in the HTTP Request payload section:
{

  "d" : {

    "Guid" : "0ed254e2-d1e6-1eda-8fb0-2a4781e3b5c5",

    "DateUpdated" : "\/Date(1578528000000)\/",

    "TimeUpdated" : "PT13H10M38S",

    "LastUpdatedBy" : "JCAPPS",

    "OrderNumber" : "8888",

    "CustomerNumber" : "9999",

    "CustomerMessage" : "This is my updated Memo!"

  }

}
Execute, and you will get the following results:


Confirm that the record update was successful:

To perform this test with the Advanced REST Client (ARC), perform the same steps in the “Database Change (CUD Operation)” section, above, but include the above payload, and your Guid Key in the url. As with the Create Operation, perform a GET first, to fetch your authorization token data. Then, do an HTTP PUT Method:


Click the “SEND” button to execute the above record update.

Delete Record
Go back to the SAP Gateway Service Builder (Transaction SEGW), and go to the following node and right-click on the “Delete” method, then “Go to ABAP Workbench”:

You’ll get the warning that it’s not yet implemented:
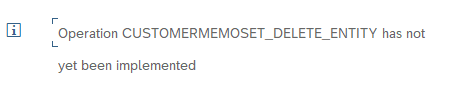
Enter to continue.
Uncheck the “Filter” checkbox, if it’s on:

Go into Change Mode for the Class:

Single click into the row for the method CUSTOMERMEMOSET_DELETE_ENTITY:

Click on the “Redefine Method” button:

Overwrite the commented code in the method, with the following code:
  METHOD customermemoset_delete_entity.

    DATA(lt_keys) = io_tech_request_context->get_keys( ).


    READ TABLE lt_keys WITH KEY name = 'GUID' INTO DATA(ls_key).

    DATA(lv_guid) = ls_key-value.


    "Ensure the GUID is valid...

    SELECT SINGLE mandt INTO @DATA(l_mandt) FROM ztest_kotlin

      WHERE guid = @lv_guid.

    IF sy-subrc <> 0.

      "Record not found...

      RAISE EXCEPTION TYPE /iwbep/cx_mgw_busi_exception

        EXPORTING

          textid      = /iwbep/cx_mgw_busi_exception=>resource_not_found

          entity_type = |{ iv_entity_name } (Guid='{ lv_guid }')|.

    ENDIF.

    "Delete the record from the database...

    DELETE FROM ztest_kotlin WHERE guid = lv_guid.

    COMMIT WORK AND WAIT.

    IF sy-subrc <> 0.

      "Delete Failed...

      RAISE EXCEPTION TYPE /iwbep/cx_mgw_busi_exception

        EXPORTING

          textid      = /iwbep/cx_mgw_busi_exception=>resource_not_found

          entity_type = |{ iv_entity_name } (Guid='{ lv_guid }')|.

    ENDIF.

  ENDMETHOD.
Save and Activate your code.
For testing, we will repeat the same steps as shown in the above “Create Record” section, except we will do an HTTP DELETE, instead of an HTTP POST. Because we are simply deleting the record, we only need to provide the Guid key in the URL and no payload is needed. The testing steps in this section are more summarized. For a very detailed explanation of the steps to test an HTTP operation with a database update, see the “Create Record” section, above.
Go to the SAP Gateway Client:

Retrieve the Guid key, for any existing record you want to delete.
Enter the request URI:
/sap/opu/odata/SAP/ZKOTLIN_APP_SRV/CustomerMemoSet(Guid=guid'0ed254e2-d1e6-1eda-8fb0-2a4781e3b5c5')Select the DELETE method:

Execute, and you will get the following results:


Confirm that the record was successfully deleted:

To perform this test with the Advanced REST Client (ARC), perform the same steps in the “Database Change (CUD Operation)” section, above, with no payload, and your Guid Key in the url. As with the Create Operation, perform a GET first, to fetch your authorization token data. Then, do an HTTP DELETE Method:

Click the “SEND” button to execute the deletion of the record.
Create a Kotlin Application
At this point, our SAP Gateway Service is fully developed and tested to support all of our CRUD operations for our custom SAP Table. Now, we can write an application using any programming language of our choice, to call the RESTful web service. Of course, Kotlin is the best, so let’s begin…
Project Creation
Kotlin was invented by the folks at JetBrains, who gained fame with their excellent development tools. So, naturally, the best IDE for Kotlin is theirs – IntelliJ IDEA. You may download and install their free community edition from their website.
Gradle
Gradle is the most compatible with Kotlin, so let’s use that for our build tool. Create a new project, as follows:

Select Gradle, Kotlin and Java:

Click Next. Leave GroupId blank, as that is only for a Maven repository. ArtifactId = Project name. Leave Version default:

Click Finish. This will build the following structure:

Double-click to open the “build.gradle” file, and add the following 2 lines to the “dependencies” section:
compile "com.github.kittinunf.fuel:fuel:2.2.1"

compile "com.fasterxml.jackson.module:jackson-module-kotlin:2.9.+"
Add the following to the “repositories” section:
jcenter()The complete “build.gradle” file should look like the following:
plugins {

    id 'java'

    id 'org.jetbrains.kotlin.jvm' version '1.3.61'

}


version '1.0-SNAPSHOT'


sourceCompatibility = 1.8


repositories {

    mavenCentral()

    jcenter()

}


dependencies {

    implementation "org.jetbrains.kotlin:kotlin-stdlib-jdk8"

    testCompile group: 'junit', name: 'junit', version: '4.12'

    compile "com.github.kittinunf.fuel:fuel:2.2.1"

    compile "com.fasterxml.jackson.module:jackson-module-kotlin:2.9.+"

}


compileKotlin {

    kotlinOptions.jvmTarget = "1.8"

}

compileTestKotlin {

    kotlinOptions.jvmTarget = "1.8"

}
Your versions could vary, and the code should still work, since it is backward compatible.
After you add these dependencies, you may see the message in the lower-right:

Go ahead and click “Import Changes”. You should get a successful build message:

This build.gradle file will pull in all of the libraries for you. Go to the menu path “File > Project Structure”, to see them:

Next, go to the “Libraries” section:

Jackson and Fuel
We will be using the Jackson library for all of our JSON parsing needs. If you recall, we can set the SAP Gateway Service to respond and receive data in JSON format. The library may be found here.
To more easily manage our HTTP networking requests, we’ll use the Fuel library. This library may be found here.
Read Records
At this point, we will walk through creation of the program step-by-step. If you want to skip the details, then just jump to the end and see the entire source code file.
First, lets write the code to read the data from the SAP Gateway, an HTTP GET. Create a new Kotlin class, by right-clicking on the below “Kotlin” node, then “New > Kotlin File/Class”:

Create a file named “TableMaintenance”, which will serve as our only source code file, and the entry point of our program:

Hit Enter to create the new Kotlin file. Just like Java, the main entry point for our Kotlin program will be called “main”. Create the following method:
//=-=-=-=-=-=-=-=-=-=-=-=-=-=-=-=-=-=-=-=-=-=-=-=-=-=-=-=-=-=-=-=-=-=-=-=-=-=-=-=-

// Method main: Entry point for the program...

//=-=-=-=-=-=-=-=-=-=-=-=-=-=-=-=-=-=-=-=-=-=-=-=-=-=-=-=-=-=-=-=-=-=-=-=-=-=-=-=-

fun main() {

    println("Hello World!")

}
Once created, you will see a “Play” icon next to our new method. Click it, to run the program:

The program will compile and run, and you will get the following results:

Now that we know everything is working, let’s create our user menu for our project. Create the following new method, which will display our menu:
//=-=-=-=-=-=-=-=-=-=-=-=-=-=-=-=-=-=-=-=-=-=-=-=-=-=-=-=-=-=-=-=-=-=-=-=-=-=-=-=-

// Method displayMainMenu: Display the user's options and prompt for input...

//=-=-=-=-=-=-=-=-=-=-=-=-=-=-=-=-=-=-=-=-=-=-=-=-=-=-=-=-=-=-=-=-=-=-=-=-=-=-=-=-

private fun displayMainMenu(): Int {

    println()

    println("Task Options: ")

    println("(1) - Display All Data")

    println("(2) - Display a Record")

    println("(3) - Create a Record")

    println("(4) - Update a Record")

    println("(5) - Delete a Record")

    println("(6) - Exit the Program")

    print("Enter an Option Number: ")

    var num = -1

    try {

        num = readLine()!!.toInt()

    } catch (e: NumberFormatException) {

    }

    return num

}
You may recall from our earlier program flow diagram, we want this to be in an infinite loop, until the user chooses to exit with Option 6:

Replace the main() method with the following code:
//=-=-=-=-=-=-=-=-=-=-=-=-=-=-=-=-=-=-=-=-=-=-=-=-=-=-=-=-=-=-=-=-=-=-=-=-=-=-=-=-

// Method main: Entry point for the program...

//=-=-=-=-=-=-=-=-=-=-=-=-=-=-=-=-=-=-=-=-=-=-=-=-=-=-=-=-=-=-=-=-=-=-=-=-=-=-=-=-

fun main() {

    //Process User Selection...

    var answer = 0

    while (answer != 6) {

        answer = displayMainMenu()

        when (answer) {

            1 -> println("Proceeding to Display All Data...")

            2 -> println("Proceeding to Display a Record...")

            3 -> println("Proceeding to Create a Record...")

            4 -> println("Proceeding to Update a Record...")

            5 -> println("Proceeding to Delete a Record...")

            6 -> {

                println("\nThank you for using this amazing program!!...Goodbye...")

                exitProcess(0)

            }

            else -> {

                println()

                println("Invalid Option Number. Please Enter a valid option number 1 thru 6.")

            }

        }

    }

}
Execute the program, and you can test out the user menu. Hit Option 6 to exit:

Now we have our infinite loop, until the user chooses to exit. From our earlier exercises to test the Gateway service, we know there are some strings we will need throughout the program. Create the following constants at the top of the program, above our main method. Be sure to use your own system (MAIN_URL) and auth string (AUTH_STRING), rather than the below:
//=-=-=-=-=-=-=-=-=-=-=-=-=-=-=-=-=-=-=-=-=-=-=-=-=-=-=-=-=-=-=-=-=-=-=-=-=-=-=-=-=-=-=-=-=

// Global Final Variables used throughout the program (val = Final, var = Variable)...

//=-=-=-=-=-=-=-=-=-=-=-=-=-=-=-=-=-=-=-=-=-=-=-=-=-=-=-=-=-=-=-=-=-=-=-=-=-=-=-=-=-=-=-=-=

const val AUTH_STRING = "amNhcHBblahblahblahblahc="

const val MAIN_URL = "http://<your server>/sap/opu/odata/SAP/ZTEST_KOTLIN_SRV/ZTEST_KOTLINSet"

const val JSON_FORMAT = "?\$format=json"


//=-=-=-=-=-=-=-=-=-=-=-=-=-=-=-=-=-=-=-=-=-=-=-=-=-=-=-=-=-=-=-=-=-=-=-=-=-=-=-=-

// Method main: Entry point for the program...

//=-=-=-=-=-=-=-=-=-=-=-=-=-=-=-=-=-=-=-=-=-=-=-=-=-=-=-=-=-=-=-=-=-=-=-=-=-=-=-=-

fun main() {
Before we write our next method, let’s talk about the format of the JSON we will receive from the SAP Gateway, and how we may translate that into a Kotlin class…
Data Classes
Kotlin has special classes that we can define only to hold data:
https://kotlinlang.org/docs/reference/data-classes.html
A perfect fit as a container to hold our JSON data nodes. Recall earlier, while testing our SAP Gateway service, we had the following JSON results:

We have the main node of “d”, then a sub node with “results”. Within each repeating record, we have an “__metadata” node. We need to traverse this structure and fetch only the data we want. For example, to parse out the first 2 records, we want the following:

To “Deserialize” a JSON string is to convert it from the above string into a Kotlin object. To “Serialize”, is to go the reverse, from an object back into a string. We’ll need this throughout our program, and we’ll use the Jackson library to help us. We’ll be declaring the following Jackson mapper throughout the program:
val mapper = jacksonObjectMapper()To represent only the record itself, we’ll define the following Kotlin Data Class:
//=-=-=-=-=-=-=-=-=-=-=-=-=-=-=-=-=-=-=-=-=-=-=-=-=-=-=-=-=-=-=-=-=-=-=-=-=-=-=-=-=-=-=-=-=-=-=

// A data class which represents a single Customer Memo Record from the ZTEST_KOTLIN SAP table.

//=-=-=-=-=-=-=-=-=-=-=-=-=-=-=-=-=-=-=-=-=-=-=-=-=-=-=-=-=-=-=-=-=-=-=-=-=-=-=-=-=-=-=-=-=-=-=

data class CustomerMemoRecord(

    var Guid: String = "",

    var DateUpdated: String = "",

    var TimeUpdated: String = "",

    var LastUpdatedBy: String = "",

    var OrderNumber: String = "",

    var CustomerNumber: String = "",

    var CustomerMessage: String = ""

)
To mirror our JSON string into an object, to fetch multiple records, we’ll define a Kotlin “List”, which will represent all records:
val customerRecords: List<CustomerMemoRecord> = emptyList()To mirror the JSON string into a complete set of records, and traverse the “d” and “results” nodes, we’ll define the following 2 Kotlin Data Classes:
//=-=-=-=-=-=-=-=-=-=-=-=-=-=-=-=-=-=-=-=-=-=-=-=-=-=-=-=-=-=-=-=-=-=-=-=-=-=-=-=-=-=-=-=-=

// Multiple Record GET - RootJsonNodeSet plus CustomerDataSet with all Customer Records...

//=-=-=-=-=-=-=-=-=-=-=-=-=-=-=-=-=-=-=-=-=-=-=-=-=-=-=-=-=-=-=-=-=-=-=-=-=-=-=-=-=-=-=-=-=

data class RootJsonNodeSet(

    @JsonProperty("d")

    val allRecords: CustomerDataSet

)

data class CustomerDataSet(

    @JsonProperty("results")

    val customerRecords: List<CustomerMemoRecord> = emptyList()

)
If we minimize the JSON Nodes, we can correlate more easily with the above Data Class definition:

The above will correspond to the CUSTOMERMEMOSET_GET_ENTITYSET method we coded earlier in our SAP Gateway service.
To fetch a single record, the JSON string looks a little different:
Notice that the “results” node is not in a single record for an HTTP GET. For single records, we’ll define the following Data Class:
//=-=-=-=-=-=-=-=-=-=-=-=-=-=-=-=-=-=-=-=-=-=-=-=-=-=-=-=-

// Single Record GET for one Customer Memo Record...

//=-=-=-=-=-=-=-=-=-=-=-=-=-=-=-=-=-=-=-=-=-=-=-=-=-=-=-=-

data class RootJsonNodeSingle(

    @JsonProperty("d")

    val singleCustomerRecord: CustomerMemoRecord

)
The above will correspond to the CUSTOMERMEMOSET_GET_ENTITY method we coded earlier in our SAP Gateway service, which fetches a single record.
You may be wondering how we ignore the “__metadata” node. The Jackson Object Mapper has a setting to ignore unknown properties that we don’t have defined in our data class:
//Ignore any properties that don't exist in our CustomerMemoRecord Class...

mapper.configure(DeserializationFeature.FAIL_ON_UNKNOWN_PROPERTIES, false)
Let’s define one last Data Class, which will represent a GET we will need to do for CUD (Create, Update, Delete) operations in order to fetch the CSRF Token and Cookie:
//=-=-=-=-=-=-=-=-=-=-=-=-=-=-=-=-=-=-=-=-=-=-=-=-=-=-=

// Data Class for a Fetch record, for CUD Operations...

//=-=-=-=-=-=-=-=-=-=-=-=-=-=-=-=-=-=-=-=-=-=-=-=-=-=-=

data class FetchRecord(

    val CsrfToken: String,

    val Cookie: String,

    var singleCustomerRecord: CustomerMemoRecord

)
Add the 5 above Data Classes at the top of the program, just above the “fun main()” method. You may have noticed that IntelliJ has automatically added the following 2 imports to the top of our program, as we are working:
import com.fasterxml.jackson.annotation.JsonProperty

import kotlin.system.exitProcess
Other various library imports will be added by IntelliJ as we continue to write code.
Date and Time Formats
You may have noticed the strange formats for Date and Time Data Types:

SAP Gateway Definition:

Double-click on Properties, to see the definition:

Edm.DateTime is an Epoch Date, which is a computer time that represents the amount of seconds that have passed since a point in time.
Edm.Time is an XSD:Duration Date Type.
For detailed links with information about these formats, see the Reference section below and the section titled “SAP Gateway Date and Time Format:”.
Add the following 2 methods to the bottom of our program, which will convert these Dates and Times into something readable:
//=-=-=-=-=-=-=-=-=-=-=-=-=-=-=-=-=-=-=-=-=-=-=-=-=-=-=-=-=-=-=-=-=-=-=-=-=-=-=-=-=-=

// Method jsonDateFormatter: Parse a JSON Date (Epoch Date) into a Java/Kotlin Date

//=-=-=-=-=-=-=-=-=-=-=-=-=-=-=-=-=-=-=-=-=-=-=-=-=-=-=-=-=-=-=-=-=-=-=-=-=-=-=-=-=-=

private fun jsonDateFormatter(jsonDate: String): String {

    val epochDate = jsonDate.replace("[^0-9]".toRegex(), "")

    val updateDate = Instant.ofEpochMilli(java.lang.Long.parseLong(epochDate))

        .atZone(ZoneId.of("CET"))

        .toLocalDate()

    return updateDate.toString()

}


//=-=-=-=-=-=-=-=-=-=-=-=-=-=-=-=-=-=-=-=-=-=-=-=-=-=-=-=-=-=-=-=-=-=-=-=-=-=-=-=-=-=-=-=-=-=

// Method jsonTimeFormatter: Parse a JSON Time (XSD:Duration Date Type) into Java/Kotlin Time

//=-=-=-=-=-=-=-=-=-=-=-=-=-=-=-=-=-=-=-=-=-=-=-=-=-=-=-=-=-=-=-=-=-=-=-=-=-=-=-=-=-=-=-=-=-=

private fun jsonTimeFormatter(jsonTime: String): String {

    val fTime = LocalTime.ofNanoOfDay(Duration.parse(jsonTime).toNanos())

    val df = DateTimeFormatter.ISO_LOCAL_TIME

    return fTime.format(df)

}
The above 2 methods will convert these date and time formats into the following:
Date: YYYY-MM-DD, for example 2020-01-23
Time: HH:MM:SS, for example 18:16:26
Next, let’s write the code to perform an HTTP GET to read one or more records and call our SAP Gateway service. Create the following method to display all records:
//=-=-=-=-=-=-=-=-=-=-=-=-=-=-=-=-=-=-=-=-=-=-=-=-=-=-=-=-=-=-=-=-=-=-=-=-=-=-=-=-

// Method displayDataSet: Display all records in the ZTEST_KOTLIN SAP table...

//=-=-=-=-=-=-=-=-=-=-=-=-=-=-=-=-=-=-=-=-=-=-=-=-=-=-=-=-=-=-=-=-=-=-=-=-=-=-=-=-

private fun displayDataSet() {

    println()

    println("...One moment please, retrieving all records...")

    FuelManager.instance.baseHeaders = mapOf("Authorization" to "Basic $AUTH_STRING")

    val mapper = jacksonObjectMapper()

    val url = MAIN_URL + JSON_FORMAT

    //This allows you to parse out only the attributes you'd like, and ignore all others...

    mapper.configure(DeserializationFeature.FAIL_ON_UNKNOWN_PROPERTIES, false)

    val (_, _, result) = url.httpGet().responseString()

    when (result) {

        is Result.Failure -> {

            val ex = result.getException()

            print(ex)

        }

        is Result.Success -> {

            val myJsonData: RootJsonNodeSet = mapper.readValue(result.get())

            val memoRecords: List<CustomerMemoRecord> = myJsonData.allRecords.customerRecords

            println("\nTable ZTEST_KOTLIN (${memoRecords.count()} Records):")

            for (x in 0..80) print("=-") // Print 80 times for line separator...

            println()

            println("Guid (key)                           " +

                    "| Date       " +

                    "| Time     " +

                    "| Updated By   " +

                    "| Order #    " +

                    "| Customer # " +

                    "| Memo")

            for (x in 0..80) print("=-") // Print 80 times...

            println()

            memoRecords.forEach {

                println(

                    "${it.Guid} " +

                            "| ${jsonDateFormatter(it.DateUpdated)} " +

                            "| ${jsonTimeFormatter(it.TimeUpdated)} " +

                            "| ${it.LastUpdatedBy.padStart(12)} " + //pad to 12 characters, to line up with column header

                            "| ${it.OrderNumber.padStart(10)} " + //pad to 10 characters

                            "| ${it.CustomerNumber.padStart(10)} " + //pad to 10 characters

                            "| ${it.CustomerMessage}"

                )

            }

            for (x in 0..80) print("=-") // Print 80 times...

            println()

        }

    }

}
Next, we need to update our user menu in the main method, so it calls the above displayDataSet() method:
when (answer) {

    1 -> displayDataSet() //<<<add this
Execute the program (run the main method), and select Option 1 in the user menu:

The above displayed all records currently in the ZTEST_KOTLIN table.
To read a single record, we will require the user to enter the Guid Key for the record. Create the following method, for prompting the user. We will use this method in several places, so we’ll create a generic method that simply prompts the user with a message and returns their entry:
//=-=-=-=-=-=-=-=-=-=-=-=-=-=-=-=-=-=-=-=-=-=-=-=-=-=-=-=-=-=-=-=-=-=-=-=-=-=-=-=-

// Method promptTheUser: Prompt the end user for something...

//=-=-=-=-=-=-=-=-=-=-=-=-=-=-=-=-=-=-=-=-=-=-=-=-=-=-=-=-=-=-=-=-=-=-=-=-=-=-=-=-

private fun promptTheUser(message: String): String {

    print(message)

    return readLine()!!

}
Because we will also need to perform an HTTP GET to retrieve our tokens for the CUD operations, let’s create a generic method that simply fetches a record:
//=-=-=-=-=-=-=-=-=-=-=-=-=-=-=-=-=-=-=-=-=-=-=-=-=-=-=-=-=-=-=-=-=-=-=-=-=-=-=-=-

// Method fetchSingleRecord: Fetch Data for a Single Record...

//=-=-=-=-=-=-=-=-=-=-=-=-=-=-=-=-=-=-=-=-=-=-=-=-=-=-=-=-=-=-=-=-=-=-=-=-=-=-=-=-

private fun fetchSingleRecord(lclUrl: String): FetchRecord {

    val mapper = jacksonObjectMapper()

    FuelManager.instance.baseHeaders = mapOf(

        "Authorization" to "Basic $AUTH_STRING",

        "X-CSRF-Token" to "Fetch"

    )

    //Ignore any properties that don't exist in our CustomerMemoRecord Class...

    mapper.configure(DeserializationFeature.FAIL_ON_UNKNOWN_PROPERTIES, false)

    val (_, response, result) = lclUrl.httpGet().responseString()

    val csrfToken: String? = response.headers["x-csrf-token"].elementAt(0)

    val cookie: String? = response.headers["set-cookie"].elementAt(0) + response.headers["set-cookie"].elementAt(1)

    var memoRecord = CustomerMemoRecord()

    when (result) {

        is Result.Failure -> {

            val ex = result.getException()

            print(ex)

        }

        is Result.Success -> {

            val myJsonData: RootJsonNodeSingle = mapper.readValue(result.get())

            memoRecord = myJsonData.singleCustomerRecord

        }

    }

    return FetchRecord(

        CsrfToken = csrfToken.toString(),

        Cookie = cookie.toString(),

        singleCustomerRecord = memoRecord

    )

}
Also, because there will be multiple places we will want to display a single record (for example, after we update it), lets create a generic method which formats a single record:
//=-=-=-=-=-=-=-=-=-=-=-=-=-=-=-=-=-=-=-=-=-=-=-=-=-=-=-=-=-=-=-=-=-=-=-=-=-=-=-=-

// Method showFormattedRecord: Display of a single record...

//=-=-=-=-=-=-=-=-=-=-=-=-=-=-=-=-=-=-=-=-=-=-=-=-=-=-=-=-=-=-=-=-=-=-=-=-=-=-=-=-

private fun showFormattedRecord(record: CustomerMemoRecord, lclTitle: String) {

    println()

    for (x in 0..50) print("=-") // Print 50 times for line separator...

    println()

    println("$lclTitle Record for Order Number ${record.OrderNumber}:")

    for (x in 0..50) print("=-") // Print 50 times...

    println()

    println("          Guid (key): ${record.Guid}")

    println("   Date Last Updated: ${jsonDateFormatter(record.DateUpdated)}")

    println("   Time Last Updated: ${jsonTimeFormatter(record.TimeUpdated)}")

    println("Last Updated By User: ${record.LastUpdatedBy}")

    println("        Order Number: ${record.OrderNumber}")

    println("     Customer Number: ${record.CustomerNumber}")

    println("       Customer Memo: ${record.CustomerMessage}")

    for (x in 0..50) print("=-") // Print 50 times...

    println()

}
Here is the method which displays a single record:
//=-=-=-=-=-=-=-=-=-=-=-=-=-=-=-=-=-=-=-=-=-=-=-=-=-=-=-=-=-=-=-=-=-=-=-=-=-=-=-=-=

// Method displaySingleRecord: Display a single record in the ZTEST_KOTLIN table...

//=-=-=-=-=-=-=-=-=-=-=-=-=-=-=-=-=-=-=-=-=-=-=-=-=-=-=-=-=-=-=-=-=-=-=-=-=-=-=-=-=

private fun displayRecord(lclGuid: String, lclTitle: String) {

    val singleRecordString = "(Guid=guid'${lclGuid}')"

    val lclUrl = MAIN_URL + singleRecordString + JSON_FORMAT

    val fetchRecord = fetchSingleRecord(lclUrl)

    showFormattedRecord( fetchRecord.singleCustomerRecord, lclTitle )

}
Finally, we need to call our new method from the user menu. Add the following to the main() method for user menu option “2”:
when (answer) {

    1 -> displayDataSet()

    2 -> displayRecord(promptTheUser("Enter a GUID to Display: "), "Current")
In order to get a Guid Key, you can run option 1, first, to display all records, then copy and paste the Guid in order to run option 2 and display the single record. For example, you can run it and do the following:

Highlight and Copy the last Guid (key), then run with option 2:

Now, we’ve completed all of our HTTP GET methods. Let’s move on to the remainder of our methods, which will Create, Update and Delete records…
Create Record
This is the first operation where we will be performing an actual SAP Database update from our Kotlin application. Earlier in the SAP Gateway setup and testing section, we explained how to setup a “GET” operation to fetch our CSRF Token and Cookie for security required when updating the database. For read only operations (i.e. GET), we don’t need these tokens. Above, we created a data class called “FetchRecord” to hold our tokens, and wrote a method called “FetchSingleRecord” which will store our tokens.
A few items we will need for our Create Record method:
- Data required from the user to create a new record is:
- Order Number
- Customer Number
- Customer Memo
So we will prompt the user 3 times by calling our generic “promptTheUser” method.
- Call our Gateway Service for an HTTP GET, with our token “Fetch” option, to get the necessary tokens to update the backend database.
- Fill the JSON string with the Order Number, Customer Number and Customer Memo, which the user entered in step 1 using our Jackson Object Mapper.
- Call the SAP Gateway service and do an HTTP POST with our JSON string to create the new record.
- Display the newly created record to the end-user, along with the new Guid Key and other administrative fields (Date Created, Time Created, etc.).
First, there is a bit of common code we will be using each time we do a Create, Update and Delete. Let’s write the following reusable method, which will initialize the headers for our Fuel HTTP Library:
//=-=-=-=-=-=-=-=-=-=-=-=-=-=-=-=-=-=-=-=-=-=-=-=-=-=-=-=-=-=-=-=-=-=-=-=-=-=-=-=-

// Method initializeFuel: Set the FuelManager for UPDATE or POST...

//=-=-=-=-=-=-=-=-=-=-=-=-=-=-=-=-=-=-=-=-=-=-=-=-=-=-=-=-=-=-=-=-=-=-=-=-=-=-=-=-

private fun initializeFuel(CsrfToken: String, Cookie: String) {

    FuelManager.instance.baseHeaders = mapOf(

        "Authorization" to "Basic $AUTH_STRING",

        "X-CSRF-Token" to CsrfToken,

        "cookie" to Cookie,

        "Content-Type" to "application/json",

        "Accept" to "application/json"

    )

}
Create the following method called “createRecord”:
//=-=-=-=-=-=-=-=-=-=-=-=-=-=-=-=-=-=-=-=-=-=-=-=-=-=-=-=-=-=-=-=-=-=-=-=-=-=-=-=-

// Method createRecord: Create a single record in the ZTEST_KOTLIN table...

//=-=-=-=-=-=-=-=-=-=-=-=-=-=-=-=-=-=-=-=-=-=-=-=-=-=-=-=-=-=-=-=-=-=-=-=-=-=-=-=-

private fun createRecord() {

    val lclOrder = promptTheUser("Enter Order Number: ")

    val lclCustomer = promptTheUser("Enter Customer Number: ")

    val lclMemo = promptTheUser("Enter Customer Memo: ")


    //First, fetch the CSRF Token and Cookie, prior to performing the POST...

    var url = MAIN_URL + JSON_FORMAT

    val fetchRecord = fetchSingleRecord(url)

    fetchRecord.singleCustomerRecord.OrderNumber = lclOrder

    fetchRecord.singleCustomerRecord.CustomerNumber = lclCustomer

    fetchRecord.singleCustomerRecord.CustomerMessage = lclMemo

    //Even though we are doing a POST (Create), we still need to fill in all of the

    //attributes, so enter dummy data for these ignored fields...

    fetchRecord.singleCustomerRecord.Guid = "00000000-0000-0000-0000-000000000000"

    fetchRecord.singleCustomerRecord.DateUpdated = """/Date(1578441600000)/"""

    fetchRecord.singleCustomerRecord.LastUpdatedBy = ""

    fetchRecord.singleCustomerRecord.TimeUpdated = "PT13H12M09S"

    val mapper = jacksonObjectMapper()

    // The default mapper, adjusts the field names to lower case camel case, but our

    // Gateway service has upper case (i.e. dateUpdated vs. DateUpdated),

    // so we set the UPPER_CAMEL_CASE property here...

    mapper.propertyNamingStrategy = PropertyNamingStrategy.UPPER_CAMEL_CASE

    mapper.configure(DeserializationFeature.FAIL_ON_UNKNOWN_PROPERTIES, false)

    // Serialize the fetchRecord Object back into a JSON String and use for our POST

    // to create the Customer Memo...

    val jsonString = mapper.writeValueAsString(fetchRecord.singleCustomerRecord)

    //Remove the "jsonFormat" URI Option, prior to doing the POST...

    url = MAIN_URL

    val newRecord: CustomerMemoRecord


    initializeFuel(fetchRecord.CsrfToken, fetchRecord.Cookie)

    val postString = """{ "d" : $jsonString }"""


    //This is a synchronous "Blocking Mode" call (i.e. will wait for a response)...

    val (_, _, result) = url.httpPost().body(postString).responseString()

    when (result) {

        is Result.Failure -> {

            println()

            println("Post Failed...")

            println(result.getException().toString() + result.error.response.toString())

        }

        is Result.Success -> {

            val myJsonData: RootJsonNodeSingle = mapper.readValue(result.get())

            newRecord = myJsonData.singleCustomerRecord

            println()

            println("...Customer Memo successfully created...")

            displayRecord(newRecord.Guid, "New")

        }

    }

}
Lastly, add a call to our new “Create” method on our user menu for option 3:
when (answer) {

    1 -> displayDataSet()

    2 -> displayRecord(promptTheUser("Enter a GUID to Display: "), "Current")

    3 -> createRecord()
Run the program, and test the new Create Method:

Update Record
An Update operation is very similar to our Create operation, above, except we will do an “HTTP PUT”, to update an existing record, rather than an HTTP POST. Our Update Record method will do the following:
- Prompt the user for a Guid Key for the record to be updated.
- Prompt the user for the new Customer Memo to overwrite their existing Memo.
- Call our fetchSingleRecord method for the Guid key to be updated. This will retrieve our tokens, plus a JSON string which represents the record.
- Modify the above JSON String, and overwrite the memo with our new memo. Utilizing our Jackson Object Mapper, we simply update the CustomerMessage attribute in our CustomerMemoRecord object.
- Perform an HTTP PUT with our Fuel HTTP library. Display the old Memo and the new Memo.
- Display the newly updated record to the end user.
Create the following updateRecord method:
//=-=-=-=-=-=-=-=-=-=-=-=-=-=-=-=-=-=-=-=-=-=-=-=-=-=-=-=-=-=-=-=-=-=-=-=-=-=-=-=-

// Method updateRecord: Update a single record in the ZTEST_KOTLIN table...

//=-=-=-=-=-=-=-=-=-=-=-=-=-=-=-=-=-=-=-=-=-=-=-=-=-=-=-=-=-=-=-=-=-=-=-=-=-=-=-=-

private fun updateRecord() {

    val lclGuid = promptTheUser("Enter a GUID to Update: ")

    val newMemo = promptTheUser("Enter the New Memo: ")

    var url = "$MAIN_URL(Guid=guid'$lclGuid')$JSON_FORMAT"

    val fetchRecord = fetchSingleRecord(url)

    val originalMemo = fetchRecord.singleCustomerRecord.CustomerMessage

    fetchRecord.singleCustomerRecord.CustomerMessage = newMemo

    val mapper = jacksonObjectMapper()

    mapper.propertyNamingStrategy = PropertyNamingStrategy.UPPER_CAMEL_CASE

    val jsonString = mapper.writeValueAsString(fetchRecord.singleCustomerRecord)

    url = "$MAIN_URL(Guid=guid'$lclGuid')"


    initializeFuel(fetchRecord.CsrfToken, fetchRecord.Cookie)

    val putString = """{ "d" : $jsonString }"""

    val (_, _, result) = url.httpPut().body(putString).responseString()

    when (result) {

        is Result.Failure -> {

            println(result.getException().toString())

        }

        is Result.Success -> {

            println("...Customer Memo successfully updated...")

            println("Old Memo: $originalMemo")

            println("New Memo: $newMemo")

            displayRecord(lclGuid, "Updated")

        }

    }

}
Add a call to our new “Update” method on our user menu for option 4:
when (answer) {

    1 -> displayDataSet()

    2 -> displayRecord(promptTheUser("Enter a GUID to Display: "), "Current")

    3 -> createRecord()

    4 -> updateRecord()
To test, we’ll need to get a Guid Key for the record we’d like to update. You can display all records, with option 1, then copy a Guid key to input into the update record option 4, as follows:

Delete Record
The Deletion method is a bit simpler. Since we are simply deleting the record, we only need to provide the Guid Key. We still need to fetch the tokens, just as we did with Create and Update operations.
Our Delete Method will perform the following:
- Prompt the user for a Guid Key for the record to be deleted.
- Call our fetchSingleRecord method for the Guid key to be deleted and retrieve our tokens.
- Perform an HTTP DELETE with our Fuel HTTP library, adding the Guid to the URL.
- Display the deleted record to the end user.
Create the following deleteRecord method:
//=-=-=-=-=-=-=-=-=-=-=-=-=-=-=-=-=-=-=-=-=-=-=-=-=-=-=-=-=-=-=-=-=-=-=-=-=-=-=-=-

// Method deleteRecord: Delete a single record in the ZTEST_KOTLIN table...

//=-=-=-=-=-=-=-=-=-=-=-=-=-=-=-=-=-=-=-=-=-=-=-=-=-=-=-=-=-=-=-=-=-=-=-=-=-=-=-=-

private fun deleteRecord() {

    val lclGuid = promptTheUser("Enter a GUID to Delete: ")

    var url = "$MAIN_URL(Guid=guid'$lclGuid')$JSON_FORMAT"

    val fetchRecord = fetchSingleRecord(url)

    val mapper = jacksonObjectMapper()

    mapper.propertyNamingStrategy = PropertyNamingStrategy.UPPER_CAMEL_CASE

    url = "$MAIN_URL(Guid=guid'$lclGuid')"

    initializeFuel(fetchRecord.CsrfToken, fetchRecord.Cookie)

    val (_, _, result) = url.httpDelete().responseString()

    when (result) {

        is Result.Failure -> {

            println(result.getException().toString())

        }

        is Result.Success -> {

            println("...Customer Memo successfully deleted...")

            showFormattedRecord( fetchRecord.singleCustomerRecord, "Deleted" )

        }

    }

}
Add a call to our new “Delete” method on our user menu for option 5:
when (answer) {

    1 -> displayDataSet()

    2 -> displayRecord(promptTheUser("Enter a GUID to Display: "), "Current")

    3 -> createRecord()

    4 -> updateRecord()

    5 -> deleteRecord()
To test, display all records with option 1, decide on which record you want to delete, and copy the Guid key. Run option 5 to delete the record by pasting in the Guid key. You can test as follows:

Complete Kotlin Program
Here is the complete source code for the single TableMaintenance.kt Kotlin file:
import com.fasterxml.jackson.annotation.JsonProperty

import com.fasterxml.jackson.databind.DeserializationFeature

import com.fasterxml.jackson.databind.PropertyNamingStrategy

import com.fasterxml.jackson.module.kotlin.jacksonObjectMapper

import com.fasterxml.jackson.module.kotlin.readValue

import com.github.kittinunf.fuel.core.FuelManager

import com.github.kittinunf.fuel.httpDelete

import com.github.kittinunf.fuel.httpGet

import com.github.kittinunf.fuel.httpPost

import com.github.kittinunf.fuel.httpPut

import com.github.kittinunf.result.Result

import java.time.Duration

import java.time.Instant

import java.time.LocalTime

import java.time.ZoneId

import java.time.format.DateTimeFormatter

import kotlin.system.exitProcess


//=-=-=-=-=-=-=-=-=-=-=-=-=-=-=-=-=-=-=-=-=-=-=-=-=-=-=-=-=-=-=-=-=-=-=-=-=-=-=-=-=-=-=-=-=

// Global Final Variables used throughout the program (val = Final, var = Variable)...

//=-=-=-=-=-=-=-=-=-=-=-=-=-=-=-=-=-=-=-=-=-=-=-=-=-=-=-=-=-=-=-=-=-=-=-=-=-=-=-=-=-=-=-=-=

const val AUTH_STRING = "amNhc<blah><blah><blah>FSUkVMTDc="

const val MAIN_URL = "http://<your server>/sap/opu/odata/SAP/ZTEST_KOTLIN_SRV/ZTEST_KOTLINSet"

const val JSON_FORMAT = "?\$format=json"


//=-=-=-=-=-=-=-=-=-=-=-=-=-=-=-=-=-=-=-=-=-=-=-=-=-=-=

// Data Class for a Fetch record, for CUD Operations...

//=-=-=-=-=-=-=-=-=-=-=-=-=-=-=-=-=-=-=-=-=-=-=-=-=-=-=

data class FetchRecord(

    val CsrfToken: String,

    val Cookie: String,

    var singleCustomerRecord: CustomerMemoRecord

)


//=-=-=-=-=-=-=-=-=-=-=-=-=-=-=-=-=-=-=-=-=-=-=-=-=-=-=-=-=-=-=-=-=-=-=-=-=-=-=-=-=-=-=-=-=-=-=

// A data class which represents a single Customer Memo Record from the ZTEST_KOTLIN SAP table.

//=-=-=-=-=-=-=-=-=-=-=-=-=-=-=-=-=-=-=-=-=-=-=-=-=-=-=-=-=-=-=-=-=-=-=-=-=-=-=-=-=-=-=-=-=-=-=

data class CustomerMemoRecord(

    var Guid: String = "",

    var DateUpdated: String = "",

    var TimeUpdated: String = "",

    var LastUpdatedBy: String = "",

    var OrderNumber: String = "",

    var CustomerNumber: String = "",

    var CustomerMessage: String = ""

)


//=-=-=-=-=-=-=-=-=-=-=-=-=-=-=-=-=-=-=-=-=-=-=-=-=-=-=-=-=-=-=-=-=-=-=-=-=-=-=-=-=-=-=-=-=

// Multiple Record GET - RootJsonNodeSet plus CustomerDataSet with all Customer Records...

//=-=-=-=-=-=-=-=-=-=-=-=-=-=-=-=-=-=-=-=-=-=-=-=-=-=-=-=-=-=-=-=-=-=-=-=-=-=-=-=-=-=-=-=-=

data class RootJsonNodeSet(

    @JsonProperty("d")

    val allRecords: CustomerDataSet

)

data class CustomerDataSet(

    @JsonProperty("results")

    val customerRecords: List<CustomerMemoRecord> = emptyList()

)


//=-=-=-=-=-=-=-=-=-=-=-=-=-=-=-=-=-=-=-=-=-=-=-=-=-=-=-=-

// Single Record GET for one Customer Memo Record...

//=-=-=-=-=-=-=-=-=-=-=-=-=-=-=-=-=-=-=-=-=-=-=-=-=-=-=-=-

data class RootJsonNodeSingle(

    @JsonProperty("d")

    val singleCustomerRecord: CustomerMemoRecord

)


//=-=-=-=-=-=-=-=-=-=-=-=-=-=-=-=-=-=-=-=-=-=-=-=-=-=-=-=-=-=-=-=-=-=-=-=-=-=-=-=-

// Method main: Entry point for the program...

//=-=-=-=-=-=-=-=-=-=-=-=-=-=-=-=-=-=-=-=-=-=-=-=-=-=-=-=-=-=-=-=-=-=-=-=-=-=-=-=-

fun main() {

    //Process User Selection...

    var answer = 0

    while (answer != 6) {

        answer = displayMainMenu()

        when (answer) {

            1 -> displayDataSet()

            2 -> displayRecord(promptTheUser("Enter a GUID to Display: "), "Current")

            3 -> createRecord()

            4 -> updateRecord()

            5 -> deleteRecord()

            6 -> {

                println("\nThank you for using this amazing program!!...Goodbye...")

                exitProcess(0)

            }

            else -> {

                println()

                println("Invalid Option Number. Please Enter a valid option number 1 thru 6.")

            }

        }

    }

}


//=-=-=-=-=-=-=-=-=-=-=-=-=-=-=-=-=-=-=-=-=-=-=-=-=-=-=-=-=-=-=-=-=-=-=-=-=-=-=-=-

// Method promptTheUser: Prompt the end user for something...

//=-=-=-=-=-=-=-=-=-=-=-=-=-=-=-=-=-=-=-=-=-=-=-=-=-=-=-=-=-=-=-=-=-=-=-=-=-=-=-=-

private fun promptTheUser(message: String): String {

    print(message)

    return readLine()!!

}


//=-=-=-=-=-=-=-=-=-=-=-=-=-=-=-=-=-=-=-=-=-=-=-=-=-=-=-=-=-=-=-=-=-=-=-=-=-=-=-=-

// Method displayMainMenu: Display the user's options and prompt for input...

//=-=-=-=-=-=-=-=-=-=-=-=-=-=-=-=-=-=-=-=-=-=-=-=-=-=-=-=-=-=-=-=-=-=-=-=-=-=-=-=-

private fun displayMainMenu(): Int {

    println()

    println("Task Options: ")

    println("(1) - Display All Data")

    println("(2) - Display a Record")

    println("(3) - Create a Record")

    println("(4) - Update a Record")

    println("(5) - Delete a Record")

    println("(6) - Exit the Program")

    print("Enter an Option Number: ")

    var num = -1

    try {

        num = readLine()!!.toInt()

    } catch (e: NumberFormatException) {

    }

    return num

}


//=-=-=-=-=-=-=-=-=-=-=-=-=-=-=-=-=-=-=-=-=-=-=-=-=-=-=-=-=-=-=-=-=-=-=-=-=-=-=-=-=

// Method displaySingleRecord: Display a single record in the ZTEST_KOTLIN table...

//=-=-=-=-=-=-=-=-=-=-=-=-=-=-=-=-=-=-=-=-=-=-=-=-=-=-=-=-=-=-=-=-=-=-=-=-=-=-=-=-=

private fun displayRecord(lclGuid: String, lclTitle: String) {

    val singleRecordString = "(Guid=guid'${lclGuid}')"

    val lclUrl = MAIN_URL + singleRecordString + JSON_FORMAT

    val fetchRecord = fetchSingleRecord(lclUrl)

    showFormattedRecord( fetchRecord.singleCustomerRecord, lclTitle )

}


//=-=-=-=-=-=-=-=-=-=-=-=-=-=-=-=-=-=-=-=-=-=-=-=-=-=-=-=-=-=-=-=-=-=-=-=-=-=-=-=-

// Method showFormattedRecord: Display of a single record...

//=-=-=-=-=-=-=-=-=-=-=-=-=-=-=-=-=-=-=-=-=-=-=-=-=-=-=-=-=-=-=-=-=-=-=-=-=-=-=-=-

private fun showFormattedRecord(record: CustomerMemoRecord, lclTitle: String) {

    println()

    for (x in 0..50) print("=-") // Print 50 times for line separator...

    println()

    println("$lclTitle Record for Order Number ${record.OrderNumber}:")

    for (x in 0..50) print("=-") // Print 50 times...

    println()

    println("          Guid (key): ${record.Guid}")

    println("   Date Last Updated: ${jsonDateFormatter(record.DateUpdated)}")

    println("   Time Last Updated: ${jsonTimeFormatter(record.TimeUpdated)}")

    println("Last Updated By User: ${record.LastUpdatedBy}")

    println("        Order Number: ${record.OrderNumber}")

    println("     Customer Number: ${record.CustomerNumber}")

    println("       Customer Memo: ${record.CustomerMessage}")

    for (x in 0..50) print("=-") // Print 50 times...

    println()

}


//=-=-=-=-=-=-=-=-=-=-=-=-=-=-=-=-=-=-=-=-=-=-=-=-=-=-=-=-=-=-=-=-=-=-=-=-=-=-=-=-

// Method fetchSingleRecord: Fetch Data for a Single Record...

//=-=-=-=-=-=-=-=-=-=-=-=-=-=-=-=-=-=-=-=-=-=-=-=-=-=-=-=-=-=-=-=-=-=-=-=-=-=-=-=-

private fun fetchSingleRecord(lclUrl: String): FetchRecord {

    val mapper = jacksonObjectMapper()

    FuelManager.instance.baseHeaders = mapOf(

        "Authorization" to "Basic $AUTH_STRING",

        "X-CSRF-Token" to "Fetch"

    )

    //Ignore any properties that don't exist in our CustomerMemoRecord Class...

    mapper.configure(DeserializationFeature.FAIL_ON_UNKNOWN_PROPERTIES, false)

    val (_, response, result) = lclUrl.httpGet().responseString()

    val csrfToken: String? = response.headers["x-csrf-token"].elementAt(0)

    val cookie: String? = response.headers["set-cookie"].elementAt(0) + response.headers["set-cookie"].elementAt(1)

    var memoRecord = CustomerMemoRecord()

    when (result) {

        is Result.Failure -> {

            val ex = result.getException()

            print(ex)

        }

        is Result.Success -> {

            val myJsonData: RootJsonNodeSingle = mapper.readValue(result.get())

            memoRecord = myJsonData.singleCustomerRecord

        }

    }

    return FetchRecord(

        CsrfToken = csrfToken.toString(),

        Cookie = cookie.toString(),

        singleCustomerRecord = memoRecord

    )

}


//=-=-=-=-=-=-=-=-=-=-=-=-=-=-=-=-=-=-=-=-=-=-=-=-=-=-=-=-=-=-=-=-=-=-=-=-=-=-=-=-

// Method displayDataSet: Display all records in the ZTEST_KOTLIN SAP table...

//=-=-=-=-=-=-=-=-=-=-=-=-=-=-=-=-=-=-=-=-=-=-=-=-=-=-=-=-=-=-=-=-=-=-=-=-=-=-=-=-

private fun displayDataSet() {

    println()

    println("...One moment please, retrieving all records...")

    FuelManager.instance.baseHeaders = mapOf("Authorization" to "Basic $AUTH_STRING")

    val mapper = jacksonObjectMapper()

    val url = MAIN_URL + JSON_FORMAT

    //This allows you to parse out only the attributes you'd like, and ignore all others...

    mapper.configure(DeserializationFeature.FAIL_ON_UNKNOWN_PROPERTIES, false)

    val (_, _, result) = url.httpGet().responseString()

    when (result) {

        is Result.Failure -> {

            val ex = result.getException()

            print(ex)

        }

        is Result.Success -> {

            val myJsonData: RootJsonNodeSet = mapper.readValue(result.get())

            val memoRecords: List<CustomerMemoRecord> = myJsonData.allRecords.customerRecords

            println("\nTable ZTEST_KOTLIN (${memoRecords.count()} Records):")

            for (x in 0..80) print("=-") // Print 80 times for line separator...

            println()

            println("Guid (key)                           " +

                    "| Date       " +

                    "| Time     " +

                    "| Updated By   " +

                    "| Order #    " +

                    "| Customer # " +

                    "| Memo")

            for (x in 0..80) print("=-") // Print 80 times...

            println()

            memoRecords.forEach {

                println(

                    "${it.Guid} " +

                            "| ${jsonDateFormatter(it.DateUpdated)} " +

                            "| ${jsonTimeFormatter(it.TimeUpdated)} " +

                            "| ${it.LastUpdatedBy.padStart(12)} " + //pad to 12 characters, to line up with column header

                            "| ${it.OrderNumber.padStart(10)} " + //pad to 10 characters

                            "| ${it.CustomerNumber.padStart(10)} " + //pad to 10 characters

                            "| ${it.CustomerMessage}"

                )

            }

            for (x in 0..80) print("=-") // Print 80 times...

            println()

        }

    }

}


//=-=-=-=-=-=-=-=-=-=-=-=-=-=-=-=-=-=-=-=-=-=-=-=-=-=-=-=-=-=-=-=-=-=-=-=-=-=-=-=-

// Method createRecord: Create a single record in the ZTEST_KOTLIN table...

//=-=-=-=-=-=-=-=-=-=-=-=-=-=-=-=-=-=-=-=-=-=-=-=-=-=-=-=-=-=-=-=-=-=-=-=-=-=-=-=-

private fun createRecord() {

    val lclOrder = promptTheUser("Enter Order Number: ")

    val lclCustomer = promptTheUser("Enter Customer Number: ")

    val lclMemo = promptTheUser("Enter Customer Memo: ")


    //First, fetch the CSRF Token and Cookie, prior to performing the POST...

    var url = MAIN_URL + JSON_FORMAT

    val fetchRecord = fetchSingleRecord(url)

    fetchRecord.singleCustomerRecord.OrderNumber = lclOrder

    fetchRecord.singleCustomerRecord.CustomerNumber = lclCustomer

    fetchRecord.singleCustomerRecord.CustomerMessage = lclMemo

    //Even though we are doing a POST (Create), we still need to fill in all of the

    //attributes, so enter dummy data for these ignored fields...

    fetchRecord.singleCustomerRecord.Guid = "00000000-0000-0000-0000-000000000000"

    fetchRecord.singleCustomerRecord.DateUpdated = """/Date(1578441600000)/"""

    fetchRecord.singleCustomerRecord.LastUpdatedBy = ""

    fetchRecord.singleCustomerRecord.TimeUpdated = "PT13H12M09S"

    val mapper = jacksonObjectMapper()

    // The default mapper, adjusts the field names to lower case camel case, but our

    // Gateway service has upper case (i.e. dateUpdated vs. DateUpdated),

    // so we set the UPPER_CAMEL_CASE property here...

    mapper.propertyNamingStrategy = PropertyNamingStrategy.UPPER_CAMEL_CASE

    mapper.configure(DeserializationFeature.FAIL_ON_UNKNOWN_PROPERTIES, false)

    // Serialize the fetchRecord Object back into a JSON String and use for our POST

    // to create the Customer Memo...

    val jsonString = mapper.writeValueAsString(fetchRecord.singleCustomerRecord)

    //Remove the "jsonFormat" URI Option, prior to doing the POST...

    url = MAIN_URL

    val newRecord: CustomerMemoRecord


    initializeFuel(fetchRecord.CsrfToken, fetchRecord.Cookie)

    val postString = """{ "d" : $jsonString }"""


    //This is a synchronous "Blocking Mode" call (i.e. will wait for a response)...

    val (_, _, result) = url.httpPost().body(postString).responseString()

    when (result) {

        is Result.Failure -> {

            println()

            println("Post Failed...")

            println(result.getException().toString() + result.error.response.toString())

        }

        is Result.Success -> {

            val myJsonData: RootJsonNodeSingle = mapper.readValue(result.get())

            newRecord = myJsonData.singleCustomerRecord

            println()

            println("...Customer Memo successfully created...")

            displayRecord(newRecord.Guid, "New")

        }

    }

}


//=-=-=-=-=-=-=-=-=-=-=-=-=-=-=-=-=-=-=-=-=-=-=-=-=-=-=-=-=-=-=-=-=-=-=-=-=-=-=-=-

// Method updateRecord: Update a single record in the ZTEST_KOTLIN table...

//=-=-=-=-=-=-=-=-=-=-=-=-=-=-=-=-=-=-=-=-=-=-=-=-=-=-=-=-=-=-=-=-=-=-=-=-=-=-=-=-

private fun updateRecord() {

    val lclGuid = promptTheUser("Enter a GUID to Update: ")

    val newMemo = promptTheUser("Enter the New Memo: ")

    var url = "$MAIN_URL(Guid=guid'$lclGuid')$JSON_FORMAT"

    val fetchRecord = fetchSingleRecord(url)

    val originalMemo = fetchRecord.singleCustomerRecord.CustomerMessage

    fetchRecord.singleCustomerRecord.CustomerMessage = newMemo

    val mapper = jacksonObjectMapper()

    mapper.propertyNamingStrategy = PropertyNamingStrategy.UPPER_CAMEL_CASE

    val jsonString = mapper.writeValueAsString(fetchRecord.singleCustomerRecord)

    url = "$MAIN_URL(Guid=guid'$lclGuid')"


    initializeFuel(fetchRecord.CsrfToken, fetchRecord.Cookie)

    val putString = """{ "d" : $jsonString }"""

    val (_, _, result) = url.httpPut().body(putString).responseString()

    when (result) {

        is Result.Failure -> {

            println(result.getException().toString())

        }

        is Result.Success -> {

            println("...Customer Memo successfully updated...")

            println("Old Memo: $originalMemo")

            println("New Memo: $newMemo")

            displayRecord(lclGuid, "Updated")

        }

    }

}


//=-=-=-=-=-=-=-=-=-=-=-=-=-=-=-=-=-=-=-=-=-=-=-=-=-=-=-=-=-=-=-=-=-=-=-=-=-=-=-=-

// Method deleteRecord: Delete a single record in the ZTEST_KOTLIN table...

//=-=-=-=-=-=-=-=-=-=-=-=-=-=-=-=-=-=-=-=-=-=-=-=-=-=-=-=-=-=-=-=-=-=-=-=-=-=-=-=-

private fun deleteRecord() {

    val lclGuid = promptTheUser("Enter a GUID to Delete: ")

    var url = "$MAIN_URL(Guid=guid'$lclGuid')$JSON_FORMAT"

    val fetchRecord = fetchSingleRecord(url)

    val mapper = jacksonObjectMapper()

    mapper.propertyNamingStrategy = PropertyNamingStrategy.UPPER_CAMEL_CASE

    url = "$MAIN_URL(Guid=guid'$lclGuid')"

    initializeFuel(fetchRecord.CsrfToken, fetchRecord.Cookie)

    val (_, _, result) = url.httpDelete().responseString()

    when (result) {

        is Result.Failure -> {

            println(result.getException().toString())

        }

        is Result.Success -> {

            println("...Customer Memo successfully deleted...")

            showFormattedRecord( fetchRecord.singleCustomerRecord, "Deleted" )

        }

    }

}


//=-=-=-=-=-=-=-=-=-=-=-=-=-=-=-=-=-=-=-=-=-=-=-=-=-=-=-=-=-=-=-=-=-=-=-=-=-=-=-=-

// Method initializeFuel: Set the FuelManager for UPDATE or POST...

//=-=-=-=-=-=-=-=-=-=-=-=-=-=-=-=-=-=-=-=-=-=-=-=-=-=-=-=-=-=-=-=-=-=-=-=-=-=-=-=-

private fun initializeFuel(CsrfToken: String, Cookie: String) {

    FuelManager.instance.baseHeaders = mapOf(

        "Authorization" to "Basic $AUTH_STRING",

        "X-CSRF-Token" to CsrfToken,

        "cookie" to Cookie,

        "Content-Type" to "application/json",

        "Accept" to "application/json"

    )

}


//=-=-=-=-=-=-=-=-=-=-=-=-=-=-=-=-=-=-=-=-=-=-=-=-=-=-=-=-=-=-=-=-=-=-=-=-=-=-=-=-=-=

// Method jsonDateFormatter: Parse a JSON Date (Epoch Date) into a Java/Kotlin Date

//=-=-=-=-=-=-=-=-=-=-=-=-=-=-=-=-=-=-=-=-=-=-=-=-=-=-=-=-=-=-=-=-=-=-=-=-=-=-=-=-=-=

private fun jsonDateFormatter(jsonDate: String): String {

    val epochDate = jsonDate.replace("[^0-9]".toRegex(), "")

    val updateDate = Instant.ofEpochMilli(java.lang.Long.parseLong(epochDate))

        .atZone(ZoneId.of("CET"))

        .toLocalDate()

    return updateDate.toString()

}


//=-=-=-=-=-=-=-=-=-=-=-=-=-=-=-=-=-=-=-=-=-=-=-=-=-=-=-=-=-=-=-=-=-=-=-=-=-=-=-=-=-=-=-=-=-=

// Method jsonTimeFormatter: Parse a JSON Time (XSD:Duration Date Type) into Java/Kotlin Time

//=-=-=-=-=-=-=-=-=-=-=-=-=-=-=-=-=-=-=-=-=-=-=-=-=-=-=-=-=-=-=-=-=-=-=-=-=-=-=-=-=-=-=-=-=-=

private fun jsonTimeFormatter(jsonTime: String): String {

    val fTime = LocalTime.ofNanoOfDay(Duration.parse(jsonTime).toNanos())

    val df = DateTimeFormatter.ISO_LOCAL_TIME

    return fTime.format(df)

}
References
Related Blogs:
A simple GET Kotlin project with SAP Gateway:
https://blogs.sap.com/2018/05/21/kotlin-sap-gateway-and-intellij/
Maintain your ZTEST_KOTLIN table in Excel:
https://blogs.sap.com/2019/11/13/excel-xlsx-table-maintenance/
Kotlin and Android on the SAP Cloud Platform:
https://blogs.sap.com/2019/05/24/create-an-android-sap-cloud-platform-app-using-kotlin-and-sap-fiori...
IntelliJ IDE:
https://www.jetbrains.com/idea/
To read more about the Kotlin Language:
https://kotlinlang.org/
Kotlin Fuel:
Fuel library for Kotlin HTTP requests.
https://ryanharrison.co.uk/2018/06/15/make-http-requests-kotlin.html
https://www.baeldung.com/kotlin-fuel
https://fuel.gitbook.io/documentation/
Jackson JSON Parser:
https://www.baeldung.com/jackson-kotlin
SAP Gateway Date and Time Format:
Good Blog on OData date format:
https://blogs.sap.com/2017/01/05/date-and-time-in-sap-gateway-foundation/
Time for OData 2.0 is of type “XSD:Duration Date Type”
https://www.w3.org/TR/xmlschema11-2/#dayTimeDuration
Day/Time Duration:
https://docs.oracle.com/javase/10/docs/api/javax/xml/datatype/DatatypeFactory.html
Json Date, search for code with “epochDate = jsonDate.replace”. Here is an Epoch Converter:
https://www.epochconverter.com/
To Check an SAP System’s Time zone, run the program TZONECHECK.
Using the IntelliJ IDE to get a Basic Authorization String:
The IntelliJ IDE also has RESTful Web Service client, which allows us to generate a Basic Authorization Header string. Here are the steps:
Go to the menu path “Tools > HTTP Client > Test RESTful Web Service”:

In the lower-left, click on the button “Generate Authorization Header”:

When prompted, type in your SAP User Name and password and click “OK”:

This generates an authorization string in the lower-left corner:

Copy this string, starting with the “Basic…” part, all the way to the end of the string. When you click on the string, it will toggle into an edit box, where you may copy it:

- SAP Managed Tags:
- ABAP Development,
- OData,
- SAP Gateway,
- NW ABAP Gateway (OData)
7 Comments
You must be a registered user to add a comment. If you've already registered, sign in. Otherwise, register and sign in.
Labels in this area
-
"automatische backups"
1 -
"regelmäßige sicherung"
1 -
"TypeScript" "Development" "FeedBack"
1 -
505 Technology Updates 53
1 -
ABAP
14 -
ABAP API
1 -
ABAP CDS Views
2 -
ABAP CDS Views - BW Extraction
1 -
ABAP CDS Views - CDC (Change Data Capture)
1 -
ABAP class
2 -
ABAP Cloud
2 -
ABAP Development
5 -
ABAP in Eclipse
1 -
ABAP Platform Trial
1 -
ABAP Programming
2 -
abap technical
1 -
absl
2 -
access data from SAP Datasphere directly from Snowflake
1 -
Access data from SAP datasphere to Qliksense
1 -
Accrual
1 -
action
1 -
adapter modules
1 -
Addon
1 -
Adobe Document Services
1 -
ADS
1 -
ADS Config
1 -
ADS with ABAP
1 -
ADS with Java
1 -
ADT
2 -
Advance Shipping and Receiving
1 -
Advanced Event Mesh
3 -
AEM
1 -
AI
7 -
AI Launchpad
1 -
AI Projects
1 -
AIML
9 -
Alert in Sap analytical cloud
1 -
Amazon S3
1 -
Analytical Dataset
1 -
Analytical Model
1 -
Analytics
1 -
Analyze Workload Data
1 -
annotations
1 -
API
1 -
API and Integration
3 -
API Call
2 -
Application Architecture
1 -
Application Development
5 -
Application Development for SAP HANA Cloud
3 -
Applications and Business Processes (AP)
1 -
Artificial Intelligence
1 -
Artificial Intelligence (AI)
5 -
Artificial Intelligence (AI) 1 Business Trends 363 Business Trends 8 Digital Transformation with Cloud ERP (DT) 1 Event Information 462 Event Information 15 Expert Insights 114 Expert Insights 76 Life at SAP 418 Life at SAP 1 Product Updates 4
1 -
Artificial Intelligence (AI) blockchain Data & Analytics
1 -
Artificial Intelligence (AI) blockchain Data & Analytics Intelligent Enterprise
1 -
Artificial Intelligence (AI) blockchain Data & Analytics Intelligent Enterprise Oil Gas IoT Exploration Production
1 -
Artificial Intelligence (AI) blockchain Data & Analytics Intelligent Enterprise sustainability responsibility esg social compliance cybersecurity risk
1 -
ASE
1 -
ASR
2 -
ASUG
1 -
Attachments
1 -
Authorisations
1 -
Automating Processes
1 -
Automation
2 -
aws
2 -
Azure
1 -
Azure AI Studio
1 -
B2B Integration
1 -
Backorder Processing
1 -
Backup
1 -
Backup and Recovery
1 -
Backup schedule
1 -
BADI_MATERIAL_CHECK error message
1 -
Bank
1 -
BAS
1 -
basis
2 -
Basis Monitoring & Tcodes with Key notes
2 -
Batch Management
1 -
BDC
1 -
Best Practice
1 -
bitcoin
1 -
Blockchain
3 -
bodl
1 -
BOP in aATP
1 -
BOP Segments
1 -
BOP Strategies
1 -
BOP Variant
1 -
BPC
1 -
BPC LIVE
1 -
BTP
12 -
BTP Destination
2 -
Business AI
1 -
Business and IT Integration
1 -
Business application stu
1 -
Business Application Studio
1 -
Business Architecture
1 -
Business Communication Services
1 -
Business Continuity
1 -
Business Data Fabric
3 -
Business Partner
12 -
Business Partner Master Data
10 -
Business Technology Platform
2 -
Business Trends
4 -
CA
1 -
calculation view
1 -
CAP
3 -
Capgemini
1 -
CAPM
1 -
Catalyst for Efficiency: Revolutionizing SAP Integration Suite with Artificial Intelligence (AI) and
1 -
CCMS
2 -
CDQ
12 -
CDS
2 -
Cental Finance
1 -
Certificates
1 -
CFL
1 -
Change Management
1 -
chatbot
1 -
chatgpt
3 -
CL_SALV_TABLE
2 -
Class Runner
1 -
Classrunner
1 -
Cloud ALM Monitoring
1 -
Cloud ALM Operations
1 -
cloud connector
1 -
Cloud Extensibility
1 -
Cloud Foundry
4 -
Cloud Integration
6 -
Cloud Platform Integration
2 -
cloudalm
1 -
communication
1 -
Compensation Information Management
1 -
Compensation Management
1 -
Compliance
1 -
Compound Employee API
1 -
Configuration
1 -
Connectors
1 -
Consolidation Extension for SAP Analytics Cloud
2 -
Control Indicators.
1 -
Controller-Service-Repository pattern
1 -
Conversion
1 -
Cosine similarity
1 -
cryptocurrency
1 -
CSI
1 -
ctms
1 -
Custom chatbot
3 -
Custom Destination Service
1 -
custom fields
1 -
Customer Experience
1 -
Customer Journey
1 -
Customizing
1 -
cyber security
3 -
cybersecurity
1 -
Data
1 -
Data & Analytics
1 -
Data Aging
1 -
Data Analytics
2 -
Data and Analytics (DA)
1 -
Data Archiving
1 -
Data Back-up
1 -
Data Flow
1 -
Data Governance
5 -
Data Integration
2 -
Data Quality
12 -
Data Quality Management
12 -
Data Synchronization
1 -
data transfer
1 -
Data Unleashed
1 -
Data Value
8 -
database tables
1 -
Datasphere
3 -
datenbanksicherung
1 -
dba cockpit
1 -
dbacockpit
1 -
Debugging
2 -
Delimiting Pay Components
1 -
Delta Integrations
1 -
Destination
3 -
Destination Service
1 -
Developer extensibility
1 -
Developing with SAP Integration Suite
1 -
Devops
1 -
digital transformation
1 -
Documentation
1 -
Dot Product
1 -
DQM
1 -
dump database
1 -
dump transaction
1 -
e-Invoice
1 -
E4H Conversion
1 -
Eclipse ADT ABAP Development Tools
2 -
edoc
1 -
edocument
1 -
ELA
1 -
Embedded Consolidation
1 -
Embedding
1 -
Embeddings
1 -
Employee Central
1 -
Employee Central Payroll
1 -
Employee Central Time Off
1 -
Employee Information
1 -
Employee Rehires
1 -
Enable Now
1 -
Enable now manager
1 -
endpoint
1 -
Enhancement Request
1 -
Enterprise Architecture
1 -
ETL Business Analytics with SAP Signavio
1 -
Euclidean distance
1 -
Event Dates
1 -
Event Driven Architecture
1 -
Event Mesh
2 -
Event Reason
1 -
EventBasedIntegration
1 -
EWM
1 -
EWM Outbound configuration
1 -
EWM-TM-Integration
1 -
Existing Event Changes
1 -
Expand
1 -
Expert
2 -
Expert Insights
2 -
Exploits
1 -
Fiori
14 -
Fiori Elements
2 -
Fiori SAPUI5
12 -
Flask
1 -
Full Stack
8 -
Funds Management
1 -
General
1 -
General Splitter
1 -
Generative AI
1 -
Getting Started
1 -
GitHub
8 -
Grants Management
1 -
GraphQL
1 -
groovy
1 -
GTP
1 -
HANA
6 -
HANA Cloud
2 -
Hana Cloud Database Integration
2 -
HANA DB
2 -
HANA XS Advanced
1 -
Historical Events
1 -
home labs
1 -
HowTo
1 -
HR Data Management
1 -
html5
8 -
HTML5 Application
1 -
Identity cards validation
1 -
idm
1 -
Implementation
1 -
input parameter
1 -
instant payments
1 -
Integration
3 -
Integration Advisor
1 -
Integration Architecture
1 -
Integration Center
1 -
Integration Suite
1 -
intelligent enterprise
1 -
iot
1 -
Java
1 -
job
1 -
Job Information Changes
1 -
Job-Related Events
1 -
Job_Event_Information
1 -
joule
4 -
Journal Entries
1 -
Just Ask
1 -
Kerberos for ABAP
8 -
Kerberos for JAVA
8 -
KNN
1 -
Launch Wizard
1 -
Learning Content
2 -
Life at SAP
5 -
lightning
1 -
Linear Regression SAP HANA Cloud
1 -
Loading Indicator
1 -
local tax regulations
1 -
LP
1 -
Machine Learning
2 -
Marketing
1 -
Master Data
3 -
Master Data Management
14 -
Maxdb
2 -
MDG
1 -
MDGM
1 -
MDM
1 -
Message box.
1 -
Messages on RF Device
1 -
Microservices Architecture
1 -
Microsoft Universal Print
1 -
Middleware Solutions
1 -
Migration
5 -
ML Model Development
1 -
Modeling in SAP HANA Cloud
8 -
Monitoring
3 -
MTA
1 -
Multi-Record Scenarios
1 -
Multiple Event Triggers
1 -
Myself Transformation
1 -
Neo
1 -
New Event Creation
1 -
New Feature
1 -
Newcomer
1 -
NodeJS
2 -
ODATA
2 -
OData APIs
1 -
odatav2
1 -
ODATAV4
1 -
ODBC
1 -
ODBC Connection
1 -
Onpremise
1 -
open source
2 -
OpenAI API
1 -
Oracle
1 -
PaPM
1 -
PaPM Dynamic Data Copy through Writer function
1 -
PaPM Remote Call
1 -
PAS-C01
1 -
Pay Component Management
1 -
PGP
1 -
Pickle
1 -
PLANNING ARCHITECTURE
1 -
Popup in Sap analytical cloud
1 -
PostgrSQL
1 -
POSTMAN
1 -
Process Automation
2 -
Product Updates
4 -
PSM
1 -
Public Cloud
1 -
Python
4 -
Qlik
1 -
Qualtrics
1 -
RAP
3 -
RAP BO
2 -
Record Deletion
1 -
Recovery
1 -
recurring payments
1 -
redeply
1 -
Release
1 -
Remote Consumption Model
1 -
Replication Flows
1 -
research
1 -
Resilience
1 -
REST
1 -
REST API
2 -
Retagging Required
1 -
Risk
1 -
Rolling Kernel Switch
1 -
route
1 -
rules
1 -
S4 HANA
1 -
S4 HANA Cloud
1 -
S4 HANA On-Premise
1 -
S4HANA
3 -
S4HANA_OP_2023
2 -
SAC
10 -
SAC PLANNING
9 -
SAP
4 -
SAP ABAP
1 -
SAP Advanced Event Mesh
1 -
SAP AI Core
8 -
SAP AI Launchpad
8 -
SAP Analytic Cloud Compass
1 -
Sap Analytical Cloud
1 -
SAP Analytics Cloud
4 -
SAP Analytics Cloud for Consolidation
3 -
SAP Analytics Cloud Story
1 -
SAP analytics clouds
1 -
SAP BAS
1 -
SAP Basis
6 -
SAP BODS
1 -
SAP BODS certification.
1 -
SAP BTP
21 -
SAP BTP Build Work Zone
2 -
SAP BTP Cloud Foundry
6 -
SAP BTP Costing
1 -
SAP BTP CTMS
1 -
SAP BTP Innovation
1 -
SAP BTP Migration Tool
1 -
SAP BTP SDK IOS
1 -
SAP Build
11 -
SAP Build App
1 -
SAP Build apps
1 -
SAP Build CodeJam
1 -
SAP Build Process Automation
3 -
SAP Build work zone
10 -
SAP Business Objects Platform
1 -
SAP Business Technology
2 -
SAP Business Technology Platform (XP)
1 -
sap bw
1 -
SAP CAP
2 -
SAP CDC
1 -
SAP CDP
1 -
SAP CDS VIEW
1 -
SAP Certification
1 -
SAP Cloud ALM
4 -
SAP Cloud Application Programming Model
1 -
SAP Cloud Integration for Data Services
1 -
SAP cloud platform
8 -
SAP Companion
1 -
SAP CPI
3 -
SAP CPI (Cloud Platform Integration)
2 -
SAP CPI Discover tab
1 -
sap credential store
1 -
SAP Customer Data Cloud
1 -
SAP Customer Data Platform
1 -
SAP Data Intelligence
1 -
SAP Data Migration in Retail Industry
1 -
SAP Data Services
1 -
SAP DATABASE
1 -
SAP Dataspher to Non SAP BI tools
1 -
SAP Datasphere
9 -
SAP DRC
1 -
SAP EWM
1 -
SAP Fiori
3 -
SAP Fiori App Embedding
1 -
Sap Fiori Extension Project Using BAS
1 -
SAP GRC
1 -
SAP HANA
1 -
SAP HCM (Human Capital Management)
1 -
SAP HR Solutions
1 -
SAP IDM
1 -
SAP Integration Suite
9 -
SAP Integrations
4 -
SAP iRPA
2 -
SAP LAGGING AND SLOW
1 -
SAP Learning Class
1 -
SAP Learning Hub
1 -
SAP Odata
2 -
SAP on Azure
1 -
SAP PartnerEdge
1 -
sap partners
1 -
SAP Password Reset
1 -
SAP PO Migration
1 -
SAP Prepackaged Content
1 -
SAP Process Automation
2 -
SAP Process Integration
2 -
SAP Process Orchestration
1 -
SAP S4HANA
2 -
SAP S4HANA Cloud
1 -
SAP S4HANA Cloud for Finance
1 -
SAP S4HANA Cloud private edition
1 -
SAP Sandbox
1 -
SAP STMS
1 -
SAP successfactors
3 -
SAP SuccessFactors HXM Core
1 -
SAP Time
1 -
SAP TM
2 -
SAP Trading Partner Management
1 -
SAP UI5
1 -
SAP Upgrade
1 -
SAP Utilities
1 -
SAP-GUI
8 -
SAP_COM_0276
1 -
SAPBTP
1 -
SAPCPI
1 -
SAPEWM
1 -
sapmentors
1 -
saponaws
2 -
SAPS4HANA
1 -
SAPUI5
5 -
schedule
1 -
Script Operator
1 -
Secure Login Client Setup
8 -
security
9 -
Selenium Testing
1 -
Self Transformation
1 -
Self-Transformation
1 -
SEN
1 -
SEN Manager
1 -
service
1 -
SET_CELL_TYPE
1 -
SET_CELL_TYPE_COLUMN
1 -
SFTP scenario
2 -
Simplex
1 -
Single Sign On
8 -
Singlesource
1 -
SKLearn
1 -
Slow loading
1 -
soap
1 -
Software Development
1 -
SOLMAN
1 -
solman 7.2
2 -
Solution Manager
3 -
sp_dumpdb
1 -
sp_dumptrans
1 -
SQL
1 -
sql script
1 -
SSL
8 -
SSO
8 -
Substring function
1 -
SuccessFactors
1 -
SuccessFactors Platform
1 -
SuccessFactors Time Tracking
1 -
Sybase
1 -
system copy method
1 -
System owner
1 -
Table splitting
1 -
Tax Integration
1 -
Technical article
1 -
Technical articles
1 -
Technology Updates
14 -
Technology Updates
1 -
Technology_Updates
1 -
terraform
1 -
Threats
2 -
Time Collectors
1 -
Time Off
2 -
Time Sheet
1 -
Time Sheet SAP SuccessFactors Time Tracking
1 -
Tips and tricks
2 -
toggle button
1 -
Tools
1 -
Trainings & Certifications
1 -
Transformation Flow
1 -
Transport in SAP BODS
1 -
Transport Management
1 -
TypeScript
2 -
ui designer
1 -
unbind
1 -
Unified Customer Profile
1 -
UPB
1 -
Use of Parameters for Data Copy in PaPM
1 -
User Unlock
1 -
VA02
1 -
Validations
1 -
Vector Database
2 -
Vector Engine
1 -
Visual Studio Code
1 -
VSCode
1 -
Vulnerabilities
1 -
Web SDK
1 -
work zone
1 -
workload
1 -
xsa
1 -
XSA Refresh
1
- « Previous
- Next »
Related Content
- On Uploading PDF or PPt File Getting 403 Error Forbidden in Technology Q&A
- What’s new in Mobile development kit client 24.4 in Technology Blogs by SAP
- Convert multiple xml's into single Xlsx(MS Excel) using groovy script in Technology Blogs by Members
- Kyma Integration with SAP Cloud Logging. Part 2: Let's ship some traces in Technology Blogs by SAP
- SAP BTP SDK for Android 24.4.0 is now available in Technology Blogs by SAP
Top kudoed authors
| User | Count |
|---|---|
| 7 | |
| 5 | |
| 5 | |
| 5 | |
| 4 | |
| 4 | |
| 4 | |
| 4 | |
| 3 | |
| 3 |