
- SAP Community
- Products and Technology
- Technology
- Technology Blogs by SAP
- Track water intake with SAP Leonardo IoT
Technology Blogs by SAP
Learn how to extend and personalize SAP applications. Follow the SAP technology blog for insights into SAP BTP, ABAP, SAP Analytics Cloud, SAP HANA, and more.
Turn on suggestions
Auto-suggest helps you quickly narrow down your search results by suggesting possible matches as you type.
Showing results for
Advisor
Options
- Subscribe to RSS Feed
- Mark as New
- Mark as Read
- Bookmark
- Subscribe
- Printer Friendly Page
- Report Inappropriate Content
02-12-2020
10:23 AM
Introduction
Many of us are aware of the usefulness of adequate water intake in our bodies. Especially with climate change, our daily water requirement is much more than eight glasses. There is also a general rule to calculate your water requirement, like for every 15 kilos of body weight, you must drink a liter of water.
With water drinking reminder apps around, the importance of drinking enough water has never been emphasized more than today. I found they are just reminders and not able to detect if I had taken one sip in the last hour. So, to monitor the actual intake and send an alert is all that I have done and shared it in this blog post.
I have shared the DIY steps to build the prototype. It consists of a Load sensor that takes the input of the bottle weight and sends the values to the edge gateway for storing, processing and passing it to the SAP Cloud Platform and IFTTT services for notification.
Block Diagram

- Device Setup: This is the main sensor unit, which will measure the weight of the bottle and send the values to Raspberry Pi.
- Raspberry Pi: I have used it as an Edge gateway, which reads the incoming values from the device and processes it to two different channels, one is SAP Cloud Platform IoT and another to IFTTT service.
- SAP Cloud Platform IoT: It reads the data from Raspberry Pi using HTTP and displays a chart for visualization and storing the data in the cloud.
- IFTTT: For notification, I have used IFTTT which is a free web-based service that can send alert to the registered app user.
Components used:
A. Hardware:
- Arduino Nano
- Loadcell
- HX711 (ADC)
- Raspberry Pi 3 (RPi)
- Serial Communication Cable
- Jumper cables
- Acrylic Sheet
B. Software:
- SQLite3 on RPi
- Node-Red on RPi
- Python 3 on RPi
- Arduino IDE
C. Access to SAP Cloud Platform IoT service
D. Notification Rule created on IFTTT
Device Setup (DIY):

The above circuit describes the connection of Loadcell to HX711 (ADC) to Arduino. I have replaced Arduino Uno with Nano to minimize the complete setup.
The original setup:

Download Arduino IDE on your laptop and compile the below code. If you are using Arduino Nano, change the "Processor" under "Tools" to ATmega328P(Old Bootloader). Note: CH34ISER driver should be installed on your local system for recognizing the COM Port of Arduino.
Additionally HX711.h library to be installed in Arduino IDE. The below code can be used for both calibration and measurement.
/*

Niladri Podder

*/


#include "HX711.h"  //You must have this library in your arduino library folder

const int LOADCELL_DOUT_PIN = 2;

const int LOADCELL_SCK_PIN = 3;


HX711 scale;


//Change this calibration factor as per your load cell once it is found you may need to vary it in thousands

float calibration_factor = 69525;


//=============================================================================================

//                         SETUP

//=============================================================================================

void setup() {

  Serial.begin(9600);

  //softSerial.begin(9600);

  scale.begin(LOADCELL_DOUT_PIN, LOADCELL_SCK_PIN);

  //Serial.println("HX711 Calibration");

  //Serial.println("Remove all weight from scale");

  //Serial.println("After readings begin, place known weight on scale");

  //Serial.println("Press a,s,d,f to increase calibration factor by 10,100,1000,10000 respectively");

  //Serial.println("Press z,x,c,v to decrease calibration factor by 10,100,1000,10000 respectively");

  //Serial.println("Press t for tare");

  scale.set_scale();

  scale.tare(); //Reset the scale to 0


  long zero_factor = scale.read_average(); //Get a baseline reading

  //Serial.print("Zero factor: "); //This can be used to remove the need to tare the scale. Useful in permanent scale projects.

  //Serial.println(zero_factor);

}


//=============================================================================================

//                         LOOP

//=============================================================================================

void loop() {


  scale.set_scale(calibration_factor); //Adjust to this calibration factor


  float load = scale.get_units()/10 ;

  if (load >= 0.000)

  {

    //Serial.print("Reading: ");

    Serial.println(load);

    //Serial.print(" kg"); //Change this to kg and re-adjust the calibration factor if you follow SI units like a sane person

    //Serial.print(" calibration_factor: ");

    //Serial.print(calibration_factor);

    //Serial.println();

  }

  else {

    //don't print

  }


  delay(600000);  //10 minute

  //delay(5000);  //5 sec for testing


  if(Serial.available())

  {

    char temp = Serial.read();

    if(temp == '+' || temp == 'a')

      calibration_factor += 10;

    else if(temp == '-' || temp == 'z')

      calibration_factor -= 10;

    else if(temp == 's')

      calibration_factor += 100;

    else if(temp == 'x')

      calibration_factor -= 100;

    else if(temp == 'd')

      calibration_factor += 1000;

    else if(temp == 'c')

      calibration_factor -= 1000;

    else if(temp == 'f')

      calibration_factor += 10000;

    else if(temp == 'v')

      calibration_factor -= 10000;

    else if(temp == 't')

      scale.tare();  //Reset the scale to zero

  }

}

//=============================================================================================
Structural setup for the loadcell and acrylic sheet.

Edge Gateway:
Raspberry Pi is the most affordable and commonly used edge gateway for IoT use-cases.
Here, I have used USB for Serial Communication to read the Device values. So once the device is connected to one of the USB Port run the below command to know the COM port.
pi@raspberrypi ~ $ dmesg | grep ttyThe output of the above command may look like, /dev/ttyUSB0.
For storing the values in Raspberry Pi, I have used SQLite 3 which is best suited for embedded devices. You can use SQLite Studio on RPi to easily run SQL statements.
Install the SQLite package:

---> sudo apt-get install sqlite3


Then you can install SQLite browser:

---> sudo apt-get install sqlitebrowser
Database and Table creation:
- Create a database with the name: sensor_new.db
- Create a table with the name: water_table
- Create a structure like below:

IFTTT (If This Then That):
I have used IFTTT as it is an easily configurable web service to trigger alerts, notification, and actuation. You have to create an account to use IFTTT service and get the API-key which will be added later in the code.
Follow the below steps to create one Applet:
- Go to log in to the IFTTT website and go to https://ifttt.com/maker_webhooks
- Click "Connect".
- Go to: https://ifttt.com/maker_webhooks, and click "Documentation".
- Your key will be displayed. Take a note of this key as it will be needed later.
- In the "My Applets" window, choose “New Applet “.
- Click "+ this".
- Search for “webhooks “, and click the “Webhooks”.
- Choose "Receive a web request", set up your Event Name, and click “Create trigger “.
- Click "that".
- Search for “Notifications “, and click "Connect".
- Choose "Send a notification from the IFTTT app", and set up the data to receive.
- Click "Create action".
- Install the IFTTT app on your Android or iOS device, and log in to see your applet.
For this POC I have chosen two ways to connect it to SAP Leonardo IoT, one with Code and another with No-Code.
Code Approach:
I have used Python to read the Arduino Nano readings to Raspberry Pi over USB. I use Serial Communication for reading the values over /dev/ttyUSB0, you can also use COM Port in PC/Laptop if not using RPi as a gateway.
We are collecting the bottle weight every 10 min interval 6 times in an hour. So, we need to iterate until the range of 6 to calculate the range between the array elements, which is the total water consumed in an hour.
import numpy as np

import sqlite3

import json

import requests

import ssl

import http.client

import serial

import ast


def job():

    # this port address is for the serial communication

    SERIAL_PORT = '/dev/ttyUSB0'  # 'COM7'

    # be sure to set the baudrate to the same used on the Arduino nano

    SERIAL_RATE = 9600


    ser = serial.Serial(SERIAL_PORT, SERIAL_RATE)

    # reading = ser.readline().decode('utf-8')

    # reading is a string...do whatever you want from here


    data = []

    certificate_file = 'certificate.pem'

    certificate_secret = 'inPjqfPN3RJt4KBcUE39SVj3RszyJziQ0rS3'

    host = '<your tenant id>.eu10.cp.iot.sap'


    # SAP IoT Cockpit Values

    device_alternate_id = '77'

    capability_alternate_id = '99'

    sensor_alternate_id = '66'


    # iterating till the range as we are collecting 6 values in every 1 hr for 10 min interval

    for i in range(6):

        reading = ser.readline().decode('utf-8')

        val = ast.literal_eval(reading)

        print(val)

        line = data.append(val)


    array1 = np.array(data)

    sensor = np.ptp(array1)

    if sensor == 0:

        r = requests.post(url="https://maker.ifttt.com/trigger/<event name>/with/key/<key from IFTTT webhook>")

        quit()


    else:

        print(sensor)


    conn = sqlite3.connect('/home/pi/Database/sensor_new.db')

    cur = conn.cursor()


    cur.execute("update water_table set new_value = ? where id = 1", (sensor,))


    cur.executescript("""

    update water_table set total = (select sum(new_value + old_value) from water_table) where id = 1;

    update water_table set old_value = (select total from water_table) where id = 1;

    """)


    select = cur.execute("select new_value, total from water_table;")


    for row in select:

        request_body_dict = {

            'capabilityAlternateId': capability_alternate_id,

            'sensorAlternateId': sensor_alternate_id,

            'measures': [{

                'consumed': row[0],

                'total': row[1]

            }]

        }


        print(json.dumps(request_body_dict))


        # Defining parts of the HTTP request

        request_url = '/iot/gateway/rest/measures/%s' % device_alternate_id

        request_headers = {

            'Content-Type': 'application/json'

        }


        # Declare client certificate settings for https connection

        context = ssl.SSLContext(ssl.PROTOCOL_SSLv23)

        context.load_cert_chain(certfile=certificate_file, password=certificate_secret)

        connection = http.client.HTTPSConnection(host, port=443, context=context)


        # HTTP POST request

        connection.request(method="POST", url=request_url,headers=request_headers, body=json.dumps(request_body_dict))


        # Print the HTTP response

        response = connection.getresponse()

        print(response.status, response.reason)

        if response.status == 202:

            print("Go on")


while True:

    job()
Below is the output from the RPi Terminal and the values obtained are in mL.
pi@raspberrypi ~ $ python smart_bottle.py

0.33

0.33

0.27

0.27

0.27

0.27

0.06

{"capabilityAlternateId": "99", "sensorAlternateId": "66", "measures": [{"consumed": 0.06, "total": 4.81}]}

202 Accepted

Go on
No Code Approach:
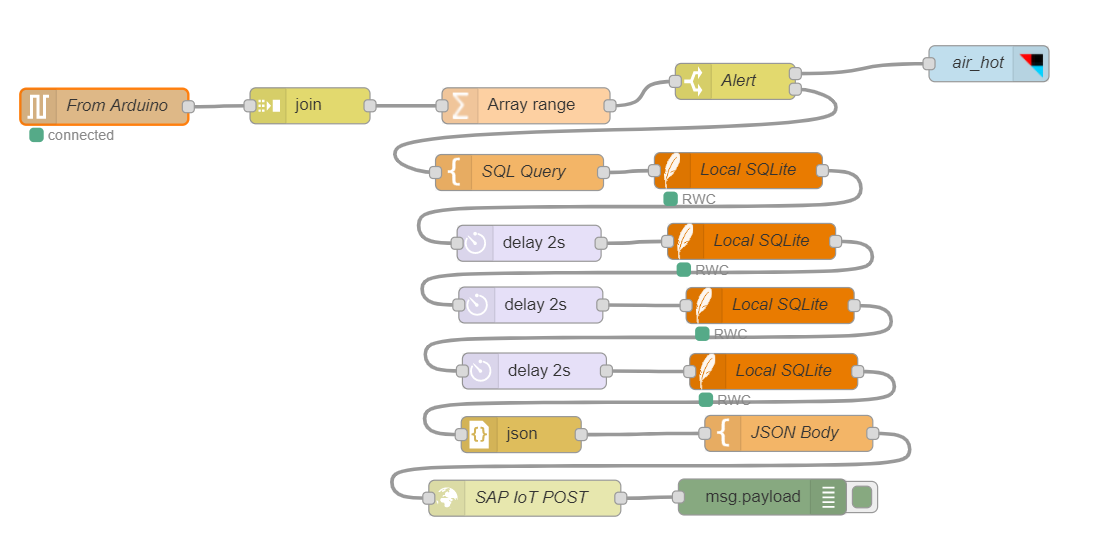
If you like Node-Red, you can use the below flow to connect the device to SAP Leonardo IoT.
Result
SAP IoT Cockpit:

IFTTT Alert:
The alert gets triggered when there is no change in current value for the last hour.

Conclusion
We can easily extend this complete DIY setup into other projects and can monitor other parameters. Using SAP Leonardo IoT we can further build custom rules and can trigger commands from the cloud. We generally tend to forget to drink water, but this POC can be a helpful one to monitor your daily total water intake while you are on the desk.
- SAP Managed Tags:
- SAP Internet of Things,
- Internet of Things,
- SAP Business Technology Platform
Labels:
2 Comments
You must be a registered user to add a comment. If you've already registered, sign in. Otherwise, register and sign in.
Labels in this area
-
ABAP CDS Views - CDC (Change Data Capture)
2 -
AI
1 -
Analyze Workload Data
1 -
BTP
1 -
Business and IT Integration
2 -
Business application stu
1 -
Business Technology Platform
1 -
Business Trends
1,658 -
Business Trends
107 -
CAP
1 -
cf
1 -
Cloud Foundry
1 -
Confluent
1 -
Customer COE Basics and Fundamentals
1 -
Customer COE Latest and Greatest
3 -
Customer Data Browser app
1 -
Data Analysis Tool
1 -
data migration
1 -
data transfer
1 -
Datasphere
2 -
Event Information
1,400 -
Event Information
72 -
Expert
1 -
Expert Insights
177 -
Expert Insights
343 -
General
1 -
Google cloud
1 -
Google Next'24
1 -
GraphQL
1 -
Kafka
1 -
Life at SAP
780 -
Life at SAP
14 -
Migrate your Data App
1 -
MTA
1 -
Network Performance Analysis
1 -
NodeJS
1 -
PDF
1 -
POC
1 -
Product Updates
4,575 -
Product Updates
386 -
Replication Flow
1 -
REST API
1 -
RisewithSAP
1 -
SAP BTP
1 -
SAP BTP Cloud Foundry
1 -
SAP Cloud ALM
1 -
SAP Cloud Application Programming Model
1 -
SAP Datasphere
2 -
SAP S4HANA Cloud
1 -
SAP S4HANA Migration Cockpit
1 -
Technology Updates
6,872 -
Technology Updates
474 -
Workload Fluctuations
1
Related Content
- AI/Automation and how It is leveraged in Intelligent SAP Centric Enterprise in Technology Blogs by Members
- Equipment as a service with SAP IoT - Part 1 in Technology Blogs by SAP
- Tip & Trick for Master Data Search with SAP Analytics Cloud in Technology Blogs by SAP
- Infusing RPA With Machine Learning: A Powerful Medley in Technology Blogs by SAP
Top kudoed authors
| User | Count |
|---|---|
| 17 | |
| 15 | |
| 13 | |
| 10 | |
| 9 | |
| 7 | |
| 7 | |
| 7 | |
| 7 | |
| 6 |