
- SAP Community
- Products and Technology
- Technology
- Technology Blogs by SAP
- Mass Deletion of Users in SAP GUI using SAP Intell...
Technology Blogs by SAP
Learn how to extend and personalize SAP applications. Follow the SAP technology blog for insights into SAP BTP, ABAP, SAP Analytics Cloud, SAP HANA, and more.
Turn on suggestions
Auto-suggest helps you quickly narrow down your search results by suggesting possible matches as you type.
Showing results for
abhishek_malik
Explorer
Options
- Subscribe to RSS Feed
- Mark as New
- Mark as Read
- Bookmark
- Subscribe
- Printer Friendly Page
- Report Inappropriate Content
02-05-2020
10:34 AM
Background
In our previous blog post Mass Creation of Users in SAP GUI, my colleague nikhil.prabhu had demonstrated how we leveraged the power and features of SAP Intelligent RPA to automate the task of creating many users on SAP systems. So, it’s only natural that we worked on another project to complement the previous one; Automating the mass deletion of users. Using the previous project as a start/reference point, we set out to modify our current workflow to read a list of users and systems from an Excel spreadsheet, and delete them from those systems.
Settings to be done before starting this project
- Go to Edit project and Enable Excel Integration in Libraries. If you want to use inbuilt Excel activities then it should be enabled.

- Scripting should be enabled in SAP GUI Options.

- Run transaction RZ11. Specify the parameter name sapgui/user_scripting and press Enter on the keyboard. In display Profile Parameter Details Current Value should be TRUE.

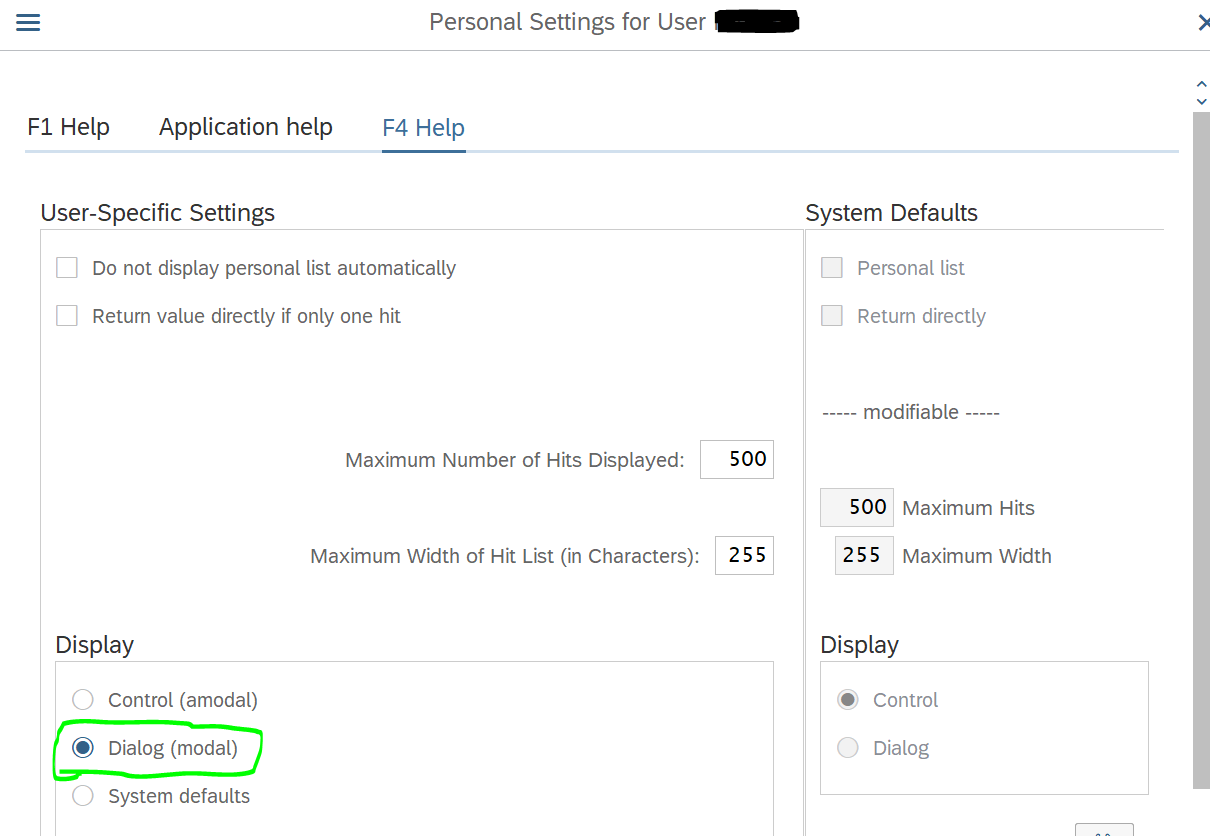
- Apart from this, Dialog (modal) display options also need to be enabled. Click Help>Settings>F4 Help and Select Dialog(modal).
Creation of Project and Addition of Application
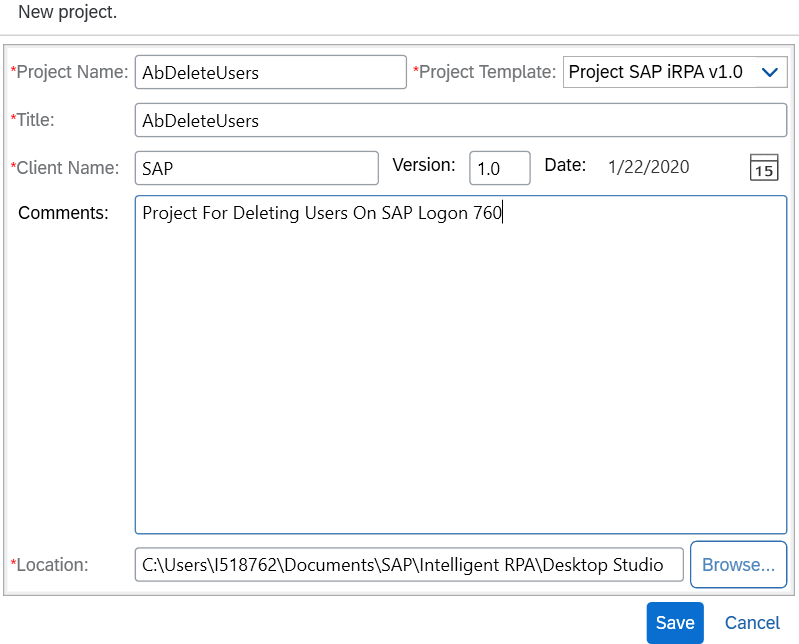
Click on File and New Project for creating a new project. Enter details and click on Save.
Click on Add Application to add application and select UI Automation in Technology.
Select SAP Logon 760 in Applications and click on Scan and Capture.

Capturing Pages
Right click on Application name and select Add New Page.
Click Ctrl button on the page which you want to capture, and it will appear in red rectangle.

Click on Scan and Capture on the page shown below.
In this way we captured all pages needed for the project.

Creation of Excel File

System names and the users that must deleted should be entered in the excel file.
The user must provide the start and end row numbers (i.e. from which row the deletion should start and at which row it should end) in the excel file. This is a new feature we have added in both our projects.
Workflow of our project

Explanation
1.

Excel and SAP logon will be started.
Start Row, End Row and System name will be taken from the Excel file.

2.

- System will be dynamically selected.
- User will be logged in.
- Transaction code will be entered.
3.

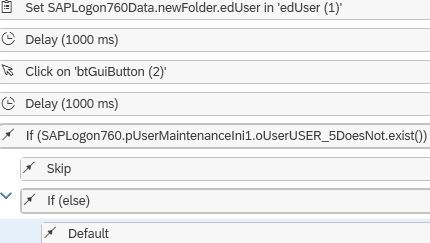
- User to be deleted will be taken from Excel.
- User name will be entered, and View user icon will be clicked.
- If user does not exist, “User does not exist” displays at the bottom of the page. When this happens, “Skip” branch of the switch block will be executed. If User is displayed then “Default“ branch of the switch block will be executed.
- Row number will be incremented in Excel.

- Exit Loop condition will be checked.
If either all users are deleted or the starting row number is equal to the last row, then control will be passed out of the loop.
4.

- User will be deleted.
5.

Skip Branch: -
- Row number will be incremented.
- Exit loop condition will be checked and control will be passed to “Loops to the Start Block”
6.

- If Exit loop condition is false, then control will pass to “Start Loop”. If it is true, then SAP Logon and Excel will be closed.

Deploying the bot on SAP Intelligent Robotic Process Automation Factory
- Details on exporting packages and deployment can be found in the following link: OpenSAP/iRPA/Course2/Week2/Unit5
- Once you've logged into the iRPA Cloud Factory, you will arrive at the Dashboard.

- Before proceeding with importing and deploying the bot, hierarchies should be defined. Click on the Management > Hierarchies tab to create them.

- Next, you should click on the Packages tab, and import the package that you exported from the Desktop Studio.

- After the package is imported, you should click on the Deployments tab to deploy the bot. After deployment, you can schedule when you want the bot to run.


Final Result
- All the users will be deleted.

Conclusion
Working on Intelligent Robotic Process Automation was very interesting. It helped us broaden our knowledge about SAP related technologies and Robotic Process Automation in general.
Through these projects we helped reduce the repetitive and tedious work of our team-mates. Now our team-mates can better utilize their time in working on other tasks. We hope to work on helping them in more tasks like this in the future.
Labels:
1 Comment
You must be a registered user to add a comment. If you've already registered, sign in. Otherwise, register and sign in.
Labels in this area
-
ABAP CDS Views - CDC (Change Data Capture)
2 -
AI
1 -
Analyze Workload Data
1 -
BTP
1 -
Business and IT Integration
2 -
Business application stu
1 -
Business Technology Platform
1 -
Business Trends
1,661 -
Business Trends
87 -
CAP
1 -
cf
1 -
Cloud Foundry
1 -
Confluent
1 -
Customer COE Basics and Fundamentals
1 -
Customer COE Latest and Greatest
3 -
Customer Data Browser app
1 -
Data Analysis Tool
1 -
data migration
1 -
data transfer
1 -
Datasphere
2 -
Event Information
1,400 -
Event Information
64 -
Expert
1 -
Expert Insights
178 -
Expert Insights
274 -
General
1 -
Google cloud
1 -
Google Next'24
1 -
Kafka
1 -
Life at SAP
784 -
Life at SAP
11 -
Migrate your Data App
1 -
MTA
1 -
Network Performance Analysis
1 -
NodeJS
1 -
PDF
1 -
POC
1 -
Product Updates
4,577 -
Product Updates
327 -
Replication Flow
1 -
RisewithSAP
1 -
SAP BTP
1 -
SAP BTP Cloud Foundry
1 -
SAP Cloud ALM
1 -
SAP Cloud Application Programming Model
1 -
SAP Datasphere
2 -
SAP S4HANA Cloud
1 -
SAP S4HANA Migration Cockpit
1 -
Technology Updates
6,886 -
Technology Updates
405 -
Workload Fluctuations
1
Related Content
- SAP HANA Cloud Vector Engine: Quick FAQ Reference in Technology Blogs by SAP
- Error while deleting object in eclipse - object does not exist (BTP) in Technology Q&A
- 10+ ways to reshape your SAP landscape with SAP Business Technology Platform - Blog 7 in Technology Blogs by SAP
- 10+ ways to reshape your SAP landscape with SAP Business Technology Platform – Blog 4 in Technology Blogs by SAP
- Delete distinct records from an internal table. in Technology Q&A
Top kudoed authors
| User | Count |
|---|---|
| 13 | |
| 10 | |
| 10 | |
| 7 | |
| 7 | |
| 6 | |
| 5 | |
| 5 | |
| 5 | |
| 4 |