
- SAP Community
- Products and Technology
- Technology
- Technology Blogs by SAP
- Automatically provision S-Users to SAP Cloud Platf...
Technology Blogs by SAP
Learn how to extend and personalize SAP applications. Follow the SAP technology blog for insights into SAP BTP, ABAP, SAP Analytics Cloud, SAP HANA, and more.
Turn on suggestions
Auto-suggest helps you quickly narrow down your search results by suggesting possible matches as you type.
Showing results for
TobiasPahlings
Participant
Options
- Subscribe to RSS Feed
- Mark as New
- Mark as Read
- Bookmark
- Subscribe
- Printer Friendly Page
- Report Inappropriate Content
02-04-2020
11:39 AM
This blog post will explain how you can leverage the Identity Provisioning Service (IPS) to mostly automate the life cycle of an S-User Member in the SAP Cloud Platform Neo Environment.
You may ask: Why should provision S-Users to my SCP if i could also user my own company managed Identity Authentication Service (IAS) Users.
The answer to this is simple. Some tasks may require you to still have an S-User in the System to gain access and some customers prefer to use these users for certain scenarios.
IF you decide to use these S-User you ideally want to cover the full life cycle of this user. Traditionally these user would have been created by an administrator, later the person switches the department or leaves the company but the user would still be able to work on the platform as an administrator. To circumvent this situation i will leverage the Identity Provisioning Service as provisioning Engine as well as the Identity Authentication Service as additional User store for user related information.
The procedure i am aiming to is shown in the picture below.
First a standard provisioning job is triggered by the customer IDP (or the IPS) to create a new Member in an SCP aub account. In this example we would assume that the user should only get an S-User in the system but is not required to have an company managed ID as well. IF this would be an requirement, there is nothing preventing this flow to be extended to also create the company managed user.
This first step is nothing special, except for the target. Although the user requested access to the SCP sub Account, the user will only be created in the IAS instead. Additionally the user gets a role assigned that indicates the requested permission and subAccount.
From there on we cannot continue as we do not have the required Information in the system.
Now an administrator needs to step in and manually edit the S-User information into the IAS user information. This is necessary to link the 2 Identities together.
Once this step is finished an automated job can start that can create the user in the correct target subAccount.
Although there is one manual step involved, this procedure has a clear benefit over the traditional fully manual process. Once a user leaves the company or all subAccount permissions get removed, the IPS can automatically take care of the removal of the user in the respective target systems and access is automatically revoked, triggered by the central identity management system.
Additionally the manual step is only necessary once. Once the user is associated to the s-User in the IAS, all further role assignments will automatically use this user information stored in the IAS.
Of course the much cleaner version of this setup would be to have the S-User information stored inside the customer IDP but reality shows that many customers are not willing / capable to do so.
Implementation steps:
I will not go into detail of the first two steps of the setup for now as these steps do not require any special configuration that is not covered by the documentation.
(Maybe I will add on this later)

To create users in the target system in IPS, first we need to collect all necessary properties.
Most important are the oAuth client credentials later used by the IPS to connect to the target subAccount.
These credentials can be obtained in the "OAuth" section of the "Security" in the SAP Cloud Platform Cockpit of the target subAccount.

There you need to click on "Create API Client" and select the "Account Member Management" scope.
For later recognition of this client credentials, it is also recommended to write a short description of the use case into the "Description" flied.
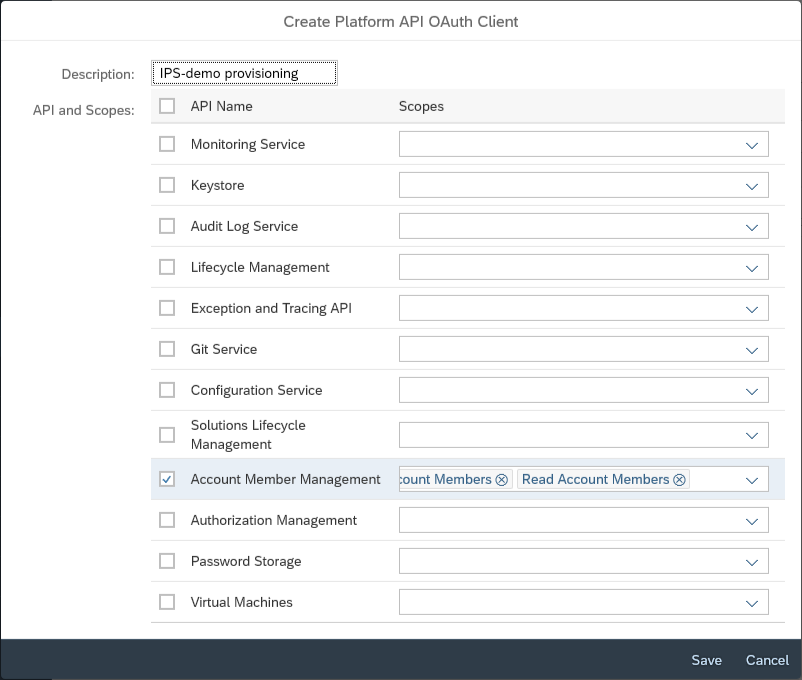
After you press save, the system will show you the "Client ID" and "Client Secret". You should save this information, as we will need it later in the IPS configuration. "Client ID" will be used as "User" and "Client Secret" will be used as "Password".

Additionally to the Client Credentials we need some basic information on the subAccount that we want to connect. This information can be found in the overview page in the "SAP Cloud Platform Cockpit".

The highlighted areas show the "SAP CP Host" in the URL bar and the "Technical Name" in the "subAccount Information" area. The SAP CP Host we will need later while constructing the URL and the oAuth2TokenServiceURL and the Technical name we will need as the" SAP CP account ID" in the URL parameter.
With that information collected, we have everything we need to create the IPS configuration.
To create a new configuration in IPS click "Add" in the "Target Systems" Area of the "Identity Provisioning Service Administration" page.
Then select the Type " SAP Cloud Platform Account Members" and specify a "System Name".
It is also recommended to select a meaningful description for later recognition.
Last you need to select the IAS System you connected as a prerequisite.

Next you need to fill the properties tab with the information below:
This information can also be found on the sapHelp page.
Last thing to check is the transformation, where we need to make sure, that the right userName is used when the user is created.
In my example, i want to use the customAttribute1 that is available in an IAS user record, therefor the IPS Transformation for the userName looks like this:
Additionally, i only want to provision users that actually have an entry in the customAttribute1, therefore i also need to create a condition on the top level, looking for an entry in customAttribute 1:
With this finished, the configuration should run without an error.
For a full test of the scenario, we only need to go into the IAS and set the customAttribute1 of one user to be its S-User. This can be done in the "User Management" Section in the "User Details" under "Custom Attributes".

Last we need to execute (or better schedule) the job in IPS and check whether the user was created:
The job can be sheduled in the IPS section "Source Systems" under the entry for your IAS selected earlier. There click on Jobs and execute a "Read Job" by clicking "Run Now":

After the job has finished, the most recent job log should look something like this:

Most of the entries have been scipped, as only one User has a "customAttribute1" in his user profile.
Additionally, you should now see the user created in the Member section of the SAP Cloud Platform.
With that, you are now able to automatically provision S-Users into the SCP and be able to automatically delete an s-user once he no longer exits in IAS.
Motivation
You may ask: Why should provision S-Users to my SCP if i could also user my own company managed Identity Authentication Service (IAS) Users.
The answer to this is simple. Some tasks may require you to still have an S-User in the System to gain access and some customers prefer to use these users for certain scenarios.
IF you decide to use these S-User you ideally want to cover the full life cycle of this user. Traditionally these user would have been created by an administrator, later the person switches the department or leaves the company but the user would still be able to work on the platform as an administrator. To circumvent this situation i will leverage the Identity Provisioning Service as provisioning Engine as well as the Identity Authentication Service as additional User store for user related information.
Architecture
The procedure i am aiming to is shown in the picture below.
First a standard provisioning job is triggered by the customer IDP (or the IPS) to create a new Member in an SCP aub account. In this example we would assume that the user should only get an S-User in the system but is not required to have an company managed ID as well. IF this would be an requirement, there is nothing preventing this flow to be extended to also create the company managed user.
This first step is nothing special, except for the target. Although the user requested access to the SCP sub Account, the user will only be created in the IAS instead. Additionally the user gets a role assigned that indicates the requested permission and subAccount.
From there on we cannot continue as we do not have the required Information in the system.
Now an administrator needs to step in and manually edit the S-User information into the IAS user information. This is necessary to link the 2 Identities together.
Once this step is finished an automated job can start that can create the user in the correct target subAccount.
Although there is one manual step involved, this procedure has a clear benefit over the traditional fully manual process. Once a user leaves the company or all subAccount permissions get removed, the IPS can automatically take care of the removal of the user in the respective target systems and access is automatically revoked, triggered by the central identity management system.
Additionally the manual step is only necessary once. Once the user is associated to the s-User in the IAS, all further role assignments will automatically use this user information stored in the IAS.
Of course the much cleaner version of this setup would be to have the S-User information stored inside the customer IDP but reality shows that many customers are not willing / capable to do so.
Implementation steps:
- Setup connection between Customer Identity Management System and Identity Provisioning
- Setup Identity Authentication for automatic provisioning of user changes
- Setup Identity Provisioning to provision users from IAS to Target subAccount
I will not go into detail of the first two steps of the setup for now as these steps do not require any special configuration that is not covered by the documentation.
(Maybe I will add on this later)
Create target system in IPS
To create users in the target system in IPS, first we need to collect all necessary properties.
Most important are the oAuth client credentials later used by the IPS to connect to the target subAccount.
These credentials can be obtained in the "OAuth" section of the "Security" in the SAP Cloud Platform Cockpit of the target subAccount.
There you need to click on "Create API Client" and select the "Account Member Management" scope.
For later recognition of this client credentials, it is also recommended to write a short description of the use case into the "Description" flied.
After you press save, the system will show you the "Client ID" and "Client Secret". You should save this information, as we will need it later in the IPS configuration. "Client ID" will be used as "User" and "Client Secret" will be used as "Password".
Additionally to the Client Credentials we need some basic information on the subAccount that we want to connect. This information can be found in the overview page in the "SAP Cloud Platform Cockpit".
The highlighted areas show the "SAP CP Host" in the URL bar and the "Technical Name" in the "subAccount Information" area. The SAP CP Host we will need later while constructing the URL and the oAuth2TokenServiceURL and the Technical name we will need as the" SAP CP account ID" in the URL parameter.
With that information collected, we have everything we need to create the IPS configuration.
To create a new configuration in IPS click "Add" in the "Target Systems" Area of the "Identity Provisioning Service Administration" page.
Then select the Type " SAP Cloud Platform Account Members" and specify a "System Name".
It is also recommended to select a meaningful description for later recognition.
Last you need to select the IAS System you connected as a prerequisite.
Next you need to fill the properties tab with the information below:
Property Name | Description & Value |
|---|---|
| Type | HTTP |
| URL | https://api.<SAP_CP_host>/authorization/v1/platform/accounts/<SAP_CP_account_ID> |
| ProxyType | Internet |
| Authentication | BasicAuthentication |
| User | <client id> |
| Password | <client secret> |
| OAuth2TokenServiceURL | https://api.<SAP_CP_host>/oauth2/apitoken/v1 |
| scp.user.userbase | account.sap.com |
This information can also be found on the sapHelp page.
Last thing to check is the transformation, where we need to make sure, that the right userName is used when the user is created.
In my example, i want to use the customAttribute1 that is available in an IAS user record, therefor the IPS Transformation for the userName looks like this:
{

	"sourcePath": "$['urn:sap:cloud:scim:schemas:extension:custom:2.0:User'].attributes[0].value",

	"targetPath": "$.userName"

}
Additionally, i only want to provision users that actually have an entry in the customAttribute1, therefore i also need to create a condition on the top level, looking for an entry in customAttribute 1:
{

	"user": {

		"condition": "$['urn:sap:cloud:scim:schemas:extension:custom:2.0:User'].attributes[?(@.name == 'customAttribute1')]  EMPTY false",

		"mappings": [

			{...
With this finished, the configuration should run without an error.
Add the S-User Information to a User record
For a full test of the scenario, we only need to go into the IAS and set the customAttribute1 of one user to be its S-User. This can be done in the "User Management" Section in the "User Details" under "Custom Attributes".
Wrap-up
Last we need to execute (or better schedule) the job in IPS and check whether the user was created:
The job can be sheduled in the IPS section "Source Systems" under the entry for your IAS selected earlier. There click on Jobs and execute a "Read Job" by clicking "Run Now":
After the job has finished, the most recent job log should look something like this:
Most of the entries have been scipped, as only one User has a "customAttribute1" in his user profile.
Additionally, you should now see the user created in the Member section of the SAP Cloud Platform.
With that, you are now able to automatically provision S-Users into the SCP and be able to automatically delete an s-user once he no longer exits in IAS.
- SAP Managed Tags:
- SAP Cloud Identity Services,
- Identity Provisioning,
- SAP Business Technology Platform
Labels:
6 Comments
You must be a registered user to add a comment. If you've already registered, sign in. Otherwise, register and sign in.
Labels in this area
-
ABAP CDS Views - CDC (Change Data Capture)
2 -
AI
1 -
Analyze Workload Data
1 -
BTP
1 -
Business and IT Integration
2 -
Business application stu
1 -
Business Technology Platform
1 -
Business Trends
1,658 -
Business Trends
92 -
CAP
1 -
cf
1 -
Cloud Foundry
1 -
Confluent
1 -
Customer COE Basics and Fundamentals
1 -
Customer COE Latest and Greatest
3 -
Customer Data Browser app
1 -
Data Analysis Tool
1 -
data migration
1 -
data transfer
1 -
Datasphere
2 -
Event Information
1,400 -
Event Information
66 -
Expert
1 -
Expert Insights
177 -
Expert Insights
298 -
General
1 -
Google cloud
1 -
Google Next'24
1 -
Kafka
1 -
Life at SAP
780 -
Life at SAP
13 -
Migrate your Data App
1 -
MTA
1 -
Network Performance Analysis
1 -
NodeJS
1 -
PDF
1 -
POC
1 -
Product Updates
4,577 -
Product Updates
344 -
Replication Flow
1 -
RisewithSAP
1 -
SAP BTP
1 -
SAP BTP Cloud Foundry
1 -
SAP Cloud ALM
1 -
SAP Cloud Application Programming Model
1 -
SAP Datasphere
2 -
SAP S4HANA Cloud
1 -
SAP S4HANA Migration Cockpit
1 -
Technology Updates
6,873 -
Technology Updates
421 -
Workload Fluctuations
1
Related Content
- Consuming SAP with SAP Build Apps - Mobile Apps for iOS and Android in Technology Blogs by SAP
- How to use AI services to translate Picklists in SAP SuccessFactors - An example in Technology Blogs by SAP
- Configure Custom SAP IAS tenant with SAP BTP Kyma runtime environment in Technology Blogs by SAP
- ABAP Cloud Developer Trial 2022 Available Now in Technology Blogs by SAP
- 10+ ways to reshape your SAP landscape with SAP Business Technology Platform – Blog 4 in Technology Blogs by SAP
Top kudoed authors
| User | Count |
|---|---|
| 38 | |
| 25 | |
| 17 | |
| 13 | |
| 7 | |
| 7 | |
| 7 | |
| 7 | |
| 6 | |
| 6 |