
- SAP Community
- Products and Technology
- Technology
- Technology Blogs by SAP
- SAP Leonardo Machine Learning Foundation-Bring You...
Technology Blogs by SAP
Learn how to extend and personalize SAP applications. Follow the SAP technology blog for insights into SAP BTP, ABAP, SAP Analytics Cloud, SAP HANA, and more.
Turn on suggestions
Auto-suggest helps you quickly narrow down your search results by suggesting possible matches as you type.
Showing results for
roshangupta
Explorer
Options
- Subscribe to RSS Feed
- Mark as New
- Mark as Read
- Bookmark
- Subscribe
- Printer Friendly Page
- Report Inappropriate Content
01-29-2020
11:51 PM
Introduction
In this series of blog post i will talk about creating your own machine learning model using tensor-flow from scratch, saving the model using saved_model format which is standard way in tensorflow to save your model for inference if you are building it for production environment and deploy it on cloud foundry using Ml Foundation Service. At the end of blog post i will share git hub link of entire code i have used in this blog post. Lets get started.
1.1 Prerequisites
I will start from the basic, but still there are some prerequisites needs to be fulfilled to understand the entire flow of the blog post. you should be familiar with python(basic level), tensorlfow, keras different API to construct neural network model , minimum experience with machine learning algorithms and familiar with SAP cloud platform.
1.2 Dependencies
import tensorflow as tf

from tensorflow.keras.layers import Dense, Dropout, Flatten, Conv2D, MaxPool2D, MaxPooling2D

from tensorflow.keras.preprocessing.image import ImageDataGenerator

from tensorflow.keras.optimizers import SGD, RMSprop

from tensorflow.keras.callbacks import ReduceLROnPlateau, LearningRateScheduler

from tensorflow.keras.datasets import fashion_mnist

import matplotlib.pyplot as plt

import os
Download and import all these dependencies for creating a machine learning model and visualizing the images.
- Tensorflow 2.0 beta1
- Matplotlib
Model Overview
1.1 Architecture
print(tf.__version__)

print(tf.executing_eagerly())


class MyModel(tf.keras.Model):


    def __init__(self):

        super(MyModel,self).__init__()

        self.Conv2D_1 = tf.keras.layers.Conv2D(filters = 16, kernel_size = (3, 3),

                         kernel_initializer='he_uniform', activation='relu', input_shape = (28, 28, 1))

        self.Conv2D_2 = tf.keras.layers.Conv2D(filters = 16, kernel_size = (3, 3), activation='relu')

        self.MaxPooling2D_1 = tf.keras.layers.MaxPooling2D(strides=(2,2))

        self.Conv2D_3 = tf.keras.layers.Conv2D(filters = 32, kernel_size = (3, 3), activation='relu')

        self.Conv2D_4 = tf.keras.layers.Conv2D(filters = 32, kernel_size = (3, 3), activation='relu')

        self.MaxPooling2D_2 = tf.keras.layers.MaxPooling2D(strides=(2,2))

        self.Flatten = tf.keras.layers.Flatten()

        self.Dense_1  = tf.keras.layers.Dense(512, activation='relu', kernel_initializer='he_uniform')

        self.Dropout_1 = tf.keras.layers.Dropout(0.025)

        self.Dense_2  = tf.keras.layers.Dense(1024, activation='relu', kernel_initializer='he_uniform')

        self.Dropout_2 = tf.keras.layers.Dropout(0.025)

        self.Dense_3  = tf.keras.layers.Dense(10, activation='softmax')


    def call(self, inputs):

        x = self.Conv2D_1(inputs)

        x = self.Conv2D_2(x)

        x = self.MaxPooling2D_1(x)

        x = self.Conv2D_3(x)

        x = self.Conv2D_4(x)

        x = self.MaxPooling2D_2(x)

        x = self.Flatten(x)

        x = self.Dense_1(x)

        x = self.Dropout_1(x)

        x = self.Dense_2(x)

        x = self.Dropout_2(x)

        x = self.Dense_3(x)

        return x
There are different ways to construct neural network model using tf.keras (Tensorflow's high level API) like using Sequential Model, When you want create complex model in that case you can use Functional API, for this i have used different approach sub classing 'tf.keras.model' to define own custom model. This is also helpful when you want define your own signature for tensorflow graph( I am using default signature you will see later part). Lets go through the model and understand the flow
Convolution Layer : In this layers where you define the number of filters and filter size which will be applied on images ( like edge detection, sharpness detection etc.) to extract important features from images. This helps in reducing the dimension of images and extracting only important features for feeding in network. The convolved features are stacked into matrix and feed forward into a next layer.
Max Pooling : Max Pooling is a down-sampling strategy in Convolution Neural Networks , it calculates the maximum value for each patch of the feature map. This layer reduces dimension of images.
Flatten : The stacked matrix from images are flatten into single vector and passed into dense layer.
Dense : Every input is connected to every output, It is way to design your network.
Dropout : This is one of regularization technique to overcome over-fitting, A dropout layer does not have any trainable parameters i.e. nothing gets updated during backward pass of back-propagation. Here randomly some of the activation of neurons are set to zero to prevent from over-fitting.
ReLu : It is activation function which activates a neuron in network and introduces linearity in model. If the number is positive returns the same number if it is negative it will return zero.
Softmax : I have used softmax activation function in output layer which will give the probabilities of each class , total probability of all class will be equal to one , this is suitable when you are dealing with multi-class classification, for binary classification its better to use sigmoid activation.
1.2 Know Your Dataset
def load_dataset():

    # load fashoion mnist dataset

    (x_train, y_train), (x_test, y_test) = fashion_mnist.load_data()

    # print their shape

    print("x_train shape : {}, y_train shape : {}".format(

        x_train.shape, y_train.shape))

    print("x_test shape : {}, y_test shape : {}".format(

        x_test.shape, y_test.shape))


    # Normalize the data in range [0,1]

    x_train = x_train / 255

    x_test = x_test / 255


    x_train = x_train.astype("float32")

    x_test = x_test.astype("float32")


    # Reshape image in 3 dimensions (height = 28px, width = 28px , channel = 1)

    x_train = tf.reshape(x_train, [-1, 28, 28, 1])

    x_test = tf.reshape(x_test, [-1, 28, 28, 1])


    # one hot encoding

    y_train = tf.one_hot(y_train, 10)

    y_test = tf.one_hot(y_test, 10)


    return (x_train, x_test, y_train, y_test)
Download Fashion Mnist Dataset , which will be used for training the model, the dataset consist of 10 classes and there are 60000 images for training , 10000 for testing . Normalize the image(scaling between [0-1] ) so training will be easier , reshape and one hot encode the target variable . The label of images are as following. For more information about the dataset navigate this link.
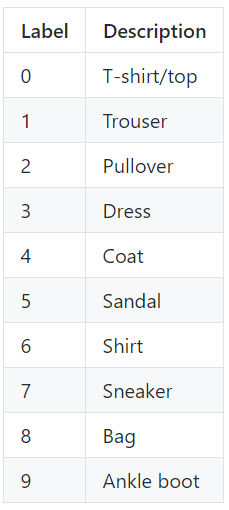
Figure 1.1 : Label of images
1.3 Plot Images
def plot_digits():

    # plot some of digits

    (x_train, x_test, y_train, y_test) = load_dataset()

    fig = plt.figure(figsize=(22, 14))

    ax1 = fig.add_subplot(331)

    plt.imshow(x_train[0][:, :, 0], cmap=plt.get_cmap('gray'))

    ax2 = fig.add_subplot(332)

    plt.imshow(x_train[2][:, :, 0], cmap=plt.get_cmap('gray'))

    ax3 = fig.add_subplot(333)

    plt.imshow(x_train[3][:, :, 0], cmap=plt.get_cmap('gray'))

    fig.show()
This is utility function where you can plot images from dataset using matplotlib and compare with label.
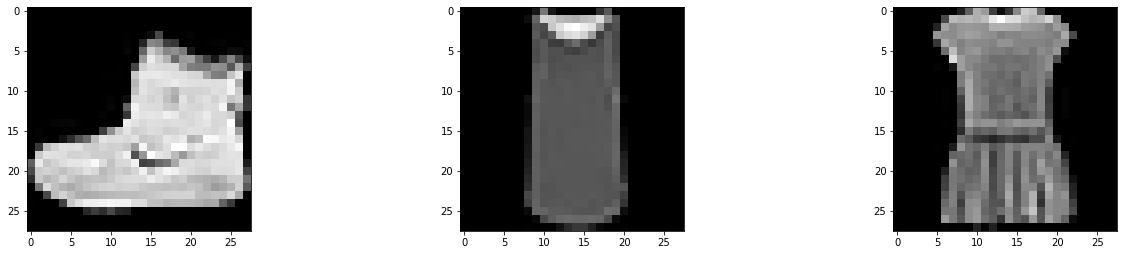
Fig 1.1 : Plotting images in jupyter notebook
1.4 Data Augmentation
def data_generator():

    # Apply data augmentation technique on images to introduce diversity in images

    params = {'featurewise_center': False,

              'samplewise_center': False,

              'featurewise_std_normalization': False,

              'samplewise_std_normalization': False,

              'zca_whitening': False,

              'zca_epsilon': 1e-06,

              'rotation_range': 10,

              'width_shift_range': 0.0,

              'height_shift_range': 0.0,

              'shear_range': 0.1,

              'zoom_range': [1.0, 1.0],

              'channel_shift_range': 0.0,

              'fill_mode': 'nearest',

              'cval': 0.0,

              'horizontal_flip': True,

              'vertical_flip': True

              }

    return ImageDataGenerator(**params)
Lets define a parameters for data augmentation, if you have less dataset its a best technique to go for data augmentation, It is strategy which enables you to introduce diversity in dataset by applying different set of techniques like cropping , flipping, padding, scaling images etc. The more diversity in images model will learn better. Tensorflow provides API for augmenting the images.
1.5 Train and Save Your Model
def train_model():

    # Create instance of model

    model = MyModel()

    SGD_OPTIMIZER = SGD(learning_rate=0.01, momentum=0.001, nesterov=False)

    model.compile(loss='categorical_crossentropy',

                  optimizer=SGD_OPTIMIZER, metrics=["accuracy"])


    schedule_lr = LearningRateScheduler(lambda x: 1e-3 * 0.9 ** x)

    reduce_lr = ReduceLROnPlateau(

        monitor='val_loss', factor=0.2, patience=5, min_lr=0.001)


    (x_train, x_test, y_train, y_test) = load_dataset()


    # Call data generator

    datagen = data_generator()

    history = model.fit_generator(datagen.flow(x_train, y_train, batch_size=60),

                                  epochs=10,

                                  verbose=2,

                                  steps_per_epoch=500,

                                  validation_data=(x_test, y_test),

                                  callbacks=[schedule_lr, reduce_lr])


    if not os.path.exists("fashionClassifier"):

        os.makedirs("fashionClassifier")

        tf.saved_model.save(model, "fashionClassifier")

    else:

        tf.saved_model.save(model, "fashionClassifier")
Now since model definition is done, we will specify different parameters for training the model. I have used Stochastic gradient descent as an optimizer, I have specified total 10 epoch which is not suited better for training 60000 images since it takes lot of time in computing. If you want better accuracy you should go for 50 epochs and steps for epoch around 700.
Once model is completely trained save the model in saved_model format it should have .pb file in it which will be use for deploying on cloud foundry. Cloud Foundry does not support if you are deploying in other format.

Figure 1.3 : Saved Model file structure.
1.6 Check Signature
def sign():

    if not os.path.exists("fashionClassifier"):

        print("model does not exist")

    else:

        model = tf.saved_model.load("fashionClassifier")

        print("Printing available graph signatures")

        print(list(model.signatures.keys()))

        infer = model.signatures["serving_default"]

        print("print input structure")

        print(infer.structured_input_signature)

        print("print output structure")

        print(infer.structured_outputs)


if __name__ == "__main__":

    train_model()

    sign()
After saving the model in correct format, load the model and check signatures which will be used for inference through gRPC. If you don't specify signature it will automatically create a default signature for you, for this model i have only one signature that is default signature.
Signature name : ['serving_default']
Input structure : ((), {'input_1': TensorSpec(shape=(None, 28, 28, 1), dtype=tf.float32, name='input_1')})
output structure : {'output_1': TensorSpec(shape=(None, 10), dtype=tf.float32, name='output_1')}
Additional Resources
In my second part of blog i will talk about how to deploy this model on Cloud Foundry using ML Foundation Service and use this model for inference.
Second part
https://blogs.sap.com/2020/01/30/sap-leonardo-machine-learning-foundation-bring-your-own-modelpart-2...
This is git hub link of code i have used in these blogs
https://github.com/GuptaRoshan/fashionClassifier
- SAP Managed Tags:
- Machine Learning,
- SAP Business Technology Platform
Labels:
2 Comments
You must be a registered user to add a comment. If you've already registered, sign in. Otherwise, register and sign in.
Labels in this area
-
ABAP CDS Views - CDC (Change Data Capture)
2 -
AI
1 -
Analyze Workload Data
1 -
BTP
1 -
Business and IT Integration
2 -
Business application stu
1 -
Business Technology Platform
1 -
Business Trends
1,658 -
Business Trends
92 -
CAP
1 -
cf
1 -
Cloud Foundry
1 -
Confluent
1 -
Customer COE Basics and Fundamentals
1 -
Customer COE Latest and Greatest
3 -
Customer Data Browser app
1 -
Data Analysis Tool
1 -
data migration
1 -
data transfer
1 -
Datasphere
2 -
Event Information
1,400 -
Event Information
66 -
Expert
1 -
Expert Insights
177 -
Expert Insights
298 -
General
1 -
Google cloud
1 -
Google Next'24
1 -
Kafka
1 -
Life at SAP
780 -
Life at SAP
13 -
Migrate your Data App
1 -
MTA
1 -
Network Performance Analysis
1 -
NodeJS
1 -
PDF
1 -
POC
1 -
Product Updates
4,577 -
Product Updates
344 -
Replication Flow
1 -
RisewithSAP
1 -
SAP BTP
1 -
SAP BTP Cloud Foundry
1 -
SAP Cloud ALM
1 -
SAP Cloud Application Programming Model
1 -
SAP Datasphere
2 -
SAP S4HANA Cloud
1 -
SAP S4HANA Migration Cockpit
1 -
Technology Updates
6,873 -
Technology Updates
421 -
Workload Fluctuations
1
Related Content
- Onboarding Users in SAP Quality Issue Resolution in Technology Blogs by SAP
- Embracing TypeScript in SAPUI5 Development in Technology Blogs by Members
- Exploring SAP support portals & processes in Technology Q&A
- ABAP Cloud Developer Trial 2022 Available Now in Technology Blogs by SAP
- Re Generate Co files and data files in Technology Q&A
Top kudoed authors
| User | Count |
|---|---|
| 38 | |
| 25 | |
| 17 | |
| 13 | |
| 7 | |
| 7 | |
| 7 | |
| 7 | |
| 6 | |
| 6 |