This blog, the second in the S/4HANA Cloud in-app extensibility series, intends to demonstrate in-app extensibility in S/4 HANA cloud, with focus on how a custom field can be added on a form. In the previous blog, we saw how a custom field could be created and subsequently added to the fiori UI screen. In this blog, we will explore how the same field can be added on a form output as well. It is of course also possible to create a separate custom field for the form purpose, but for the sake of simplicity and continuity, we will explore the use of the custom field created in the previous blog for adding to a form.
Problem
The customer needs to add a custom field on the “Purchase Order” form, as they need to see this information to be printed on the form.
Solution
A custom field needs to be created in the system and subsequently added to the purchase order form.
Please note that in this blog, we will focus on the custom field which is already created and use it to add it on the form. To refer to how a custom field is created, please refer to the previous blog in this series (link below)
https://blogs.sap.com?p=504
Pre-Requisites
To be able to carry out in-app extensions, you must have one of the following roles assigned to your user in the S/4 HANA Cloud system:
· SAP_BR_ADMINISTRATOR
· SAP_BR_BPC_EXPERT
· SAP_BR_ANALYTICS_SPECIALIST
Steps
1) Navigate to the “Custom fields and logic” app.

2) Search for the field that was created previously (special request to supplier). Click on the field name to move into the edit mode.

3) On the subsequent screen, move to the “Form templates” tab. The system will display the form templates where this field can be added. It may be recalled that since the field was added into the business context “Procurement: Purchasing document”, only the form templates within this business context are displayed here.

4) Click on “Enable Usage” button against the “Form template Purchase Order”, since we want to add this field on the purchase order form. The field usage status will change to “Enabled”.
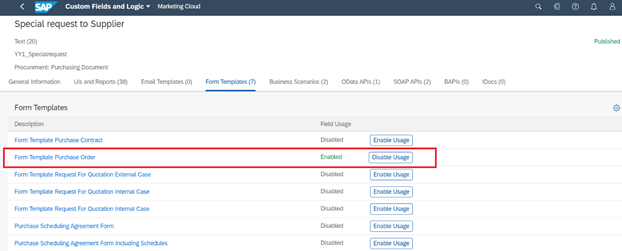
5) Click on “Save” to save the changes.

6) Don’t forget to click on “Publish” to ensure the changes are registered.

7) The field status will change to “Published”. This may take a few minutes though.

😎 At this stage, the field is now enabled to be used on the Purchase order form. The next step is to add this field on the form. To do this, we need to first navigate to the app “Maintain form templates”.

9) Search for the purchase order form under the “Predelivered Templates”.

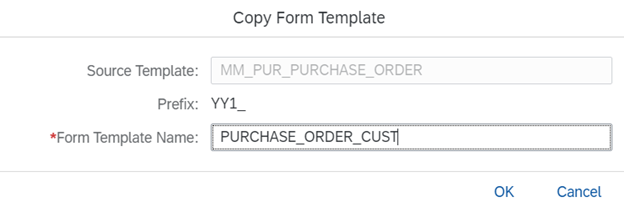
10) Click on the form “MM_PUR_PURCHASE_ORDER”

11) To make changes to a standard form, it needs to be first copied into a custom template and then changes are made to it. To do so, click on the “Copy” button after selecting the form.

12) Provide a name to the custom form template on the subsequent popup window
13) The custom form template will now be available in the “Custom templates” tab
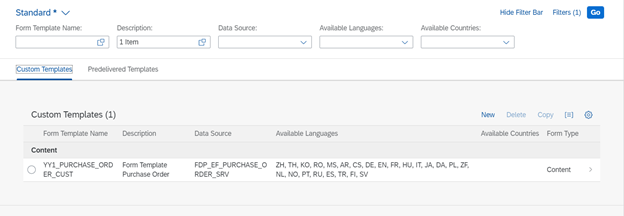
14) Select the custom template and click to open it

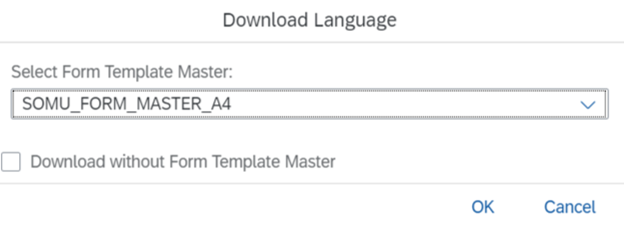
15) To make changes to a form, its template first needs to be downloaded on the local PC and then any changes can be made. Therefore, on the subsequent screen, click on the “Download” button to download the form template.

16) The system will prompt for selecting a master template for choosing the download language. Choose a master template and click OK to download.
17) The system will download a zip file on the local PC. It will be named as “Entity.zip”.

18) Extract the zip file to check its contents. It should have two files – a .xdp file and a .xsd file. The XDP file is the one that will be used to edit the form template.

19) In order to make changes to the form, the XDP file downloaded in the previous step needs to be opened in the “Adobe LiveCycle Designer” tool. This tool needs to be installed on the local PC. If your local PC does not already have it installed, you can download it from within your S/4 HANA Cloud system itself. The app “Install Additional Software” allows you to do so.


20) Once installed, open the LiveCycle designer and open the XDP file that was extracted after downloading the custom form template.

Ensure that you are in the “Design view” where you can see the different parts of the form.

21) In the design view, choose the place where you want to add the custom field. You will need to take care of the fact that depending on the form you have chosen to modify, there may be already some standard fields and you may need to move them to create some space for the new field. Please do exercise due caution to ensure that while doing so, you don’t accidentally lose the existing bindings and positionings, else the form output may get misaligned.
In our example, we add a new text field in the highlighted area in the screenshot below:

22) Rename the text field appropriately and change the appearance as desired
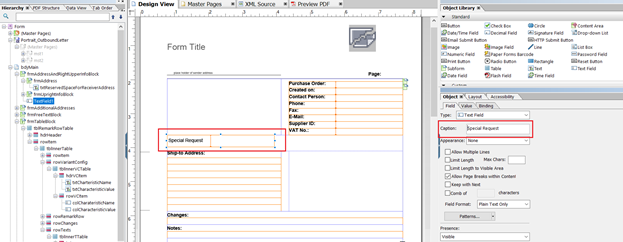
23) Now this new text field needs to be bound to the custom field that was added in the S/4 HANA Cloud system.
To do this, choose the “Binding” tab in the “Object” window and click on the “Select Data binding” button.

24) Choose the “Use Data Connection” à PurchaseOrderNode

25) Then within the “PurchaseOrderNode”, locate the field that was added as a custom field (refer previous blog)

26) The tool will provide a popup to choose the binding properties you want to update. Select “Update all related properties” and click OK

The newly added text field is now bound to the custom field created in the S/4 system.
27) Save the form template in the livecycle designer.

28) After saving the changes, the form template needs to be uploaded back to the S/4 HANA cloud system, so that the changes (which are currently saved on a local PC) are reflected back in the S/4 HANA cloud. To do this, navigate to the “Maintain form templates” app and open the same custom template that was copied in an earlier step.

Click on the Upload button and browse for the XDP file that was modified using the LiveCycle Designer tool.


Once uploaded, the modified form is ready for use in the system. However, the relevant print conditions need to be updated to ensure that the custom template is now used instead of the standard one. Remember that in a previous step, we copied the standard template into a custom template. Therefore, the updated custom template now needs to be used to ensure that the changes made are available in the subsequent use of the purchase order form.
Conclusion
The purpose of this blog was to enable you to understand how a custom field can be added on a form output in the S/4 HANA cloud system.
The updating of the print condition records and the testing of the form is left out of scope of this document and needs to be performed as per your need.
