Note: The content of this blog post applies to the version of tax service that runs in the Neo environment.
If you are using the tax service connected to your SAP S/4HANA (cloud or on-premise) and you want to check how tax service built the JSON request and response payloads for a specific document, perform the following steps.
Access Tax Service Trace from Your SAP S/4HANA Cloud Fiori Launchpad
NOTE: To access this feature in SAP S/4HANA on-premise edition, use the TXS_TRACE transaction
See the steps below on how to access it through the Fiori Launchpad:
- Login to your SAP S/4HANA Cloud Fiori Launchpad with the TAX_SPECIALIST role.
- Go to the SLH, Tax Service tab.
- Choose the Tax Service Trace Transaction tile.

Note: Every document and document item (where taxes were calculated by the tax service) contains a unique reference ID, also named Trace GUID, which will be used to access the specific request and response JSON payloads logged on Tax Service Audit Logger solution. See the Audit Logger official documentation for more information.
- On the Tax Service Trace, you can search for the Trace GUID using other information about the document. See the example below:
Example:
Company Code: 1410
Application: V (Sales and Distribution)
Document Category: C (for Orders)
Document Number: 145 (Sales Order Number)
Fiscal Year: 2019

- Choose the Execute button.
- Copy the GUID from the result to use in the Tax Service Audit Logger solution in the next steps.

Ensure You Have the Right Authorization to Access Tax Service Audit Logger
In order to access the
Tax Service Audit Logger data, you need to ensure you have the right authorization.
Create a new OAuth client on your SAP Cloud Platform account.
- On your SAP Cloud Platform account, under Security > OAuth > Client, choose the Register New Client button.
- Fill in the Name, ID, and Secret fields.
- For the Subscription field, choose the taxservice application.
- For the Authorization Grant, choose Client Credentials.

Ensure your client id is assigned to your Administrator role.
- In your SAP Cloud Platform account, under the taxservice subscription application, access the Roles section.
- Choose the Administrator role and ensure that under Individual Users there is an OAuth client with the following naming-convention: oauth_client_<client id>. Use the Client ID created on previous step. Example: oauth_client_taxuser_sapsupport.

Get a new bearer token.
- On your SAP Cloud Platform account, under Security > OAuth > Branding, get the Token Endpoint.
- Using a REST API client tool, get a new bearer token using the Token Endpoint, Client ID, and Secret from the previous steps. See the following screenshot of an example where I used the Postman tool to get a bearer token.

Reprinted with permission © Postdot Technologies Inc. All rights reserved.
Access Tax Service Request and Response Payloads from Audit Logger Using Document ID (GUID)
Now that the proper authorization is in place, you can use a REST API client tool to access the Tax Service Audit Logger endpoint to retrieve the request and response payloads for a given document ID (
GUID).
- On your SAP Cloud Platform account, under Applications > subscriptions, choose the taxservice application and copy the Application URL.
- Concatenate the copied URL with /tenantAccessLogs
- Add the documentId parameter with the GUID (copied in previous step) as the value.
- For authorization, use the generated bearer token from previous step.
See the following screenshot of an example where I used the Postman tool to get the request and response and payloads.
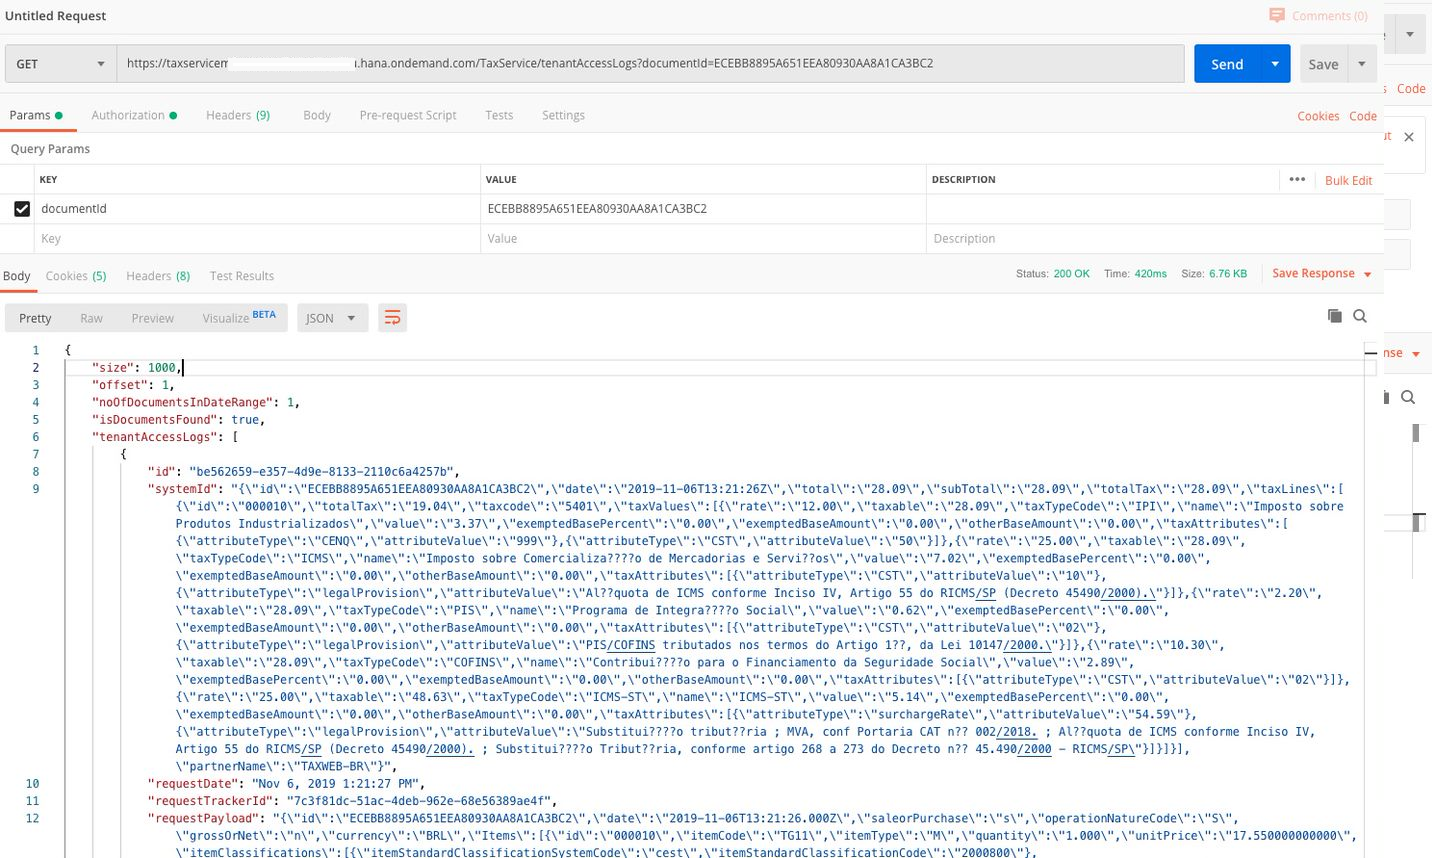
Reprinted with permission © Postdot Technologies Inc. All rights reserved.
Result: You will see the JSON request payload on
requestPayload field and the JSON response payload on
systemId field.
