As the year comes to an end and a lot of you have some free time you might spend on some hacking, I want to share with you how you can connect some cheap hardware to SAP Leonardo IoT.
In this tutorial I'll show you how to connect an ESP32. A developer board which you can buy for less than 10€, connect to a lot of different sensors and actors and use for nice demos. For the tutorial I assume that you know how to model Things in Leonardo IoT and therefore purely focus on the hardware part. If you've never used Leonardo IoT before I would recommend to first do two other tutorials:
Create a Simple IoT Device Model and
Create a Thing Model and Bind to Device.
As described in those two tutorials you should first model a Thing which matches the sensors you want to use.
Prepare your certificate
After you have created the model and instantiated a device you can download the certificate in
pem format.

And copy the secret.

Now we need to convert the certificates, so that our ESP32 can handle them. Therefore, you need
openssl.
After openssl is installed open a command line and navigate to the folder where your certificate is stored. Enter the command
openssl rsa -in <CertificateName>.pem -out key_full.pem
It will ask you for the pass phrase. Paste the secret you copied in the step before and press enter. Afterwards a new file
key_full.pem is created. This is the private key for our device.
In the next step we will format the certificate:
openssl x509 -in <CertificateName>.pem -out cert_full.pem
This command will create a file called
cert_full.pem.
Set up an ESP32 project
To set up a new project I will use
Visual Studio Code, you can also use the
Arduino IDE or any other IDE which supports ESP32. There are a lot of tutorials available for the different IDEs in combination with ESP32.
First of all, we have to install Platform IO within Visual Studio Code:

After you have installed Platform IO you can create a new Project:

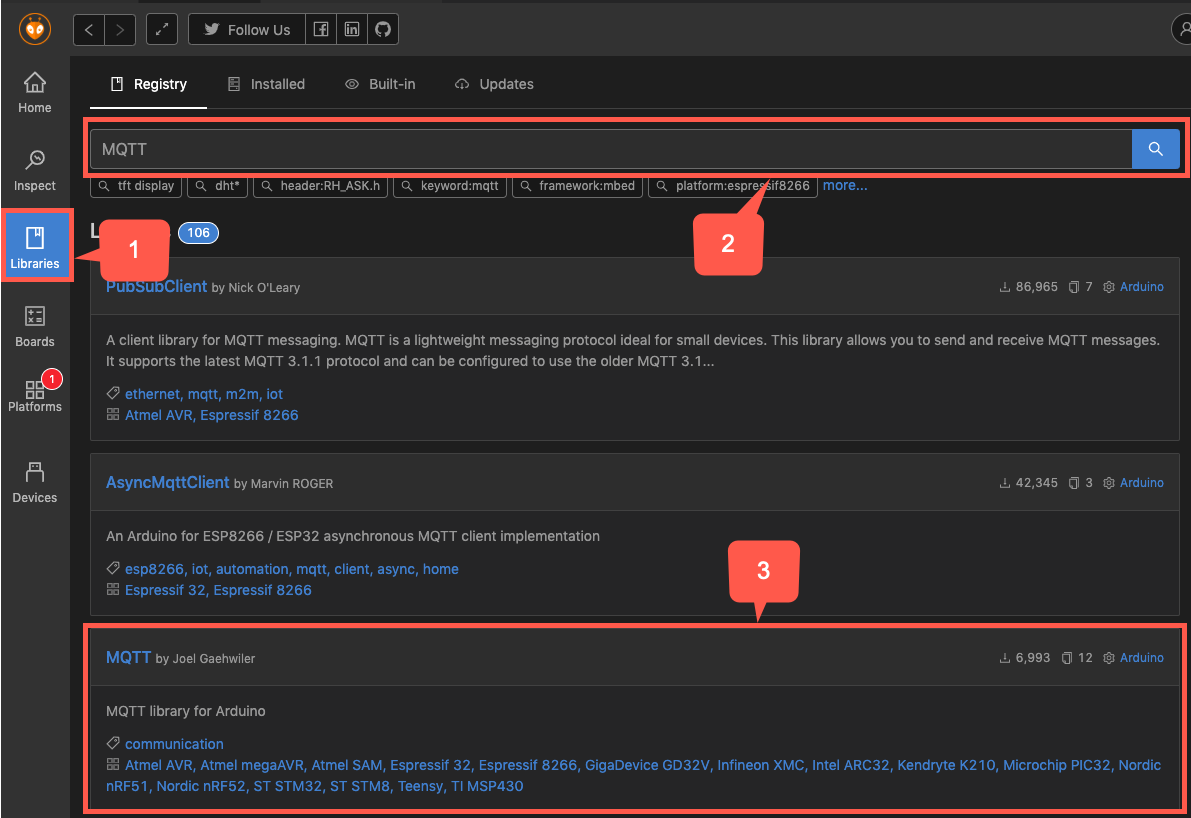
The last step before we can start coding is to install a MQTT library:
Implement your MQTT Client
Next you can open the
main.cpp file in Visual Studio Code and paste the following code:
#include <SPI.h>


#include <WiFiClientSecure.h>


#include <MQTTClient.h>


const char* ssid     = "<YourSSID>";

const char* password = "<YourWiFiPW>";


WiFiClientSecure espClient;

MQTTClient client;


const char* mqtt_server = "<YourIoTServiceInstance>.eu10.cp.iot.sap";

const char* ca_cert = \

"-----BEGIN CERTIFICATE-----\n" \

"MIIElDCCA3ygAwIBAgIQAf2j627KdciIQ4tyS8+8kTANBgkqhkiG9w0BAQsFADBh\n" \

"MQswCQYDVQQGEwJVUzEVMBMGA1UEChMMRGlnaUNlcnQgSW5jMRkwFwYDVQQLExB3\n" \

"d3cuZGlnaWNlcnQuY29tMSAwHgYDVQQDExdEaWdpQ2VydCBHbG9iYWwgUm9vdCBD\n" \

"QTAeFw0xMzAzMDgxMjAwMDBaFw0yMzAzMDgxMjAwMDBaME0xCzAJBgNVBAYTAlVT\n" \

"MRUwEwYDVQQKEwxEaWdpQ2VydCBJbmMxJzAlBgNVBAMTHkRpZ2lDZXJ0IFNIQTIg\n" \

"U2VjdXJlIFNlcnZlciBDQTCCASIwDQYJKoZIhvcNAQEBBQADggEPADCCAQoCggEB\n" \

"ANyuWJBNwcQwFZA1W248ghX1LFy949v/cUP6ZCWA1O4Yok3wZtAKc24RmDYXZK83\n" \

"nf36QYSvx6+M/hpzTc8zl5CilodTgyu5pnVILR1WN3vaMTIa16yrBvSqXUu3R0bd\n" \

"KpPDkC55gIDvEwRqFDu1m5K+wgdlTvza/P96rtxcflUxDOg5B6TXvi/TC2rSsd9f\n" \

"/ld0Uzs1gN2ujkSYs58O09rg1/RrKatEp0tYhG2SS4HD2nOLEpdIkARFdRrdNzGX\n" \

"kujNVA075ME/OV4uuPNcfhCOhkEAjUVmR7ChZc6gqikJTvOX6+guqw9ypzAO+sf0\n" \

"/RR3w6RbKFfCs/mC/bdFWJsCAwEAAaOCAVowggFWMBIGA1UdEwEB/wQIMAYBAf8C\n" \

"AQAwDgYDVR0PAQH/BAQDAgGGMDQGCCsGAQUFBwEBBCgwJjAkBggrBgEFBQcwAYYY\n" \

"aHR0cDovL29jc3AuZGlnaWNlcnQuY29tMHsGA1UdHwR0MHIwN6A1oDOGMWh0dHA6\n" \

"Ly9jcmwzLmRpZ2ljZXJ0LmNvbS9EaWdpQ2VydEdsb2JhbFJvb3RDQS5jcmwwN6A1\n" \

"oDOGMWh0dHA6Ly9jcmw0LmRpZ2ljZXJ0LmNvbS9EaWdpQ2VydEdsb2JhbFJvb3RD\n" \

"QS5jcmwwPQYDVR0gBDYwNDAyBgRVHSAAMCowKAYIKwYBBQUHAgEWHGh0dHBzOi8v\n" \

"d3d3LmRpZ2ljZXJ0LmNvbS9DUFMwHQYDVR0OBBYEFA+AYRyCMWHVLyjnjUY4tCzh\n" \

"xtniMB8GA1UdIwQYMBaAFAPeUDVW0Uy7ZvCj4hsbw5eyPdFVMA0GCSqGSIb3DQEB\n" \

"CwUAA4IBAQAjPt9L0jFCpbZ+QlwaRMxp0Wi0XUvgBCFsS+JtzLHgl4+mUwnNqipl\n" \

"5TlPHoOlblyYoiQm5vuh7ZPHLgLGTUq/sELfeNqzqPlt/yGFUzZgTHbO7Djc1lGA\n" \

"8MXW5dRNJ2Srm8c+cftIl7gzbckTB+6WohsYFfZcTEDts8Ls/3HB40f/1LkAtDdC\n" \

"2iDJ6m6K7hQGrn2iWZiIqBtvLfTyyRRfJs8sjX7tN8Cp1Tm5gr8ZDOo0rwAhaPit\n" \

"c+LJMto4JQtV05od8GiG7S5BNO98pVAdvzr508EIDObtHopYJeS4d60tbvVS3bR0\n" \

"j6tJLp07kzQoH3jOlOrHvdPJbRzeXDLz\n" \

"-----END CERTIFICATE-----\n";


const char* cert = \

<YourCert>;


const char* key = \

<YourPrivateKey>;


void connect() {

  Serial.print("\nconnecting...");

    while (!client.connect("<DeviceAlternateId>", false)) {

      Serial.print(".");

        delay(2000);

      }

  Serial.println("\nconnected!");

}


void setup()

{

  Serial.begin(9600);

  SPI.begin();


  WiFi.begin(ssid, password);

  while (WiFi.status() != WL_CONNECTED) {

    Serial.print(".");

    delay(1000);

  }

  Serial.println("connected...yeey :)");


  espClient.setCACert(ca_cert);

  espClient.setCertificate(cert);

  espClient.setPrivateKey(key);


  client.begin(mqtt_server, 8883, espClient);

  connect();

}


void loop()

{

  if (!client.connected()) {

    connect();

  }


  const char *cstr = "{\"sensorAlternateId\": \"<SensorAlternateId>\", \"capabilityAlternateId\": \"<CabailityAlternateId>\", \"measures\": [{ \"<Property>\": \"<Value>\" } ]}";

  client.publish("measures/<DeviceAlternateId>", cstr);

  Serial.println("Message sent");


  delay(5000);

}
Replace everything in <> (e.g. <SensorAlternateId>), except the certificate and private key, with your specific information, coming from your WiFi and IoT Service instance.
Next you can go back to your command line tool and finish the preparation of your certificates. Use the following command:
cat *full.pem | sed -e 's/\(.*\)/\"\1\\n\" \\/g'
This will only work on UNIX based systems and will add a " to the begin of each row and a
\n" \ to the end (if you don't have a UNIX based system you can do the adjustments manually). The result should look like this:

Now you can copy the certificate and the private key and paste it to your code and save the file.
Upload the code to your ESP32
Connect your ESP32 via USB to your computer. Next you can click the small upload icon in the lower left corner of Visual Studio Code. You should see some upload information. After the upload has finished click on the connector icon.

Now you should see the console log of your ESP32:
.........connected...yeey 🙂


connecting...

connected!

Message sent
And the sensor values in Leonardo IoT.
Next Steps
Now you have successfully and
securely connected your ESP32 to SAP Leonardo IoT. And that was the hardest part. As a next step I would propose to connect one of the many available sensors out there and send some real data. No worries there are tons of great tutorials how to connect different sensors to your ESP32.
Happy hacking and a good start into 2020!
