SAP HANA smart data access allows you to access remote data as if the data was stored in local tables in SAP HANA, without copying the data into SAP HANA.
In this blog, we will show you how to set up SDA for SQL SERVER 13. The steps are also same for SQL SERVER 12.
Download and install Microsoft ODBC driver
Follow the introduction as the following Microsoft official link(Choose the commands according to your OS):
https://docs.microsoft.com/en-gb/sql/connect/odbc/linux-mac/installing-the-microsoft-odbc-driver-for...Using the "root" user, run the following red commands to install the Microsoft ODBC driver in your HANA server if your HANA OS is SUSE Linux Enterprise Server 12
sudo su

zypper ar https://packages.microsoft.com/config/sles/12/prod.repo

exit

sudo ACCEPT_EULA=Y zypper install msodbcsql

# optional: for bcp and sqlcmd

sudo ACCEPT_EULA=Y zypper install mssql-tools

echo 'export PATH="$PATH:/opt/mssql-tools/bin"' >> ~/.bash_profile

echo 'export PATH="$PATH:/opt/mssql-tools/bin"' >> ~/.bashrc source ~/.bashrc

# optional: for unixODBC development headers

sudo zypper install unixODBC-devel

After the installation, there will be /opt/microsoft/msodbcsql/lib64 generated. And the driver libmsodbcsql-13.1.so.9.2 should be in this dirctiory.

Install and test using unixODBC to check if the ODBC connection can be set well.
Actually during setting up SDA, we can skip this step in configuring the SDA to MSSQL. But we strongly recommend you installing the unixODBC to test if the ODBC connection can be set correctly. Only when the unixODBC test works, and then the SDA will work.
a) Go to unixODBC offical page http://www.unixodbc.org/ -> Download, follow the steps in the page to install the unixODBC.
 Once the unixODBC is installed, check if the drivers installed properly.
>> isql --version
The output should be the version of unixODBC "unixODBC 2.3.1"
b) Using command "odbcinst -j" to know where the odbc.ini is located, and then we need to create the DSN in the odbc.ini file to set up the odbc connection.
<hostname>:~ # odbcinst -j

unixODBC 2.3.1

DRIVERS............: /etc/unixODBC/odbcinst.ini

SYSTEM DATA SOURCES: /etc/unixODBC/odbc.ini

FILE DATA SOURCES..: /etc/unixODBC/ODBCDataSources

USER DATA SOURCES..: /root/.odbc.ini

SQLULEN Size.......: 8

SQLLEN Size........: 8

SQLSETPOSIROW Size.: 8
Configure the odbc.ini file "/etc/unixODBC/odbc.ini" :
The format is like below:
[<DATABASE_NAME>]

Server = <SQLSERVER_IP_ADDRESS>,<sqlserver_port>
In my example, the DSN is like the following:
[MSSQL]

Driver= /opt/microsoft/msodbcsql/lib64/libmsodbcsql-13.1.so.9.2

Server=<SQLSERVER_IP_ADDRESS>,1433
The port number got from "Sql Server Configuration Manager" -> Protocols for MSSQLSERVER -> TCP/IP -> TCP Port :

c) Test the ODBC connection by the following command:
isql -v <DATABASE_NAME> <user> <password>

Once this has been established successfully, then we can configure the SDA much quickly.
Set up SQL Server ODBC Driver
a) Change to <sid>adm $HOME directory
In /usr/sap/<SID>/home create file ".customer.sh" by <sid>adm userAdd the following to the file ".customer.sh"
export LD_LIBRARY_PATH=$LD_LIBRARY_PATH:/opt/microsoft/msodbcsql/lib64

export LD_LIBRARY_PATH=$LD_LIBRARY_PATH:/usr/local/lib64
Then source file ".customer.sh" .
And check if the path has been added to the enviroment LD_LIBRARY_PATH
echo $LD_LIBRARY_PATH
Check if "/opt/microsoft/msodbcsql/lib64" and "/usr/local/lib64" has been added to the environment LD_LIBRARY_PATH . If not, please restart your HANA instance and check it again.
- Create a DSN Entry
Change to <sid>adm $HOME directory
In /usr/sap/<SID>/home , create ".odbc.ini" file, the same as we create in /etc/unixODBC/odbc.ini file.[MSSQL]
Driver= /opt/microsoft/msodbcsql/lib64/libmsodbcsql-13.1.so.9.2
Server=<SQLSERVER_IP_ADDRESS>,1433And restart HANA instance to apply the changes to the .INI file.
- HANA studio -> Provisioning -> Remote Sources -> New remote source
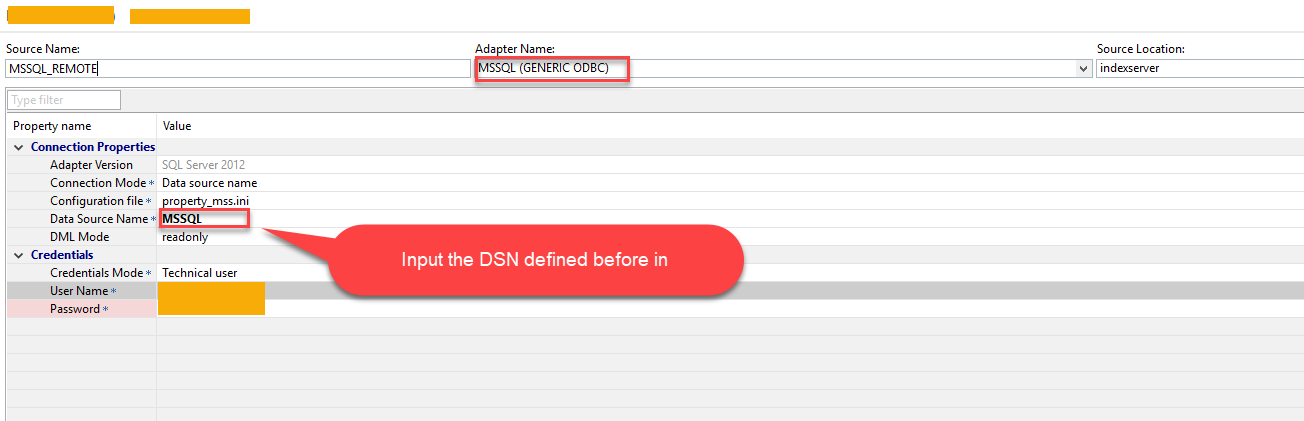
- Save the configuration, then the SDA remote connection is configured successfully.
And then you could add the virtual table to one schema of current HANA DB.
For more other detailed information about SDA, you could refer to the latest
HANA Admin Guide.
