
- SAP Community
- Products and Technology
- Technology
- Technology Blogs by SAP
- Adaptation Project: Get to know how to extend a Fi...
Technology Blogs by SAP
Learn how to extend and personalize SAP applications. Follow the SAP technology blog for insights into SAP BTP, ABAP, SAP Analytics Cloud, SAP HANA, and more.
Turn on suggestions
Auto-suggest helps you quickly narrow down your search results by suggesting possible matches as you type.
Showing results for
vishal_vk
Explorer
Options
- Subscribe to RSS Feed
- Mark as New
- Mark as Read
- Bookmark
- Subscribe
- Printer Friendly Page
- Report Inappropriate Content
12-16-2019
4:33 PM
In this blog post, we will understand what are the different types of users of Fiori applications and what options are available to them to create their own extensions. We will also learn in detail on how to create an Adaptation project, and get to know how customers can create their own extensions to standard fiori apps without creating modifications.
There are different types of users for Fiori applications. Each type of user has their own requirements, and they can be broadly classified into the following categories.

S/4HANA provides different options for creating extensions based on the kind of user.

S/4HANA provides Runtime Extensibility option for Key Users (Business Experts).
Key Users of Fiori applications can extend an application and incorporate additional changes at runtime.
This can be achieved using the Adapt UI option in Fiori Launchpad.

S/4HANA also provides Design Time Extensibility option for Developers, which provides additional freestyle capabilities compared to the Adapt UI option.
SAPUI5 flexibility uses Layering concept to store the UI changes.
The changes are stored in Layered Repository (LREP) in respective layers.
Understand more about Layering concept here.
How can customers extend a Fiori Elements application and add custom logic to it which is modification-free?
As of S/4HANA 1809, this can be achieved with…… Adaptation Project!!
When an Adaptation Project is created, a new variant of the existing application is created. The app variant has a reference to the original application but contains only changes created in the adaptation project. Hence, any new changes made in the original application are automatically available in the adaptation project as well. The changes made in the variant are applied on top of the original application.
Some key features of Adaptation Project are:
How is Adaptation project different from Break-outs (template extensions)?
An Adaptation project can be created in WebIDE, by selecting a source application which needs to be extended.

Provide the requested details and follow the configuration in the wizard.


Open the project using SAPUI5 Visual Editor.

We can Preview and Edit the application. When in Safe mode, only semantic changes (changes possible during the application runtime) can be made.
Safe mode provides less freestyle capabilities but allows you to stay fully compatible with a future upgrade of the source application.
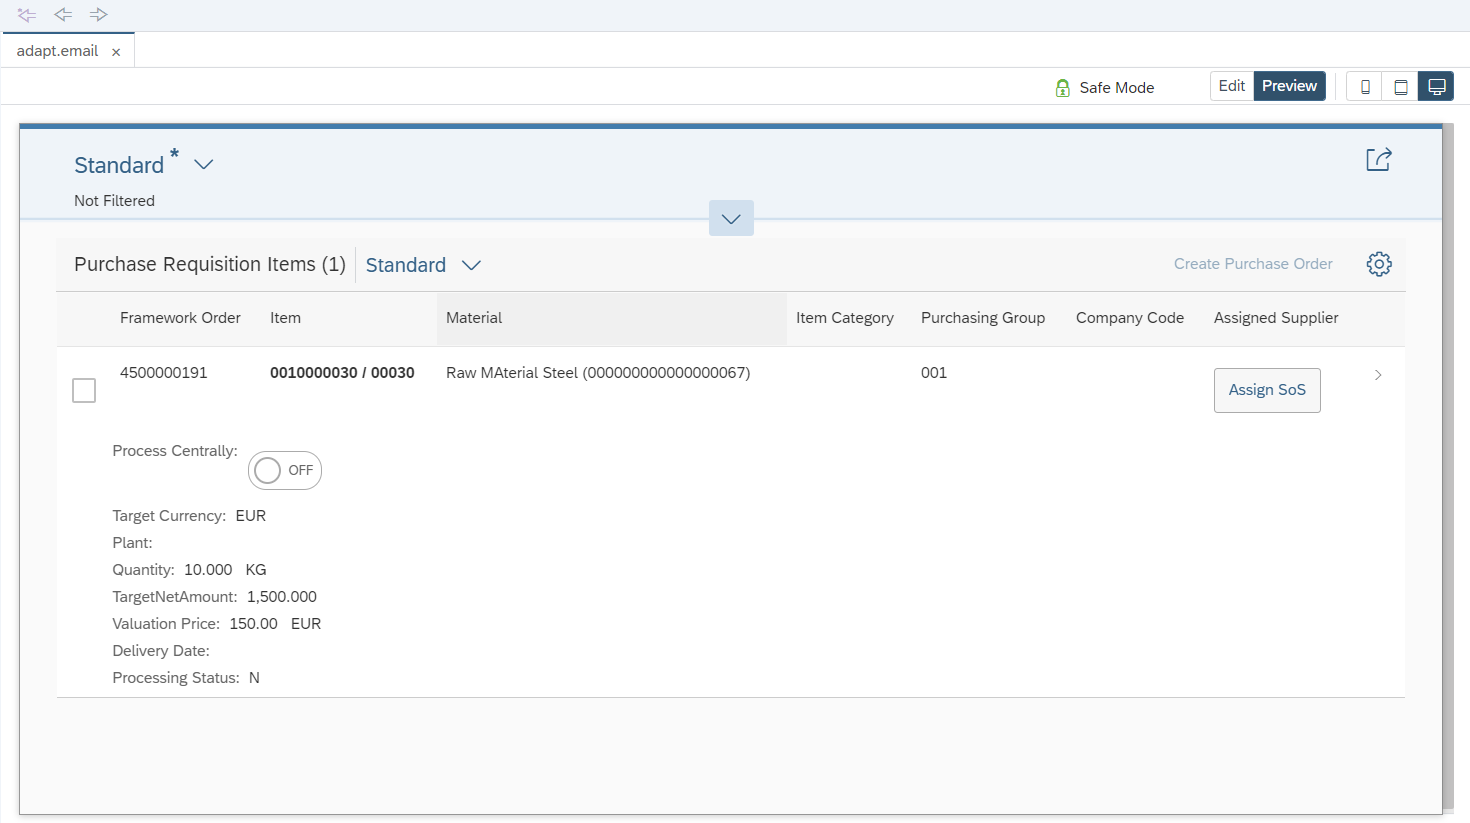
Click on Safe mode button and then disable the safe mode. Once Safe mode is disabled, it cannot be enabled again.
If you use the SAPUI5 Visual Editor without Safe mode, you are responsible for any changes that you make to the project.

Once the app is deployed to the system, changes made using the Visual Editor are saved in the Layered Repository (LREP).
In the Visual Editor, disable the Safe Mode and go to Advanced Mode.
Click on Edit button to make the changes.

Select the control where the button is to be added.
The custom button needs to be added in the table toolbar of the list report. So the table toolbar should be selected.
Click on Add fragment.

Select the Target aggregation and position where the new fragment needs to be added.
Click on Create new to create a new fragment.
Provide a fragment name and click on Create.

The new fragment is created.
Add the XML logic to add a button. Use Stable IDs in the XML code.

A changes folder gets created in the project. The fragment is saved in fragments folder.

A change file is created to apply the XML fragment on top of the source application.

The layer property in the change file indicates the layer at which the change was made.
Save the changes made and click on Preview. The newly added button would be visible.

Now let us extend the controller to handle the click of the button.
Click on Edit button. Click on the newly created button and select Extend with Controller.

Provide a controller name and click on Extend.

A coding folder is created, under which the extension controller file is saved.


A change file is created to apply the extension controller logic on top of the source application.

In the controller extension file, add a function and write the logic to open an email.

Add the press event to the button in the XML fragment.
Ensure that the event handler is provided correctly. It has to begin with .extension.

Save the changes.
Run the Adaptation_index.html to execute the application in WebIDE.

Click on Send email button.

An email opens in outlook!!

Now let us deploy the application to the ABAP repository.
Right click on the project > Deploy > Deploy to SAP NW Application Server ABAP
Follow the steps prompted.

Provide the Package and TR details if you are using one.
In this case, let us go ahead with a local object.

Click on Finish to deploy.

Once the deployment is successful, success message is displayed!

The application would be saved in the Layered repository. It can be opened using transaction SUI_SUPPORT.

Provide the application variant ID and click on execute.

The list of files would be displayed from the Layered Repository.

A new tile can be configured using the Fiori Launchpad Designer (Transaction Code /UI2/FLPD_CUST or /UI2/FLPD_CONF).
Open the catalog where the tile is to be added.
Add the details for the tile and target mapping.


Provide the ID from the manifest app descriptor in the project.


Add the tile to the required group.
The tile will appear in the Fiori Launchpad.

With this, the adaptation project has been deployed to the system and it can be accessed from the Fiori Launchpad.
Currently, few of the limitations of Adaptation Project are listed below:
(Some of these limitations might be addressed in future).
With a vast range of freestyle capabilities, Adaptation project is a go to option for customers to implement their own custom extensions to standard Fiori applications.
The following links would help you to understand more about Adaptation project.
https://blogs.sap.com/2018/09/28/adaptation-projects-its-time-for-a-new-way-to-extend-your-fiori-ele...
https://blogs.sap.com/2019/01/14/adaptation-projects-a-tutorial/
https://help.sap.com/viewer/825270ffffe74d9f988a0f0066ad59f0/CF/en-US/94f024b04a6245d8ba9e02ee2facc5...
Different Personas and their needs
There are different types of users for Fiori applications. Each type of user has their own requirements, and they can be broadly classified into the following categories.
Extensibility options in S/4HANA
S/4HANA provides different options for creating extensions based on the kind of user.
S/4HANA provides Runtime Extensibility option for Key Users (Business Experts).
Key Users of Fiori applications can extend an application and incorporate additional changes at runtime.
This can be achieved using the Adapt UI option in Fiori Launchpad.
S/4HANA also provides Design Time Extensibility option for Developers, which provides additional freestyle capabilities compared to the Adapt UI option.
Layering Concept
SAPUI5 flexibility uses Layering concept to store the UI changes.
The changes are stored in Layered Repository (LREP) in respective layers.
Understand more about Layering concept here.
Layer | Used by | User | Type of changes |
| USER | Customer | End users | User Personalization settings |
| CUSTOMER | Key users | UI Changes to adapt apps for all users | |
| End users | Views that the end user saves as Public | ||
| CUSTOMER_BASE | Developers | UI changes made with SAPUI5 Visual Editor | |
| VENDOR | SAP | SAP | Example: Update of an app |
Design Time Adaptation (DTA) for extending Fiori Elements Application
How can customers extend a Fiori Elements application and add custom logic to it which is modification-free?
As of S/4HANA 1809, this can be achieved with…… Adaptation Project!!
When an Adaptation Project is created, a new variant of the existing application is created. The app variant has a reference to the original application but contains only changes created in the adaptation project. Hence, any new changes made in the original application are automatically available in the adaptation project as well. The changes made in the variant are applied on top of the original application.
Some key features of Adaptation Project are:
- Semantic changes can be done to applications (Ex. Hide a field based on certain condition)
- Control properties and bindings can be changed (Ex. Enable or disable Excel Export for Smart Table)
- Custom XML fragments can be added to extend views (Ex. Open a custom dialog on click of a button)
- Custom business logic (JavaScript) can be added (Ex. Call an odata service on click of a button)
- Extend I18n texts (Ex. Translation for labels of custom buttons)
- Move controls/sections (Ex. Place a custom field in between 2 standard fields in object page)
How is Adaptation project different from Break-outs (template extensions)?
- In a Fiori Elements application, break-outs are created for adding custom UI (XML) and business logic (JavaScript) to the smart template.
- Break-outs are a part of the actual application. Hence, if an application development team creates a Fiori elements app, and a customer wants to add custom logic via break-outs, then that would be a modification.
- Break-outs are extensions to the smart template and are a part of the original application, whereas adaptation project is an “extension” of the application!
Creating an Adaptation Project
An Adaptation project can be created in WebIDE, by selecting a source application which needs to be extended.
Provide the requested details and follow the configuration in the wizard.
Open the project using SAPUI5 Visual Editor.
We can Preview and Edit the application. When in Safe mode, only semantic changes (changes possible during the application runtime) can be made.
Safe mode provides less freestyle capabilities but allows you to stay fully compatible with a future upgrade of the source application.
Click on Safe mode button and then disable the safe mode. Once Safe mode is disabled, it cannot be enabled again.
If you use the SAPUI5 Visual Editor without Safe mode, you are responsible for any changes that you make to the project.
Once the app is deployed to the system, changes made using the Visual Editor are saved in the Layered Repository (LREP).
Use case: Add a custom button to open an email
In the Visual Editor, disable the Safe Mode and go to Advanced Mode.
Click on Edit button to make the changes.
- The Outline tab shows the hierarchy of the controls in the screen.
- The Changes tab shows the currently applied changes.
- The right side pane shows the properties that can be changed for the selected control.
Select the control where the button is to be added.
The custom button needs to be added in the table toolbar of the list report. So the table toolbar should be selected.
Click on Add fragment.
Select the Target aggregation and position where the new fragment needs to be added.
Click on Create new to create a new fragment.
Provide a fragment name and click on Create.
The new fragment is created.
Add the XML logic to add a button. Use Stable IDs in the XML code.
A changes folder gets created in the project. The fragment is saved in fragments folder.
A change file is created to apply the XML fragment on top of the source application.
The layer property in the change file indicates the layer at which the change was made.
Save the changes made and click on Preview. The newly added button would be visible.
Now let us extend the controller to handle the click of the button.
Click on Edit button. Click on the newly created button and select Extend with Controller.
Provide a controller name and click on Extend.
A coding folder is created, under which the extension controller file is saved.
A change file is created to apply the extension controller logic on top of the source application.
In the controller extension file, add a function and write the logic to open an email.
Add the press event to the button in the XML fragment.
Ensure that the event handler is provided correctly. It has to begin with .extension.
Save the changes.
Run the Adaptation_index.html to execute the application in WebIDE.
Click on Send email button.
An email opens in outlook!!
Deploying the application
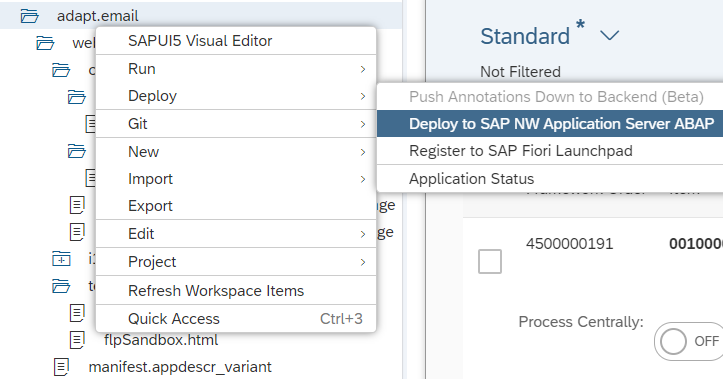
Now let us deploy the application to the ABAP repository.
Right click on the project > Deploy > Deploy to SAP NW Application Server ABAP
Follow the steps prompted.
Provide the Package and TR details if you are using one.
In this case, let us go ahead with a local object.
Click on Finish to deploy.
Once the deployment is successful, success message is displayed!
The application would be saved in the Layered repository. It can be opened using transaction SUI_SUPPORT.
Provide the application variant ID and click on execute.
The list of files would be displayed from the Layered Repository.
Fiori Launchpad Tile configuration
A new tile can be configured using the Fiori Launchpad Designer (Transaction Code /UI2/FLPD_CUST or /UI2/FLPD_CONF).
Open the catalog where the tile is to be added.
Add the details for the tile and target mapping.
Provide the ID from the manifest app descriptor in the project.
- The recommended way is to use the same Semantic Object as the source application, but a different Action. This ensures that whenever there is a navigation implemented using CDS annotations, then both (the source application and the variant) appear in a popup.
- Another way is to use the same semantic object and action as that of the source application, along with the sap-appvar-id parameter.
Add the tile to the required group.
The tile will appear in the Fiori Launchpad.
With this, the adaptation project has been deployed to the system and it can be accessed from the Fiori Launchpad.
Limitations
Currently, few of the limitations of Adaptation Project are listed below:
- Supports Fiori Elements applications. Not all Free style apps are supported.
- Supports only smart controls.
- Not all properties of a control can be changed.
- App to App navigation is not supported in WebIDE.
- Other Reuse components cannot be embedded in an Adaptation project.
- Not all properties of a table Column can be changed.
- It is not possible to change the OData service that is used in the source application.
(Some of these limitations might be addressed in future).
With a vast range of freestyle capabilities, Adaptation project is a go to option for customers to implement their own custom extensions to standard Fiori applications.
Further Reads
The following links would help you to understand more about Adaptation project.
https://blogs.sap.com/2018/09/28/adaptation-projects-its-time-for-a-new-way-to-extend-your-fiori-ele...
https://blogs.sap.com/2019/01/14/adaptation-projects-a-tutorial/
https://help.sap.com/viewer/825270ffffe74d9f988a0f0066ad59f0/CF/en-US/94f024b04a6245d8ba9e02ee2facc5...
- SAP Managed Tags:
- SAP Fiori for SAP S/4HANA
Labels:
31 Comments
You must be a registered user to add a comment. If you've already registered, sign in. Otherwise, register and sign in.
Labels in this area
-
ABAP CDS Views - CDC (Change Data Capture)
2 -
AI
1 -
Analyze Workload Data
1 -
BTP
1 -
Business and IT Integration
2 -
Business application stu
1 -
Business Technology Platform
1 -
Business Trends
1,658 -
Business Trends
92 -
CAP
1 -
cf
1 -
Cloud Foundry
1 -
Confluent
1 -
Customer COE Basics and Fundamentals
1 -
Customer COE Latest and Greatest
3 -
Customer Data Browser app
1 -
Data Analysis Tool
1 -
data migration
1 -
data transfer
1 -
Datasphere
2 -
Event Information
1,400 -
Event Information
66 -
Expert
1 -
Expert Insights
177 -
Expert Insights
295 -
General
1 -
Google cloud
1 -
Google Next'24
1 -
Kafka
1 -
Life at SAP
780 -
Life at SAP
13 -
Migrate your Data App
1 -
MTA
1 -
Network Performance Analysis
1 -
NodeJS
1 -
PDF
1 -
POC
1 -
Product Updates
4,577 -
Product Updates
341 -
Replication Flow
1 -
RisewithSAP
1 -
SAP BTP
1 -
SAP BTP Cloud Foundry
1 -
SAP Cloud ALM
1 -
SAP Cloud Application Programming Model
1 -
SAP Datasphere
2 -
SAP S4HANA Cloud
1 -
SAP S4HANA Migration Cockpit
1 -
Technology Updates
6,873 -
Technology Updates
419 -
Workload Fluctuations
1
Related Content
- Empowering Retail Business with a Seamless Data Migration to SAP S/4HANA in Technology Blogs by Members
- WebIDE: Extending Create Purchase Requisition New (F1643A) in Technology Q&A
- Unlocking Full-Stack Potential using SAP build code - Part 1 in Technology Blogs by Members
- Cloud Integration: Manually Sign / Verify XML payload based on XML Signature Standard in Technology Blogs by SAP
- I am truing to extend the app F1515 using adaptation project on BAS in Technology Q&A
Top kudoed authors
| User | Count |
|---|---|
| 36 | |
| 25 | |
| 17 | |
| 13 | |
| 8 | |
| 7 | |
| 6 | |
| 6 | |
| 6 | |
| 6 |