
- SAP Community
- Products and Technology
- CRM and Customer Experience
- CRM and CX Blogs by SAP
- Styling Forms - Introduction
CRM and CX Blogs by SAP
Stay up-to-date on the latest developments and product news about intelligent customer experience and CRM technologies through blog posts from SAP experts.
Turn on suggestions
Auto-suggest helps you quickly narrow down your search results by suggesting possible matches as you type.
Showing results for
Advisor
Options
- Subscribe to RSS Feed
- Mark as New
- Mark as Read
- Bookmark
- Subscribe
- Printer Friendly Page
- Report Inappropriate Content
12-10-2019
3:21 PM
Introduction
A form in SAP Marketing Cloud is used to collect data from new or existing contacts. In the form designer of the Content Studio app you have basic capabilities to influence the styling. For example you can change the sequence of fields and the placement of field labels. Since release 1905, you have the option to embed the form into the new landing page and there you have additional options to change the style of your form. For example you can change the color of the button and the button text.
If you need more advanced capabilities for styling your form, we support the definition of a custom CSS file in the form designer.
In this article, I want to give you an overview of the preconditions and process to improve the style of your forms. I also intend to build on this article and publish a series of posts on specific improvements you can do with CSS.
Before you read any further, I want to point out that this will become very technical and that you should have the following:
- Knowledge in HTML and CSS. If you don't you should improve your skills first. Some good starting points are:
- w3.org - Starting with HTML + CSS
- LinkedIn Learning (Lynda.com) - Excellent paid online courses. For example CSS Essential Training
- Just a web search on 'learn css' or 'css getting started'
- Access to a public web server with user credentials to edit or upload files
- An FTP client to upload your CSS files to the web server (For convenience - usually you can also use tools on your web server to create or edit files)
Also please note that all CSS code I present here come without warranty – you need to try out for yourself and test everything thoroughly – especially for multiple screen sizes, devices or browsers! A good way to check the global compatibility of any CSS property you might want to use is caniuse.com.
Getting Started
Add the Domain of your Web Server to the CSP Whitelist
Recently we started to implement and enable a new security feature, which is called Content Security Policy (CSP, see http://www.w3.org/TR/CSP3/). See the section 'Using Stylesheet URLs' in the Forms documentation. When this policy is fully effective any external CSS file will be blocked. Therefore, you need to add the domain of the web server where you store your CSS files to the CSP whitelist as follows:
- Open the 'Manage Content Security Policy'-app (See also documentation)

- Open the Trusted Sites tab and select UI_RESOURCES_STYLES in the list.
- In the Managed by SAP section click Add.
- In the Managed by Customer section, click New and enter the domain of your web server.

Caution - Do not Break the UI!
With CSS you can influence every part of an HTML page. In the context of the form designer this really means every element of that web page! If you enable a CSS stylesheet for your form then all the styling statements in that file might potentially also influence HTML elements of the user interface (since the UI is also built with HTML). At worst this could make the UI unusable!
For this reason I'd like to give some recommendations or ground rules here:
- Do NOT simply style a single HTML tag like H1, P or even worse HTML or BODY. This would be very unspecific. It is OK though to use an HTML tag after a much more specific class name, for example '.MyCustomClass > P'.
- Be as specific as possible with your CSS selectors
- My general recommendation to avoid that problem is to start every CSS selector with the class '.sapCpContentPage' because that is the class of the very first DIV element of the form itself. By doing so you will never influence any UI element of the form designer.
- If you are only using your own custom CSS classes which you assign to certain fields (see next section) then it is safe to use that class as CSS selector (no need to prepend '.sapCpContentPage').
However, this is only valid, if the styles of those classes will not change the layout of fields (see next paragraph)
A slightly related problem is that you might need to do some styling, which influences the very layout of the form elements. For example placing 2 input fields side by side on the same line. While this might be a valid use case for the runtime form such layout changes also have the potential to break the UI of the form builder. The result would be issues arising when you add new fields or move fields around.
As a workaround I recommend to restrict the effectiveness of the related CSS styles to the display mode or runtime only - or in other words to block those styles for the edit mode. Luckily there is a class called '.sapCpContentPageEditable' on the top level DIV of the form when you are in edit mode. Therefore, I'd like to extend the above list with this point:
- For all styles that change the layout of fields, labels or any other property that disturbs the form designer you should prepend your CSS selector with '.sapCpContentPage:not(.sapCpContentPageEditable)' (instead of only using '.sapCpContentPage')
- This also needs to be done for your own custom classes if they are the trigger for such changes!
Browser Development Tools
Since I already assume that you have a good knowledge on CSS you should be aware of this but just for completeness I'd like to point out how helpful the browser development tools are.
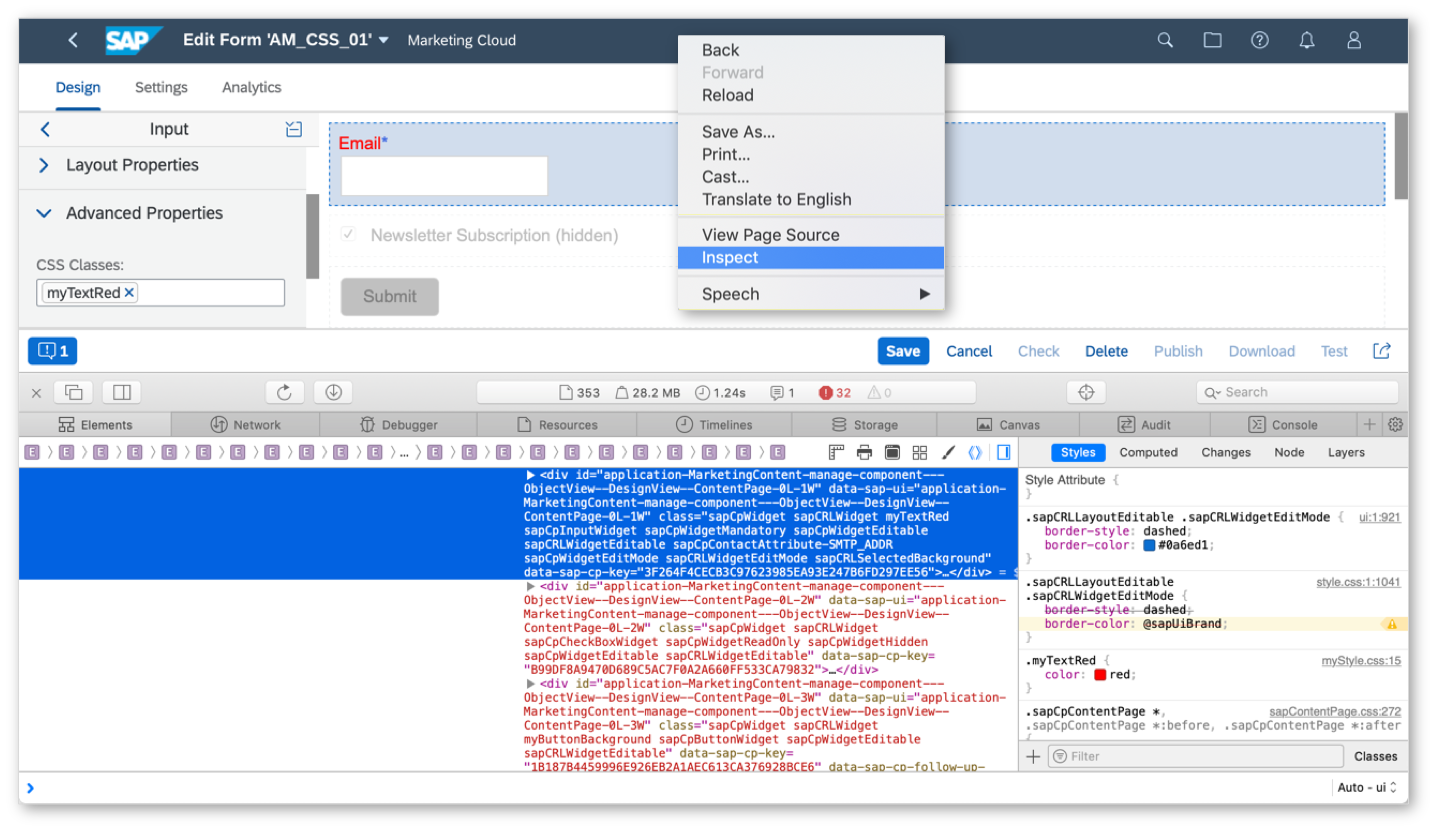
Every browser has tools to investigate the details of any web page. To activate the tools you need to check your specific browser. The most intuitive way for me is the inspect option, which should be available in every browser when you hover over an element that interests you and then press the right mouse key. In the context menu you'll see an option like 'Inspect' or 'Inspect Element'. So, if you want to create a style for a specific field on your form then you just need to hover over that field and invoke the inspect option (see popup in the screenshot above).
Note:
You might have a form embedded in a landing page. If you invoke the inspector in this case, you will not get to that field because the form is embedded in an iFrame and the inspector will land on that iFrame level. Therefore, I recommend you do this in the form designer and not in the landing page designer. If you absolutely want to do this in the landing page designer, then the quickest way I found is to invoke the inspector and then do a search for the field label you are looking for.
Once the inspector is active you will see a split screen with the HTML code in one part (bottom part of screenshot) and the page on the other part (top part of screenshot). You can now hover over the different HTML code lines and see the corresponding areas highlighted on the page view. This is very helpful to narrow down which HTML element you need to address with a CSS selector to do the styling.
The next useful feature is the style info panel (see bottom right in the screenshot). Here you can see exactly which styles have been loaded and what the sequence is in which they are evaluated (priority goes from top to bottom). So, if you created a style and you wonder why a particular style attribute is not working then you need to look here and find your stylesheet reference. Most likely that style attribute has been invalidated (strike through) because the same style attribute has been used in another style, which lies above your style. In that case, you need to find ways to make your style more important. For example by making the selector even more specific or - last resort - setting the '!important' option.
One way of trying things out even before writing the actual CSS file is to inspect the element you want to change, and then go to the style info panel described above and enter some style attributes in the very top element called 'Style Attribute'. By doing so, you will see any effect a change has immediately on the screen.
Enable your CSS Stylesheet
After you have created your CSS stylesheet file and uploaded it to your web server you need to assign it to your form:

Usually there will be some changes in the CSS stylesheet after this assignment. In that case, you might need to clear the cache of your browser before reloading the form.
CSS Classes and Document Structure
There are two things you might want to do:
- Create new custom classes, which then can be used to apply a specific style to specific form fields
- Influence the general styling of the entire form or every occurrence of a specific form type (explained at a later time)
Custom Classes
You create a custom class by defining a style in your CSS stylesheet, which uses that class as a selector. For example, if you want to assign a new class 'myTextRed' for a red text color:
.myTextRed {

   color: red;

}
To make that class styling active in your form, you need to assign the class in the advanced properties of a form element in the field 'CSS Classes'. Please note that you can assign multiple classes here, for example one for the text color and one for the background color. Also please note that you need to enter the class name without the dot that you see in the example code of the stylesheet above:

In the browser development tool, you will also see the result of this. The assigned custom classes are always assigned to the DIV element (Standard class '.sapCpWidget').

Please note that the styled element (label 'Email') is below the DIV element which holds the class. But since attributes often get inherited by their children this works in that case. In many cases you might want to style only children of the DIV element with that custom class. For that, you need to use a more specific selector (But you already should know about that because you should have some CSS knowhow before reading through this post 😉 ).
Document Structure and Standard Classes
In this section I would like to explain the general HTML structure and standard CSS classes we used. Please note that this might change in the future and that I can't guarantee that this will always be up-to-date. Also, I will only focus on the structure and attributes like IDs and classes. In the code, you will find other attributes that are not relevant for styling. I also will not explain all the classes here - I encourage you to look for yourself in the code using the browser tool explained above and experiment.
Basic Layout Structure
To explain the layout, I give you a simplified example of the form HTML:
<FORM class="sapCpContentPage">

   <DIV class="sapCpLayout" >

      <DIV class="sapCpWidget ...">...</DIV>

      <DIV class="sapCpWidget ...">...</DIV>

      <DIV class="sapCpWidget ...">...</DIV>

   </DIV>

</FORM>
Here you see 3 levels:
- The FORM element, which can be addressed in your CSS stylesheet with the class 'sapCpContentPage'. Also remember my earlier comment to avoid breaking the UI? This is the same class that you should generally use for the start of every selector.
- The next element is a DIV that you can probably ignore for your styling - it just adds some additional padding around the form.
- Finally, you will find the elements that you dragged onto your form canvas (input, checkboxes, buttons,...). They all have the common class 'sapCpWidget'. Depending on the type of the element there will be additional classes, which let you select only certain types of fields for your style.
Indentation / Labels
In the parameters of each field you can specify the indentation or switch the indentation off. This also influences the structure of the HTML elements and you might need to build/check your stylesheet against both variants (in case you use both).
- Indentation

...
<div class="sapCpWidget ...">
<div class="sapCpWidgetContentNoIndent">
<label class="sapCpLabel">...</label>
<input class="sapCpInput"></div>
</div>
</div>
...
Label is positioned left from input field (exception: For checkboxes the label is right from the checkbox) - No Indentation

...
<div class="sapCpWidget ...">
<div class="sapCpWidgetContent sapCpWidgetContentLeft" style="width: 30%;">
<label class="sapCpLabel">...</label>
</div>
<div class="sapCpWidgetContent sapCpWidgetContentRight" style="padding-left: 30%;">
<input class="sapCpInput"></div>
</div>
</div>
...
Label is positioned above the input field (exception: For checkboxes the label is right from the checkbox)
Collection of Some Useful Standard Classes
Basic Elements of a Form:
| Class | Description |
| sapCpTextWidget | Text element |
| sapCpInputWidget | Input element. The structure may vary depending on the type of the attribute:
|
| sapCpCheckBoxWidget | Permission or subscription element. Please note that also other elements will show a checkbox (Interaction, Download) |
| sapCpInteractionWidget | Interaction element (Checkbox) |
| sapCpNoteWidget | Note element to capture a longer text (Text can be assigned to other elements that create an interaction) |
| sapCpDownloadWidget | Download element (Checkbox) |
| sapCpButtonWidget | Submit button |
Other Classes:
| Class | Description |
| sapCpWidgetMandatory | The field is mandatory. |
| sapCpWidgetReadOnly | The field is set to read-only. |
| sapCpWidgetHidden | The entire element (label and field) is hidden. |
| sapCpLabel | The label of the field. |
| sapCpLabelRequired | The label has a mandatory indicator (per default: '*'). |
| sapCpInput | Normal input field (No checkbox or dropdown) |
| sapCpDropDown | Dropdown field |
| sapCpDropDownPlaceholder | Indicates that the text in the dropdown is a placeholder (not a real value) |
| sapCpCheckBox | Checkbox field |
| sapCpTextArea | Long text input field (Note element) |
| sapCpButton | Submit button |
| sapCpButtonWidgetExtraText | Used for every info message text below the button (e.g. error or success message). This includes a download link. |
| sapCpMissingMandatoryFieldText | Text message for a missing value in a mandatory field. |
| sapCpErrorMessageText | Text message for an error. |
| sapCpSuccessMessageText | Text message for a successful submit. |
| sapCpButtonWidgetDownloadLink | A link to download a document (if there is a download element in the form). |
| sapCpSubmitCompleted | Class on the level of the form (same level as class 'sapCpContentPage') that indicates that the submit has been completed |
Conclusion
After reading this post you should be able to do some basic styling of your forms with CSS stylesheet.
Other posts of my CSS series:
- SAP Managed Tags:
- SAP Marketing Cloud
Labels:
5 Comments
You must be a registered user to add a comment. If you've already registered, sign in. Otherwise, register and sign in.
Labels in this area
-
Business Trends
270 -
Business Trends
11 -
chitchat
1 -
customerexperience
1 -
Event Information
256 -
Event Information
18 -
Expert Insights
30 -
Expert Insights
51 -
Life at SAP
133 -
Life at SAP
1 -
Product Updates
666 -
Product Updates
24 -
SAP HANA Service
1 -
SAPHANACloud
1 -
SAPHANAService
1 -
Technology Updates
453 -
Technology Updates
15
Related Content
- Concept and PoC of a Simple Forms Solution for Emarsys in CRM and CX Blogs by SAP
- Landing Pages and Forms: Definition and Requirements in CRM and CX Blogs by SAP
- Password less Registration and Login process with SAP CDC – Part 4 in CRM and CX Blogs by SAP
- Data Binding with Repeating Items and Complex Tables in Print Forms in CRM and CX Blogs by SAP
- Drive buyers to engage and return – an introduction to SmartEdit in CRM and CX Blogs by SAP
Top kudoed authors
| User | Count |
|---|---|
| 5 | |
| 2 | |
| 2 | |
| 2 | |
| 2 | |
| 1 | |
| 1 | |
| 1 | |
| 1 | |
| 1 |