
- SAP Community
- Products and Technology
- Technology
- Technology Blogs by SAP
- Creating a Voice Controlled Chatbot with a Custom ...
Technology Blogs by SAP
Learn how to extend and personalize SAP applications. Follow the SAP technology blog for insights into SAP BTP, ABAP, SAP Analytics Cloud, SAP HANA, and more.
Turn on suggestions
Auto-suggest helps you quickly narrow down your search results by suggesting possible matches as you type.
Showing results for
former_member61
Participant
Options
- Subscribe to RSS Feed
- Mark as New
- Mark as Read
- Bookmark
- Subscribe
- Printer Friendly Page
- Report Inappropriate Content
11-29-2019
2:04 PM
This is the first part of a 2-part tutorial.
Very Short Summary
This is a post to show steps of building a custom user interface for a chatbot in UI5. The chatbot can be added to an existing UI5 app that is already deployed on SAP Cloud Platform. SAP Conversational AI API is used to process the user input, detect the intention and give a response based on the skills we create. Finally, a fragment view is used to display the chat between user and chatbot. Features such as Speech-To-Text are also included to enhance user experience.
Target Audience
You want to create your own UI for your chatbot.
You have a UI5 web application.
You want to be able to add new non-native features that don’t currently exist on the SAP Conversational AI platform.
You don’t want to use the default web chat UI given by the SAP. (This webchat UI can be found here at this view in your SAP Conversational AI platform account.

About this post
I wanted to add voice control to my chatbot that I was trying to integrate into an existing SAP Cloud Platform application. Voice control is not a native feature in SAP Conversational AI at the time of writing this article. I needed to create my own user interface for the chatbot so that I could add a mic button to activate speech-to-text feature.
I came across the following two blogs:
https://cai.tools.sap/blog/how-to-integrate-sap-conversational-ai-chatbot-to-sap-ui5/ https://blogs.sap.com/2019/04/05/integration-of-speech-enabled-chatbot-with-sap-fiori/
First one is about speech recognition via Google DialogFlow Natural Process Engine.
Second one is about ChatBot Integration to a Fiori App. Credits go to creators of those blog posts Manisha Madhwani and Rishikesh Aarsh for the idea as they inspired me.
I found tutorials for chatbot integration and some other blog posts for SAP Conversational AI and then some others on how to add custom features, but there wasn’t one place that helped me. I had to gather information from several different resources. This post is not a silver-bullet for custom chatbot UIs or non-native chatbot features but a comprehensive entry point for anyone who wants to take start developing a chatbot UI with non-native features such voice activation.
Prerequisites:
You are familiar with API usage and Ajax calls.
You have an account in SAP Conversational AI.
You are using Google Chrome Web Browser (Speech Recognition works only on Chrome)
What you will learn:
Part 1 of this post
Part 2 of this post
What is a Chatbot and why you would need it
A chatbot can speed up user interaction, increase retention rate for a website and enhance the user experience. It can increase the efficiency of navigation for users and help them find them what they are looking for in the website.
What is SAP Conversational AI?
SAP Conversational AI is bought by SAP and got integrated into our system. It was formerly known as recast.ai Currently, SAP Employees can create an account for free at the time of writing this article and start using their API by visiting here https://cai.tools.sap/.
How to follow steps in this post?
I will give snippets of functions. In your UI5 application, you can add these functions to your root component without affecting the existing functionality in your app. In your app, your root component might look like this based on whether you are extending a controller or creating your controller from scratch.
Learning #1 Getting an SAP Conversational AI developer token
We need to include the developer and request tokens to our GET request code. The tokens can be located in the SAP Conversational AI platform as follows:

Learning #2 Making fetch requests to an SAP Conversational AI endpoint
We will use our developer tokens that we got from step 1 to make requests to the SAP Conversational AI API. In this step, we must initialize the instance of the bot after the view rendering is complete.
I do have a component name as “mydomain.myappname.mycomponentname” in my BaseController.extend(). When you are using these code snippets, please make sure that your app name replaces this placeholder.
Learning # 3: Creating a Welcome Message when the pop over opens
We need to have a function to parse the user input, create a message element, respond to the user with the message element, and display message on our UI.
First, we add createMessage function.
There is a tweeter_flag that builds a query string to get tweets from Twitter API. Tweeter feature is beyond the scope of this post and can be considered as a placeholder right now.
Once we are done with parsing and responding, we create a function for welcome message generation for the user.
Once we implement the previous functions, sending a welcome message is achieved by calling the createMessage function with a welcome message inside the openBot function. Make sure that you call the following line in the openBot function
This will send a welcome message, whenever your chat bot is open.
Learning #4: Creating a Pop over fragment in your Fiori App so that users can click to open the bot
So far we have implemented functions to handle messaging, but we never created the UI for the user to see a UI container for our chat. Now, we are creating a view fragment to achieve a user container.
We are creating a Popover fragment view placed inside the view folder in our UI5 web app. Its name should be Popover.fragment.xml
Here is the function definition that would create an instance of the fragment view along with a function named openBot. openBot function has a line "this.oChatBot.openBy(this.byId('chatBtn'))". This will open our fragment view by the button with ID chatBtn. This means that you have to add a button to your existing application, and make sure that the button has the ID "chatBtn".
Here is the XML fragment view of what we are going to open.
Our pop over fragment view has to be placed inside the view folder in our UI5 app.
Conclusion
For the remaining steps, please make sure that you check part 2 of this blog series. Happy coding!
To see my other projects, you can check my personal website, GitHub page and Linkedin Page:
https://ya332.github.io/
https://github.com/ya332
https://www.linkedin.com/in/yigit-alparslan/
Very Short Summary
This is a post to show steps of building a custom user interface for a chatbot in UI5. The chatbot can be added to an existing UI5 app that is already deployed on SAP Cloud Platform. SAP Conversational AI API is used to process the user input, detect the intention and give a response based on the skills we create. Finally, a fragment view is used to display the chat between user and chatbot. Features such as Speech-To-Text are also included to enhance user experience.
Target Audience
You want to create your own UI for your chatbot.
You have a UI5 web application.
You want to be able to add new non-native features that don’t currently exist on the SAP Conversational AI platform.
You don’t want to use the default web chat UI given by the SAP. (This webchat UI can be found here at this view in your SAP Conversational AI platform account.
About this post
I wanted to add voice control to my chatbot that I was trying to integrate into an existing SAP Cloud Platform application. Voice control is not a native feature in SAP Conversational AI at the time of writing this article. I needed to create my own user interface for the chatbot so that I could add a mic button to activate speech-to-text feature.
I came across the following two blogs:
https://cai.tools.sap/blog/how-to-integrate-sap-conversational-ai-chatbot-to-sap-ui5/ https://blogs.sap.com/2019/04/05/integration-of-speech-enabled-chatbot-with-sap-fiori/
First one is about speech recognition via Google DialogFlow Natural Process Engine.
Second one is about ChatBot Integration to a Fiori App. Credits go to creators of those blog posts Manisha Madhwani and Rishikesh Aarsh for the idea as they inspired me.
I found tutorials for chatbot integration and some other blog posts for SAP Conversational AI and then some others on how to add custom features, but there wasn’t one place that helped me. I had to gather information from several different resources. This post is not a silver-bullet for custom chatbot UIs or non-native chatbot features but a comprehensive entry point for anyone who wants to take start developing a chatbot UI with non-native features such voice activation.
Prerequisites:
You are familiar with API usage and Ajax calls.
You have an account in SAP Conversational AI.
You are using Google Chrome Web Browser (Speech Recognition works only on Chrome)
What you will learn:
Part 1 of this post
- Getting an SAP Conversational AI developer token
- Making fetch requests to an SAP Conversational AI endpoint
- Creating a Welcome Message
- Creating a Pop over fragment in your Fiori App so that users can click to open the bot
Part 2 of this post
- Adding custom CSS to modify the interface of the chatbot container
- Creating a basic skill in SAP Conversational AI
- Implementing a button to the pop over in order to activate your microphone and speech-to-text conversion.
- Adding a Fallback skill to the chatbot so that bot says “I don’t get it” when the input is unclear to the bot
- Adding a “Bot is typing status” to the pop over
What is a Chatbot and why you would need it
A chatbot can speed up user interaction, increase retention rate for a website and enhance the user experience. It can increase the efficiency of navigation for users and help them find them what they are looking for in the website.
What is SAP Conversational AI?
SAP Conversational AI is bought by SAP and got integrated into our system. It was formerly known as recast.ai Currently, SAP Employees can create an account for free at the time of writing this article and start using their API by visiting here https://cai.tools.sap/.
How to follow steps in this post?
I will give snippets of functions. In your UI5 application, you can add these functions to your root component without affecting the existing functionality in your app. In your app, your root component might look like this based on whether you are extending a controller or creating your controller from scratch.
sap.ui.define([

	'jquery.sap.global',

	'sap/ui/core/Fragment',

	'sap/ui/core/mvc/Controller',

	'sap/ui/model/json/JSONModel',

	'sap/m/Popover',

	'sap/m/Button',

	"../controller/BaseController",

	"sap/m/Dialog",

	"sap/m/MessageToast",

	"sap/ui/core/mvc/XMLView"

], function (jQuery, Fragment, Controller, JSONModel, Popover, Button, BaseController, Dialog, MessageToast, XMLView) {

	"use strict";


	var CController = BaseController.extend("mydomain.myappname.mycomponentname.", {

		model: new sap.ui.model.json.JSONModel(),

		data: {},

		onInit: function () {

			var that = this;

			var oStatus = sap.ui.getCore().byId("statusbar");

		},
Learning #1 Getting an SAP Conversational AI developer token
We need to include the developer and request tokens to our GET request code. The tokens can be located in the SAP Conversational AI platform as follows:
Learning #2 Making fetch requests to an SAP Conversational AI endpoint
We will use our developer tokens that we got from step 1 to make requests to the SAP Conversational AI API. In this step, we must initialize the instance of the bot after the view rendering is complete.
onAfterRendering: function () {

this.getBotInstanceId(); //get user uuid of your bot account in recast.ai

this.getView().byId("chatBtn").attachPress(this.openBot.bind(this)); //attaching press to open chat window

},


getBotInstanceId: function () {

			var that = this;

			$.ajax({

				type: "GET",

				url: "https://" + "api.recast.ai/auth/v1/owners/<Your account user name is here> ",

				headers: {

					"Authorization": "Your Request Token Here" //request token

				},

				success: function (data) {

					that.uuid = data.results.owner.id;

					//MessageToast.show("Bot instance is successfully created");

					//console.log("uuid" + that.uuid);

				},

				error: function (data) {

					that.botError = data;

					MessageToast.show("Bot instance failed to create");

				}

			});


		}
I do have a component name as “mydomain.myappname.mycomponentname” in my BaseController.extend(). When you are using these code snippets, please make sure that your app name replaces this placeholder.
Learning # 3: Creating a Welcome Message when the pop over opens
We need to have a function to parse the user input, create a message element, respond to the user with the message element, and display message on our UI.
First, we add createMessage function.
	createMessage: function (from, message, delay, tweeter_flag) {

			var sSrc, sStyle;

			var listItem;

			if (from === "bot") {


				sSrc = "https://cdn.recast.ai/webchat/bot.png";

				sStyle = "botStyle";


					listItem = new sap.m.CustomListItem({

						content: [

							new sap.m.Image({

								src: sSrc,

								height: "2rem"


							}),

							new sap.m.Text({

								text: message

							})

						]


					});


			} else if (from === "user") {

				sSrc = "https://cdn.recast.ai/webchat/user.png";

				sStyle = "userStyle";

				listItem = new sap.m.CustomListItem({

					content: [

						new sap.m.Text({

							text: message

						}),

						new sap.m.Image({

							src: sSrc,

							height: "2rem"

						})

					]

				});

			}


			listItem.addStyleClass(sStyle);

			var oChatList = this.byId(sap.ui.core.Fragment.createId(this.createId("chatBotFragment"), "list1"));

			oChatList.addItem(listItem);


			var oScrollContainer = this.byId(sap.ui.core.Fragment.createId(this.createId("chatBotFragment"), "scrollBot"));

			oScrollContainer.rerender(true);

			oScrollContainer.scrollToElement(listItem);

		},
There is a tweeter_flag that builds a query string to get tweets from Twitter API. Tweeter feature is beyond the scope of this post and can be considered as a placeholder right now.
	parseText: function (event) {

			var message;

			if (event.sId === "change") {

				try {

					sap.ui.getCore().byId("sap-ui-invisible-interndashboard---app--chatBotFragment--statusbar").setVisible(true);


				} catch (error) {


					sap.ui.getCore().byId("interndashboard---app--chatBotFragment--statusbar").setVisible(true);


				}

				message = event.mParameters.newValue.trim();


				if (message !== "") {

					var content = this.getView();

					var inputId = sap.ui.core.Fragment.createId(this.createId("chatBotFragment"), "chat");

					var myChat = content.byId(inputId);

					myChat.setValue("");

					this.createMessage("user", message, "0", "false");

					this.respondTo(message);


				}

			}

		},


		respondTo: function (message) {

			if (message.indexOf(" ") === -1)

				msgLength = 1;

			else

				msgLength = message.split(" ").length;


			// maximum response length is 2 more words than the incoming message

			responseLength = Math.ceil(Math.random() * (msgLength + 2));


			// longer sentences should get a comma

			if (responseLength > 😎

				comma = Math.ceil(responseLength / 2);


			// simulated delayed response

			delay = Math.ceil(Math.random() * (responseLength + 1) * 1000) + 2500;

			if (msgLength > 0) { //if user has inputted message then

				var _data = {

					"message": {

						"type": "text",

						"content": message

					},

					"conversation_id": "test-1533969037613",

					"log_level": "info"

				};

				var that = this;

				$.ajax({

					type: "POST",

					data: JSON.stringify(_data),

					url: "https://" + "api.recast.ai/build/v1/dialog", //bot connector callback url you will find under settings>options

					contentType: "application/json",

					path: "/build/v1/dialog",

					scheme: "https",

					headers: {

						"Authorization": "Token xxxxxxxxxxxxxxxxxxxxx", //developer token

						"x-uuid": that.uuid

					},

					success: function (data) {


						that.pqaBotConversation = data;

						var user_input = data.results.logs.input;


						try {

							sap.ui.getCore().byId("interndashboard---app--chatBotFragment--statusbar").setVisible(false);

						} catch(error) {

							sap.ui.getCore().byId("sap-ui-invisible-interndashboard---app--chatBotFragment--statusbar").setVisible(false);

						}


						var tweeter_flag;

						// Remove Bot is typing.

						if (data.results.conversation.skill=="fallback") {

							that.createMessage("bot", fallback, "0", "false");

						}

						else if (data.results.messages[0].content != "") {

							tweeter_flag = "false";

							that.createMessage("bot", data.results.messages[0].content, delay, tweeter_flag);

						} else {

							that.createMessage("bot", "I dont know what to do. I dont understand it", delay, tweeter_flag);

						}

					},

					error: function (data) {

						that.botError = data;

						var fallback = "I don't understand it."

						that.createMessage("bot", fallback, "0", "false");

					}

				});

			}

		},
Once we are done with parsing and responding, we create a function for welcome message generation for the user.
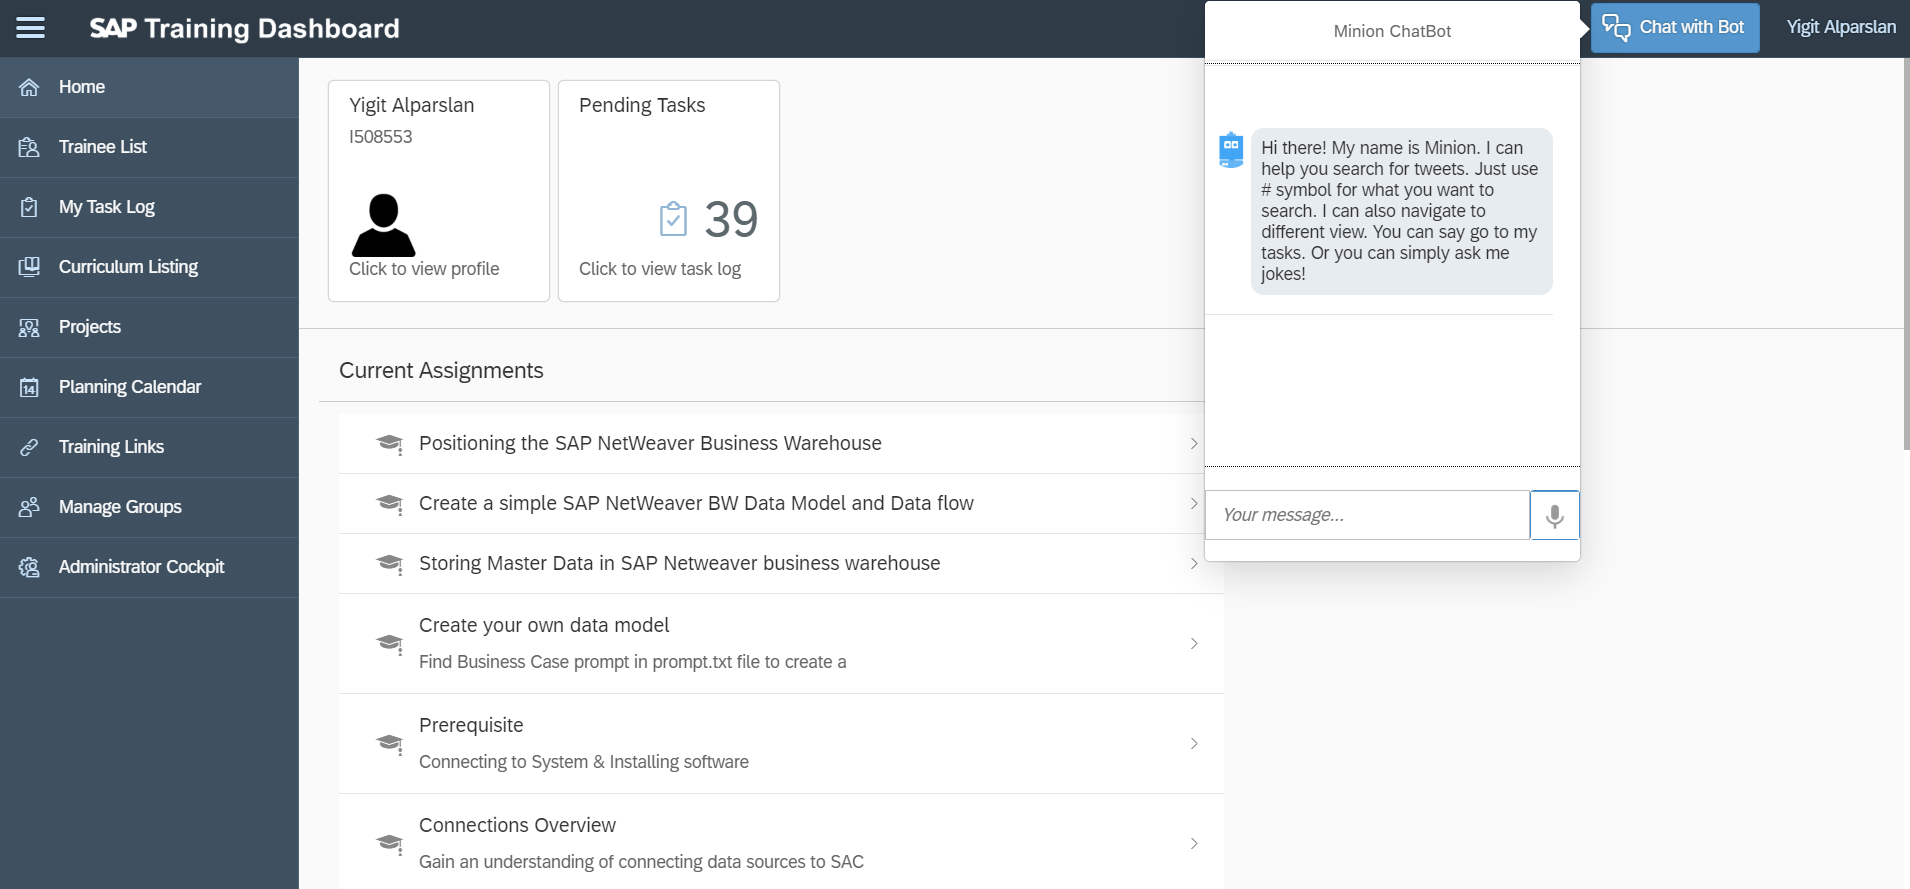
createWelcomeMessage: function () {

			var welcome = "Hi there! My name is Minion. I can help you search for tweets. Just use # symbol for what you want to search. I can also navigate to different view. You can say go to my tasks. Or you can simply ask me jokes!";

			this.createMessage("bot",welcome,"0","false");

		},
Once we implement the previous functions, sending a welcome message is achieved by calling the createMessage function with a welcome message inside the openBot function. Make sure that you call the following line in the openBot function
this.createWelcomeMessage()This will send a welcome message, whenever your chat bot is open.
Learning #4: Creating a Pop over fragment in your Fiori App so that users can click to open the bot
So far we have implemented functions to handle messaging, but we never created the UI for the user to see a UI container for our chat. Now, we are creating a view fragment to achieve a user container.
We are creating a Popover fragment view placed inside the view folder in our UI5 web app. Its name should be Popover.fragment.xml
Here is the function definition that would create an instance of the fragment view along with a function named openBot. openBot function has a line "this.oChatBot.openBy(this.byId('chatBtn'))". This will open our fragment view by the button with ID chatBtn. This means that you have to add a button to your existing application, and make sure that the button has the ID "chatBtn".
handleChatButton: function (oEvent) {

			//create popover

			if (!this._oPopover) {

				var typingStatus = {

					value: "Bot is typing..."

				};

				this._oPopover = sap.ui.xmlfragment(this.getView().getId(), "interndashboard.view.Popover", this);

				// this._oPopover.setModel(this.getView().getModel());

				this.getView().addDependent(this._oPopover);

				this.typingStatus = typingStatus;

			}

			if (this._oPopover.isOpen()) {

				this._oPopover.openBy(oEvent.getSource());

				var oChatList = this.byId(sap.ui.core.Fragment.createId(this.createId("chatBotFragment"), "list1"));

				this.chatScroll.rerender(true);

				if (oChatList.getMaxItemsCount() > 0) {

					this.chatScroll.scrollToElement(oChatList.getItems()[oChatList.getMaxItemsCount() - 1]);


				}

			}

		},


openBot: function (oEvent) {

			if (!this.oChatBot) {

				this.oChatBot = sap.ui.xmlfragment(this.createId("chatBotFragment"), "interndashboard.view.Popover", this);

				this.oChatBot.attachBeforeOpen(this.onBeforeBotOpen.bind(this));

			}

			var oModel = new sap.ui.model.json.JSONModel({

				data: {}

			});

			this.oChatBot.setModel(oModel);

			this.oChatBot.openBy(this.byId('chatBtn')); //detailContent.getFooter().getContentRight()[1]);

			this.createWelcomeMessage();

			this.chatInput = this.byId(sap.ui.core.Fragment.createId(this.createId("chatBotFragment"), "chat"));

			this.chatInput.atttachBrowserEvent("keyup", this.parseText.bind(this), false);

			this.chatInput.addStyleClass("botInput");

		},
Here is the XML fragment view of what we are going to open.
<core:FragmentDefinition xmlns="sap.m" xmlns:core="sap.ui.core" id="chatbotFragment">

	<Popover showArrow="true" title="Minion ChatBot" placement="Auto" horizontalScrolling="true" id="botPopover">

		<FlexBox xmlns:mvc="sap.ui.core.mvc" xmlns:layout="sap.ui.layout" xmlns:microchart="sap.suite.ui.microchart" xmlns="sap.m" width="300px"

			class="container" height="400px" justifyContent="Center" wrap="Wrap" alignItems="End">

			<items>

				<FlexBox width="300px" height="80%" alignItems="End">

					<ScrollContainer id="scrollBot" height="100%" width="300px" horizontal="false" vertical="true" focusable="true">

						<List id="list1" width="300px" enableBusyIndicator="false" showSeparator="None">

							<items>

								<CustomListItem id="item1">

									<content></content>

								</CustomListItem>

							</items>

						</List>

					</ScrollContainer>

				</FlexBox>

				<FlexBox width="100%" height="10px">

					<items>

						<Text id="statusbar" class="statusBar" text="Bot is typing..." visible="false"></Text>

					</items>

				</FlexBox>

				<FlexBox width="100%" class="chat_input full" height="15%">

					<items>

						<Input width="260px" id="chat" placeholder="Your message..." change="parseText"/>

						<Button type="Emphasized" press="handleSpeechToText" id="mic"

							icon="https://www.google.com/intl/en/chrome/assets/common/images/content/mic.gif" text=""/>

					</items>

				</FlexBox>

			</items>

		</FlexBox>

	</Popover>

</core:FragmentDefinition>
Our pop over fragment view has to be placed inside the view folder in our UI5 app.
Conclusion
For the remaining steps, please make sure that you check part 2 of this blog series. Happy coding!
To see my other projects, you can check my personal website, GitHub page and Linkedin Page:
https://ya332.github.io/
https://github.com/ya332
https://www.linkedin.com/in/yigit-alparslan/
- SAP Managed Tags:
- SAP Conversational AI
Labels:
You must be a registered user to add a comment. If you've already registered, sign in. Otherwise, register and sign in.
Labels in this area
-
ABAP CDS Views - CDC (Change Data Capture)
2 -
AI
1 -
Analyze Workload Data
1 -
BTP
1 -
Business and IT Integration
2 -
Business application stu
1 -
Business Technology Platform
1 -
Business Trends
1,658 -
Business Trends
91 -
CAP
1 -
cf
1 -
Cloud Foundry
1 -
Confluent
1 -
Customer COE Basics and Fundamentals
1 -
Customer COE Latest and Greatest
3 -
Customer Data Browser app
1 -
Data Analysis Tool
1 -
data migration
1 -
data transfer
1 -
Datasphere
2 -
Event Information
1,400 -
Event Information
66 -
Expert
1 -
Expert Insights
177 -
Expert Insights
295 -
General
1 -
Google cloud
1 -
Google Next'24
1 -
Kafka
1 -
Life at SAP
780 -
Life at SAP
13 -
Migrate your Data App
1 -
MTA
1 -
Network Performance Analysis
1 -
NodeJS
1 -
PDF
1 -
POC
1 -
Product Updates
4,577 -
Product Updates
341 -
Replication Flow
1 -
RisewithSAP
1 -
SAP BTP
1 -
SAP BTP Cloud Foundry
1 -
SAP Cloud ALM
1 -
SAP Cloud Application Programming Model
1 -
SAP Datasphere
2 -
SAP S4HANA Cloud
1 -
SAP S4HANA Migration Cockpit
1 -
Technology Updates
6,873 -
Technology Updates
419 -
Workload Fluctuations
1
Related Content
- Demystifying the Common Super Domain for SAP Mobile Start in Technology Blogs by SAP
- Improving Time Management in SAP S/4HANA Cloud: A GenAI Solution in Technology Blogs by SAP
- IoT - Ultimate Data Cyber Security - with Enterprise Blockchain and SAP BTP 🚀 in Technology Blogs by Members
- Embracing TypeScript in SAPUI5 Development in Technology Blogs by Members
- New Machine Learning features in SAP HANA Cloud in Technology Blogs by SAP
Top kudoed authors
| User | Count |
|---|---|
| 35 | |
| 25 | |
| 17 | |
| 13 | |
| 8 | |
| 7 | |
| 6 | |
| 6 | |
| 6 | |
| 6 |