
- SAP Community
- Products and Technology
- Enterprise Resource Planning
- ERP Blogs by Members
- AI-based Invoice Data Capture Integration with S/4...
Enterprise Resource Planning Blogs by Members
Gain new perspectives and knowledge about enterprise resource planning in blog posts from community members. Share your own comments and ERP insights today!
Turn on suggestions
Auto-suggest helps you quickly narrow down your search results by suggesting possible matches as you type.
Showing results for
kimveasna_xyz
Explorer
Options
- Subscribe to RSS Feed
- Mark as New
- Mark as Read
- Bookmark
- Subscribe
- Printer Friendly Page
- Report Inappropriate Content
11-28-2019
12:29 AM
Introduction
I have discovered recently Rossum.ai, a Data Capture tool based on artificial intelligence. This is not OCR, but an AI engine which detects data fields and annotate scanned documents. My explanation does not worth the official documentation.
I really like the freemium approach, where you can test and play with in order to evaluate. This is quite uncommon, as Invoice Capture products in SAP landscape are usually untouchable before you actually start commercial discussions with sales representatives.
Their API is simple, yet efficient and well-documented, and you can start playing with SAP integration in no time.
We will implement a simple demo use case as follows:
|

|

|

|
The final process will look like:
In order to accomplish it, we will have to go through these implementation steps:
- Have all our accounts and settings ready in both Rossum and S/4 (of course)
- Analyze and understand API message payloads with a REST client (postman)
- Extend Rossum schema to add a custom field holding SAP supplier code
- Implement extension hook "validate": simple supplier matching to retrieve SAP supplier code from name
- Implement extension hook "save": transfer invoice to S/4HANA
Setup
Rossum.ai
Our account is already usable out of the box after registration: we can upload invoices and check automatic annotations. No overwhelming setup or training is required, which is really huge time saving.
In order to use API and have access to extended option, we will install command line tool elisctl (installation instructions).
SAP S/4HANA
We need to make sure OData services for Partners et Supplier Invoices are activated in /IWFND/MAINT_SERVICES: API_BUSINESS_PARTNER and API_SUPPLIERINVOICE_PROCESS_SRV. I am not going to provide much more details, I assume we know how to use them.
API: understanding annotation structure
Rossum API is simple to use. Every request must be authorized by a token, which is provided as we login:
- Login and retrieve authentication token
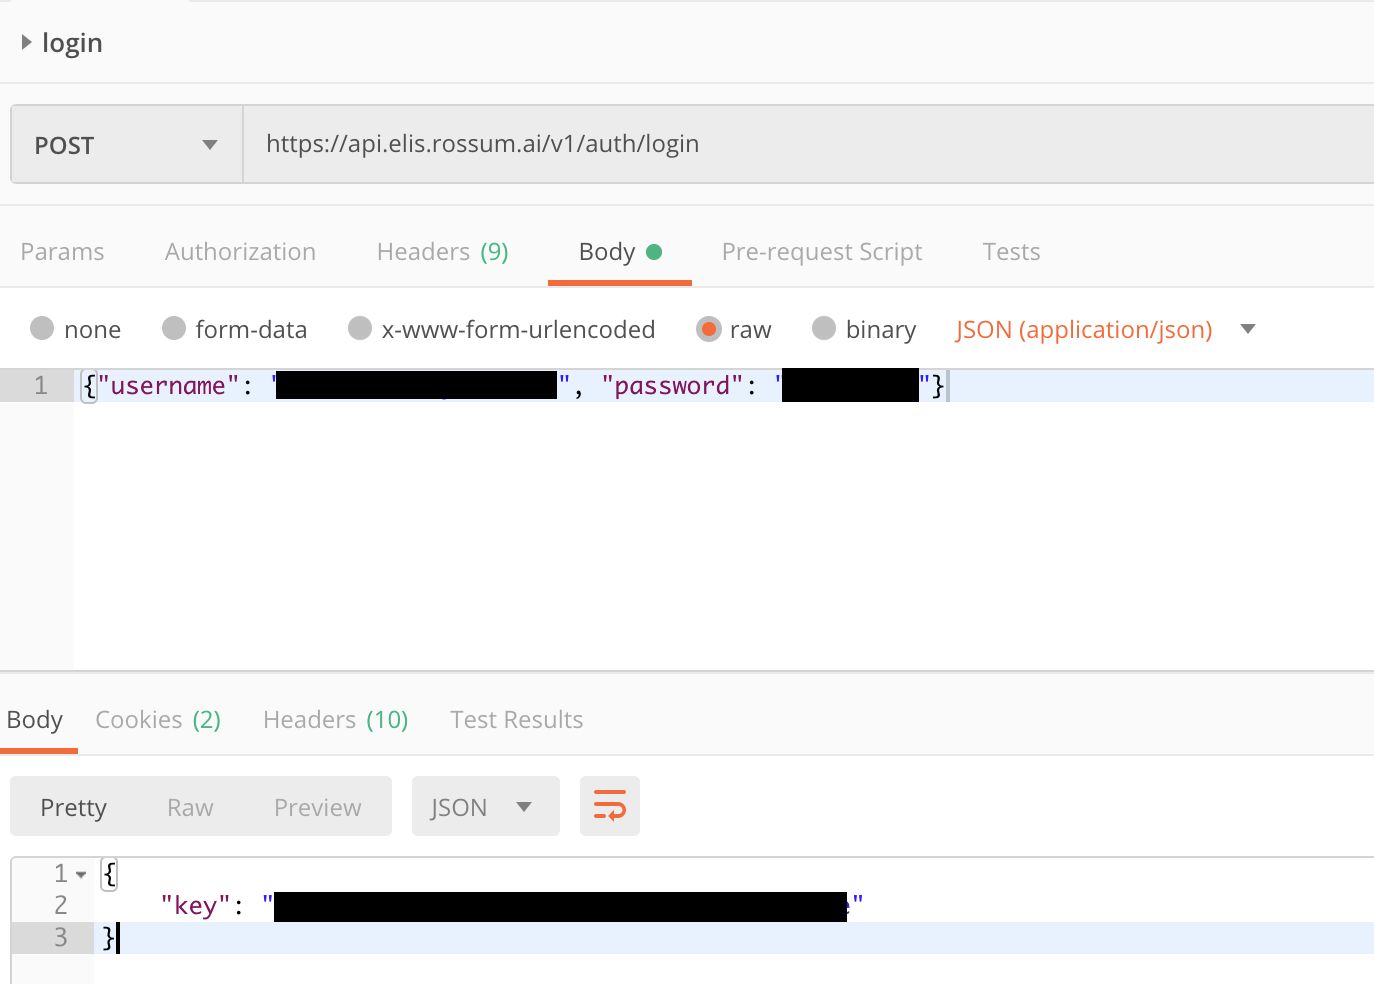
Field value key in response payload is our authorization token, and must be provided in our request headers.
- Retrieve queues: in our case only one is available

- Retrieve annotations from queue

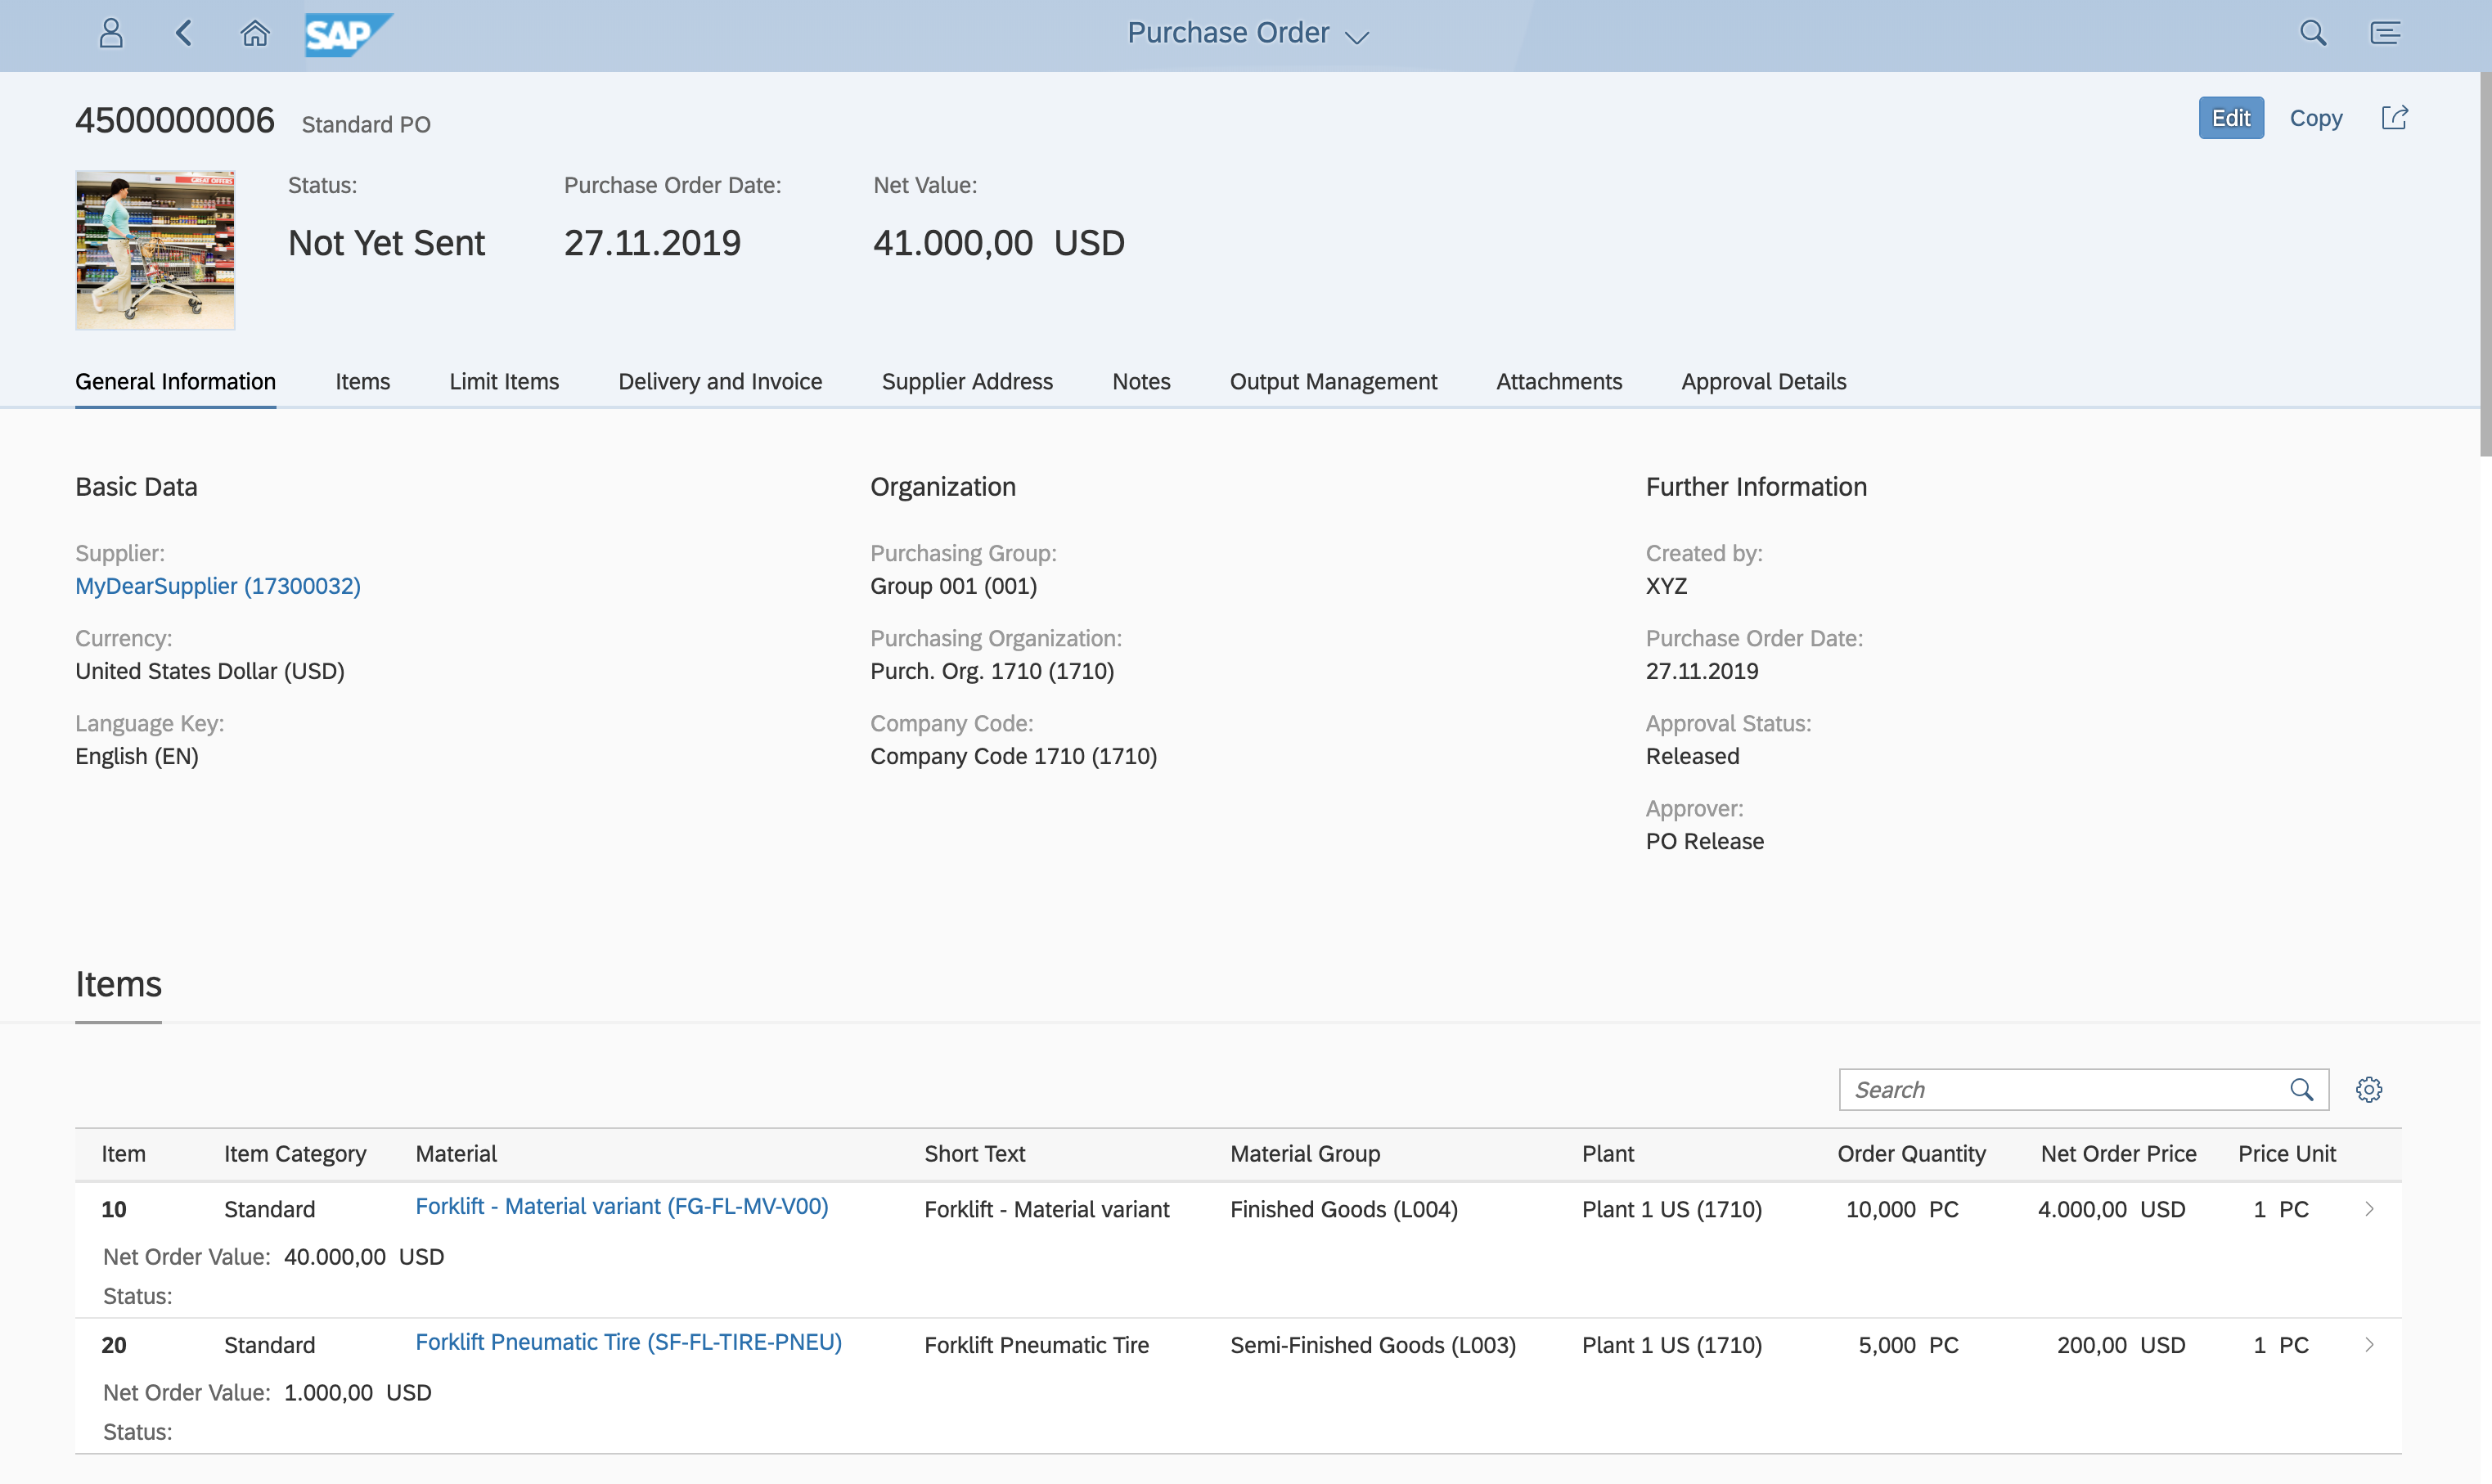
Annotation structure is exactly as on validation screen:

Extend schema with custom field "SAP supplier"
Schema can be extended with API calls or with elisctl. I have no preference so far and we will use command lines: at least it will (very slightly) simplify upload/download.
First, logon to our account using elisctl:
Welcome to the elisctl interactive mode. Start with `help` and `configure`.

elis> configure

API URL [https://api.elis.rossum.ai]:

Username: xxxx@yyy

Password: ******
Detected fields and annotations are declared in a schema. We need to extend our current schema so to make available one extra field in the annotation. We start by downloading it.
elis> queue list

   id  name                    workspace  inbox                           schema    users  connector                                      webhooks

-----  --------------------  -----------  ----------------------------  --------  -------  ---------------------------------------------  ----------

28056  Received EU invoices        25714  xxxxxxxxxxxxx@elis.rossum.ai    240106    35005  https://api.elis.rossum.ai/v1/connectors/2998


elis> schema get 240106 -O testschema.json
Then change it by adding a new datapoint.

Once done, We upload it back.
elis> schema update 240106 testschema.jsonOur new field is now available and visible in the settings

And voilà. It is directly available as an annotation field, and of course we can add as many custom fields as required: SAP material code, SAP company code, and much more. We will keep our demo simple though and have only one custom field.
The new added field is just a placeholder for now: Rossum is not going to magically determine my backend supplier code whereas its number does not appear on invoice. We could as well let it entirely manual, expecting end-user to fill it during validation step, but this would make no sense. This is where Rossum extension comes into play.
In the next step, We will declare a custom hook which will be triggered during validation: the so-called validate extension. Our extension will then call OData service API_BUSINESS_PARTNER and match a supplier code with the supplier name as recognized by Rossum. Actually we am going to reuse the partner search function we have created for our chatbot.
Implement custom hook validate
Declare a custom plugin: we use endpoint connector to post a new extension, which is no more than a name and an url. Pay attention to authorization token: it is our responsibility to authorize only request providing this token (up to us to decide on the token value/validation in our code). Though not recommended, we could as well fill any dummy value here and ignore authorization token in our custom code.

Now our extension is declared, we need to implement endpoint function /validate.
As explained in my earlier post, we will simply implement our hooks using Firebird Cloud Functions. Hassle-free service. We could do the same with AWS lambda.
The incoming request will post a payload message like this:
{

  "meta": {

    "document_url": "https://api.elis.rossum.ai/v1/documents/6780",

    "arrived_at": "2019-01-30T07:55:13.208304Z",

    ... ...

    "rir_poll_id": "54f6b9ecfa751789f71ddf12"

  },

  "content": [

        {

            "id": 133915359,

            "url": "https://api.elis.rossum.ai/v1/annotations/1166616/content/133915359",

            "children": [...],

            "category": "section",

            "schema_id": "invoice_info_section"

        },

        {

            "id": 133915368,

            "url": "https://api.elis.rossum.ai/v1/annotations/1166616/content/133915368",

            "children": [...],

            "category": "section",

            "schema_id": "payment_info_section"

        },

        {

            "id": 133915378,

            "url": "https://api.elis.rossum.ai/v1/annotations/1166616/content/133915378",

            "children": [...],

            "category": "section",

            "schema_id": "amounts_section"

        },

        {

            "id": 133915386,

            "url": "https://api.elis.rossum.ai/v1/annotations/1166616/content/133915386",

            "children": [

                {

                    "id": 137835747,

                    "url": "https://api.elis.rossum.ai/v1/annotations/1201234/content/137835747",

                    "content": {

                        "value": "MyDearSupplier",

                        "page": 1,

                        "position": [

                            889.0,

                            168.0,

                            1067.0,

                            210.0

                        ],

                        "rir_text": "MyDearSupplier",

                        "rir_position": [

                            889.0,

                            168.0,

                            1067.0,

                            210.0

                        ],

                        "rir_confidence": 0.6798204155690549,

                        "connector_position": null,

                        "connector_text": null

                    },

                    "category": "datapoint",

                    "schema_id": "sender_name",

                    "validation_sources": [],

                    "time_spent": 0.0

                },

                ...,

                {

                    "id": 137835750,

                    "url": "https://api.elis.rossum.ai/v1/annotations/1201234/content/137835750",

                    "content": {

                        "value": "",

                        "page": null,

                        "position": null,

                        "rir_text": "",

                        "rir_position": null,

                        "rir_confidence": null,

                        "connector_position": null,

                        "connector_text": null

                    },

                    "category": "datapoint",

                    "schema_id": "sap_supplier",

                    "validation_sources": [],

                    "time_spent": 0.0

                },

                ...

            ],

            "category": "section",

            "schema_id": "vendor_section"

        },

        {

            "id": 133915396,

            "url": "https://api.elis.rossum.ai/v1/annotations/1166616/content/133915396",

            "children": [...],

            "category": "section",

            "schema_id": "other_section"

        },

        {

            "id": 133915398,

            "url": "https://api.elis.rossum.ai/v1/annotations/1166616/content/133915398",

            "children": [...],

            "category": "section",

            "schema_id": "line_items_section"

        }

    ]

}
As shown in this sample, we will find supplier name under payload.content[3].children[0] and SAP supplier code under payload.content[3].children[1]. Of course we are not going to fetch by index directly (too much bug prone), but in our simple custom code, we will loop over all datapoints in seek of supplier name by checking schema_id. Once we have it, we will call our backend OData service to match with SAP supplier number. Finally, we will update our custom datapoint SAP supplier code with the correct number by responding with message:
{

  "messages": [

    {

      "content": "SAP Supplier <name> is matched with SAP number <sap_code>",

      "id": "<datapoint_id (=137835750 in sample)>"

      "type": "info"

    }

  ],

  "updated_datapoints": [

    {

      "id": "<datapoint_id (=137835750 in sample)>",

      "value": "<sap_code>"

    }

  ]

}

Sample implementation of /validate:
exports.validate = functions.https.onRequest((request, response) => {

    console.log(request.body);


    //response.sendStatus(200);

    return parseRossumContent(request.body)

        .then((content:any) => {

            return response.json({

                messages: [

                    {

                        content: "OK",

                        type: "info",

                        id: `${content.id}`

                    }

                ],

                updated_datapoints: [

                    content

                ]

            });

        })

        .catch((error: any) => {

            // handle error

            console.log(error);

        })

});
where parseRossumContent function is:
function parseRossumContent(data:any):Promise<any> {


    // Vendor name

    let sender_name:string = ''


    // SAP supplier annotation id

    let sap_supplier_schema_id:string = ''


    // Loop over all content lines until vendor_section

    data.content.some((section:any) => {


        // Found, now check its children

        if(section.schema_id === 'vendor_section') {


            // Loop over vendor_section.children until sender_name and sap_supplier

            section.children.some((subsection:any) => {

                if(subsection.schema_id === 'sender_name') {

                    sender_name = subsection.value;

                }

                else if(subsection.schema_id === 'sap_supplier') {

                    sap_supplier_schema_id = subsection.id

                }

                return (sender_name !== '' && sap_supplier_schema_id != '')

            })

            return true

        }

        return false

    })


    // At this stage, both sender_name and sap_supplier_schema_id are known

    return searchSupplier(sender_name)

        .then((sap_code:any) => {

            return {

                id: sap_supplier_schema_id,

                value: sap_code

            }

        })

}
Implement custom hook save
As with the previous section, we implement endpoint /save. In this part, we will integrate Rossum data as supplier invoice in S/4HANA.
Incoming payload has the same structure as for /validate, and no response payload is expected in case of successful processing, just HTTP status code 204.
To create an invoice in S/4 is as easy as posting OData service API_SUPPLIERINVOICE_PROCESS_SRV with the following payload:
{

    "CompanyCode": "1710",

    "DocumentDate": "/Date(1574208000000)/",

    "PostingDate": "/Date(1574208000000)/",

    "SupplierInvoiceIDByInvcgParty": "Vendor invoice number",

    "InvoicingParty": "17300032",

    "DocumentCurrency": "USD",

    "InvoiceGrossAmount": "120000.00",

    "to_SuplrInvcItemPurOrdRef": [

        {

            "SupplierInvoiceItem": "1",

            "PurchaseOrder": "4500000004",

            "PurchaseOrderItem": "10",

            "Plant": "1710",

            "TaxCode": "I1",

            "DocumentCurrency": "USD",

            "SupplierInvoiceItemAmount": "120000.00",

            "PurchaseOrderQuantityUnit": "PC",

            "QuantityInPurchaseOrderUnit": "30",

            "PurchaseOrderPriceUnit": "PC",

            "QtyInPurchaseOrderPriceUnit": "30"

        }

    ]

}
Our /save function is not very complex: we start by parsing annotation in a kind of key-value structure, then we call API in 2 steps, first GET to retrieve CSRF token and cookie, then POST to actually create the supplier invoice.
exports.save = functions.https.onRequest((request, response) => {

    console.log(request.body);

    const parsedContent = parseRossumContentForSave(request.body)


    const url = "https://yourserver:443/sap/opu/odata/sap/API_SUPPLIERINVOICE_PROCESS_SRV/A_SupplierInvoice";


    // Axios request options

    let options = {

        headers: {

            "Authorization": "Basic xxx",

            "Content-Type": "application/json",

            "Accept": "application/json",

            "x-csrf-token": "fetch",

        },

        params: {

            'sap-client': '100',

            '$format': 'json',

            '$top': 0

        },

        xsrfHeaderName: 'x-csrf-token',

        withCredentials: true

    };


    // Store invoice date in javascript format

    const invoiceDate:Date = new Date(parsedContent.invoice_info_section.date_issue)


    // Declare items to be filled, total amount will be the sum of item amounts

    let items:any[] = []

    let total = 0

    let itemNum = 0


    // Prepare items

    parsedContent.items.forEach((item:any) => {

        itemNum++

        total += Number(item.item_amount_total.replace(/\s+/g, ''))

        items.push({

            SupplierInvoiceItem: itemNum.toString(),

            PurchaseOrder: parsedContent.invoice_info_section.order_id,

            PurchaseOrderItem: (itemNum*10) .toString(),

            Plant: "1710",

            TaxCode: "I1",

            DocumentCurrency: parsedContent.amounts_section.currency.toUpperCase(),

            SupplierInvoiceItemAmount: item.item_amount_total.replace(/\s+/g, ''),

            PurchaseOrderQuantityUnit: "PC",

            QuantityInPurchaseOrderUnit: item.item_quantity.replace(/\s+/g, ''),

            PurchaseOrderPriceUnit: "PC",

            QtyInPurchaseOrderPriceUnit: item.item_quantity.replace(/\s+/g, '')

        })

    })


    // First GET request is to get CSRF token

    axios.get(url, options)

        .then((res:any) => {

            console.log("Get OK")

            console.log(res)


            let invoice_json = {

                CompanyCode: "1710",

                DocumentDate: `/Date(${invoiceDate.valueOf()})/` ,

                PostingDate: `/Date(${invoiceDate.valueOf()})/`,

                SupplierInvoiceIDByInvcgParty: parsedContent.invoice_info_section.invoice_id,

                InvoicingParty: parsedContent.vendor_section.sap_supplier,

                DocumentCurrency: parsedContent.amounts_section.currency.toUpperCase(),

                InvoiceGrossAmount: total.toString(),


                to_SuplrInvcItemPurOrdRef: items

            }


            // CSRF token in header must be accompanied with Cookie. Not sure this is the best way to manage it ...

            let cookie = ""

            res.headers['set-cookie'].forEach((val:string) => {

                cookie += val.split(";")[0] + ";"

            })


            return axios.post(url,invoice_json, {

                headers: {

                    "Authorization": "Basic xxx",

                    "Content-Type": "application/json",

                    "Accept": "application/json",

                    "x-csrf-token": res.headers['x-csrf-token'],

                    'Cookie': cookie,

                },

                params: {

                    'sap-client': '100'

                },

                xsrfHeaderName: 'x-csrf-token',

                withCredentials: true

            })

        })

        .then(response.status(204))

        .catch((error:any) => {

            console.log(error.response)

        })

});
Conclusion
I am really impressed by the simplicity of use of rossum.ai, and I am glad they offer a trial we can easily play with. My demo was straightforward, but we can imagine more complex scenarios with higher integration points (supplier repository, purchase order, material, etc.) so to build a more complete and efficient tool for invoice recognition and matching. It really worths a try, especially in comparison to more complex, expensive and monolithic VIM tools we are used to plug to SAP ECC or S/4.
In my next post, I will explain how to combine Rossum.ai with Google DialogFlow Chatbot to enhance user interaction in our invoice receipt process.
Enjoy!
- SAP Managed Tags:
- SAP S/4HANA,
- MM Invoice Verification
3 Comments
You must be a registered user to add a comment. If you've already registered, sign in. Otherwise, register and sign in.
Labels in this area
-
"mm02"
1 -
A_PurchaseOrderItem additional fields
1 -
ABAP
1 -
ABAP Extensibility
1 -
ACCOSTRATE
1 -
ACDOCP
1 -
Adding your country in SPRO - Project Administration
1 -
Advance Return Management
1 -
AI and RPA in SAP Upgrades
1 -
Approval Workflows
1 -
Ariba
1 -
ARM
1 -
ASN
1 -
Asset Management
1 -
Associations in CDS Views
1 -
auditlog
1 -
Authorization
1 -
Availability date
1 -
Azure Center for SAP Solutions
1 -
AzureSentinel
2 -
Bank
1 -
BAPI_SALESORDER_CREATEFROMDAT2
1 -
BRF+
1 -
BRFPLUS
1 -
Bundled Cloud Services
1 -
business participation
1 -
Business Processes
1 -
CAPM
1 -
Carbon
1 -
Cental Finance
1 -
CFIN
1 -
CFIN Document Splitting
1 -
Cloud ALM
1 -
Cloud Integration
1 -
condition contract management
1 -
Connection - The default connection string cannot be used.
1 -
Custom Table Creation
1 -
Customer Screen in Production Order
1 -
Data Quality Management
1 -
Date required
1 -
Decisions
1 -
desafios4hana
1 -
Developing with SAP Integration Suite
1 -
Direct Outbound Delivery
1 -
DMOVE2S4
1 -
EAM
1 -
EDI
3 -
EDI 850
1 -
EDI 856
1 -
edocument
1 -
EHS Product Structure
1 -
Emergency Access Management
1 -
Energy
1 -
EPC
1 -
Financial Operations
1 -
Find
1 -
FINSSKF
1 -
Fiori
1 -
Flexible Workflow
1 -
Gas
1 -
Gen AI enabled SAP Upgrades
1 -
General
1 -
generate_xlsx_file
1 -
Getting Started
1 -
HomogeneousDMO
1 -
IDOC
2 -
Integration
1 -
Learning Content
2 -
LogicApps
2 -
low touchproject
1 -
Maintenance
1 -
management
1 -
Material creation
1 -
Material Management
1 -
MD04
1 -
MD61
1 -
methodology
1 -
Microsoft
2 -
MicrosoftSentinel
2 -
Migration
1 -
mm purchasing
1 -
MRP
1 -
MS Teams
2 -
MT940
1 -
Newcomer
1 -
Notifications
1 -
Oil
1 -
open connectors
1 -
Order Change Log
1 -
ORDERS
2 -
OSS Note 390635
1 -
outbound delivery
1 -
outsourcing
1 -
PCE
1 -
Permit to Work
1 -
PIR Consumption Mode
1 -
PIR's
1 -
PIRs
1 -
PIRs Consumption
1 -
PIRs Reduction
1 -
Plan Independent Requirement
1 -
Premium Plus
1 -
pricing
1 -
Primavera P6
1 -
Process Excellence
1 -
Process Management
1 -
Process Order Change Log
1 -
Process purchase requisitions
1 -
Product Information
1 -
Production Order Change Log
1 -
purchase order
1 -
Purchase requisition
1 -
Purchasing Lead Time
1 -
Redwood for SAP Job execution Setup
1 -
RISE with SAP
1 -
RisewithSAP
1 -
Rizing
1 -
S4 Cost Center Planning
1 -
S4 HANA
1 -
S4HANA
3 -
Sales and Distribution
1 -
Sales Commission
1 -
sales order
1 -
SAP
2 -
SAP Best Practices
1 -
SAP Build
1 -
SAP Build apps
1 -
SAP Cloud ALM
1 -
SAP Data Quality Management
1 -
SAP Maintenance resource scheduling
2 -
SAP Note 390635
1 -
SAP S4HANA
2 -
SAP S4HANA Cloud private edition
1 -
SAP Upgrade Automation
1 -
SAP WCM
1 -
SAP Work Clearance Management
1 -
Schedule Agreement
1 -
SDM
1 -
security
2 -
Settlement Management
1 -
soar
2 -
Sourcing and Procurement
1 -
SSIS
1 -
SU01
1 -
SUM2.0SP17
1 -
SUMDMO
1 -
Teams
2 -
User Administration
1 -
User Participation
1 -
Utilities
1 -
va01
1 -
vendor
1 -
vl01n
1 -
vl02n
1 -
WCM
1 -
X12 850
1 -
xlsx_file_abap
1 -
YTD|MTD|QTD in CDs views using Date Function
1
- « Previous
- Next »
Related Content
- Advance Return Management complete configuration(SAP ARM) in Enterprise Resource Planning Blogs by Members
- SAP ERP Functionality for EDI Processing: UoMs Determination for Inbound Orders in Enterprise Resource Planning Blogs by Members
- An introduction into Service Management in S/4HANA Cloud Private Edition in Enterprise Resource Planning Blogs by SAP
- How to track exchange rates for outgoing payment in different currency? in Enterprise Resource Planning Q&A
- Deep Dive into SAP Build Process Automation with SAP S/4HANA Cloud Public Edition - Retail in Enterprise Resource Planning Blogs by SAP
Top kudoed authors
| User | Count |
|---|---|
| 5 | |
| 2 | |
| 2 | |
| 2 | |
| 2 | |
| 2 | |
| 1 | |
| 1 | |
| 1 |