
- SAP Community
- Products and Technology
- Enterprise Resource Planning
- ERP Blogs by Members
- SAP Best Practice 1909 Activation for Different Co...
Enterprise Resource Planning Blogs by Members
Gain new perspectives and knowledge about enterprise resource planning in blog posts from community members. Share your own comments and ERP insights today!
Turn on suggestions
Auto-suggest helps you quickly narrow down your search results by suggesting possible matches as you type.
Showing results for
sheoshankarchou
Explorer
Options
- Subscribe to RSS Feed
- Mark as New
- Mark as Read
- Bookmark
- Subscribe
- Printer Friendly Page
- Report Inappropriate Content
11-21-2019
3:02 PM
Introduction:
This blog post is created by keeping in mind about the complexity of the Activation process of SAP Best practices specially for all those consultant who are very new to this activation process and has little knowledge on what all needs to be taken care while activation.
Through this blog post I also has tried to draft a process in which the SAP Best Practices get activated with or without Master (Demo) data for Multiple Country in Multiple Language in the same client. Also I have given the Client Strategy followed by multiple customers across the globe.
Assumption:


Client Setup:

1. Pre-steps in Client 000:
SM59->ABAP->Create-><SID>CLNT<NNN>

BD54->New Entry-><SID>EWM<NNN>
SA38-> /SCWM/R_ERP_RFC_DEST->execute->On the Assign a Standard BAPI Destination screen, in the RFC Destination field, enter the RFC destination you have created for the system: <S/4HANA system name>CLNT<client>

Start transaction SPRO and in the IMG, choose Logistics Execution->Extended Warehouse Management Integration->Basic Setup of Connectivity->Define Queue for Transfer to SAP EWM->Change View “Configuration of EWM communication via Queue”: Overview screen, choose New Entries

2. Pre-steps in Client 000 and S4 HANA Best Practice Client (Here it is 300)
SMQS->Registration->Give the following Detail as shown in the below figure

SPRO->SCM Extended Warehouse Management->Extended Warehouse Management->Interfaces->ERP Integration->General Settings->Define Business System

SPRO->SCM Extended Warehouse Management->SCM Basis->Integration->Basis Settings for creating the System Landscape->Maintain Business System Group

Note: Here one can create Business System Group for different clients with naming convention as BSG_<nnn> where nnn is the client number.
SPRO->SCM Extended Warehouse Management->SCM Basis->Integration->Basis Settings for creating the System Landscape->Assign Logical System and Queue Type

SPRO->SCM Extended Warehouse Management->Extended Warehouse Management->Interfaces->ERP Integration->General Settings->Control for RFC Queue

3. Cleaning up System as per SAP Note#2839315 in Client 300 or the client in which you want to activate SAP Best Practices

The client 000 reference sample Tax Jurisdiction codes are not required as the Best practices activation creates the tax Jurisdiction codes during the activation. If the client 000 reference settings are left undeleted, you will not be able to create any further jurisdiction codes. Please follow the below procedure to delete the default Tax Jurisdictions (mandatory step before you start the activation)

When the activation client has all client 000 settings, there are some sample operating concerns present. During the BP activation, the ECATT cannot decide which operating concern to select. Therefore, parametrizing a fixed value in your user settings (SU01) enables the ECATT to select only the best practices defined operating concern. Enter parameter enter ERB value as A000 and ETP as 2.
Note: If you have any other existing parameters, do not delete them.

In SPRO, navigate to the
Logistics Execution –> Shipping –> Deliveries -> Proof of Delivery -> Define Reasons for Quantity Differences

Create an executable program with the following code:
REPORT ZDELETE_T093C.
Delete from T093C Where BUKRS = '0003' or BUKRS = 'RS01'.
Execute the Report ZDELETE_T093C. When you execute the report you may not get any message but when you go to SE16n and check in T093C, there should be

In SAP GUI, in the Command field, enter /nspro and press Enter.
Choose SAP Reference IMG.
From the menu, choose Financial Accounting ->Accounts Receivable and Payable -> Customer Accounts -> Master Data -> Preparations for Creating Customer Master Data -> Create Number Ranges for Customer Accounts.

In the number range configuration environment for number range object DEBITOR , go to the Change Intervals
Choose Insert Line.
In the number range configuration environment for number range object DEBITOR , go to the Change Intervals
Choose Insert Line.

In SAP GUI, in the Command field, enter /nspro and press Enter.
Choose SAP Reference IMG.
From the menu, choose Financial Accounting -> Accounts Receivable and Payable ->Vendor Accounts -> Master Data -> Preparations for Creating Vendor Master Data -> Create Number Ranges for Vendor Accounts.

In SAP GUI, in the Command field, enter /nspro and press Enter.
Choose SAP Reference IMG.
From the menu, choose Financial Accounting -> Accounts Receivable and Payable -> Customer Accounts -> Master Data -> Preparations for Creating Customer Master Data -> Assign Number Ranges to Customer Account Groups.

In SAP GUI, in the Command field, enter /nspro and press Enter.
Choose SAP Reference IMG.
From the menu, choose Financial Accounting -> Accounts Receivable and Payable -> Vendor Accounts -> Master Data -> Preparations for Creating Vendor Master Data -> Assign Number Ranges to Vendor Account Groups.

In SAP GUI, in the Command field, enter /nspro and press Enter.
Choose SAP Reference IMG.
From the menu, choose Cross Application Components -> Master Data Synchronization -> Customer/Vendor Integration -> Business Partner Settings -> Settings for Customer Integration-> Field Assignment for Customer Integration -> Assign Keys -> Define Number Assignment for Direction BP to Customer.

In SAP GUI, in the Command field, enter /nspro and press Enter.
Choose SAP Reference IMG.
From the menu, choose Cross Application Components -> Master Data Synchronization -> Customer/Vendor Integration - Business Partner Settings -> Settings for Vendor Integration-> Field Assignment for Vendor Integration -> Assign Keys -> Define Number Assignment for Direction BP to Vendor.

4. Language Installation in client 000
Note: If there is a need for activation of Best Practices for different languages then Install the Languages prior to Activation of Best Practices otherwise one can't able to activate the Best Practice latter for additional language. Also not all language supported by Best Practices. So if Language DVD not available for download for particular language then raise OSS message and confirm from SAP. In my case for HongKong SAP confirmed that I have to use CHINESE TRADITION language. Also CHAMORRO, CHEYENNE and CHINESE_HK not supported.
I18N->I18N Menu->I18N Customizing->I18N Language Configuration->Add Language

SMLT->Add Language

5. Activation of Business Function through SFW5 in Client 000:
The following Business Functions needs to be activated:
FIN_FSCM_CLM
FIN_FSCM_BNK
FIN_REP_SIMPL_2
FIN_REP_SIMPL_3
FIN_REP_SIMPL_4
FIN_LOC_SRF
LOG_EAM_SIMPLICITY
LOG_EAM_SIMPLICITY_2
LOG_EAM_SIMPLICITY_3
LOG_EAM_SIMPLICITY_4
LOG_EAM_SIMPLICITY_5
LOG_EAM_SIMPLICITY_6
LOG_EAM_SIMPLICITY_7
LOG_EAM_SIMPLICITY_8
LOG_EAM_CI_8 <=required due to dependency
JVA_ON_ACDOCA

In transaction SFW5 Select the above required Business Functions and Activate them.
6. Importing BP content in client 000
Copy the Cofile and Data file in the respective Trans directory of the BP Content downloaded earlier and import them through STMS_IMPORT transaction in client 000.

7. SAP Best Practice Activation in Test or Development Client


Note: If Business has asked you to select specific SCOPE for a particular Country solution then double click on the Solution created above and select specific scope only. Specific Scope Selection is a good Practice for Development Landscape onwards, but in Sandbox one can leave these selection step. Please have a look into the screen shot below. Make sure that all Cross Country (XX) scopes selected even when you have specific requirement.


8. Issues and phases one might get during activation is given below. If all the pre-requisite steps, discussed above is strictly followed then no more issues other than the below will occur.

Note:For all other issues please raise a OSS message and get the resolution done by SAP. While the OSS message in processing state one can proceed with next steps and latter can activate the error out scope.But it is always recommended to have the resolution done by SAP and then move forward. Always take at least 2-3 weeks time, per Country BP,for such Best Practice activation as it involves lots of steps and issues.
Conclusion:
After following all the above steps one can easily activate the SAP Best Practice 1909 for Single/Multiple countries for Single/Multiple Language With/Without Master/Demo data in Single/Multiple clients in S/4 HANA SAP System. For any specific error during Activation, not dealing in this blog post, it is advisable to raise OSS message and get error shorted out.
This blog post is created by keeping in mind about the complexity of the Activation process of SAP Best practices specially for all those consultant who are very new to this activation process and has little knowledge on what all needs to be taken care while activation.
Through this blog post I also has tried to draft a process in which the SAP Best Practices get activated with or without Master (Demo) data for Multiple Country in Multiple Language in the same client. Also I have given the Client Strategy followed by multiple customers across the globe.
Assumption:
- Logical System (<SID>CLNT<NNN>) has already been created for the planned client in BD54
- Client has already been created in SCC4 transaction with following Setting

- In SE16-> /FTI/T_NOCLN000->Create Entry for new Client
- Client Copy has been done by selecting any one of the profile (SAP_UCUS, SAP_CUST, SAP_CUSV or SAP_UCSV) using SCCLN transaction:
Client Setup:
1. Pre-steps in Client 000:
- Defining RFC destination
SM59->ABAP->Create-><SID>CLNT<NNN>
- Defining Dummy Logical System
BD54->New Entry-><SID>EWM<NNN>
- Determining RFC destination for method callsBD97-> Assign RFC Destinations for Synchronous Method Calls screen, select the relevant EWM logical system, for example, UEXEW300.

- Determining RFC destination for method calls from S/4HANA EWM
SA38-> /SCWM/R_ERP_RFC_DEST->execute->On the Assign a Standard BAPI Destination screen, in the RFC Destination field, enter the RFC destination you have created for the system: <S/4HANA system name>CLNT<client>
- Defining queue for transferring of SAP S/4HANA EWM
Start transaction SPRO and in the IMG, choose Logistics Execution->Extended Warehouse Management Integration->Basic Setup of Connectivity->Define Queue for Transfer to SAP EWM->Change View “Configuration of EWM communication via Queue”: Overview screen, choose New Entries
2. Pre-steps in Client 000 and S4 HANA Best Practice Client (Here it is 300)
- Setting the QOUT Scheduler
SMQS->Registration->Give the following Detail as shown in the below figure
- Defining the Business System
SPRO->SCM Extended Warehouse Management->Extended Warehouse Management->Interfaces->ERP Integration->General Settings->Define Business System
- Maintain Business System Group
SPRO->SCM Extended Warehouse Management->SCM Basis->Integration->Basis Settings for creating the System Landscape->Maintain Business System Group
Note: Here one can create Business System Group for different clients with naming convention as BSG_<nnn> where nnn is the client number.
- Assigning Logical System and Queue Type
SPRO->SCM Extended Warehouse Management->SCM Basis->Integration->Basis Settings for creating the System Landscape->Assign Logical System and Queue Type
- Setting control for RFC
SPRO->SCM Extended Warehouse Management->Extended Warehouse Management->Interfaces->ERP Integration->General Settings->Control for RFC Queue
3. Cleaning up System as per SAP Note#2839315 in Client 300 or the client in which you want to activate SAP Best Practices
- Mandatory : Apply all SAP notes provided in the content activation Note 2776548
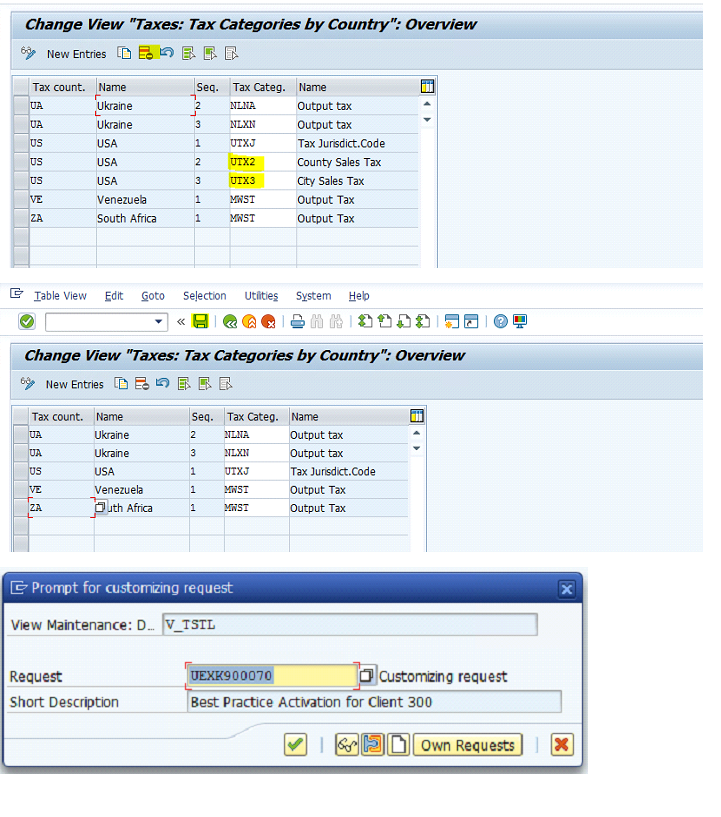
- When using the client copy from client 000, 3 tax codes appear for US. We need only UTXJ. Therefore, delete UTX2 and UTX3 in Transaction OVK1.
- Delete the entries for US – UTX2 and UTX3
- Choose Save and select or create customizing transport.
- Delete all client 000 reference Tax Jurisdiction codes from the activation client:
The client 000 reference sample Tax Jurisdiction codes are not required as the Best practices activation creates the tax Jurisdiction codes during the activation. If the client 000 reference settings are left undeleted, you will not be able to create any further jurisdiction codes. Please follow the below procedure to delete the default Tax Jurisdictions (mandatory step before you start the activation)
- In transaction SM30 enter the Table/view V_TTXJ and choose Maintain.
- On the Determine Work Area: Entry dialog, enter TAXUSJ
- On the Change View “TAX Jurisdiction”: Overview screen, from the application tool bar, choose Select All button (F7) and then choose the Delete button.
- Choose Save and then create a transport to save the change request. Please do not release this transport to your Q or P system.
- Pre-selecting the best practices Operating concern:
When the activation client has all client 000 settings, there are some sample operating concerns present. During the BP activation, the ECATT cannot decide which operating concern to select. Therefore, parametrizing a fixed value in your user settings (SU01) enables the ECATT to select only the best practices defined operating concern. Enter parameter enter ERB value as A000 and ETP as 2.
Note: If you have any other existing parameters, do not delete them.
- Define Reasons for Quantity Differences deletion:
In SPRO, navigate to the
Logistics Execution –> Shipping –> Deliveries -> Proof of Delivery -> Define Reasons for Quantity Differences
- Delete wrong delivered default client 000 settings: There are two wrong entries in table T093C, which will prevent the activation of Asset accounting (New) in J48. SAP note is expected to be released soon, but till then please follow the below workaround.
Create an executable program with the following code:
REPORT ZDELETE_T093C.
Delete from T093C Where BUKRS = '0003' or BUKRS = 'RS01'.
Execute the Report ZDELETE_T093C. When you execute the report you may not get any message but when you go to SE16n and check in T093C, there should be
- Deleting Number Range Intervals for Debitor Number Range Object
In SAP GUI, in the Command field, enter /nspro and press Enter.
Choose SAP Reference IMG.
From the menu, choose Financial Accounting ->Accounts Receivable and Payable -> Customer Accounts -> Master Data -> Preparations for Creating Customer Master Data -> Create Number Ranges for Customer Accounts.
In the number range configuration environment for number range object DEBITOR , go to the Change Intervals
Choose Insert Line.
In the number range configuration environment for number range object DEBITOR , go to the Change Intervals
Choose Insert Line.
- Deleting Number Range Intervals for KREDITOR and creating a new Number Range Object
In SAP GUI, in the Command field, enter /nspro and press Enter.
Choose SAP Reference IMG.
From the menu, choose Financial Accounting -> Accounts Receivable and Payable ->Vendor Accounts -> Master Data -> Preparations for Creating Vendor Master Data -> Create Number Ranges for Vendor Accounts.
- Assigning the BP Number Range Interval to All Customer Account Groups
In SAP GUI, in the Command field, enter /nspro and press Enter.
Choose SAP Reference IMG.
From the menu, choose Financial Accounting -> Accounts Receivable and Payable -> Customer Accounts -> Master Data -> Preparations for Creating Customer Master Data -> Assign Number Ranges to Customer Account Groups.
- Assigning the BP Number Range Interval to All Vendor Account Groups
In SAP GUI, in the Command field, enter /nspro and press Enter.
Choose SAP Reference IMG.
From the menu, choose Financial Accounting -> Accounts Receivable and Payable -> Vendor Accounts -> Master Data -> Preparations for Creating Vendor Master Data -> Assign Number Ranges to Vendor Account Groups.
- Adapt Numbering Logic in the CVI – for Customers
In SAP GUI, in the Command field, enter /nspro and press Enter.
Choose SAP Reference IMG.
From the menu, choose Cross Application Components -> Master Data Synchronization -> Customer/Vendor Integration -> Business Partner Settings -> Settings for Customer Integration-> Field Assignment for Customer Integration -> Assign Keys -> Define Number Assignment for Direction BP to Customer.
- Adapt Numbering Logic in the CVI – for Vendors
In SAP GUI, in the Command field, enter /nspro and press Enter.
Choose SAP Reference IMG.
From the menu, choose Cross Application Components -> Master Data Synchronization -> Customer/Vendor Integration - Business Partner Settings -> Settings for Vendor Integration-> Field Assignment for Vendor Integration -> Assign Keys -> Define Number Assignment for Direction BP to Vendor.
4. Language Installation in client 000
Note: If there is a need for activation of Best Practices for different languages then Install the Languages prior to Activation of Best Practices otherwise one can't able to activate the Best Practice latter for additional language. Also not all language supported by Best Practices. So if Language DVD not available for download for particular language then raise OSS message and confirm from SAP. In my case for HongKong SAP confirmed that I have to use CHINESE TRADITION language. Also CHAMORRO, CHEYENNE and CHINESE_HK not supported.
I18N->I18N Menu->I18N Customizing->I18N Language Configuration->Add Language
SMLT->Add Language
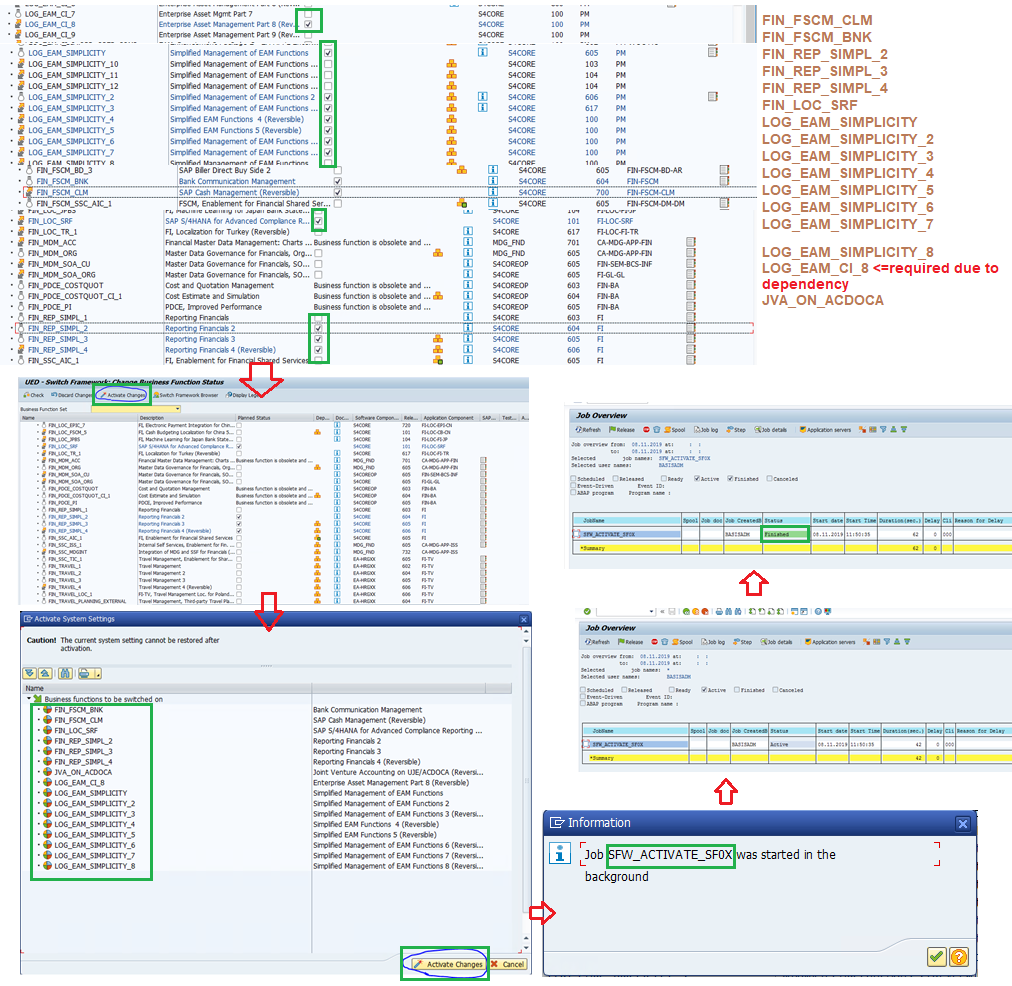
5. Activation of Business Function through SFW5 in Client 000:
The following Business Functions needs to be activated:
FIN_FSCM_CLM
FIN_FSCM_BNK
FIN_REP_SIMPL_2
FIN_REP_SIMPL_3
FIN_REP_SIMPL_4
FIN_LOC_SRF
LOG_EAM_SIMPLICITY
LOG_EAM_SIMPLICITY_2
LOG_EAM_SIMPLICITY_3
LOG_EAM_SIMPLICITY_4
LOG_EAM_SIMPLICITY_5
LOG_EAM_SIMPLICITY_6
LOG_EAM_SIMPLICITY_7
LOG_EAM_SIMPLICITY_8
LOG_EAM_CI_8 <=required due to dependency
JVA_ON_ACDOCA
In transaction SFW5 Select the above required Business Functions and Activate them.
6. Importing BP content in client 000
Copy the Cofile and Data file in the respective Trans directory of the BP Content downloaded earlier and import them through STMS_IMPORT transaction in client 000.
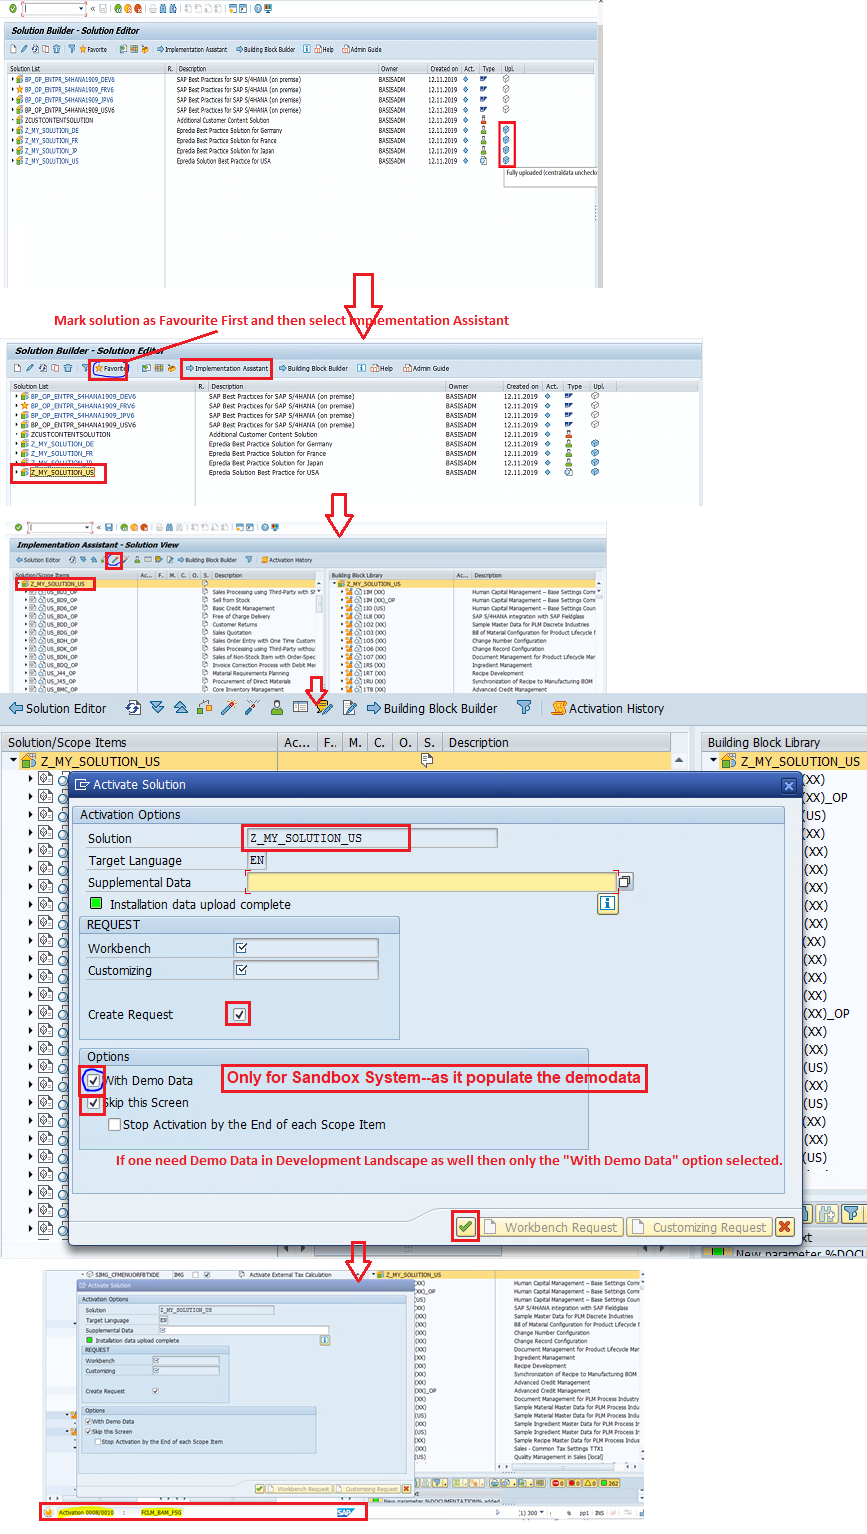
7. SAP Best Practice Activation in Test or Development Client
- Import solutions from SAP Best Practices content. Enter tCode /N/SMB/BBI. Choose menu Solution -> Import -> Solution (XML) -> From reference content
- Defining the scope of your solution. (1) Copy Solution BP_OP_ENTPR_S4HANA1909_USV6 to (2) Z_MY_SOLUTION_US
Note: If Business has asked you to select specific SCOPE for a particular Country solution then double click on the Solution created above and select specific scope only. Specific Scope Selection is a good Practice for Development Landscape onwards, but in Sandbox one can leave these selection step. Please have a look into the screen shot below. Make sure that all Cross Country (XX) scopes selected even when you have specific requirement.
- Enter tCode /n/SMB/SCOPE, Click button (1) New Entries, (2) Customer Solution and (3) select the Country and Solution as below:
- Once all the job completed then go to transaction /n/SMB/BBI and do the following:
8. Issues and phases one might get during activation is given below. If all the pre-requisite steps, discussed above is strictly followed then no more issues other than the below will occur.
Note:For all other issues please raise a OSS message and get the resolution done by SAP. While the OSS message in processing state one can proceed with next steps and latter can activate the error out scope.But it is always recommended to have the resolution done by SAP and then move forward. Always take at least 2-3 weeks time, per Country BP,for such Best Practice activation as it involves lots of steps and issues.
Conclusion:
After following all the above steps one can easily activate the SAP Best Practice 1909 for Single/Multiple countries for Single/Multiple Language With/Without Master/Demo data in Single/Multiple clients in S/4 HANA SAP System. For any specific error during Activation, not dealing in this blog post, it is advisable to raise OSS message and get error shorted out.
- SAP Managed Tags:
- SAP S/4HANA
4 Comments
You must be a registered user to add a comment. If you've already registered, sign in. Otherwise, register and sign in.
Labels in this area
-
"mm02"
1 -
A_PurchaseOrderItem additional fields
1 -
ABAP
1 -
ABAP Extensibility
1 -
ACCOSTRATE
1 -
ACDOCP
1 -
Adding your country in SPRO - Project Administration
1 -
Advance Return Management
1 -
AI and RPA in SAP Upgrades
1 -
Approval Workflows
1 -
ARM
1 -
ASN
1 -
Asset Management
1 -
Associations in CDS Views
1 -
auditlog
1 -
Authorization
1 -
Availability date
1 -
Azure Center for SAP Solutions
1 -
AzureSentinel
2 -
Bank
1 -
BAPI_SALESORDER_CREATEFROMDAT2
1 -
BRF+
1 -
BRFPLUS
1 -
Bundled Cloud Services
1 -
business participation
1 -
Business Processes
1 -
CAPM
1 -
Carbon
1 -
Cental Finance
1 -
CFIN
1 -
CFIN Document Splitting
1 -
Cloud ALM
1 -
Cloud Integration
1 -
condition contract management
1 -
Connection - The default connection string cannot be used.
1 -
Custom Table Creation
1 -
Customer Screen in Production Order
1 -
Data Quality Management
1 -
Date required
1 -
Decisions
1 -
desafios4hana
1 -
Developing with SAP Integration Suite
1 -
Direct Outbound Delivery
1 -
DMOVE2S4
1 -
EAM
1 -
EDI
2 -
EDI 850
1 -
EDI 856
1 -
edocument
1 -
EHS Product Structure
1 -
Emergency Access Management
1 -
Energy
1 -
EPC
1 -
Financial Operations
1 -
Find
1 -
FINSSKF
1 -
Fiori
1 -
Flexible Workflow
1 -
Gas
1 -
Gen AI enabled SAP Upgrades
1 -
General
1 -
generate_xlsx_file
1 -
Getting Started
1 -
HomogeneousDMO
1 -
IDOC
2 -
Integration
1 -
Learning Content
2 -
LogicApps
2 -
low touchproject
1 -
Maintenance
1 -
management
1 -
Material creation
1 -
Material Management
1 -
MD04
1 -
MD61
1 -
methodology
1 -
Microsoft
2 -
MicrosoftSentinel
2 -
Migration
1 -
MRP
1 -
MS Teams
2 -
MT940
1 -
Newcomer
1 -
Notifications
1 -
Oil
1 -
open connectors
1 -
Order Change Log
1 -
ORDERS
2 -
OSS Note 390635
1 -
outbound delivery
1 -
outsourcing
1 -
PCE
1 -
Permit to Work
1 -
PIR Consumption Mode
1 -
PIR's
1 -
PIRs
1 -
PIRs Consumption
1 -
PIRs Reduction
1 -
Plan Independent Requirement
1 -
Premium Plus
1 -
pricing
1 -
Primavera P6
1 -
Process Excellence
1 -
Process Management
1 -
Process Order Change Log
1 -
Process purchase requisitions
1 -
Product Information
1 -
Production Order Change Log
1 -
Purchase requisition
1 -
Purchasing Lead Time
1 -
Redwood for SAP Job execution Setup
1 -
RISE with SAP
1 -
RisewithSAP
1 -
Rizing
1 -
S4 Cost Center Planning
1 -
S4 HANA
1 -
S4HANA
3 -
Sales and Distribution
1 -
Sales Commission
1 -
sales order
1 -
SAP
2 -
SAP Best Practices
1 -
SAP Build
1 -
SAP Build apps
1 -
SAP Cloud ALM
1 -
SAP Data Quality Management
1 -
SAP Maintenance resource scheduling
2 -
SAP Note 390635
1 -
SAP S4HANA
2 -
SAP S4HANA Cloud private edition
1 -
SAP Upgrade Automation
1 -
SAP WCM
1 -
SAP Work Clearance Management
1 -
Schedule Agreement
1 -
SDM
1 -
security
2 -
Settlement Management
1 -
soar
2 -
SSIS
1 -
SU01
1 -
SUM2.0SP17
1 -
SUMDMO
1 -
Teams
2 -
User Administration
1 -
User Participation
1 -
Utilities
1 -
va01
1 -
vendor
1 -
vl01n
1 -
vl02n
1 -
WCM
1 -
X12 850
1 -
xlsx_file_abap
1 -
YTD|MTD|QTD in CDs views using Date Function
1
- « Previous
- Next »
Related Content
- Services for object inbound delivery in Enterprise Resource Planning Q&A
- SAP Fiori for SAP S/4HANA - Composite Roles in launchpad content and layout tools in Enterprise Resource Planning Blogs by SAP
- Customer Invoice Country Translation in Enterprise Resource Planning Q&A
- How to enter project budget with active UPA in Enterprise Resource Planning Q&A
- Update of the SAP Activate Roadmap for SAP S/4HANA (on prem) upgrades with the Clean Core Strategy in Enterprise Resource Planning Blogs by SAP
Top kudoed authors
| User | Count |
|---|---|
| 2 | |
| 2 | |
| 2 | |
| 2 | |
| 2 | |
| 2 | |
| 2 | |
| 1 | |
| 1 | |
| 1 |