
- SAP Community
- Products and Technology
- Technology
- Technology Blogs by SAP
- Build the Multi-Target Application and Deploy to F...
Technology Blogs by SAP
Learn how to extend and personalize SAP applications. Follow the SAP technology blog for insights into SAP BTP, ABAP, SAP Analytics Cloud, SAP HANA, and more.
Turn on suggestions
Auto-suggest helps you quickly narrow down your search results by suggesting possible matches as you type.
Showing results for
former_member37
Explorer
Options
- Subscribe to RSS Feed
- Mark as New
- Mark as Read
- Bookmark
- Subscribe
- Printer Friendly Page
- Report Inappropriate Content
11-19-2019
5:44 PM
Introduction
This document will guide you to use the SAP Cloud Application Programming Model to build a multi-target application with persistence, a core backend service, and multiple UI5 applications. And deploy the UI5 applications with Fiori Launchpad site on SCP Cloud Foundry environment.
The additional purpose of the document is helping the development team to build a skeleton MTA project for building the customer solution on SCP CF. This demo project will be created with WebIDE on SAP Cloud Platform Trial Account.
1. Prerequisite
- SAP Cloud Platform Trial (Cloud Foundry)
- SAP Web IDE
- Visual Studio Code (optional)
- Multi-Target Application Archive Builder (Download from here)
- CLI or shell
- Node.js/NPM (https://nodejs.org/)
- Git (https://git-scm.com/downloads/)
- Maven (https://maven.apache.org/install.html)
- Grunt (https://gruntjs.com/using-the-cli)
- CF CLI (https://docs.cloudfoundry.org/cf-cli/install-go-cli.html)
- CF CLI MTA plugin (https://tools.hana.ondemand.com/#cloud)
2. Content
- Initial setup of SAP Cloud Platform subaccount
- Create an Initial Project Using CDS
- Create the Fiori Launchpad Site
- Build and Deploy onto SCP Cloud Foundry
Initial setup of SAP Cloud Platform subaccount
Before building the application, we need an SAP Cloud Platform Trial subaccount for the Cloud Foundry environment. Go to https://account.hanatrial.ondemand.com/ and register for a trial account.
1. In the cockpit page, and create a subaccount, and create a new space within the subaccount.

2. Go to the main page of the subaccount - Entitlement, add the services to the subaccount. The required services Include Application Runtime, HTML5 Applications, Portal, SAP HANA Service.

3. And go to Quata Plan, create a quota plan and assign the quota plan to the created space.

Then, it is ready to build the project in WebIDE now.
Create an Initial project
The SAP Cloud Application Programming Model enables you to quickly create business applications by allowing you to focus on your domain logic. It offers a consistent end-to-end programming model that includes languages, libraries and APIs tailored for full-stack development on SAP Cloud Platform. (Copy from the official doc).
With WebIDE, We can create a new SAP Cloud Platform Business Application as the initial project skeleton. Based on the Cloud Application Programming model (CAP), It is efficient to use Core Data & Services (CDS) to build data models and service definitions.
1.Create a Business Service Using CDS
You need to enable the tile - SAP Cloud Platform Business Application development tools in the Preferences perspective on the Extensions page.
1. Go to WebIDE. From "Project from Template". choose the SAP Cloud Platform Business Application.
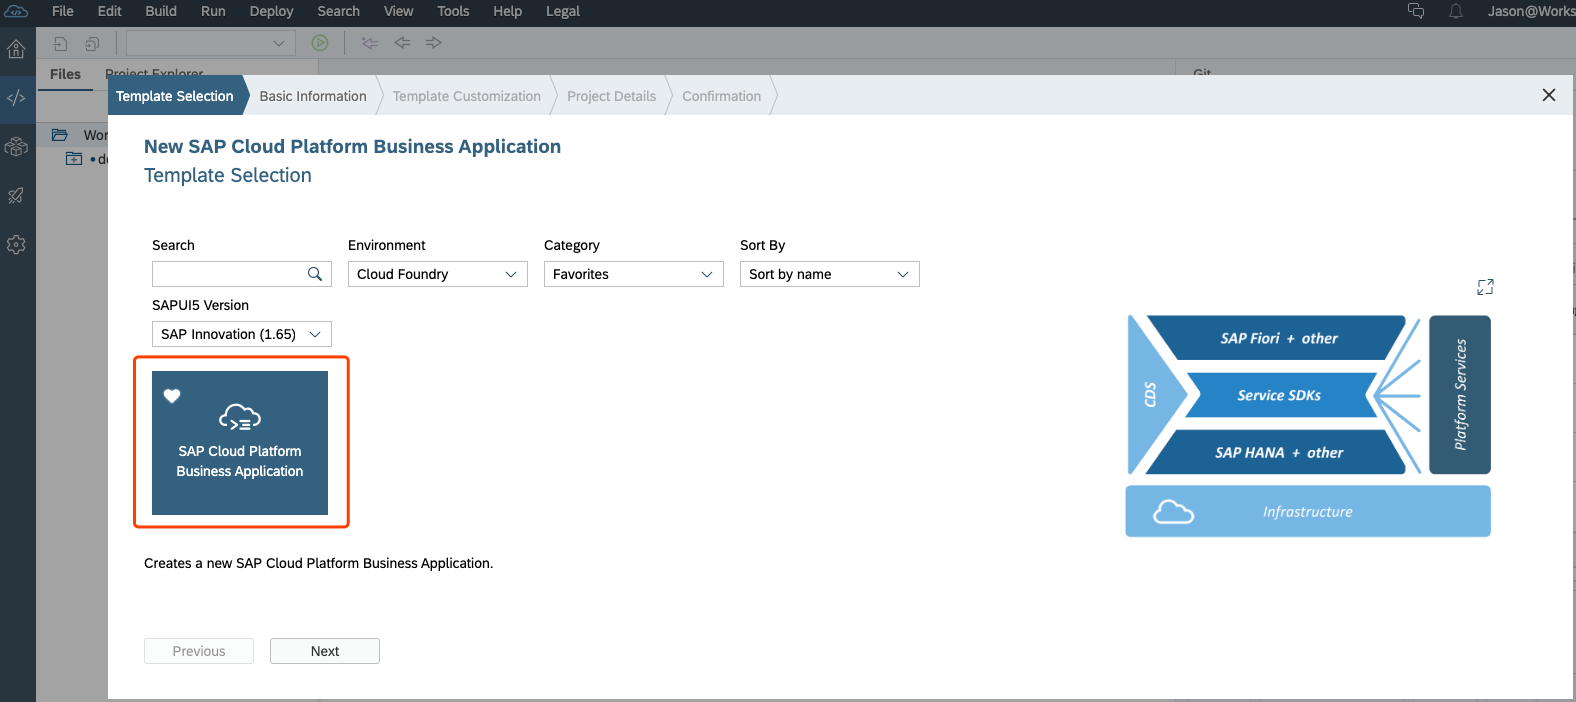
2. In Basic Information, name the project as "sample1". Then choose Java as the service type, rename the java package as my.bookshops and keep Include sample files in project as default.

3. Continue with the default settings, and finish. The initial project will be created with "db" and "srv" modules.

4. Click the project menu - Git - Initialize the local repository. And set the remote repository in Git - Set Remote. For development and build the project in the local environment, it's better to push the project into the external git repository.

5. Build the CDS via Build - Build CDS. And Click on the srv module and choose Run from the global toolbar. Then the OData service for the sample entities is available.

2. Add UI Modules to Business Applications
Let's add 2 UI List view of Books and Orders.
1. Right-click the sample1 folder and choose New | HTML5 Module. Choose List Report Application.

2. Complete the following fields:
| Field Name | Value |
|---|---|
| Module Name | books |
| Title | Books |
3. Choose Current Project from the list of sources and then
CatalogService.4. Leave the Annotation Selection tab with the default values and choose Next.In the Template
5. Customization tab, choose Books in the
OData Collection drop-down menu. Notes: Additionally, if you need to add UI annotations, please follow the detail steps here.
6. Open the file Gruntfile.js in sample1/app/books. Replace the content with the below script.
module.exports = function (grunt) {

	"use strict";

	grunt.loadNpmTasks("@sap/grunt-sapui5-bestpractice-build");

	grunt.config.merge({

		compatVersion: "edge"

	});

	grunt.registerTask("default", [

		"clean",

		"lint",

		"build"

	]);

	grunt.config.set("deploy_mode", "html_repo");

};
7. Open the file Gruntfile.js in sample1/app/books. Remove the existed routers, and add the router from the application repository runtime.
  "routes": [

    {

      "source": "^(.*)$",

      "target": "$1",

      "service": "html5-apps-repo-rt",

      "authenticationType": "xsuaa"

    }

  ]
8. Open the file manifest.json in sample1/app/books/webapp. Change the value of "uri" into " "../../odata/v2/CatalogService/",

6. Create another module for Orders which binds Ordersin the
OData Collection. with the same steps.| Field Name | Value |
|---|---|
| Module Name | orders |
| Title | Orders |
Notes: Creating 2 HTML5 modules, is to later simulate how to manage the authorization of multiple UI applications in one Fiori Launchpad Site.
7. Create a new folder app, and copy module books and orders into the folder. This step is to make all UI modules into one central folder.

8. Right-click the sample1/app/books and orders folder and choose Run | Run as Web Application. Choose List Report Application. Choose Run with Mockdata, the list report page of books can run locally.

Here, the 2 sample HTML5 modules have been added to the project successfully.
Create the Fiori Launchpad Site
1. Add Fiori Launchpad Site
1. Right-click the sample1 folder and choose New | SAP Fiori Launchpad Site Module. Input the name flp, and finish.

2. Go to
app/books/webapp, and edit the manifest.json file with Descriptor Editer. Create one semantic object books-action1, and input the tile Books and the icon for the tile.
3. Same as above, update the manifest.json file in
app/orders/webapp for below values.| Field Name | Value |
|---|---|
| Semantic Object | orders |
| Title | Orders |
4. Go to
flp/portal-site, and open the CommonDataModel.json file. Add the Books, Orders into the default group via Launchpad Editor.
Here, we added a launchpad site module into the project. In sample1/mta.yaml file, the module flp has also been initialized. Within the flp | requires, the launchpad site declares that it requires 4 components. As the dependencies, the AppRouter - dt_sample1_appRouter, and UIDeployer - sample1ui_deployer are still missing.
  - name: flp

    type: com.sap.portal.content

    path: flp

    parameters:

       stack: cflinuxfs3

       memory: 128M

       buildpack: https://github.com/cloudfoundry/nodejs-buildpack/releases/download/v1.6.39/nodejs-buildpack-cflinuxf...

    requires:

     - name: portal_resources_sample1

     - name: uaa_sample1

     - name: dt_sample1_appRouter

     - name: sample1ui_deployer
2. Add Application Router
The application router is the single point-of-entry for an application running in the Cloud Foundry environment on SAP Cloud Platform. The application router is used to serve static content, authenticate users, rewrite URLs, and forward or proxy requests to other micro services while propagating user information (Copied from here )
1. Create a subfolder approuter in the project.
2. Create a package descriptor package.json and add the below script. The package.json file contains the start command for the application router and a list of package dependencies.
{

  "name": "html5-apps-approuter",

  "description": "Node.js based application router service for html5-apps",

  "dependencies": {

    "@sap/approuter": "6.0.1"

  },

  "scripts": {

    "start": "node node_modules/@sap/approuter/approuter.js"

  }

}
3. Create a file xs-app.json and add the below script. The content of xs-app.json defines the details of the application's routes, destinations, and security scopes. (More reference from here)
{

  "welcomeFile": "/cp.portal",

  "authenticationMethod": "route",

  "routes": [

    {

      "source": "^(/odata/v2/.*)$",

      "target": "$1",

      "authenticationType": "xsuaa",

      "destination": "dest_odata_srv",

      "csrfProtection": false

    }

  ]

}
4. Add the module sample1-approuter and service approuter_sample1 into the mta.yaml file as below script. In the application router module, Add one destination dest_odata_srv which is routing to srv module.
......

modules:

  - name: sample1-approuter

    type: approuter.nodejs

    path: approuter

    properties:

      destinations:

        - name: dest_odata_srv

          url: "~{srv_api/url}"

          forwardAuthToken: true

    requires:

      - name: approuter_sample1

      - name: uaa_sample1

      - name: portal_resources_sample1

      - name: srv_api

  ......

resources:

  - name: approuter_sample1

    parameters:

      service-plan: app-runtime

      service: html5-apps-repo

    type: org.cloudfoundry.managed-service

  ......
3. Add HTML5 Application Deployer Module
The HTML5 application deployer module is to deploy the content of the HTML5 applications to the HTML5 Application Repository. HTML5 Application Repository enables the central storage of HTML5 applications' static content on the SAP Cloud Platform Cloud Foundry environment.
1. Create a subfolder uideployer in the project.
2. Create a package descriptor package.json and add the below script. The package.json file contains the start command for the application router and a list of package dependencies.
{

	"name": "approuterUIDeployer",

	"engines": {

		"node": ">=6.0.0"

	},

	"dependencies": {

		"@sap/html5-app-deployer": "2.0.0"

	},

	"scripts": {

		"start": "node node_modules/@sap/html5-app-deployer/index.js"

	}

}
3. Add the parameter deploy_mode: html5-repo in the mta.yaml file as below.

4. Add the module sample1-uideployer and service uideployer_sample1 into the mta.yaml file as below script. Within the node of build-parameters/requires, add the 2 UI application modules books and orders.
ID: sample1
_schema-version: "2.1"
parameters:
deploy_mode: html5-repo
version: 0.0.1
modules:
......
- name: sample1-uideployer
type: com.sap.html5.application-content
path: uideployer
requires:
- name: ui_deployer_sample1
build-parameters:
requires:
- name: books
artifacts:
- "./*"
target-path: resources/books
- name: orders
artifacts:
- "./*"
target-path: resources/orders
......
resources:
......
- name: ui_deployer_sample1
parameters:
service-plan: app-host
service: html5-apps-repo
type: org.cloudfoundry.managed-service
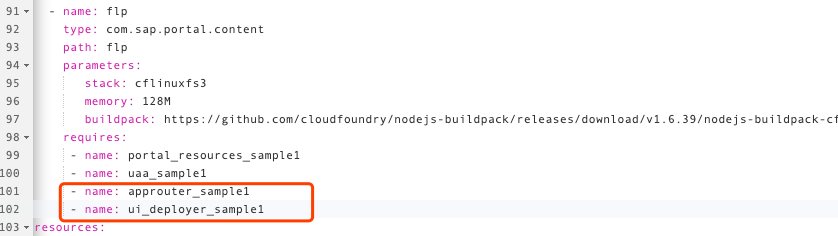
......5. Here, the application router and application deployer modules have been created. Remember to change the required module names of flp into sample1-uideployer & sample1-approuter.
6. Commit and Push the changes into Git repository via WebIDE.
Here, the multi-target application has been created as a startup skeleton project.
Build and Deploy to SCP Cloud Foundry
The multi-target application archive builder is a standalone command-line tool that builds a deployment-ready multi-target application (MTA) archive .mtar file from the artifacts of an MTA project according to the project’s MTA development descriptor (mta.yaml file).
1. Build a multi-target application archive .mtar file.
1. Download Multi-Target Application Archive Builder (from here) into local.
2. Clone the project from Git repository (or export from WebIDE and unzip ) into local.
3. Open the terminal and change to the sample1 project path.
4. Execute the command line to build CDS content.
cds build --clean5. Execute the below command line.
java -jar [path to mta.jar] --build-target=CF --mtar=sample.mtar build. 6. When the build finish, the archive file sample.mtar is generated.

2. Deploy the archive file onto Cloud Foundry
1. Login on the Cloud Foundry account via the command line. Choose the Organization and Space created in the beginning.
cf login -a https://api.cf.eu10.hana.ondemand.com2. Execute the below command line.
cf deploy sample.mtar3. When the deployment process finishes, go to the Applications of the dev space. All modules have been built as the applications. (Notes: All HTML5 applications were deployed to the HTML5 Application Repository via HTML5 Application deployer. So there is no HTML5 applications here.)

And the services...

4. Click on the application router sample1-approuter. Click the link of Application Routes, and navigate to the Fiori Launchpad site.

Finally, the full-stack application with persistence, a core backend service, and multiple UI5 applications was built successfully, and be deployed with Fiori Launchpad site on SCP Cloud Foundry environment.
I hope this blog will help you build the skeleton of the application at the beginning of your solution development.
The source code of the demo project is shared at https://github.com/spyguy/sample.git.
Want to find out more about the multi-target application development? These links are for you:
- Use the SAP Cloud Application Programming Model to Create a Full-Stack App: https://developers.sap.com/group.cp-apm-full-stack-app.html
- SAP Cloud Application Programming Model - Core Data Services (CDS): https://github.wdf.sap.corp/pages/cap/cds/
- SAP Cloud Platform Portal - Cloud Foundry: https://help.sap.com/viewer/ad4b9f0b14b0458cad9bd27bf435637d/Cloud/en-US/2ecb62d48453410286a43e8a245...
- SAP Cloud Platform - Application Router: https://help.sap.com/viewer/65de2977205c403bbc107264b8eccf4b/Cloud/en-US/01c5f9ba7d6847aaaf069d153b9...
- SAP Managed Tags:
- SAP Cloud Application Programming Model,
- SAP Business Technology Platform
Labels:
6 Comments
You must be a registered user to add a comment. If you've already registered, sign in. Otherwise, register and sign in.
Labels in this area
-
ABAP CDS Views - CDC (Change Data Capture)
2 -
AI
1 -
Analyze Workload Data
1 -
BTP
1 -
Business and IT Integration
2 -
Business application stu
1 -
Business Technology Platform
1 -
Business Trends
1,658 -
Business Trends
92 -
CAP
1 -
cf
1 -
Cloud Foundry
1 -
Confluent
1 -
Customer COE Basics and Fundamentals
1 -
Customer COE Latest and Greatest
3 -
Customer Data Browser app
1 -
Data Analysis Tool
1 -
data migration
1 -
data transfer
1 -
Datasphere
2 -
Event Information
1,400 -
Event Information
66 -
Expert
1 -
Expert Insights
177 -
Expert Insights
298 -
General
1 -
Google cloud
1 -
Google Next'24
1 -
Kafka
1 -
Life at SAP
780 -
Life at SAP
13 -
Migrate your Data App
1 -
MTA
1 -
Network Performance Analysis
1 -
NodeJS
1 -
PDF
1 -
POC
1 -
Product Updates
4,577 -
Product Updates
344 -
Replication Flow
1 -
RisewithSAP
1 -
SAP BTP
1 -
SAP BTP Cloud Foundry
1 -
SAP Cloud ALM
1 -
SAP Cloud Application Programming Model
1 -
SAP Datasphere
2 -
SAP S4HANA Cloud
1 -
SAP S4HANA Migration Cockpit
1 -
Technology Updates
6,873 -
Technology Updates
421 -
Workload Fluctuations
1
Related Content
- Demystifying the Common Super Domain for SAP Mobile Start in Technology Blogs by SAP
- Developing & Deploying the UI5 App to Cloud Foundry and Accessing from App-router End-to-End Steps in Technology Blogs by Members
- ABAP Cloud Developer Trial 2022 Available Now in Technology Blogs by SAP
- Analyze Expensive ABAP Workload in the Cloud with Work Process Sampling in Technology Blogs by SAP
- Consuming CAPM Application's OData service into SAP Fiori Application in Business Application Studio in Technology Blogs by Members
Top kudoed authors
| User | Count |
|---|---|
| 38 | |
| 25 | |
| 17 | |
| 13 | |
| 7 | |
| 7 | |
| 7 | |
| 7 | |
| 6 | |
| 6 |