
- SAP Community
- Products and Technology
- Enterprise Resource Planning
- ERP Blogs by SAP
- SAP S/4HANA Business Partner - Field Enhancement
Enterprise Resource Planning Blogs by SAP
Get insights and updates about cloud ERP and RISE with SAP, SAP S/4HANA and SAP S/4HANA Cloud, and more enterprise management capabilities with SAP blog posts.
Turn on suggestions
Auto-suggest helps you quickly narrow down your search results by suggesting possible matches as you type.
Showing results for
Product and Topic Expert
Options
- Subscribe to RSS Feed
- Mark as New
- Mark as Read
- Bookmark
- Subscribe
- Printer Friendly Page
- Report Inappropriate Content
11-07-2019
9:11 AM
In most of my Business Partner workshops I was asked the question: How shall we handle our Z-Fields from Customer/Vendor Master Data in Business Partner transaction.
Short Answer: You have to rebuild the fields in Business Partner transaction.
In this Cookbook I'll guide you step by step to implement a Z-Field from table KNA1 into Business Partner transaction.
How to add a bunch of Z-Fields on a custom tab in BP transaction, you can learn at blog post SAP S/4HANA BP screen enhancement with custom tab written by badrinathravi.
The purpose of this document is to describe how to implement a BDT enhancement. A field from table KNA1 has to be re-implemented in Business Partner transaction as well to ensure availability in SAP S/4HANA.
Remark: This procedure can be used for all the single fields from Customer or Vendor tables. This Cookbook is not made for fields related to Table Controls as of partner assignment for example from KNVP.
Foundation for this document is SAP note
2309153 - BP_CVI: Guideline Version 1.14 for customer enhancements in CVI (customer/vendor integrati...
Target audience: Functional expert, Development expert
Version: SAP S/4HANA On premise 1610 and higher
There is a field in table KNA1 which was available in XDxx transaction.

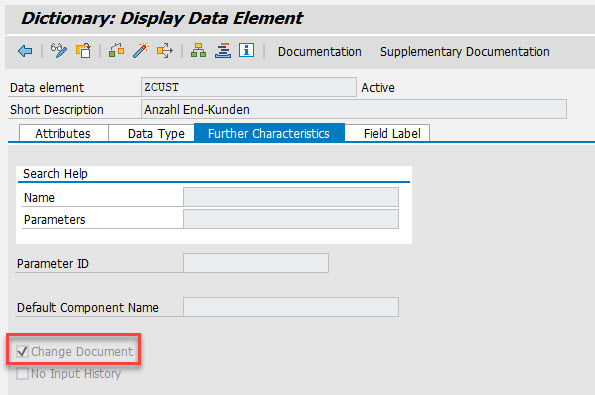
In case you are adding this field completely new, don't forget to mark for Change Document at Data Element level to track changes at this field.
This field has to be re-implemented in SAP S/4HANA to be available in transaction Business Partner with customer role.

In this example the field should be placed in customer role, tab (Screen) ‘Customer: General Data’, Section ’ Additional General Data’
To ensure data transportation from Business Partner to Customer master data the complex interface of CVI has to extended by the additional field.

With this guidance you are able to implement additional fields at Business Partner transaction on your own.
To Extent Fiori Apps please have a look at following blog posts:
Create Custom fields for Business Partner SAP Fiori screens in SAP S/4HANA
Short Answer: You have to rebuild the fields in Business Partner transaction.
In this Cookbook I'll guide you step by step to implement a Z-Field from table KNA1 into Business Partner transaction.
How to add a bunch of Z-Fields on a custom tab in BP transaction, you can learn at blog post SAP S/4HANA BP screen enhancement with custom tab written by badrinathravi.
Introduction
Purpose and target
The purpose of this document is to describe how to implement a BDT enhancement. A field from table KNA1 has to be re-implemented in Business Partner transaction as well to ensure availability in SAP S/4HANA.
Remark: This procedure can be used for all the single fields from Customer or Vendor tables. This Cookbook is not made for fields related to Table Controls as of partner assignment for example from KNVP.
Foundation for this document is SAP note
2309153 - BP_CVI: Guideline Version 1.14 for customer enhancements in CVI (customer/vendor integrati...
Target audience: Functional expert, Development expert
Version: SAP S/4HANA On premise 1610 and higher
There is a field in table KNA1 which was available in XDxx transaction.
In case you are adding this field completely new, don't forget to mark for Change Document at Data Element level to track changes at this field.
This field has to be re-implemented in SAP S/4HANA to be available in transaction Business Partner with customer role.
Implementation
Determine Area in Business Partner transaction where to place the new field
In this example the field should be placed in customer role, tab (Screen) ‘Customer: General Data’, Section ’ Additional General Data’
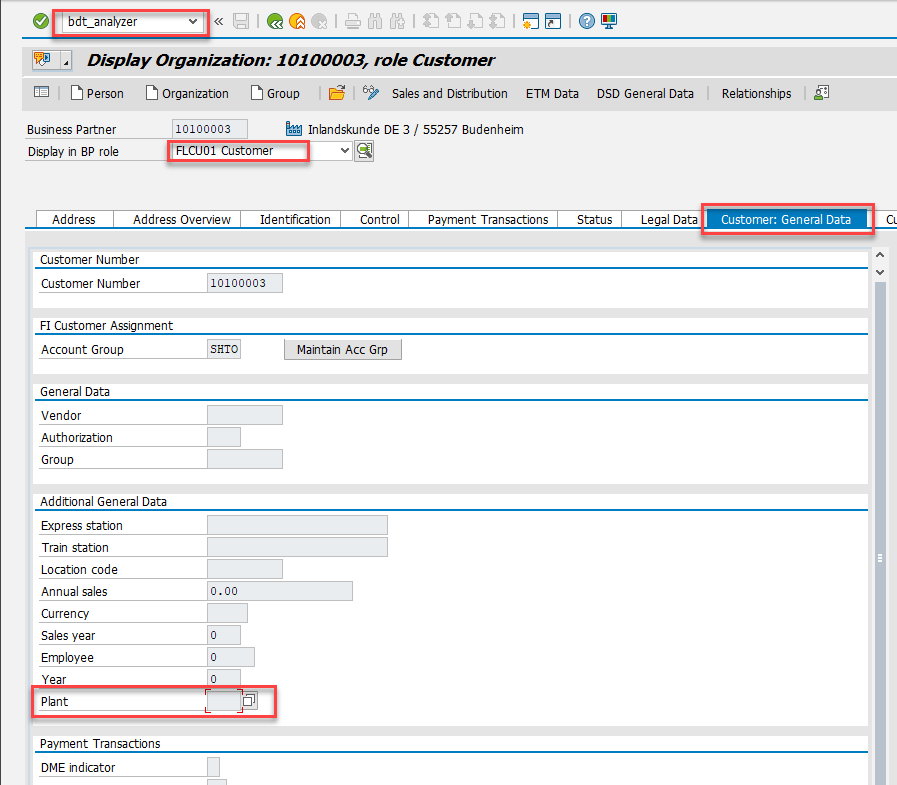
- Run transaction BP and navigate to role ‘Customer’->tab ‘Customer: General Data ’New field should be placed directly below the field ‘Plant’. To determine screen control settings of BDT, place the cursor into field plant and enter OK-Code BDT_ANALYZER into transaction field
- BDT_ANALYZER is starting and gives information about screen control. For later assignment of new view the following information is important:Navigate to
Section CVIC45- Additional General Data
and open folder viewsNote down section number (for example CVIC45)
- To get View details navigate into view CVIC62 by clicking on name CVIC62Note down
Application: CVIC
Differentiation Type: 0
Data Set: CVIC11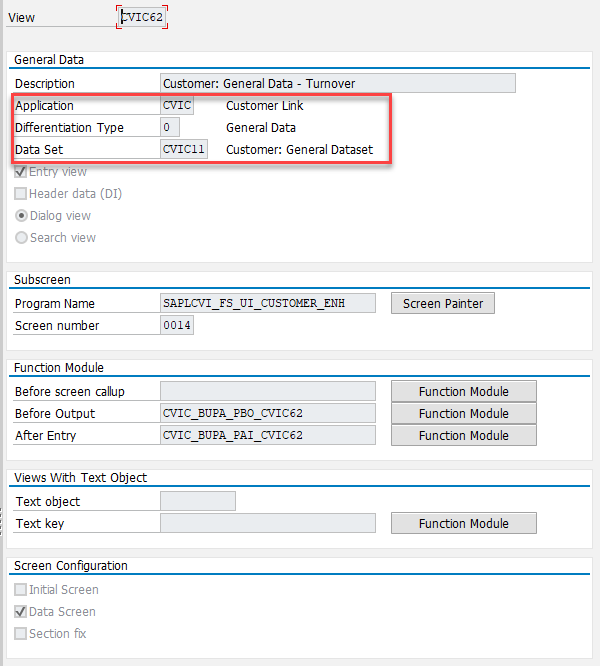
Create Technical Objects
Create Function Group
- Run Object Navigator with transaction SE80

Create PBO Function Module
- From context menu of new Function Group choose Create-> Function Module
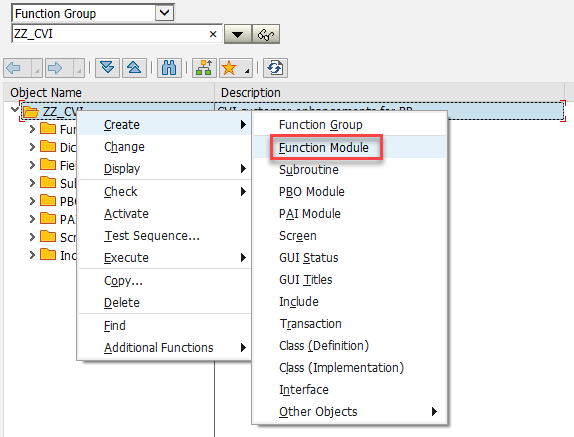
- Enter name, Function Group and Short Text of new Function Module
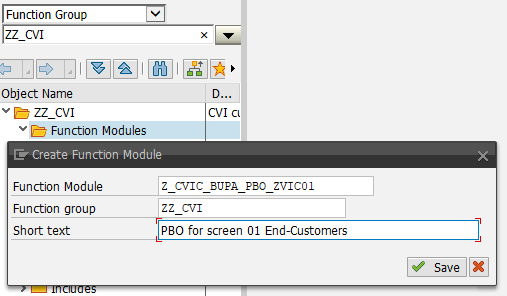
- Enter Coding
function z_cvic_bupa_pbo_zvic01.
*"----------------------------------------------------------------------
*"*"Local Interface:
*"----------------------------------------------------------------------
data:
lt_kna1 type table of kna1,
table_name_kna1 type fsbp_table_name value 'KNA1'.
* step 1: request data from xo for dynpro structure
cvi_bdt_adapter=>data_pbo(
exporting
i_table_name = table_name_kna1
importing
e_data_table = lt_kna1[]
).
if lt_kna1[] is initial.
clear gs_kna1.
else.
read table lt_kna1 into gs_kna1 index 1.
endif.
endfunction.
Save and activate
Create PAI Function Module
- From context menu of new Function Group choose Create-> Function Module

- Enter name, Function Group and Short Text of new Function Module
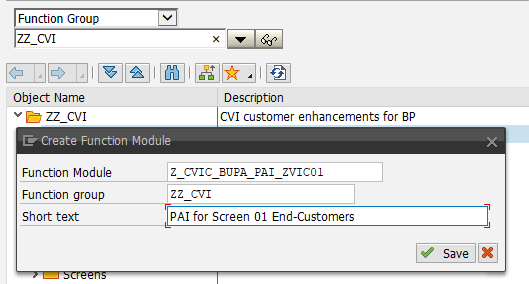
- Enter Coding
FUNCTION z_cvic_bupa_pai_zvic01.

*"----------------------------------------------------------------------

*"*"Local Interface:

*"----------------------------------------------------------------------

DATA: false   TYPE boole-boole  VALUE ' ',

      lt_kna1 TYPE TABLE OF kna1,

      table_name_kna1 TYPE fsbp_table_name VALUE 'KNA1'.


FIELD-SYMBOLS:  <kna1>  LIKE LINE OF lt_kna1.


  CHECK cvi_bdt_adapter=>is_direct_input_active( ) = false.

* step 1: update xo memory from technical screen structure

  cvi_bdt_adapter=>get_current_bp_data(

    EXPORTING

      i_table_name = table_name_kna1

    IMPORTING

      e_data_table = lt_kna1[]

  ).


  IF lt_kna1[] IS INITIAL.

    IF gs_kna1 IS NOT INITIAL.

      gs_kna1-kunnr = cvi_bdt_adapter=>get_current_customer( ).

      APPEND gs_kna1 TO lt_kna1.

    ENDIF.

  ELSE.

    READ TABLE lt_kna1 ASSIGNING <kna1> INDEX 1.

    <kna1>-zcust = gs_kna1-zcust.

  ENDIF.


  cvi_bdt_adapter=>data_pai(

   i_table_name = table_name_kna1

   i_data_new   = lt_kna1[]

   i_validate   = false

  ).


* step 2: check fields

  CHECK cvi_bdt_adapter=>get_activity( ) <> cvi_bdt_adapter=>activity_display.


*   SPACE to implement own PAI checks


ENDFUNCTION.
Save and activate.
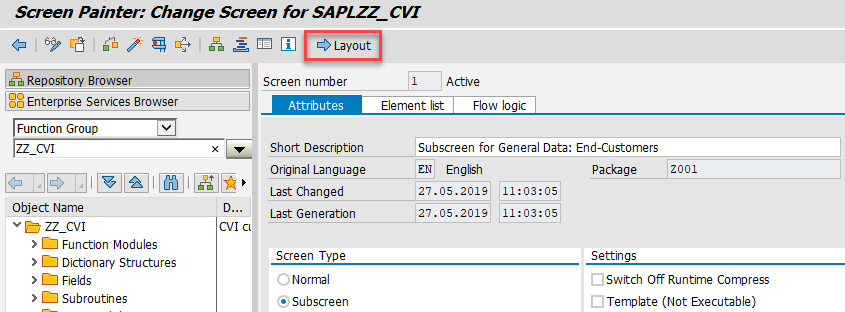
Create Technical Screen
- From context menu of new Function Group choose Create-> Function Module

- Enter screen number

- Enter screen attributes
Short Text and type Subscreen
- Navigate to Layout (Screen Painter)
- Create Text Field ‘End-Customers’
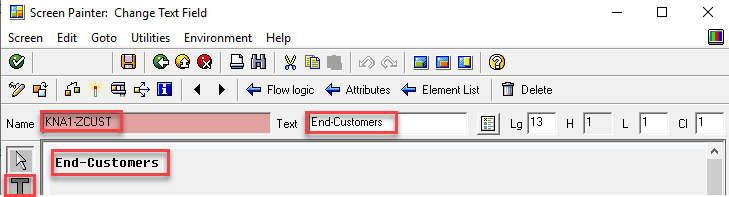
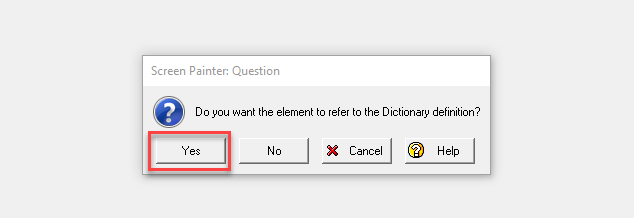
- Accept dictionary reference proposal
- Create Input field at position 25

- Define Field as NUMC via double click at field!!! Pay attention to field format. This must fit to format of field in table KNA1. !!!

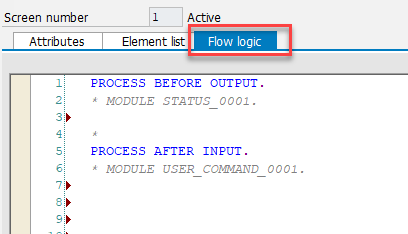
- Activate the new object and close Screen PainterNavigate to screen Flow Logic
- Assign PBO Module
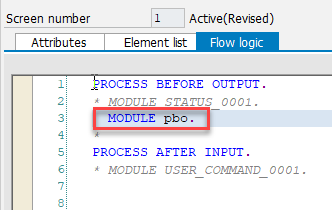
- Create PBO Module with double click at pbo
Enter sub routine pbo
- Create sub routine pbo with double click at pbo
Enter coding
*&---------------------------------------------------------------------*

*& Form PBO

*&---------------------------------------------------------------------*

*& text

*&---------------------------------------------------------------------*

*& -->  p1        text

*& <--  p2        text

*&---------------------------------------------------------------------*

FORM pbo .

  call FUNCTION 'BUS_PBO'.

ENDFORM.
- Assign PAI Module
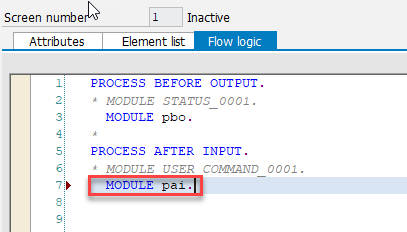
- Create PAI Module with double click at paiEnter sub routine pai

- Create sub routine pai with double click at paiEnter coding
*&---------------------------------------------------------------------*
*& Form PAI
*&---------------------------------------------------------------------*
*& text
*&---------------------------------------------------------------------*
*& --> p1 text
*& <-- p2 text
*&---------------------------------------------------------------------*
FORM pai .
call FUNCTION 'BUS_PAI'.
ENDFORM.
Extend Complex Interface CVIS_EI_EXTERN
To ensure data transportation from Business Partner to Customer master data the complex interface of CVI has to extended by the additional field.
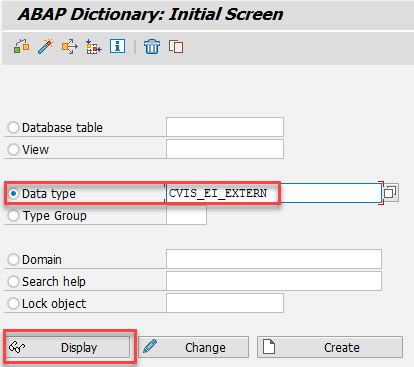
- Open ABAP Dictionary run transaction SE11 and enter data type CVIS_EI_EXTERN
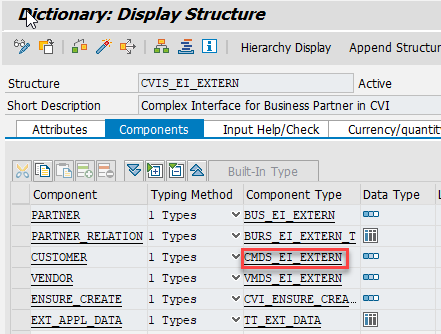
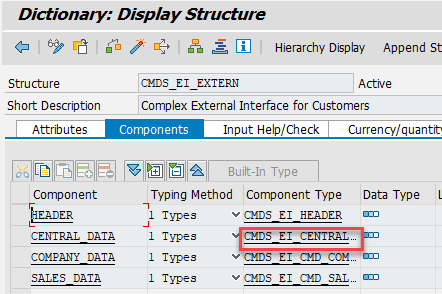
- Use forward navigation to reach customer’s central data using double click

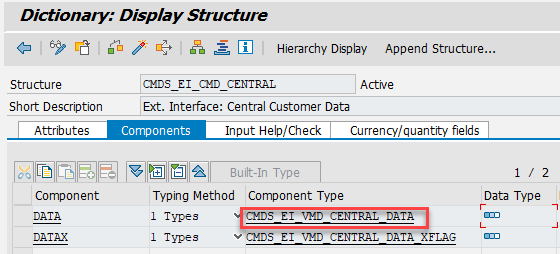
- Both structures DATA and DATAX needs to get an append

- Create append to DATA structure typeNavigate into structure with double click
- Create Append structure ZKNA1_ENH

- Add structure component and component type as definition in KNA1

- Save and Activate changes
- Navigate back to Structure CMDS_EI_CMD_CENTRAL

- Create append to DATAX structure typeNavigate into structure CMDS_EI_VMD_CENTRAL_DATA_XFLAG with double click

- Create an Append Structure ZKNA1_ENHX

- Add structure component ZCUST component type BAPIUPDATE
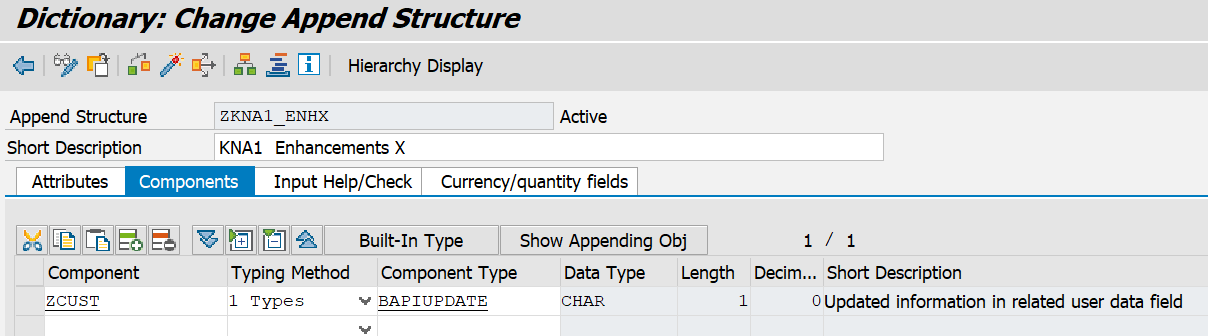
- Save and activate changes
- Leave transaction SE11
Customizing settings in BDT
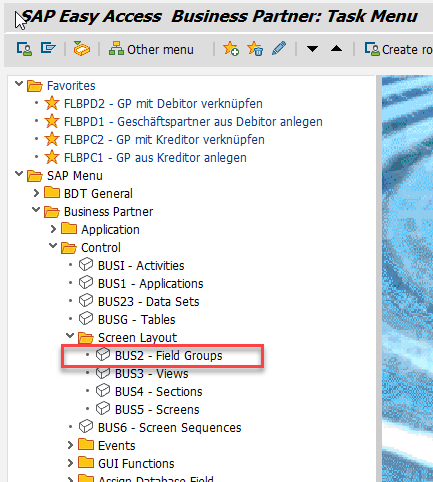
Create Field Group
- Open BDT menu using BUPT in OK-Code field


- Navigate to Screen Layout section and open Field Groups
- Create a new Field Group in Customer Name space

- Create Field Group 600
Function Module CVIC_BUPA_EVENT_FMOD2_ENH is used to determine field control (mandatory, hidden, …) from customizing
- Assign fields from technical screen to field group
 Save your changes
Create View
- Navigate to Screen Layout section and open Views

- Create a new View and take Values from Chapter ‘Determine Area in BP transaction where to place the new field’. Use technical screen program name and number from chapter ‘Create Technical Screen’ Use PBO and PAI function module names from chapters ‘Create PAI Function Module’ and ‘Create PBO Function Module’
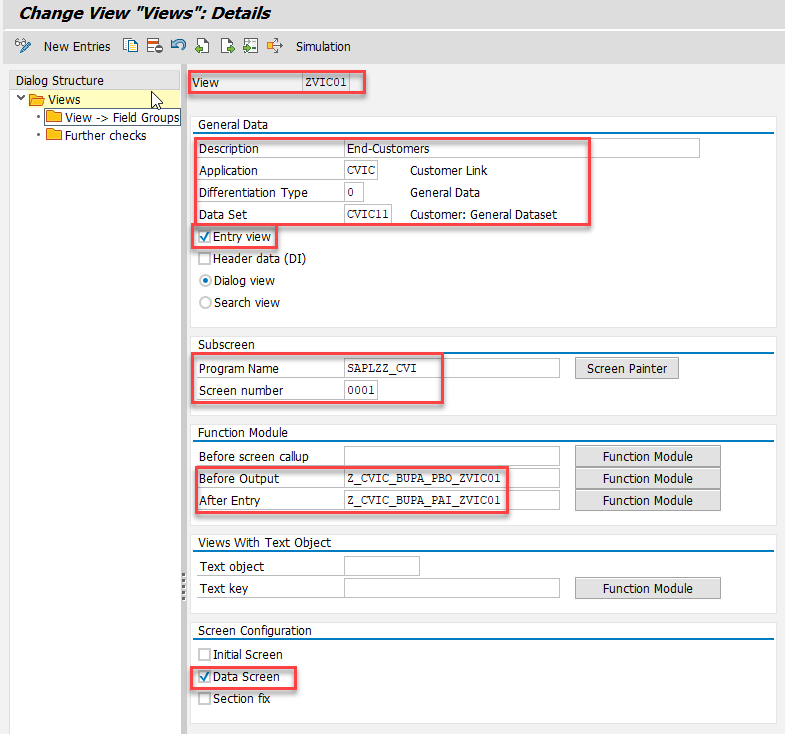
- Assign Field Group to View

- Save your changes
Assign View to Section
- Navigate to Screen Layout section and open Sections

- Position Cursor on Section determined in Chapter ‘Determine Area in BP transaction where to place the new field’
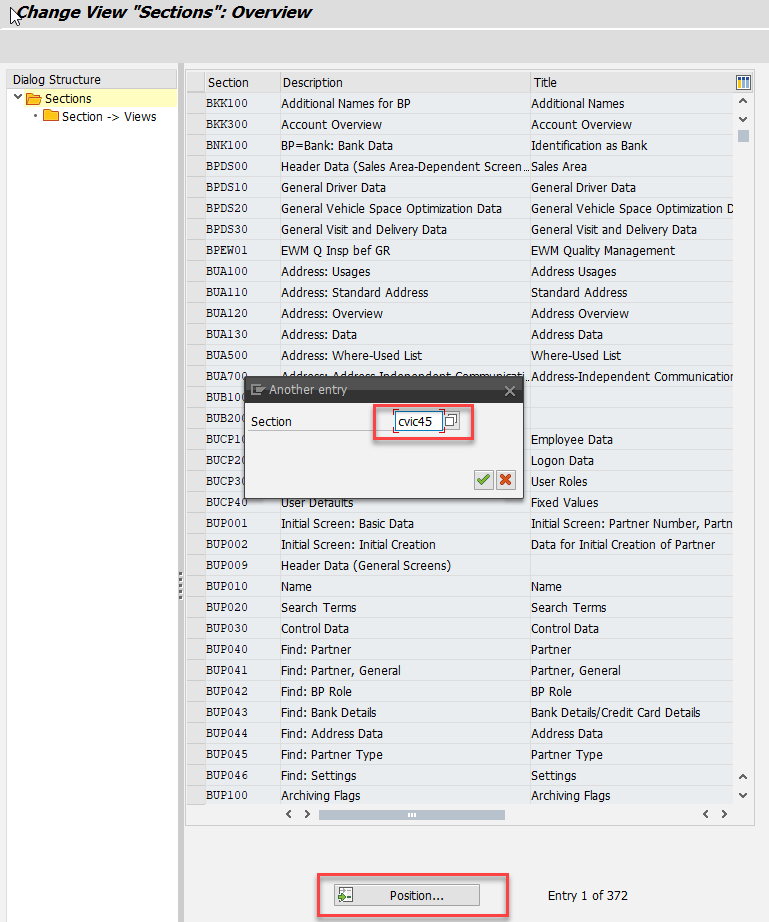
- Mark Section and choose Section->View Assignment from navigation tree

- Choose New Entries

- Enter data for new assignmentUse View number from Chapter ‘Create View’
 Save the data
Test
- Start Transaction BP
- Search for a customer
- Display the customer
- Select role ‘Customer’
- Navigate to tab ‘Customer: General Data’
Conclusion
With this guidance you are able to implement additional fields at Business Partner transaction on your own.
Fiori App Extension
To Extent Fiori Apps please have a look at following blog posts:
Create Custom fields for Business Partner SAP Fiori screens in SAP S/4HANA
SAP Fiori for SAP S/4HANA – How to extend a SAP Fiori app in SAP S/4HANA
- SAP Managed Tags:
- APP PLATFORM Business Partner,
- SAP S/4HANA Private Cloud
Labels:
52 Comments
- « Previous
-
- 1
- 2
- Next »
You must be a registered user to add a comment. If you've already registered, sign in. Otherwise, register and sign in.
Labels in this area
-
Artificial Intelligence (AI)
1 -
Business Trends
363 -
Business Trends
21 -
Customer COE Basics and Fundamentals
1 -
Digital Transformation with Cloud ERP (DT)
1 -
Event Information
461 -
Event Information
23 -
Expert Insights
114 -
Expert Insights
151 -
General
1 -
Governance and Organization
1 -
Introduction
1 -
Life at SAP
415 -
Life at SAP
2 -
Product Updates
4,686 -
Product Updates
204 -
Roadmap and Strategy
1 -
Technology Updates
1,502 -
Technology Updates
85
Related Content
- Portfolio Management – Enhanced Financial Planning integration in Enterprise Resource Planning Blogs by SAP
- The Role of SAP Business AI in the Chemical Industry. Overview in Enterprise Resource Planning Blogs by SAP
- Extending Bank Account Number Length for China in Enterprise Resource Planning Q&A
- Quick Start guide for PLM system integration 3.0 Implementation/Installation in Enterprise Resource Planning Blogs by SAP
- Introducing the GROW with SAP, core HR add-on in Enterprise Resource Planning Blogs by SAP
Top kudoed authors
| User | Count |
|---|---|
| 5 | |
| 5 | |
| 4 | |
| 4 | |
| 3 | |
| 3 | |
| 3 | |
| 3 | |
| 2 | |
| 2 |