
- SAP Community
- Products and Technology
- Technology
- Technology Blogs by SAP
- ABAP Integration – Calling a ABAP function module ...
Technology Blogs by SAP
Learn how to extend and personalize SAP applications. Follow the SAP technology blog for insights into SAP BTP, ABAP, SAP Analytics Cloud, SAP HANA, and more.
Turn on suggestions
Auto-suggest helps you quickly narrow down your search results by suggesting possible matches as you type.
Showing results for
Employee
Options
- Subscribe to RSS Feed
- Mark as New
- Mark as Read
- Bookmark
- Subscribe
- Printer Friendly Page
- Report Inappropriate Content
11-04-2019
8:14 AM
Introduction
This blog post demonstrates, how you can trigger an execution in a remote ABAP system, such as a Business Suite or SAP S/4HANA onPremise system by implementing a custom ABAP operator. Whenever you gained any intelligent insight that you would like to send back to the ABAP system, you can make use of ABAP operators to write your custom logic.
This functionality is part of the ABAP Integration within SAP Data Hub. If you are not familiar wit the overall concept of the ABAP Integration, please have a look at the overview
blog for ABAP Integration.
Remark: SAP Data Hub and SAP Data Intelligence can be treated for the purpose of this scenario exactly the same. For simplicity reasons I will mention SAP Data Hub only. In case you would like to run this scenario with a SAP Data Intelligence system, the procedure is exactly the same.
Prerequisites
For SAP S/4HANA systems greater than 1909, you are good to start - no installation required. If you however run this scenario with a SAP Business Suite system, you need to make sure, that the non-modifying add-on DMIS 2018 SP02 (or DMIS 2011 SP17) is installed on that system.
Besides, you need to be able to establish a RFC connection from your SAP Data Hub system to the SAP system. Ideally, you have already created this connection via SAP Data Hub Connection Management. To get more details on the connectivity, have a look at the following note: 2835207 -SAP Data Hub – ABAP connection type for SAP Data Hub / SAP Data Intelligence
Use Case

In our example use case we have a file (rating.csv) that stores mass data for customer flight ratings. We want to read this data and write it to a custom table in our ABAP system. We will use standard SAP Data Hub functionality to read the file, but to store it in our custom table and to do a simple calculation upfront we want to implement our own ABAP operator.
As you can see in the screenshot, we will make use of the following operators
- Read File: reads our S3 file rating.csv to get the customer flight ratings.
- To String Converter: converts the message format coming from the Read File operator to a string format.
- MY_OPER: our custom ABAP operator
- Graph Terminator: terminates the pipeline once the execution within the custom ABAP operator finished (as we do not want the pipeline to run forever)
To reduce manual activities to a minimum, there is a framework that supports you in the creation of all artifacts in the ABAP backend that are required for your own ABAP operator. The framework consists of two reports that must be executed in sequence:
- DHAPE_CREATE_OPERATOR_CLASS
- DHAPE_CREATE_OPER_BADI_IMPL
In the future this process will be simplified even further. For now, let's get our "hands on" and see how things are working.
Implementation
Implement the custom ABAP operator in the source system (ABAP system)
- Logon to the ABAP system and enter transaction se38.
- As report name enter "DHAPE_CREATE_OPERATOR_CLASS" and click on the execute button.
 Note: If your ABAP-based SAP system is not an SAP S/4HANA System, use report R_LTAPE_CREATE_OPERATOR_CLASS to create the operator implementation class.
 - Now specify the parameters as below, giving your operator a suitable name (like "MY_OPER") and execute the report.

- Note: The name specified here (in our case "MY_OPER") is also the name, that will be displayed later within SAP Data Hub Modeler.
- Assign a package or choose "local object" in the popup that occurs.
- Enter se38 in the transaction field.
- Specify "DHAPE_CREATE_OPER_BADI_IMPL" as report name.
 Note: If your ABAP-based SAP system is not an SAP S/4HANA system, use report R_LTAPE_CREATE_OPER_BADI_IMPL_CLASS to create the operator implementation class.
 - Also here, provide the following parameters and execute the report. Note, that the operator name needs to be the same everywhere.

- Assign a package or choose "local object" in the popup that occurs.
- Double-click on the "Implementing Class" to show the methods, that the class is containing.
- Double-click on the GET_INFO method.

- Add or remove inports, outports and parameters according to your needs. Remember, inports and outports are used to connect the operator in the end to other operators to come up with a data pipeline, whereas the parameters are used to influence the execution of the logic encapsulated within an operator. For our case we need one inport, one outport and no parameters.

- Now go back and double-click on the PROCESS method and on the next screen enter the local process method (lcl_process).

Inside the process method, you can implement the actual logic that you would like to execute within your custom ABAP operator. A simple event-based model is offered here that allows you to implement one or more of the following methods:
ON_START: Called once before the graph is started.
ON_RESUME: Called at least once before the graph is started or resumed.
STEP: Called frequently.
ON_SUSPEND: Called at least once after the graph is stopped or suspended.
ON_STOP: Called once after the graph is stopped.
Additionally, the abstract class provides several helper methods that you can use:
GET_PORT: Get an input or output port.
GET_CONF_VALUE: Get a value from the process configuration propertialsoes.
- As you can see, there is already some sample code offered, which we of course need to adopt for our scenario. First thing we need to change is line 27. As we do not use any parameters within this operator, we out-comment this line of code.

- Now we need to include the call of our function module. In our case, we will call the custom function module Z_STORE_RATING_00. The function module call needs to be part of the step event. Of course, this custom function module is just an example. You can call any function module here or do anything else, that you can think of.
Note: You might want to check this documentation on how to create ABAP function modules.

- Save and activate the changes.
- In case you are interested, let's have a brief look at a code snapped of our function module Z_STORE_RATING_00. There are a lot of things going on inside this function module, however what I'd like to highlight is, that we perform (after a number of calculations and accumulations of the ratings) an update on a custom table. This is important, if we later want to understand, whether the execution was successful.

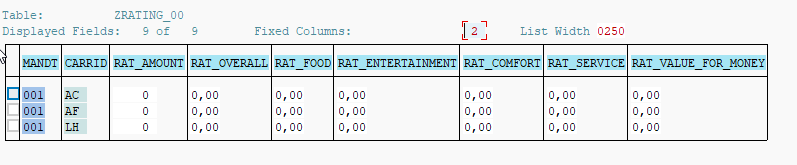
- Via se16, we can see the current state of the custom table ZRATING_00. It is empty at the moment except for the three carrier IDs:
Great. The implementation of the custom ABAP operator in the ABAP system is done!
Before you can actually work with the custom ABAP operator in SAP Data Hub, make sure, that the operator is whitelisted accordingly. Whitelisting is documented in the Security Guide attached to SAP note 2831756.
Implement the SAP Data Hub pipeline
Now we are actually ready to build the pipeline which uses among other operators also our MY_OPER operator.
- Build a pipeline like the one in the below picture by drag and dropping the operators accordingly.

- We will start with the Read File operator. Be careful when linking the Read File operator to the ToString operator. Make sure, that the outFile port is linked to the inInterface port.
- Configure the Read File operator accordingly, specifying the service and connection to the S3 system as well as providing the bucket and file path of the rating.csv file. In our case the file lies in bucket "bucket1" within folder "abap":

- The to String Converter operator does not require any specific configuration - it just works out of the box.
- For the custom ABAP Operator we need to drag and drop the "SAP ABAP Operator" into the workspace.
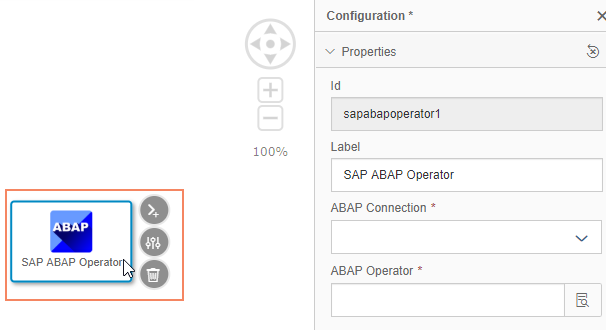
- Now we open the configuration of this operator and provide the connection to our SAP system. If we have defined the connection already in SAP Data Hub Connection Management, we can just reuse it. If not, we can manually create it. Furthermore we choose the "MY_OPER" from the list of available operators. This step will make the operator automatically adopt to its implementation in this specific ABAP system. This means, that the inport(s), outport(s) and parameter(s) are loaded, accordingly.
 Consider here, that potentially you have your SAP Data Hub system connected to multiple ABAP systems of different releases, having different states of standard ABAP operators and potentially also of custom operators.
 - Link the custom ABAP operator to the toString Operator.
- Like for the toString Converter, the Graph Terminator operator works out of the box - no configuration required here.
- Save your changes.
Execute the SAP Data Hub pipeline
Before we execute the pipeline, let's have a quick look at our rating.csv file.
To access the file, we use a so called MinIO Browser, that allows - as the names tells already - to browse our S3 bucket for files and folders:

There are also other files available. Just ignore them :).
The data inside the rating.csv file looks like this:
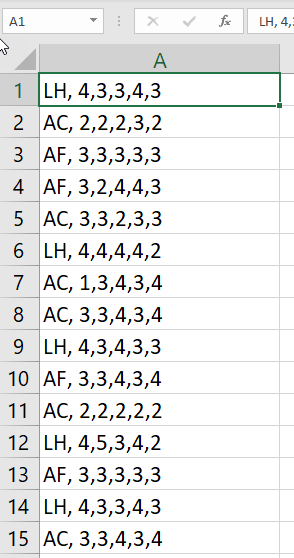
We have hundreds of carrier ratings - one rating represented by a single record. The rating consists of different values (between 1 and 5) for different categories, such as service or comfort. They will later be processed by our function module and updated in our custom table in the ABAP system.
Now coming to the execution:
- To start the execution, go back to the Modeler and push the execute button.

- After the pipeline completed, let's go back to the ABAP system and display table ZRATING_00 via se16. We should see that the table records got updated:
 So after the execution of our pipeline, the custom ABAP operator has updated the ZRATING_00 with the accumulated rating information out of the rating.csv file in S3 - Cool!
Thank you for reading this blog. Feel free to try it in your own and share your feedback with us.
- SAP Managed Tags:
- SAP Data Intelligence,
- Big Data
Labels:
10 Comments
You must be a registered user to add a comment. If you've already registered, sign in. Otherwise, register and sign in.
Labels in this area
-
ABAP CDS Views - CDC (Change Data Capture)
2 -
AI
1 -
Analyze Workload Data
1 -
BTP
1 -
Business and IT Integration
2 -
Business application stu
1 -
Business Technology Platform
1 -
Business Trends
1,661 -
Business Trends
85 -
CAP
1 -
cf
1 -
Cloud Foundry
1 -
Confluent
1 -
Customer COE Basics and Fundamentals
1 -
Customer COE Latest and Greatest
3 -
Customer Data Browser app
1 -
Data Analysis Tool
1 -
data migration
1 -
data transfer
1 -
Datasphere
2 -
Event Information
1,400 -
Event Information
64 -
Expert
1 -
Expert Insights
178 -
Expert Insights
269 -
General
1 -
Google cloud
1 -
Google Next'24
1 -
Kafka
1 -
Life at SAP
784 -
Life at SAP
10 -
Migrate your Data App
1 -
MTA
1 -
Network Performance Analysis
1 -
NodeJS
1 -
PDF
1 -
POC
1 -
Product Updates
4,578 -
Product Updates
317 -
Replication Flow
1 -
RisewithSAP
1 -
SAP BTP
1 -
SAP BTP Cloud Foundry
1 -
SAP Cloud ALM
1 -
SAP Cloud Application Programming Model
1 -
SAP Datasphere
2 -
SAP S4HANA Cloud
1 -
SAP S4HANA Migration Cockpit
1 -
Technology Updates
6,886 -
Technology Updates
389 -
Workload Fluctuations
1
Related Content
- Harnessing the Power of SAP HANA Cloud Vector Engine for Context-Aware LLM Architecture in Technology Blogs by SAP
- Business Process Integration and Assimilation in a M&A and How to Accelerate Synergy Savings. in Technology Blogs by SAP
- Trustable AI thanks to - SAP AI Core & SAP HANA Cloud & SAP S/4HANA & Enterprise Blockchain 🚀 in Technology Blogs by Members
- Partner-2-Partner Collaboration in Manufacturing in Technology Blogs by SAP
- Benchmarking in the data-driven era in Technology Blogs by SAP
Top kudoed authors
| User | Count |
|---|---|
| 12 | |
| 11 | |
| 11 | |
| 9 | |
| 9 | |
| 9 | |
| 9 | |
| 8 | |
| 7 | |
| 7 |