
- SAP Community
- Products and Technology
- Enterprise Resource Planning
- ERP Blogs by Members
- Another DIY for geeks: build your home Data Center...
Enterprise Resource Planning Blogs by Members
Gain new perspectives and knowledge about enterprise resource planning in blog posts from community members. Share your own comments and ERP insights today!
Turn on suggestions
Auto-suggest helps you quickly narrow down your search results by suggesting possible matches as you type.
Showing results for
kimveasna_xyz
Explorer
Options
- Subscribe to RSS Feed
- Mark as New
- Mark as Read
- Bookmark
- Subscribe
- Printer Friendly Page
- Report Inappropriate Content
10-23-2019
5:14 PM
Motivation
I have kept bad habits and hobbies from my student years: I like to mount my own PC, tweak it, upgrade it, dismantle it, and so on. And of course, from the beginning of my SAP career, I have tried to make sure I was able to have my own installation by my side, serving as my personal sandbox for exploring configuration scenarios, and for playing with my custom ABAP programs, etc.
I have not put a lot of details in installation steps, my post is more a testimony of an installation of S/4 in a small box. I suggest to read blog post from Mahesh Sardesa which is a must read for anyone wanting to go through a full installation.
This blog post is split into many parts:
- Gather hardware for your data center
- First building block of your home cloud: ESXi hypervisor
- Install and prepare SUSE Linux
- Install SAP HANA 2 and S/4HANA
Gather hardware for your data center
My idea, I believe is the idea many of us have been wondering: is it possible to install S/4HANA on a consumer-grade machine?
Simple answer is yes. I was able to find all parts in online shops and surprisingly Amazon was the main place to shop from: huge choice, competitive prices and excellent customer service. To be fair, parts can be pricey especially when it comes to gather 256GB of RAM.
I have different configurations and my last one was built around the last Intel Xeon-D 2100 platform which supports up to 512GB of RAM in a tiny Mini-ITX size. My BOM is mainly composed of :
- X11SDV-4C-TLN2F (Intel Xeon D-2123IT)
- 4x Crucial CT64G4LFQ424 64GB, for a total of 256GB of RAM
- SSD NVMe Samsung 960 EVO 1TB + NVMe to PCIe adapter
- SSD SATA Samsung 850 EVO 2TB
- Pico PSU 120W + AC-DC adapter block
- Minimal Mini-ITX case
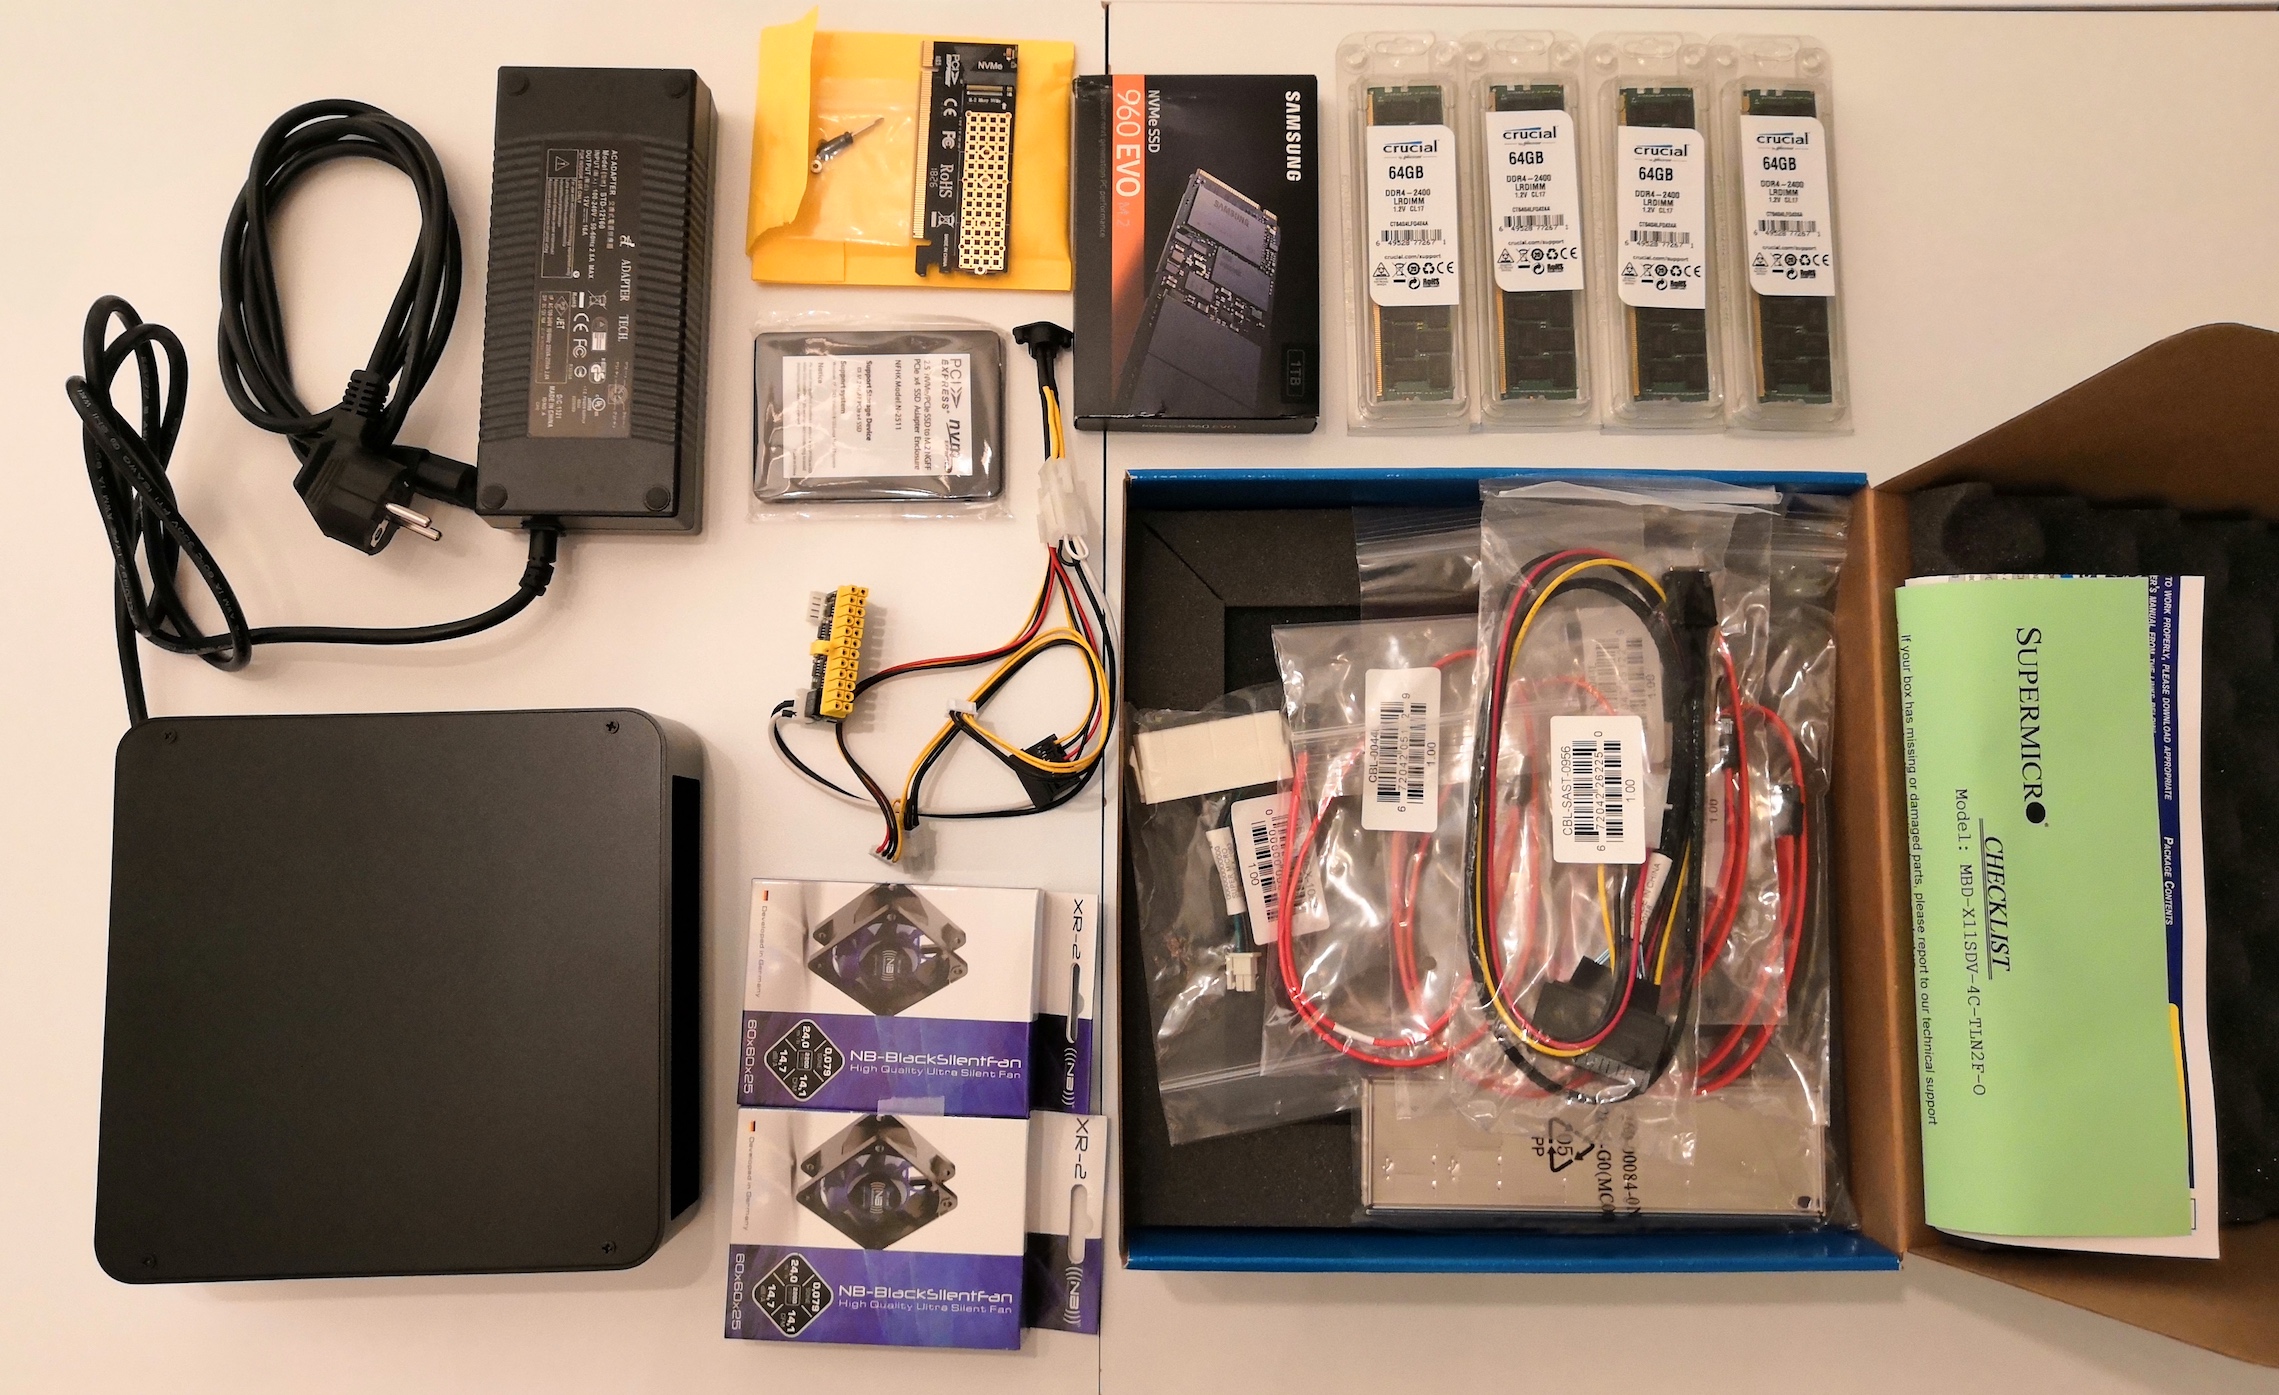
This picture does not reveal it but this is going to be packed solid.

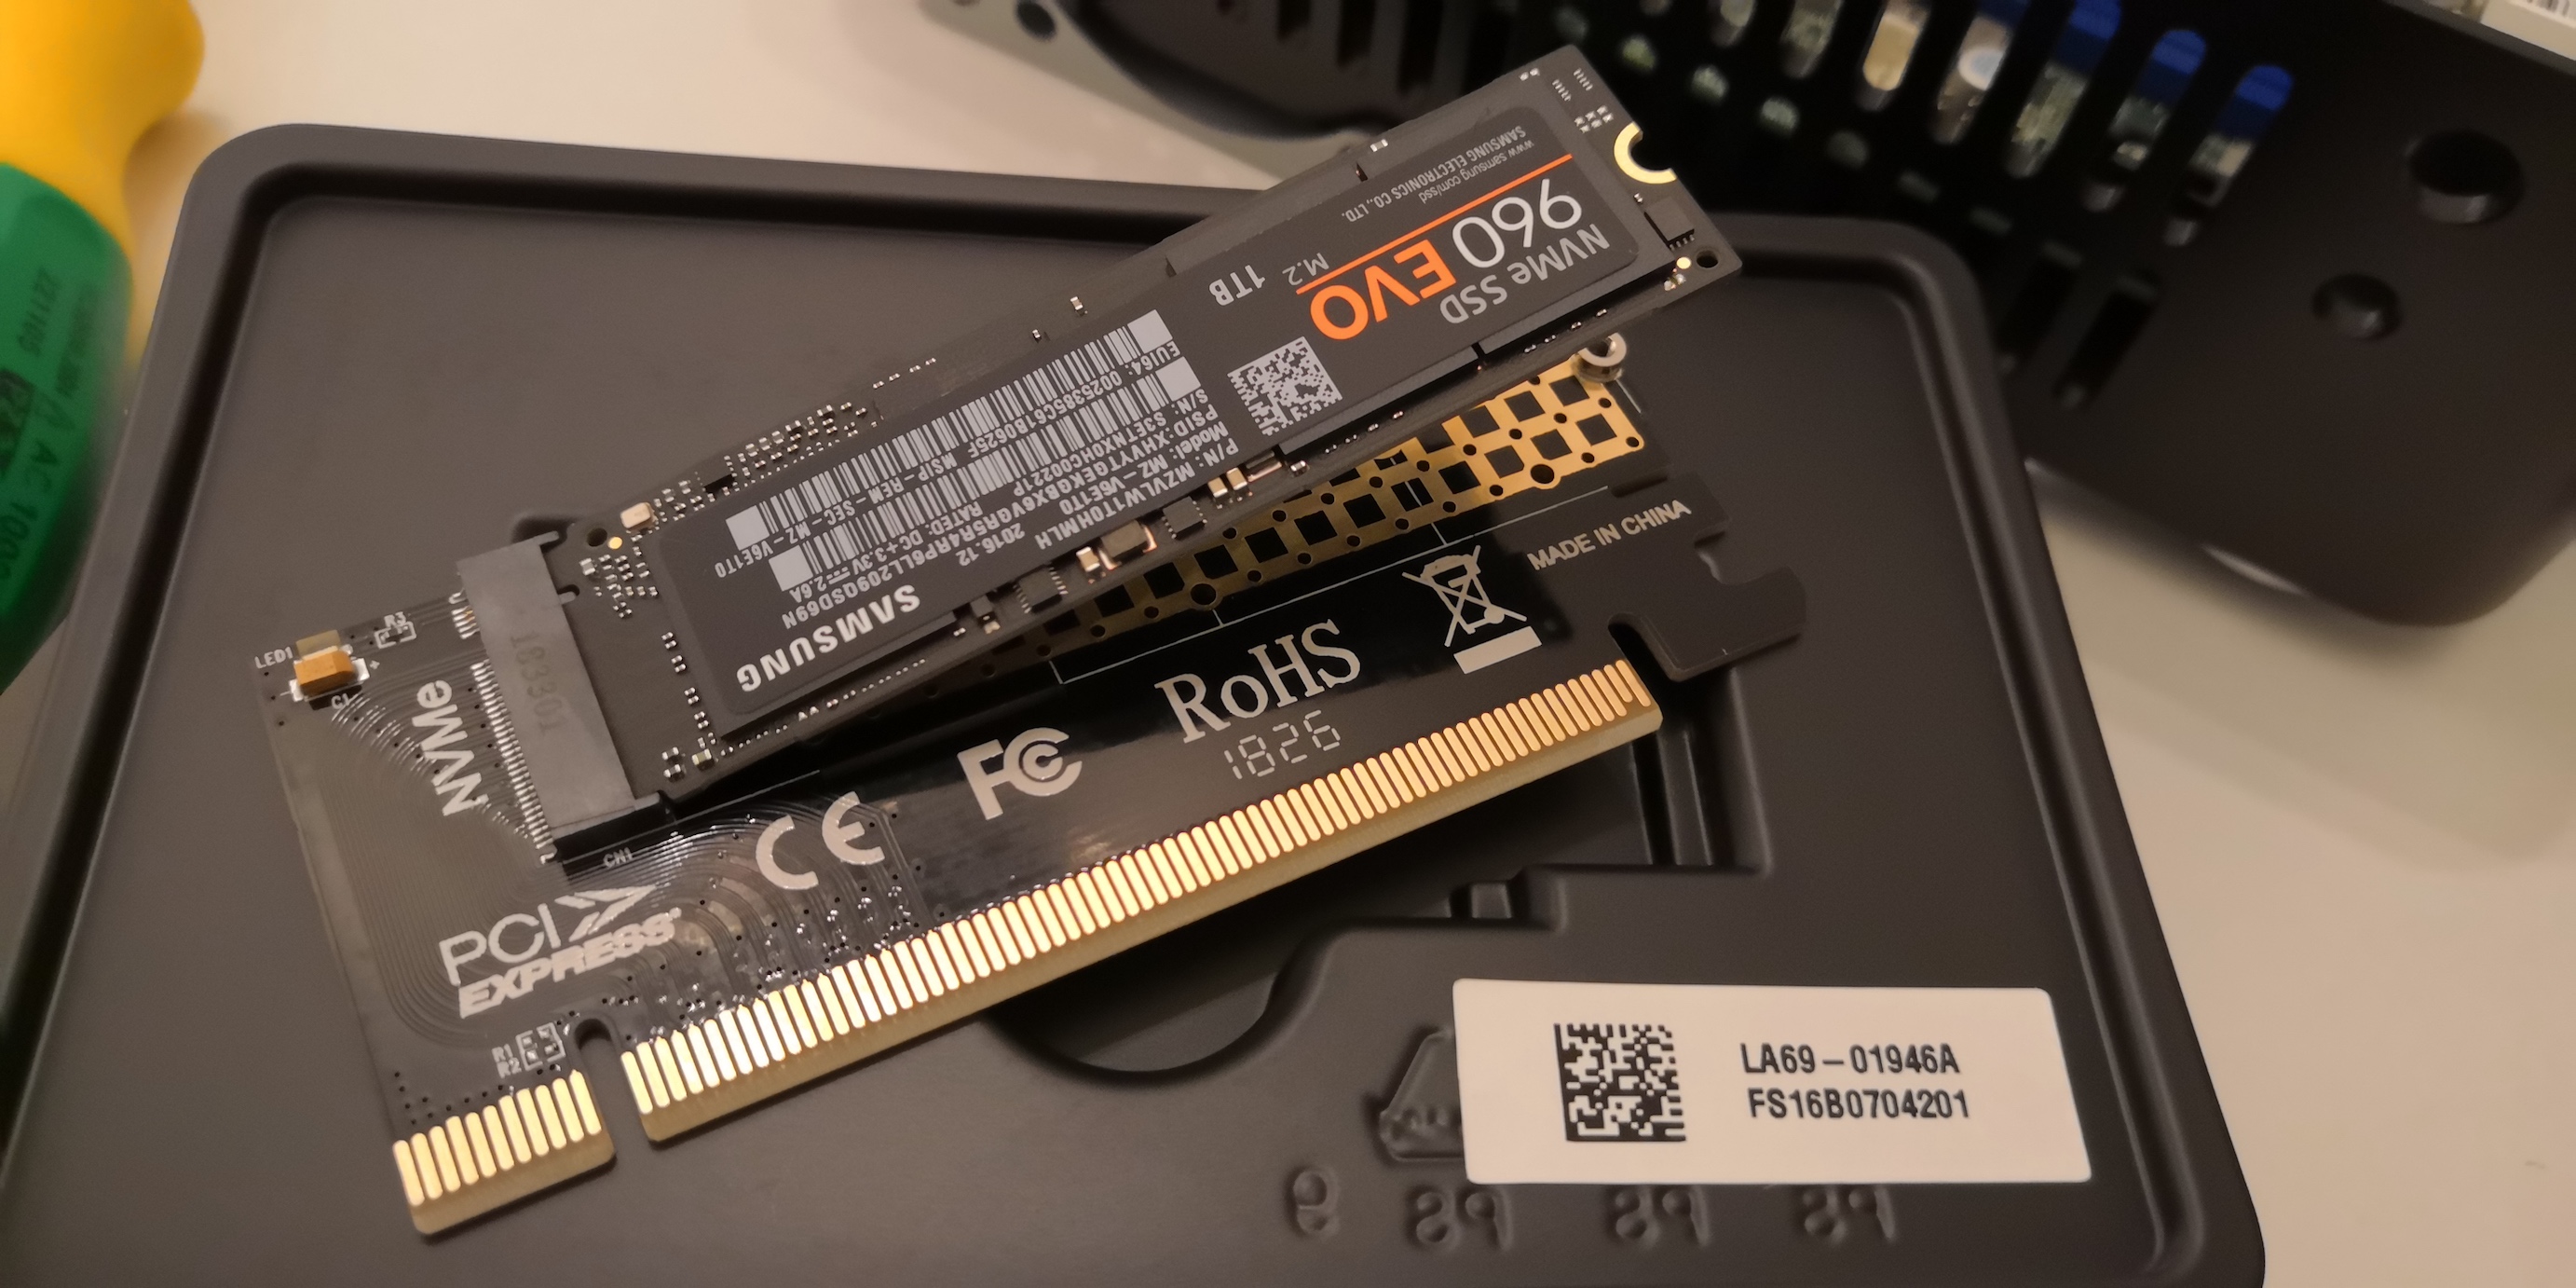
Compared to my last X10SDV-16C-TLN4F, this motherboard has no NVMe slot. Two options are available to plug my NVMe SSD:
- OCuLink to U.2 PCIE cable + U.2 to M.2 adapter (as show in the first picture)
- PCIe 1x to M.2 adapter (below picture), this is the last option I have chosen

Once assembled, parts, PSU, SSD drives and cables are heavily packed in the tiny size case. To be true, it rapidly lead to heating issues and I had to move it all to a larger case.

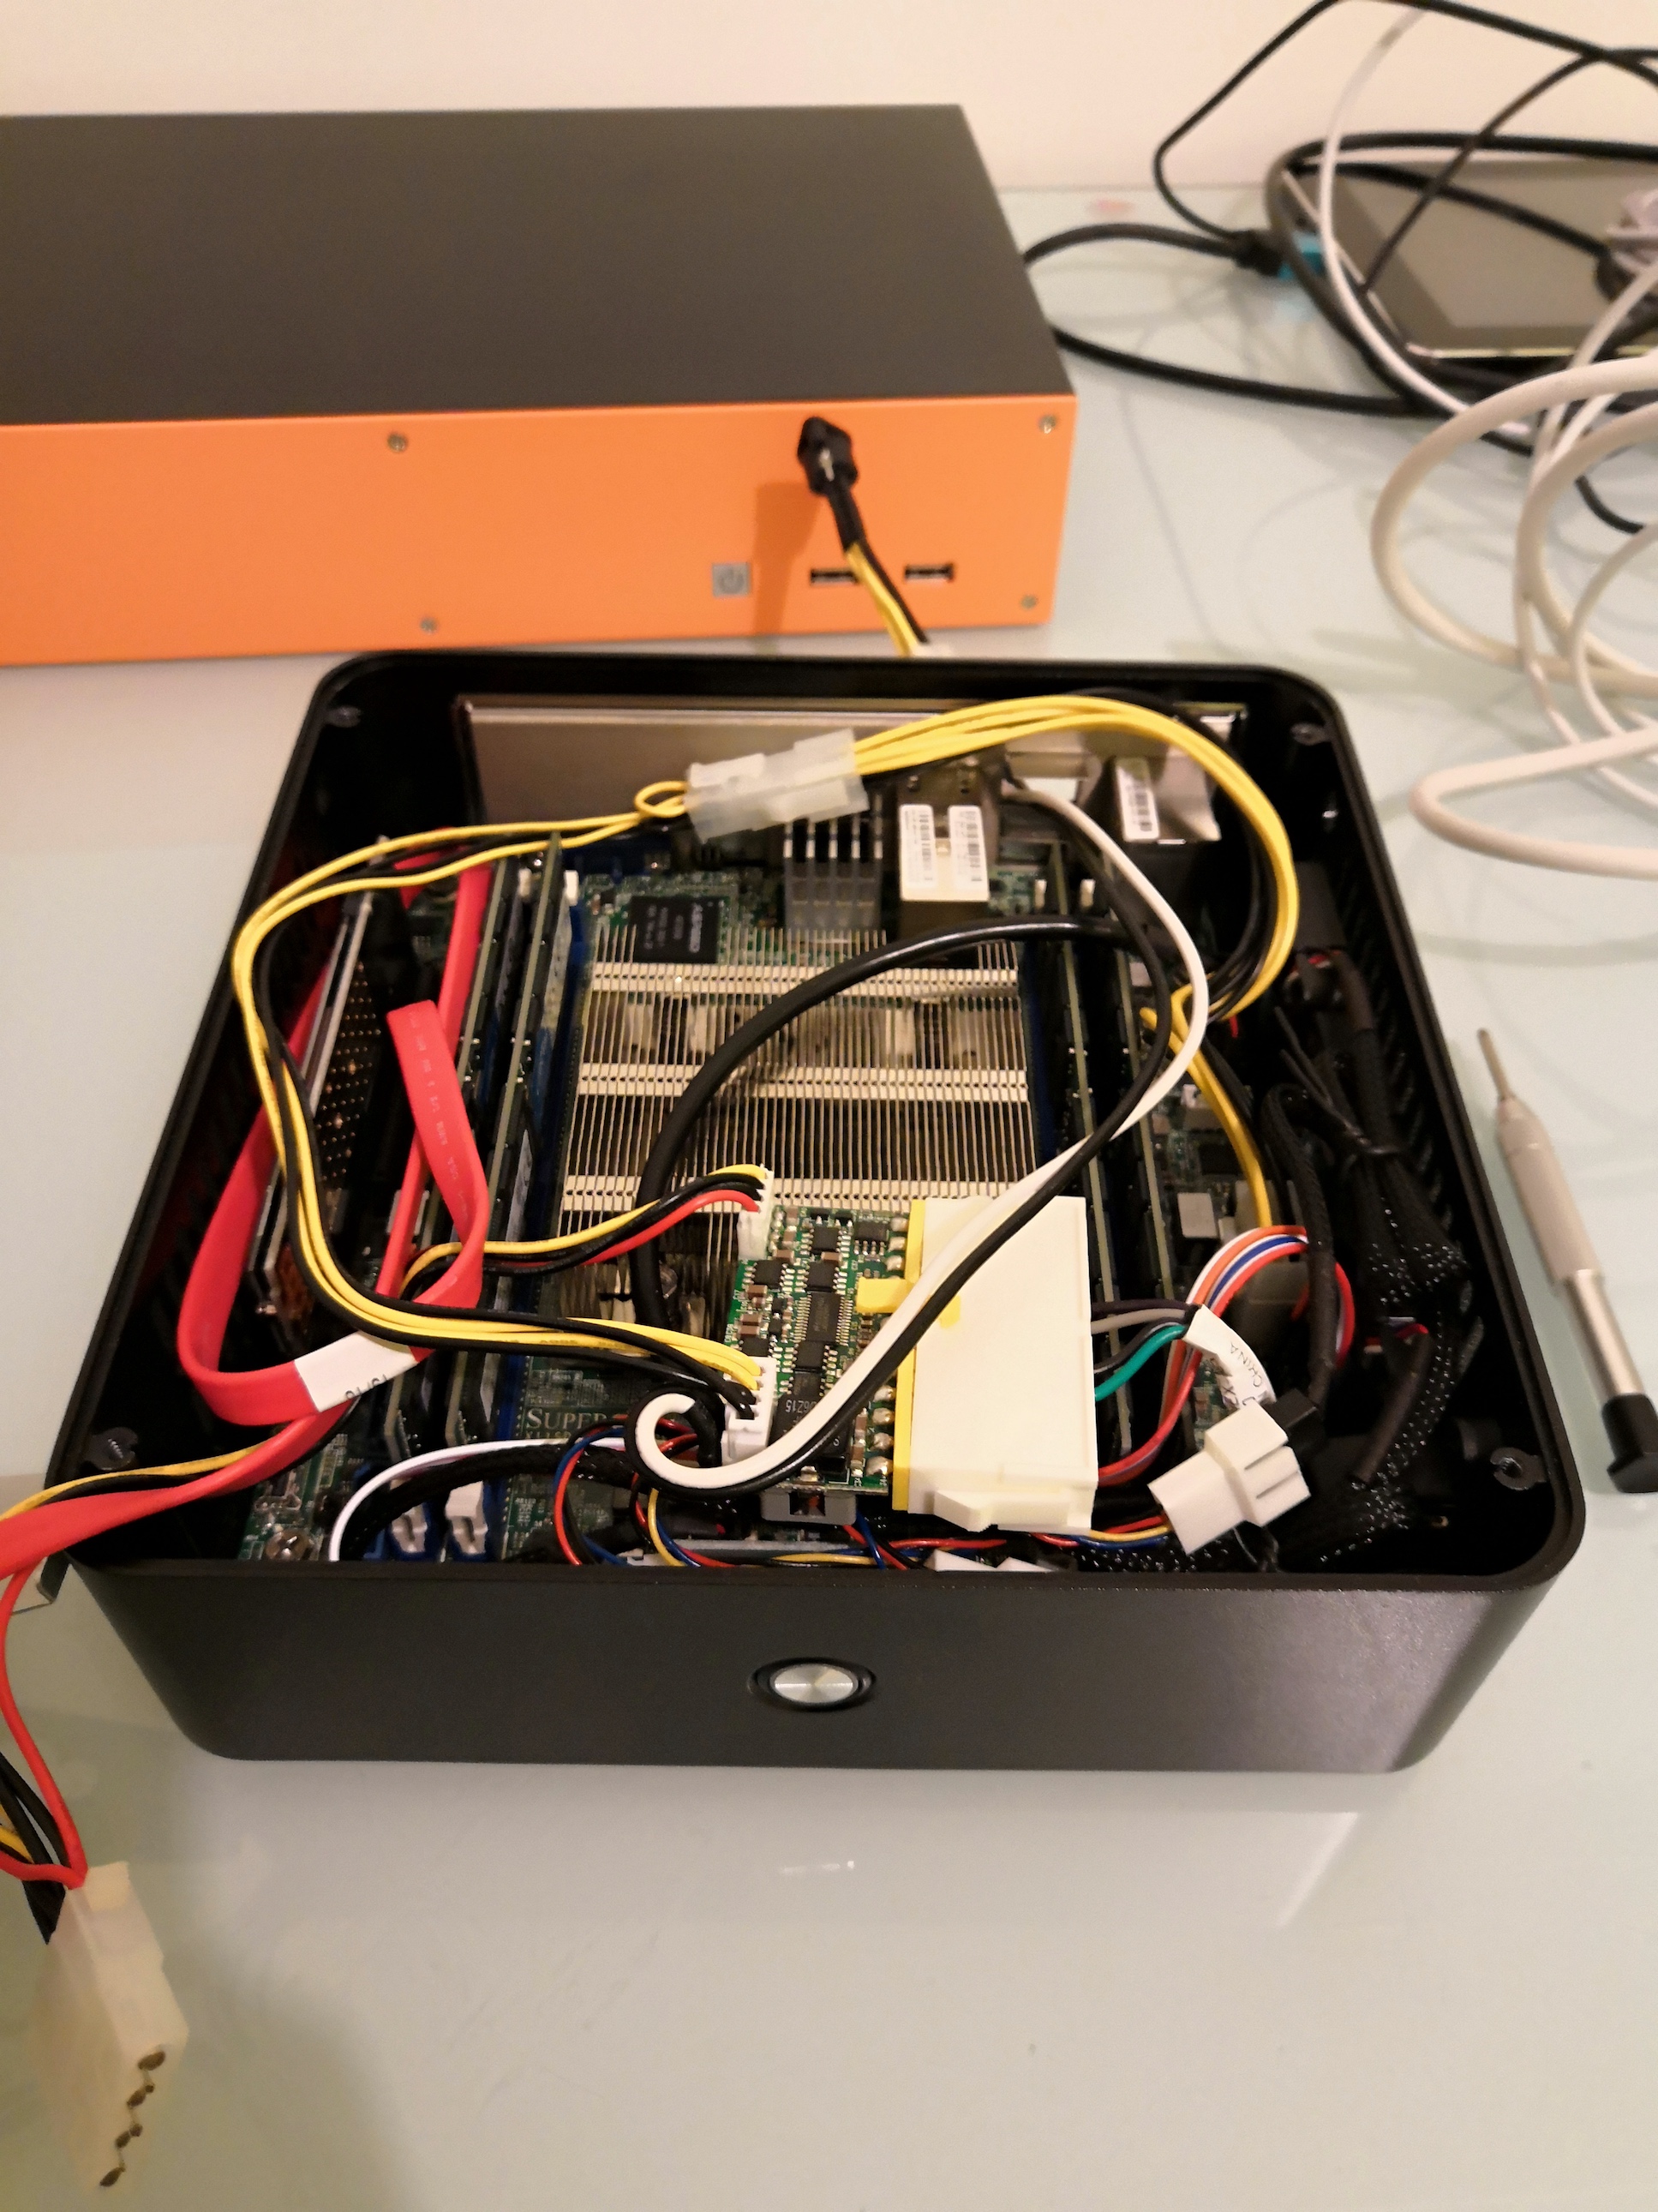
This looks handicraft, especially the 3 tiny fans set directly on the motherboard ;-). But these 3 noiseblocker 2000RPM fans are totally silent and help a lot in cooling processor and PCB. At the opposite side, 2 more fans will be added to improve airflow.

Let's now close the shoe box. Everything is ready to start our home cloud.

As a size comparison, my macbook pro 15" on top of my box:

This is a stylish box for home cloud, plus, it will empower S/4HANA.
First building block of your home cloud: ESXi hypervisor
Unless you really mean to deal with your physical hardware and do not want to mess around with an additional layer, I highly recommend to install a VM hypervisor.
Supermicro motherboards come with an onboard IPMI BMC (Baseboard Management Controller) which is very helpful: all you need is to connect your machine to your network, retrieve its IP address and launch the BMC webpage.

From there, you have access to low level information and commands (switch on/off, reset, temperature sensors, etc.). I manage the installation of ESXi through iKVM/HTML or JAVA based KVM: I found the HTML version of KVM not convenient to reach the BIOS settings (because of a less responsive keyboard redirection?) in order to update boot sequence and be able to install from my USB stick.

Once your system is booting from USB, no issue should prevent you from accomplishing the full installation within 5 minutes. Depending on your preferences, beware of your keyboard layout (make sure it is actually what you expect) otherwise you may not be able to retrieve your password.

Once done, you can head to ESXi management GUI via your browser. Et voilà. User is root, and password is the one you set during installation.

Let's now move on to the installation of SLES 15!
Install and prepare SUSE Linux
Download SUSE installation media
I recommend to download the SAP-optimized version of SUSE server, that is SUSE LINUX ENTERPRISE SERVER FOR SAP APPLICATIONS 15.
For your information, we can as well use another version of SUSE. Actually I have done it many times with the basic SUSE Linux Enterprise Server (SLES). The difference is not really visible to me, from an installation perspective the SAP-optimized version comes with pre-installed tools (saptune for example) which slightly speed up installation process.
One remark which may be obvious but was not to me: SUSE license fees. Unless terms have changed, you have to know license fee is not mandatory in order to use SUSE. That is you can use it forever free of charges, and you need to purchase license should you require enterprise grade support from SUSE.
Once ISO files are downloaded, copy them to one of the ESXi datastores so that they are available to your VM: we will virtually mount the ISO files as CD/DVD for the installation. You have many ways to perform it, whether using a USB stick to transfer to ESXi (there is a tricky part to mount it on host instead of making it available to VMs), or copy with ESXi GUI (this is my recommended method, a bit slower but far simpler).
Create a new virtual machine and allocate 120GB of RAM
Nothing really complicated here, allocate as much memory as possible (I am limited to 128GB with my current configuration). Some hints though:
- add as much CPU as possible to improve performance (especially during installation)
- allocate enough memory to GPU so that you are not limited with your virtual desktop size
- add a USB 3.0 controller to enable file transfer to/from your VM
- mount all ISO files and register the installation medias during setup to avoid any missing file
- unless you really like command lines, telnet, ssh and vi, I would recommend to install a facing desktop UI like Gnome and benefit from the many desktop tools, and RDP
- adjust the default partition table, as per default for me not all disk space was allocated
1275776 - Linux: Preparing SLES for SAP environments
This is a no brainer step, just read the SAP note 1275776 and follow the instructions. As mentioned earlier, saptune is already installed for example.

2684254 – SAP HANA DB: RECOMMENDED OS SETTINGS FOR SLES 15 / SLES FOR SAP APPLICATIONS 15


Install SAP HANA 2 and S/4HANA
I repeat it, go and read blog post from Mahesh Sardesa. But instead of running command lines for HANA installation, I'd rather use the GUI.
Run HANA Life Cycle Manager (hdblcmgui)


This is it for HANA DB, it took only a couple of minutes.
Install S/4 (empty box)
This is quick too, but not as fast as installing HANA DB. Follow steps as described in blog post from Mahesh Sardesa, be patient and you're done.
Interesting things to play with: number of processes. I am not sure I have found the optimal numbers, but I have tried to increase it as much as possible

And this had an impact on my CPU of course:

This lead to some overheat in my tiny box (CPU up to 100°C), so I had to balance a bit though to get back to normal around 75°C. I must admit I had to leave my case opened during the rest of the installation.


Be patient, and voilà.

This is actually not very long, you can easily have it all setup within a couple of hours. And this is nothing compared to the long journey of installing SAP best practices.
Conclusion
This testimony is meant to prove it is easy for anyone to setup a SAP box for development purpose, training or demo a POC.
But why would you install S/4HANA at home, in your home data center, waste valuable time whereas it is so easy to go and provision a virtual machine in the cloud (only a couple of minutes)?
Because you CAN ;-).
And from my experience, advantages I found over cloud are:
- 100% control of your hardware and VM
- 24/7 availability at limited cost (yes, hardware is a bit expensive to buy, I know)
- (relative) mobility, you can bring it to any private network, any place (you can shine at dinner with friends)
- once installed, you can copy, test, break and brick your S/4, it does not matter, copy-paste to recover from backup (no fear-of-pressing-the-button syndrom)
Enjoy!
- SAP Managed Tags:
- SAP S/4HANA
10 Comments
You must be a registered user to add a comment. If you've already registered, sign in. Otherwise, register and sign in.
Labels in this area
-
"mm02"
1 -
A_PurchaseOrderItem additional fields
1 -
ABAP
1 -
ABAP Extensibility
1 -
ACCOSTRATE
1 -
ACDOCP
1 -
Adding your country in SPRO - Project Administration
1 -
Advance Return Management
1 -
AI and RPA in SAP Upgrades
1 -
Approval Workflows
1 -
ARM
1 -
ASN
1 -
Asset Management
1 -
Associations in CDS Views
1 -
auditlog
1 -
Authorization
1 -
Availability date
1 -
Azure Center for SAP Solutions
1 -
AzureSentinel
2 -
Bank
1 -
BAPI_SALESORDER_CREATEFROMDAT2
1 -
BRF+
1 -
BRFPLUS
1 -
Bundled Cloud Services
1 -
business participation
1 -
Business Processes
1 -
CAPM
1 -
Carbon
1 -
Cental Finance
1 -
CFIN
1 -
CFIN Document Splitting
1 -
Cloud ALM
1 -
Cloud Integration
1 -
condition contract management
1 -
Connection - The default connection string cannot be used.
1 -
Custom Table Creation
1 -
Customer Screen in Production Order
1 -
Data Quality Management
1 -
Date required
1 -
Decisions
1 -
desafios4hana
1 -
Developing with SAP Integration Suite
1 -
Direct Outbound Delivery
1 -
DMOVE2S4
1 -
EAM
1 -
EDI
2 -
EDI 850
1 -
EDI 856
1 -
EHS Product Structure
1 -
Emergency Access Management
1 -
Energy
1 -
EPC
1 -
Find
1 -
FINSSKF
1 -
Fiori
1 -
Flexible Workflow
1 -
Gas
1 -
Gen AI enabled SAP Upgrades
1 -
General
1 -
generate_xlsx_file
1 -
Getting Started
1 -
HomogeneousDMO
1 -
IDOC
2 -
integration
1 -
Learning Content
2 -
LogicApps
2 -
low touchproject
1 -
Maintenance
1 -
management
1 -
Material creation
1 -
Material Management
1 -
MD04
1 -
MD61
1 -
methodology
1 -
Microsoft
2 -
MicrosoftSentinel
2 -
Migration
1 -
MRP
1 -
MS Teams
2 -
MT940
1 -
Newcomer
1 -
Notifications
1 -
Oil
1 -
open connectors
1 -
Order Change Log
1 -
ORDERS
2 -
OSS Note 390635
1 -
outbound delivery
1 -
outsourcing
1 -
PCE
1 -
Permit to Work
1 -
PIR Consumption Mode
1 -
PIR's
1 -
PIRs
1 -
PIRs Consumption
1 -
PIRs Reduction
1 -
Plan Independent Requirement
1 -
Premium Plus
1 -
pricing
1 -
Primavera P6
1 -
Process Excellence
1 -
Process Management
1 -
Process Order Change Log
1 -
Process purchase requisitions
1 -
Product Information
1 -
Production Order Change Log
1 -
Purchase requisition
1 -
Purchasing Lead Time
1 -
Redwood for SAP Job execution Setup
1 -
RISE with SAP
1 -
RisewithSAP
1 -
Rizing
1 -
S4 Cost Center Planning
1 -
S4 HANA
1 -
S4HANA
3 -
Sales and Distribution
1 -
Sales Commission
1 -
sales order
1 -
SAP
2 -
SAP Best Practices
1 -
SAP Build
1 -
SAP Build apps
1 -
SAP Cloud ALM
1 -
SAP Data Quality Management
1 -
SAP Maintenance resource scheduling
2 -
SAP Note 390635
1 -
SAP S4HANA
2 -
SAP S4HANA Cloud private edition
1 -
SAP Upgrade Automation
1 -
SAP WCM
1 -
SAP Work Clearance Management
1 -
Schedule Agreement
1 -
SDM
1 -
security
2 -
Settlement Management
1 -
soar
2 -
SSIS
1 -
SU01
1 -
SUM2.0SP17
1 -
SUMDMO
1 -
Teams
2 -
User Administration
1 -
User Participation
1 -
Utilities
1 -
va01
1 -
vendor
1 -
vl01n
1 -
vl02n
1 -
WCM
1 -
X12 850
1 -
xlsx_file_abap
1 -
YTD|MTD|QTD in CDs views using Date Function
1
- « Previous
- Next »
Related Content
- Manage Supply Shortage and Excess Supply with MRP Material Coverage Apps in Enterprise Resource Planning Blogs by SAP
- Unable to add the event filters in the Event Enablement Channel in Enterprise Resource Planning Q&A
- How to check if a note is applied in S4HANA Public Cloud? in Enterprise Resource Planning Q&A
- FP2402 New Installation in Enterprise Resource Planning Q&A
- Ariba to SAP S4HANA Cloud Integration Supplier Masterdata Standard Field Mapping in Enterprise Resource Planning Q&A
Top kudoed authors
| User | Count |
|---|---|
| 2 | |
| 2 | |
| 2 | |
| 2 | |
| 2 | |
| 1 | |
| 1 | |
| 1 | |
| 1 | |
| 1 |