
- SAP Community
- Products and Technology
- Enterprise Resource Planning
- ERP Blogs by Members
- Status profile creation and automatic status updat...
Enterprise Resource Planning Blogs by Members
Gain new perspectives and knowledge about enterprise resource planning in blog posts from community members. Share your own comments and ERP insights today!
Turn on suggestions
Auto-suggest helps you quickly narrow down your search results by suggesting possible matches as you type.
Showing results for
Abhishek_Parab
Active Participant
Options
- Subscribe to RSS Feed
- Mark as New
- Mark as Read
- Bookmark
- Subscribe
- Printer Friendly Page
- Report Inappropriate Content
10-21-2019
1:37 PM
The main purpose of this blog post is to explain how to create a status profile and how to configure the logic for an automatic status update.
The status profile is required when the system status does not provide/has the required statuses to meet the requirement. Using a status profile we can create our own status and use it in desired functionality. For Example, creating a status profile and using it in Quality Notification
Assuming that there is a requirement of the creation of a custom status profile and assigning it in the Stability Studies Quality Notification process so that a more detailed status of the quality notification can be displayed.
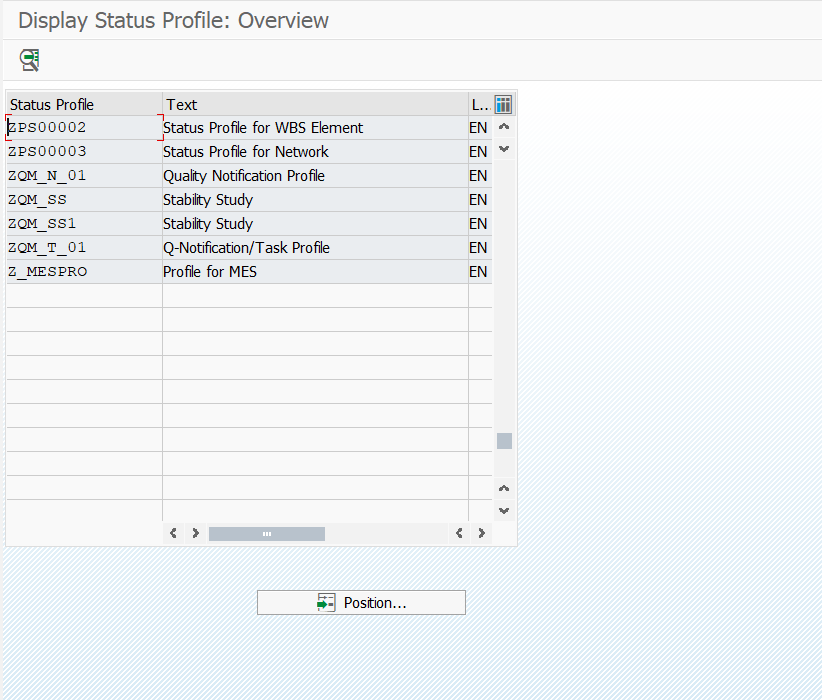
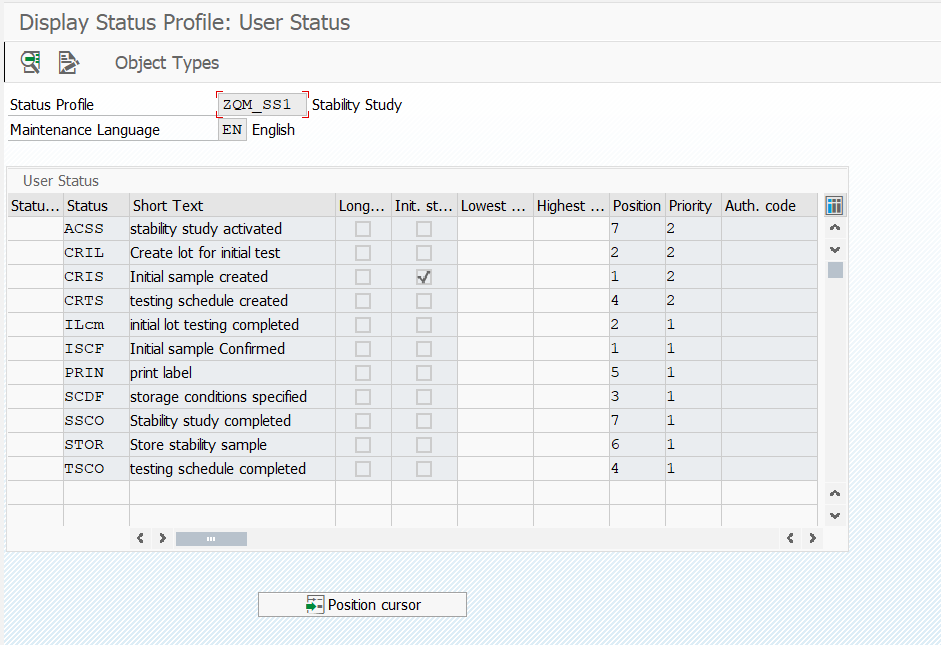
Here in this case status profile – ZQM_SS1 is created.
In this status profile, I have defined the following statuses with the description/ short text as per the requirement. Please make a point that at a time only 8 status can be displayed simultaneously.

Meaning of the fields
Ini. St- initial status.
This checkbox is used to make the selected status as the initial status, let us say when the notification is created the initial status will be CRIS in the user status section.
As you can see in the screenshot that each status has a position and a priority assigned to it. As stated in the standard documentation that only 8 status can be displayed at a time, so the position field decides which status will occupy which position starting from the left.
If 2 or more status is having the same position, then the priority field will decide which status is to be displayed in that position.
Example.
For the above table, we can see that C has a higher priority than A & B. if at a particular instance of time all the three statuses are active for position 1 then only status “c” will be displayed.
Go to the path in the menu bar as shown in the screenshot and select the object type from the list. the choice of the object type decides which business transaction can be assigned to individual statuses in status profile.

As per the requirement of stability study I have selected "Notification" as shown in the below screenshot.
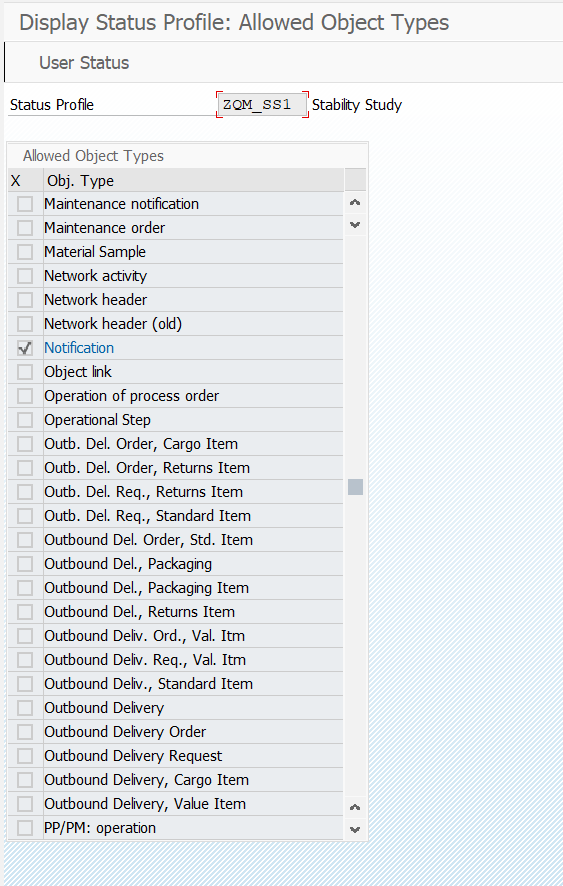
The business that can be assigned to the status depends on the object type assigned in the status profile

Meaning of the fields.
Allowed – This Radio Button allows the transaction to be executed when this Status is Set. i.e when status CRIS is set in the status profile. All the transaction mentioned in this status as allowed will only be allowed to be executed.
Warning – This Radio Button allows the transaction to be executed with warning when this Status is Set. i.e when status CRIS is set in the status profile. All the transaction mentioned in this status as “allowed” will only be allowed to be executed with a warning message
Forbidden – This Radio button does not the transaction to be executed if this particular user status is set.
No influence – The execution of the business transaction has no influence on this status.
Set – This radio button sets the user status after the execution of the transaction is completed.
Delete: - This Radio deletes this user status after executing the business transaction.
No Action - This radio ensures that the execution of the Transaction does not set/delete the user status.
To allow the system to update from one status to other the previous status needs to be assigned in the


As seen from screenshot 1 that at position 1 two user Statuses are assigned having different priorities. The status. For the current use case, the status needs to be updated fro CRIS to ISCF without user intervention.
The status needs to updated to ISCF ( initial sample confirmed) after execution of CRIS ( create Initial sample ) Status. As shown in the above screenshot the above status ISCF has a reference to the previous transaction executed in previous status CRIS.
So as soon as Create initial sample business is executed in CRIS user status, the business transaction serves no purpose in the next user status. So in User Status ISCF the business transaction Create initial Sample is set to “FORBIDDEN” and in the next action Column the Set Radio Button is checked so that after the execution of this business the ISCF user status will be set.
Set Radio button in the next action is used to set the desired user Status after the execution of the transaction
NOTE: the Business transaction marked as allowed can only be executed when this User status is set.
So on a Similar basis, the automatic status update logic is recorded in the status profile giving the reference for previous business transactions executed in the current user status.
The Logic for automation status update remains the same, but there are slight differences in this method.

As you can see from the above screenshot all the user status have the same position and priority thus we can infer from the above screenshot that only 1 user status can be displayed at a time.
Also, have a look at the 1st column, the status number is mentioned as 1,2,....etc rather than 10,20,...etc because of the system limitation that the max status number can be 99.
Also, take a look at the column lowest and highest.
Lowest mean all the status below the status number specified in this column for a particular user status, cannot be executed.
The highest means all the user status below the number specified can be executed.
Lowest and Highest act as a range for the particular status execution.
Let us take an example for status 3 CRIL ( create a lot for Initial test ), here the lowest is specified as 3 and highest is specified as 11. this means status number 1 & 2 cannot be executed when this particular status is active, all the user status having status number 3 and above can be executed upto status number 11 ).
The rest process is same as that of user status profile with multiple statuses
______________________________________________________________________________
I hope this blog post is helpful for all. This blog post would reduce/eliminate the efforts of creating a custom development for an automatic status update in status profile depending on user action and also educate the use of the status profile and also a step by step guide to creating it.
The status profile is required when the system status does not provide/has the required statuses to meet the requirement. Using a status profile we can create our own status and use it in desired functionality. For Example, creating a status profile and using it in Quality Notification
Assuming that there is a requirement of the creation of a custom status profile and assigning it in the Stability Studies Quality Notification process so that a more detailed status of the quality notification can be displayed.
Status profile creation with multiple statuses displayed at the same time.
1. Create a status profile.
Here in this case status profile – ZQM_SS1 is created.
2. Define the statuses in the status profile
In this status profile, I have defined the following statuses with the description/ short text as per the requirement. Please make a point that at a time only 8 status can be displayed simultaneously.
Meaning of the fields
Ini. St- initial status.
This checkbox is used to make the selected status as the initial status, let us say when the notification is created the initial status will be CRIS in the user status section.
Priority and position
As you can see in the screenshot that each status has a position and a priority assigned to it. As stated in the standard documentation that only 8 status can be displayed at a time, so the position field decides which status will occupy which position starting from the left.
If 2 or more status is having the same position, then the priority field will decide which status is to be displayed in that position.
Example.
| Status | Priority | Position |
| A | 3 | 1 |
| B | 2 | 1 |
| C | 1 | 1 |
For the above table, we can see that C has a higher priority than A & B. if at a particular instance of time all the three statuses are active for position 1 then only status “c” will be displayed.
3. Assign Object type.
Go to the path in the menu bar as shown in the screenshot and select the object type from the list. the choice of the object type decides which business transaction can be assigned to individual statuses in status profile.
As per the requirement of stability study I have selected "Notification" as shown in the below screenshot.
4. Assign business transaction control to each status.
The business that can be assigned to the status depends on the object type assigned in the status profile
Meaning of the fields.
Allowed – This Radio Button allows the transaction to be executed when this Status is Set. i.e when status CRIS is set in the status profile. All the transaction mentioned in this status as allowed will only be allowed to be executed.
Warning – This Radio Button allows the transaction to be executed with warning when this Status is Set. i.e when status CRIS is set in the status profile. All the transaction mentioned in this status as “allowed” will only be allowed to be executed with a warning message
Forbidden – This Radio button does not the transaction to be executed if this particular user status is set.
No influence – The execution of the business transaction has no influence on this status.
Set – This radio button sets the user status after the execution of the transaction is completed.
Delete: - This Radio deletes this user status after executing the business transaction.
No Action - This radio ensures that the execution of the Transaction does not set/delete the user status.
The logic for an automatic Status update in status profile.
To allow the system to update from one status to other the previous status needs to be assigned in the
As seen from screenshot 1 that at position 1 two user Statuses are assigned having different priorities. The status. For the current use case, the status needs to be updated fro CRIS to ISCF without user intervention.
The status needs to updated to ISCF ( initial sample confirmed) after execution of CRIS ( create Initial sample ) Status. As shown in the above screenshot the above status ISCF has a reference to the previous transaction executed in previous status CRIS.
So as soon as Create initial sample business is executed in CRIS user status, the business transaction serves no purpose in the next user status. So in User Status ISCF the business transaction Create initial Sample is set to “FORBIDDEN” and in the next action Column the Set Radio Button is checked so that after the execution of this business the ISCF user status will be set.
Set Radio button in the next action is used to set the desired user Status after the execution of the transaction
NOTE: the Business transaction marked as allowed can only be executed when this User status is set.
So on a Similar basis, the automatic status update logic is recorded in the status profile giving the reference for previous business transactions executed in the current user status.
Status profile with Status Number
The Logic for automation status update remains the same, but there are slight differences in this method.
As you can see from the above screenshot all the user status have the same position and priority thus we can infer from the above screenshot that only 1 user status can be displayed at a time.
Also, have a look at the 1st column, the status number is mentioned as 1,2,....etc rather than 10,20,...etc because of the system limitation that the max status number can be 99.
Also, take a look at the column lowest and highest.
Lowest mean all the status below the status number specified in this column for a particular user status, cannot be executed.
The highest means all the user status below the number specified can be executed.
Lowest and Highest act as a range for the particular status execution.
Let us take an example for status 3 CRIL ( create a lot for Initial test ), here the lowest is specified as 3 and highest is specified as 11. this means status number 1 & 2 cannot be executed when this particular status is active, all the user status having status number 3 and above can be executed upto status number 11 ).
The rest process is same as that of user status profile with multiple statuses
______________________________________________________________________________
I hope this blog post is helpful for all. This blog post would reduce/eliminate the efforts of creating a custom development for an automatic status update in status profile depending on user action and also educate the use of the status profile and also a step by step guide to creating it.
- SAP Managed Tags:
- PLM Quality Management (QM)
3 Comments
You must be a registered user to add a comment. If you've already registered, sign in. Otherwise, register and sign in.
Labels in this area
-
"mm02"
1 -
A_PurchaseOrderItem additional fields
1 -
ABAP
1 -
ABAP Extensibility
1 -
ACCOSTRATE
1 -
ACDOCP
1 -
Adding your country in SPRO - Project Administration
1 -
Advance Return Management
1 -
AI and RPA in SAP Upgrades
1 -
Approval Workflows
1 -
ARM
1 -
ASN
1 -
Asset Management
1 -
Associations in CDS Views
1 -
auditlog
1 -
Authorization
1 -
Availability date
1 -
Azure Center for SAP Solutions
1 -
AzureSentinel
2 -
Bank
1 -
BAPI_SALESORDER_CREATEFROMDAT2
1 -
BRF+
1 -
BRFPLUS
1 -
Bundled Cloud Services
1 -
business participation
1 -
Business Processes
1 -
CAPM
1 -
Carbon
1 -
Cental Finance
1 -
CFIN
1 -
CFIN Document Splitting
1 -
Cloud ALM
1 -
Cloud Integration
1 -
condition contract management
1 -
Connection - The default connection string cannot be used.
1 -
Custom Table Creation
1 -
Customer Screen in Production Order
1 -
Data Quality Management
1 -
Date required
1 -
Decisions
1 -
desafios4hana
1 -
Developing with SAP Integration Suite
1 -
Direct Outbound Delivery
1 -
DMOVE2S4
1 -
EAM
1 -
EDI
2 -
EDI 850
1 -
EDI 856
1 -
EHS Product Structure
1 -
Emergency Access Management
1 -
Energy
1 -
EPC
1 -
Find
1 -
FINSSKF
1 -
Fiori
1 -
Flexible Workflow
1 -
Gas
1 -
Gen AI enabled SAP Upgrades
1 -
General
1 -
generate_xlsx_file
1 -
Getting Started
1 -
HomogeneousDMO
1 -
IDOC
2 -
Integration
1 -
Learning Content
2 -
LogicApps
2 -
low touchproject
1 -
Maintenance
1 -
management
1 -
Material creation
1 -
Material Management
1 -
MD04
1 -
MD61
1 -
methodology
1 -
Microsoft
2 -
MicrosoftSentinel
2 -
Migration
1 -
MRP
1 -
MS Teams
2 -
MT940
1 -
Newcomer
1 -
Notifications
1 -
Oil
1 -
open connectors
1 -
Order Change Log
1 -
ORDERS
2 -
OSS Note 390635
1 -
outbound delivery
1 -
outsourcing
1 -
PCE
1 -
Permit to Work
1 -
PIR Consumption Mode
1 -
PIR's
1 -
PIRs
1 -
PIRs Consumption
1 -
PIRs Reduction
1 -
Plan Independent Requirement
1 -
Premium Plus
1 -
pricing
1 -
Primavera P6
1 -
Process Excellence
1 -
Process Management
1 -
Process Order Change Log
1 -
Process purchase requisitions
1 -
Product Information
1 -
Production Order Change Log
1 -
Purchase requisition
1 -
Purchasing Lead Time
1 -
Redwood for SAP Job execution Setup
1 -
RISE with SAP
1 -
RisewithSAP
1 -
Rizing
1 -
S4 Cost Center Planning
1 -
S4 HANA
1 -
S4HANA
3 -
Sales and Distribution
1 -
Sales Commission
1 -
sales order
1 -
SAP
2 -
SAP Best Practices
1 -
SAP Build
1 -
SAP Build apps
1 -
SAP Cloud ALM
1 -
SAP Data Quality Management
1 -
SAP Maintenance resource scheduling
2 -
SAP Note 390635
1 -
SAP S4HANA
2 -
SAP S4HANA Cloud private edition
1 -
SAP Upgrade Automation
1 -
SAP WCM
1 -
SAP Work Clearance Management
1 -
Schedule Agreement
1 -
SDM
1 -
security
2 -
Settlement Management
1 -
soar
2 -
SSIS
1 -
SU01
1 -
SUM2.0SP17
1 -
SUMDMO
1 -
Teams
2 -
User Administration
1 -
User Participation
1 -
Utilities
1 -
va01
1 -
vendor
1 -
vl01n
1 -
vl02n
1 -
WCM
1 -
X12 850
1 -
xlsx_file_abap
1 -
YTD|MTD|QTD in CDs views using Date Function
1
- « Previous
- Next »
Related Content
- FAQ on Upgrading SAP S/4HANA Cloud Public Edition in Enterprise Resource Planning Blogs by SAP
- Futuristic Aerospace or Defense BTP Data Mesh Layer using Collibra, Next Labs ABAC/DAM, IAG and GRC in Enterprise Resource Planning Blogs by Members
- SAP ERP Functionality for EDI Processing: UoMs Determination for Inbound Orders in Enterprise Resource Planning Blogs by Members
- Service with Advanced Execution and Resource-related Billing in Enterprise Resource Planning Blogs by SAP
- Deep Dive into SAP Build Process Automation with SAP S/4HANA Cloud Public Edition - Retail in Enterprise Resource Planning Blogs by SAP
Top kudoed authors
| User | Count |
|---|---|
| 2 | |
| 2 | |
| 2 | |
| 2 | |
| 2 | |
| 2 | |
| 2 | |
| 2 | |
| 1 | |
| 1 |