
- SAP Community
- Products and Technology
- Technology
- Technology Blogs by SAP
- Fiori Elements - A Journey of Building an Action D...
Technology Blogs by SAP
Learn how to extend and personalize SAP applications. Follow the SAP technology blog for insights into SAP BTP, ABAP, SAP Analytics Cloud, SAP HANA, and more.
Turn on suggestions
Auto-suggest helps you quickly narrow down your search results by suggesting possible matches as you type.
Showing results for
former_member37
Explorer
Options
- Subscribe to RSS Feed
- Mark as New
- Mark as Read
- Bookmark
- Subscribe
- Printer Friendly Page
- Report Inappropriate Content
10-15-2019
1:46 PM
Abstract
In this blog post you can find information on how to create complex action dialogs in SAP Fiori Elements applications without the use of app extensions (aka breakout). The blog post covers the topics of implementing the dialogs, gives technical details, mentions limitations and includes links to documentation and runnable test apps.
See below an overview with links to what you will learn in this blog post.
| Link to Chapter | Brief Description |
| #1 Simple action | A simple action can be executed without additional input.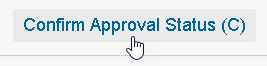 |
| #2 Critical action | Critical actions are special actions that require user confirmation. |
| #3 Action with dialog | Actions with a dialog are actions that require additional user input, for example, an approval comment or a value that should be overwritten - as below. |
| #4 Action with more complex dialog | You see below a more complex dialog using different data types. |
| #5 Action dialog with mandatory and optional parameter | You want to have a dialog with a parameter the user must fill before proceeding.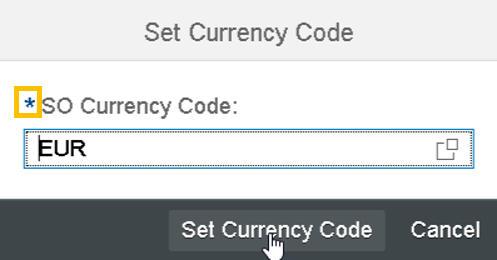 |
| #6 Action dialog with value help | Show a value help dialog. Below you see one form of value help - a type ahead value help.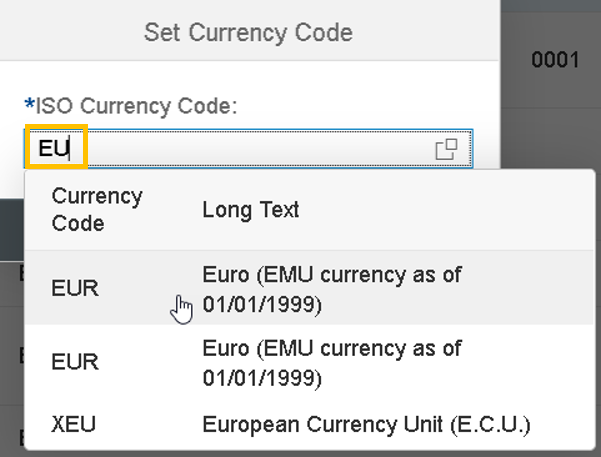 |
| #7 Action dialog with drop down value list | Show a value help as a drop-down list. |
| #8 Field Control | Influence the dialog using field controls, e.g. hiding fields instance based. Below you see a mandatory field which is not filled. |
| #9 Action dialog changing labels | Learn how to set different labels on the dialog. |
Context
Imagine you are a Fiori application developer and your Product Owner wants you to build an app with a table and different clickable actions above it. The actions shall execute application specific business logic. Some of these actions may have parameters a user needs to fill; others might be critical actions. In general the actions are very different. You know how to do that with a SAPUI5 freestyle app, but you have heard of Fiori Elements before and wonder if you can use that framework. Checking the List Report Elements documentation getting a table seems straight forward. If you can realize all those different clickable actions with Fiori Elements is now your question. Your Product Owner adds, preferably to do that without any app extensions (also known as custom or breakout actions), because he heard that increases the maintenance effort for the application.
You are bound to and use the following technical components:
- Your SAP backend system is on version SAP Basis 7.55
- The UI add on shows UI5 Version 1.69.0 - see What's New in SAPUI5 1.69 and Release Notes to find out what was possible with this release
- SAP Web IDE Full-Stack v.190314
- Google Chrome Browser v.72.0.3626.121
- SAP ABAP Development Tools v.3.1.100
Get Familiar with
Your strategy is to start easy with theory, then the simplest form of an action and then little by little you want to test more complicated actions to in the end come up with an overview of what is possible.
What is Fiori Elements?
Fiori Elements is a library for the most common application use cases and offers these as different floorplans. [Fiori Design Guidelines] To get a fast start into the topic, especially to “Understand Fiori Elements technology” you…
- scanned the official documentation and read “Why use SAP Fiori elements?”
- browsed through the Getting Started with SAP Fiori Elements Video Series
- had a look at the slides of Evolved Web Apps with SAPUI5 - Week 05, especially with slide 5 showing the Fiori Elements technology, which is part of a publicly available hands-on course http://open.sap.com/courses/ui52 (see here an intro video).
Your main takeaways -for the moment- are:
- You read that, for the right use cases, using Fiori Elements is much faster than building freestyle.
- In regards to Fiori Elements technology, you know that an application developer needs to, by any means, expose an “OData Service” and annotate the “OData Service” with “OData Annotations” using “OData Vocabularies”. Since you are developing on an ABAP stack, you plan to use the ABAP Development Tools to create a Core Data Service view using CDS annotations, so-called CDS backend annotations. These CDS artifacts will then be automatically mapped and exposed as OData Service & OData annotations – see here and here.
First try’s
Having an ABAP backend to expose the OData Service using CDS Services you are following the information on Preparing OData Services. Furthermore you read and implemented the About ABAP Programming Model for SAP Fiori until you reach the point of Running the Resulting SAP Fiori App and your UI looks similar to that:
On your app there might even be some actions like “Delete” or “+” above the table, which let you interact with the table data.
Action support
The Product Owner mentioned “clickable actions that execute application specific business logic”. In the context of the UI an action is mostly understood as an UI element with which you can interact by clicking. In this blog when talking about actions the following is meant:
- App-Specific Actions
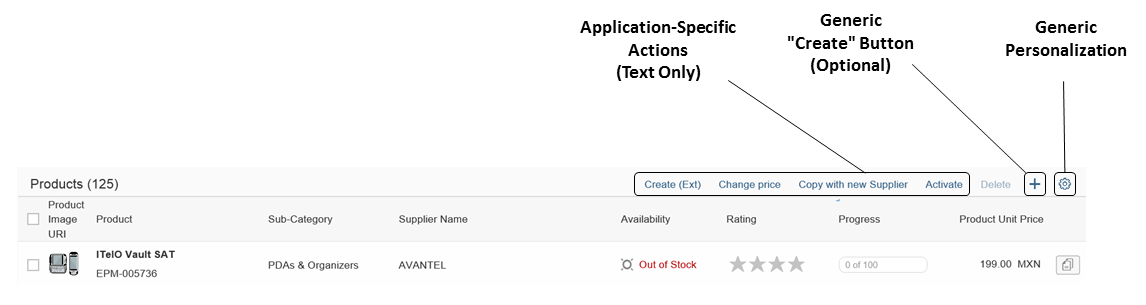
See in the picture, taken from Actions in the List Report, the distinction to actions that are generic, like pressing on the “Create” button: App specific actions are defined and handled by each application whereas generic actions are the same cross all applications. - UI actions that execute logic on a business object
So, you don’t need an UI action that "only" triggers a navigation, which you also found under Enabling Actions in the List Report: "Action triggering external navigation". But instead your action changes the business object. - App extension actions
App extension actions are actions that give full control to the application developer on what happens after clicking the action.
You searched in the documentation for things coming with app extensions and found Read Before Extending a Generated App: “After you've created an app extension, its display (for example, control placing, CSS) and system behavior (for example, model and binding usage, busy handling) of the app extension lies within the applications responsibility.”, which seconds the statement of your Product Owner about the maintenance effort.
So, fitting to the requirement of the Product Owner you want, without any application specific client code detour (app extension), trigger an UI action that calls function imports in the backend. The backend executes the function import and returns its result, objects and/or messages.
App-specific actions in OData
An OData service and its capabilities is described in the metadata.xml file. This holds also true for app-specific actions, which are expressed like that - click metadata.xml file and search for C_STTA_SalesOrder_WD_20Setapprovalstatus. Just to get a feeling for how such a file and the definition of an action on OData level looks like (remark: it’s a mocked metadata.xml, not a real one):
<EntityContainer Name="STTA_SALES_ORDER_WD_20_SRV_Entities"…


<FunctionImport Name="C_STTA_SalesOrder_WD_20Setapprovalstatus" ReturnType="STTA_SALES_ORDER_WD_20_SRV.C_STTA_SalesOrder_WD_20Type"EntitySet="C_STTA_SalesOrder_WD_20" m:HttpMethod="POST" sap:action-for="STTA_SALES_ORDER_WD_20_SRV.C_STTA_SalesOrder_WD_20Type" sap:applicable-path="Setapprovalstatus_ac">

<Parameter Name="SalesOrder" Type="Edm.String" Mode="In" MaxLength="10"/>

<Parameter Name="DraftUUID" Type="Edm.Guid" Mode="In"/>

<Parameter Name="IsActiveEntity" Type="Edm.Boolean" Mode="In"/>

</FunctionImport>
Following you see an example request against such a defined function import: POST C_STTA_SalesOrder_WD_20Setapprovalstatus?IsActiveEntity=true&DraftUUID=guid'00505691-115b-1ed9-a5cc-09ad63829d29'&…
A “real” metadata.xml file is generated by the backend and the app-specific actions explicitly can be defined in ADT ABAP Development Tools in the “BOPF Business Objects” – you will see later how that works. When you have specified the BOPF object action the “<FunctionImport Name="C_STTA_SalesOrder_WD_20Setapprovalstatus"…” entry in the metadata.xml is generated for you.
Tests with different kind of actions
Let’s start with different UI action tests. The titles of the following chapters are case descriptions. For example, depending on whom you ask, the “Simple Action” is understood differently. The chapters start with an explanation of the case.
You can test all these cases in the technical demo app [Start the DEMO app], by clicking on ‘GO’, selecting an item and press the corresponding action.
DISCLAIMER – this technical demo app serves no business use and herewith we only want to focus on the actions above the list, the rest might or might not work. The service behind the technical demo app is a read-only mock service.
1. Simple action
Let’s start with the use-case of creating a “Simple action”. A simple action can be executed without additional input. There is no dialog coming up, asking for input parameters. Also, it executes a simple logic on whatever was selected. An example here would be the action “Confirm Approval Status (C)” in the DEMO app. The action “Confirm Approval Status (C)” changes the value of the field “Confirmation Status” of the selected line item to “C” (confirmed). See below or [Start the DEMO app].

In the picture you can see two line-items. One of them is marked as a “Draft”. See here for an explanation about draft. For this item '5000000001' a draft was created before, by going into the object page and clicking on ‘Edit’. Now you can change that draft object, also with UI actions. To be able to change active objects directly, in the picture above the '500000000' you need to enable so-called quick actions Extending Apps with Quick Actions in your app. With quick actions you are able to change values of line items without going into edit-mode first.
How to achieve that?
1.1 Steps in the backend (e.g. CDS annotations)
For the first use-case this will be a bit more detailed.
You now want to do the prerequisites in the backend to create a quick action. You can refer to Adding a New BOPF Action for more help.
- in ADT in the “BOPF Business Objects” you create a new BOPF action by clicking on "New...". This is the backend representation of the quick action.

- using these properties

- Then you implement the “Implementation Class” like below. Example backend implementation:
CLASS CL_I_A_SETAPPROVALSTATUS IMPLEMENTATION.


  METHOD /bobf/if_frw_action~execute.


    " ------------------------------------------------------------------------------------------

    " Separate the keys

    " ------------------------------------------------------------------------------------------

    /bobf/cl_lib_draft_active=>get_instance( is_ctx-bo_key )->separate_keys(

      EXPORTING

        iv_node_key   = is_ctx-node_key

        it_key        = it_key

      IMPORTING

        et_active_key = DATA(lt_active_key)

    ).


    CHECK lt_active_key IS NOT INITIAL.


    DATA: lt_sales_order TYPE itk_stta_salesorder_wd_20_act1.


    /bobf/cl_lib_legacy_key=>get_instance( is_ctx-bo_key )->convert_bopf_to_legacy_keys(

      EXPORTING

        iv_node_key   = is_ctx-node_key

        it_bopf_key   = lt_active_key

      IMPORTING

        et_legacy_key = lt_sales_order

    ).


    LOOP AT lt_sales_order REFERENCE INTO DATA(ls_salesorder).

      UPDATE stta_so_wd SET approval_status = 'C' WHERE node_key = ls_salesorder->activeuuid.

    ENDLOOP.


  ENDMETHOD.

ENDCLASS.
The corresponding ODATA representation - fully generated from the backend, after activating the BOPF action - looks like this:
<FunctionImport Name="C_STTA_SalesOrder_WD_20Setapprovalstatus"> ReturnType="STTA_SALES_ORDER_WD_20_SRV.C_STTA_SalesOrder_WD_20Type" EntitySet="C_STTA_SalesOrder_WD_20"m:HttpMethod="POST" sap:action-for="STTA_SALES_ORDER_WD_20_SRV.C_STTA_SalesOrder_WD_20Type" sap:applicable-path="Setapprovalstatus_ac">

   <Parameter Name="SalesOrder" Type="Edm.String" Mode="In" MaxLength="10"/>

   <Parameter Name="DraftUUID" Type="Edm.Guid" Mode="In"/>

   <Parameter Name="IsActiveEntity" Type="Edm.Boolean" Mode="In"/>

</FunctionImport>
The UI can now call this action.
You now want to place the action button inside your table toolbar. See Enabling Actions in the List Report ”Application-Specific Actions in Toolbar” where you see that the OData annotation DataFieldForAction is needed to do so.
With the following CDS annotation, preferably done in the “Metadata Extensions”, you add two things. First you have included the field approval_status in metadata extension file, by using "position: 10". Then you need to add an UI annotation to declare an action button with referring to the implemented BOPF action:
annotate view C_STTA_SalesOrder_WD_20 with

{

  @UI.lineItem:       [

      { position: 10, importance: #HIGH },

      { type: #FOR_ACTION, dataAction: 'BOPF:SETAPPROVALSTATUS', label: 'Confirm Approval Status (C)'}

  ]

  approval_status;
The CDS line item annotation of type ‘#FOR_ACTION’ will lead to the following OData annotation in the service metadata - fully generated from the backend, after activating the BOPF action - looks like this:
<Annotations Target="STTA_SALES_ORDER_WD_20_SRV.C_STTA_SalesOrder_WD_20Type">

	<Annotation Term="UI.LineItem">

		<Collection>

			<Record Type="UI.DataFieldForAction">

				<PropertyValue Property="Label" String="Confirm Approval Status (C)"/>

				<PropertyValue Property="Action" String="STTA_SALES_ORDER_WD_20_SRV.STTA_SALES_ORDER_WD_20_SRV_Entities/C_STTA_SalesOrder_WD_20Setapprovalstatus"/>

			</Record>

		</Collection>

	</Annotation>

</Annotations>
1.2 Steps in UI Project (e.g. local OData annotation file)
There are no changes needed in the UI project.
2. Critical action
Critical actions are special actions that require user confirmation. This can be useful for actions that, for example, have severe consequences. When the user executes such an action the system opens a dialog in which the user must confirm the action. See Adding Confirmation Popovers for Actions for more details. An example for a critical action would be the action “Set Currency to USD” – see below or [Start the DEMO app]:

How to achieve that?
2.1 Steps in the in backend (e.g. CDS annotations)
This annotation is not supported by CDS so far, so there are no changes needed in the backend.
2.2 Steps in UI Project (e.g. local OData annotation file)
The OData annotation which is needed for the critical action looks like this – taken from the annotation.xml document:
<Annotations Target=”STTA_SALES_ORDER_WD_20_SRV.STTA_SALES_ORDER_WD_20_SRV_ENTITIES/C_STTA_SalesOrder_WD_20Setcurrencyusd”>

   <Annotation Term=”COMMON.IsActionCritical” Bool=”true”/>

</Annotations>
The target property of this OData annotation points to the function import which is the OData representation of the BOPF action. The target is divided into three parts which contain the service name and the entity container separated with a dot and the function import name separated with a slash. In this example the service name is “STTA_SALES_ORDER_WD_20_SRV”. The entity container is usually named as a combination of service name and the keyword “ENTITIES”. In our example the name of the entity container is therefore “STTA_SALES_ORDER_WD_20_ENTITIES”. The function import name is usually a concatenation of the entity set name and the BOPF action name. In our example the function import name is “C_STTA_SalesOrder_WD_20Setcurrencyusd”. In some cases it may happen that the concatenation of entity set name and BOPF action name is just too long for a function import name. In this case the function import name will be generated differently.
3. Action with dialog
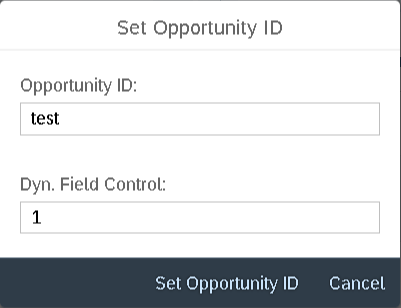
Actions with a dialog are actions that require additional user input, for example, an approval comment. The system opens a dialog with one or more input fields in which the user enters the required data. If applicable, the system can pre-fill data. To achieve an action with dialog you can enrich your action with additional import parameters. ‘Additional’ in this case means: in addition to the key fields which are automatically parameters of the action. An example of an action with a simple dialog can be found here: [Start the DEMO app] and click “Set Opportunity ID”.

How to achieve that?
3.1 Steps in the in backend (e.g. CDS annotations)
To add additional import parameters to a function import, you must add a parameter structure to the BOPF action:

The structure contains all additional import parameters which are needed for the user input. It can be chosen via value help or be created on the fly. In our example the structure contains 1 parameter "Opportunity":
@EndUserText.label : 'Parameter for action Set Opportunity ID'

@AbapCatalog.enhancementCategory

define structure stta_s_a_setoppid {

        Opportunity: snwd_op_id;

}
The field Opportunity is the additional import parameter which will let the system generate the dialog with an input field. Best - the id and type of the parameters should be the same as the corresponding field in the CDS view. Then you get for free:
- A label for the parameter (see chapter #9 Action dialog changing labels)
- The value of the property of the entity type gets propagated to the dialog – the value “0001” on the picture in the beginning of the chapter
- Type validations (if the field would be Edm.Int, UI control checks would not allow to enter a string)
The corresponding ODATA representation - fully generated from the backend, after activating the BOPF action - looks like this:
<FunctionImport Name="C_STTA_SalesOrder_WD_20Setopportunityid" ReturnType="STTA_SALES_ORDER_WD_20_SRV.C_STTA_SalesOrder_WD_20Type" EntitySet="C_STTA_SalesOrder_WD_20" m:HttpMethod="POST" sap:action-for="STTA_SALES_ORDER_WD_20_SRV.C_STTA_SalesOrder_WD_20Type" sap:applicable-path="Setopportunityid_ac">

   <Parameter Name="SalesOrder" Type="Edm.String" Mode="In" MaxLength="10"/>

   <Parameter Name="DraftUUID" Type="Edm.Guid" Mode="In"/>

   <Parameter Name="IsActiveEntity" Type="Edm.Boolean" Mode="In"/>

   <Parameter Name="Opportunity" Type="Edm.String" Mode="In" MaxLength="35"/>

</FunctionImport>
3.2 Steps in UI Project (e.g. local OData annotation file)
No changes required.
4. Action with more complex dialog
The next example ‘Set Opportunity ID And More’ is an action with a more complex dialog. The dialog requires three different parameters to be filled by the user. The parameters are represented by three different controls. For testing this action [Start the DEMO app].

How to achieve that?
4.1 Steps in the in backend (e.g. CDS annotations)
Which type of control will be rendered depends on the data type of the function import parameter inside the metadata description file. The so called ‘Entity Data Model (EDM) types’ are generated automatically for each property inside the OData service. With which EDM type a function import parameter gets generated depends on the ABAP data type of the corresponding property inside the import parameter structure which was assigned to the BOPF action. See below how the structure was defined - e.g. the snwd_op_id is of the built-in type CHAR 35.
@EndUserText.label : 'Parameter for action Set Opportunity ID'

@AbapCatalog.enhancementCategory : #NOT_EXTENSIBLE

define structure stta_s_a_setoppid {

        OpportunityString   : snwd_op_id;

        OpportunityBoolean  : bool;

        OpportunityDateTime : dateformat;

}
The corresponding ODATA representation - fully generated from the backend, after activating the BOPF object - looks like this:
<Parameter Name="OpportunityString" Type="Edm.String" Mode="In" MaxLength="35" Nullable="false" />

<Parameter Name="OpportunityBoolean" Type="Edm.Boolean" Mode="In" />

<Parameter Name="OpportunityDateTime" Type="Edm.DateTime" Mode="In" />
In our example the first parameter OpportunityString is represented as a simple input field. The EDM type for this input field is ‘EDM.String’.
- The first parameter: The little asterisk next to ‘OpportunityString’ in the dialog indicates that this parameter is mandatory. How a field is set to mandatory will be covered in the next chapter #5 Action dialog with mandatory and optional parameter.
- The second parameter ‘OpportunityBoolean’ is represented as a checkbox based on the type ‘EDM.Boolean’.
- The third parameter ‘OpportunityDateTime’ is represented as a control named ‘date time picker’. The corresponding EDM type for this control is ‘EDM.DateTime’:
The date time picker always comes with a value help to select the date time. One peculiarity with the EDM type ‘EDM.DateTime’ is that in the context of a function import always a date time picker control will be rendered. This is a different behavior compared to a filter or a smart field referring to an entity property. Here it depends on the ABAP type if a date time picker or a date picker will be rendered. For example: If the ABAP type is ‘DATS’ which is an 8 character type to represent a date (but not a time), in case of an entity property the additional OData annotation sap:display-format=”Date” will be generated. For the action dialog this additional OData annotation is not created.
For more information about the EDM types, see here (6. Primitive Data Types).
4.2 Steps in UI Project (e.g. local OData annotation file)
In case you need a Date picker control for your action dialog you need the additional property ‘sap:display-format=”Date”’ in addition to the EDM type ‘EDM.DateTime’. This can be added in the local annotation file.
<Parameter Name="DateToChange" Type="Edm.DateTime" Mode="In" Nullable="true" sap:display-format="Date" />
This annotation will lead to a date picker control instead of a date time picker. See below:


5. Action dialog with mandatory and optional parameter
You want to have a dialog with a parameter the user must fill before proceeding. In the last chapter you already could see an example of how a mandatory input field looks like. Another example for a mandatory input field can be seen when executing the action ‘Set Currency Code’ [Start the DEMO app]

How to achieve that?
5.1 Steps in the in backend (e.g. CDS annotations)
This annotation is not supported by CDS so far.
5.2 Steps in UI Project (e.g. local OData annotation file)
The OData annotation which is needed for the mandatory action parameter looks like this:
<Parameter Name="CurrencyCode" Type="Edm.String" Mode="In" MaxLength=”5” Nullable=”false”/>
The annotation ‘Nullable=”false”’ will tell the framework explicitly that this parameter is mandatory. To show this to the user the input field will get marked as mandatory (the little asterisk).
With having the annotation ‘Nullable=”true”’, the parameter will be treated as optional.
If this annotation Nullable is missing, the parameter will also be treated as mandatory but without the asterisk for the input field. The standard behavior of function imports is, that it treats its parameters as mandatory. Even though, the UI does not mark the fields as mandatory the user will get an error message if he doesn’t pass any value to the input field when executing the action. As this is not very user friendly you should add an additional annotation to the function import parameters to mark them as mandatory or, in case they are optional, change the standard behavior of function imports, so that the parameters are treated as such.
6. Action dialog with value help
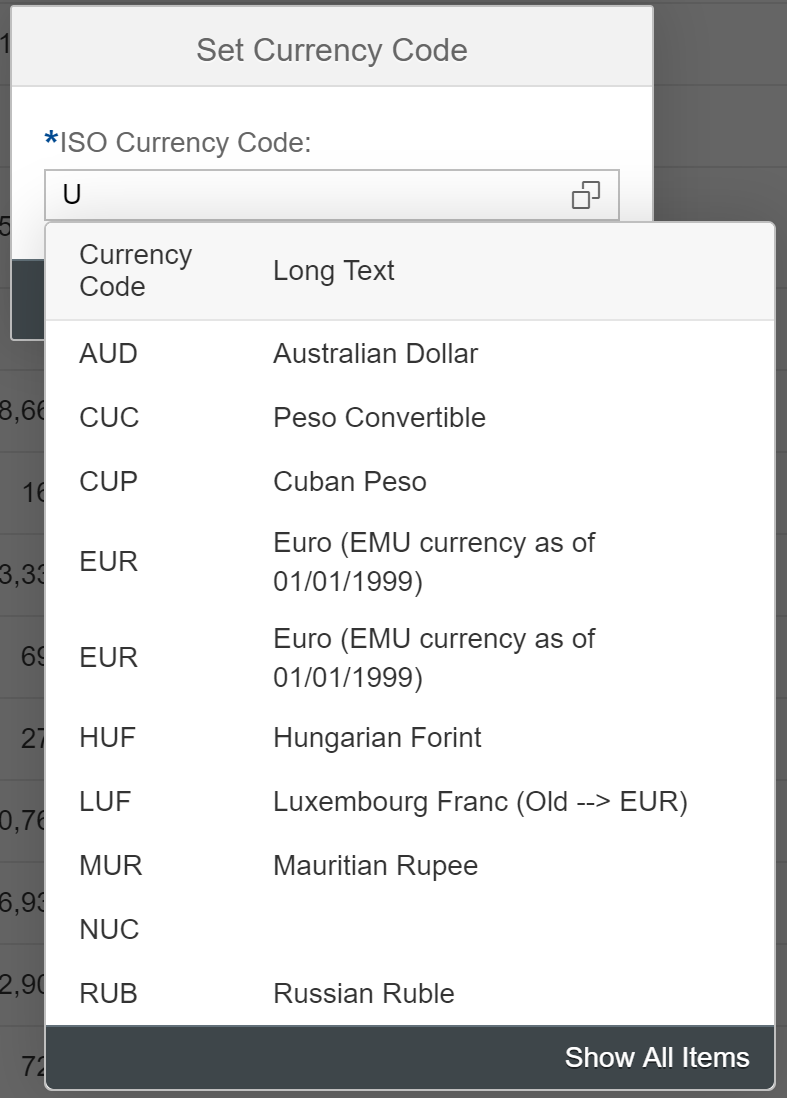
Beside the mandatory sign, the input field in the dialog of the action ‘Set Currency Code’ provides a value help. This value help shows a list with possible currency codes for the user to select. It also features a type ahead help which shows possible values in a drop-down list while the user is typing.
[Start the DEMO app]
How to achieve that?
6.1 Steps in the in backend (e.g. CDS annotations)
To get this behavior, an additional value help annotation is needed which has the function import parameter as target.
First, it must be ensured that an entity which provides the value help is part of the OData service. You can have a look on how to model a CDS view to get a value help and how to add it to your service here.
6.2 Steps in UI Project (e.g. local OData annotation file)
If the OData service contains the entity which provides the value help a value help annotation is needed. This annotation must be manually added into the local annotation file. The OData annotation for the value help looks like this:
<Annotations xmlns="http://docs.oasis-open.org/odata/ns/edm" Target="STTA_SALES_ORDER_WD_20_SRV.STTA_SALES_ORDER_WD_20_SRV_Entities/C_STTA_SalesOrder_WD_20Setcurrencycode/CurrencyCode">

 <Annotation Term="Common.ValueList">

  <Record>

   <PropertyValue Property="Label" String="Value Help for Currency Code" />

   <PropertyValue Property="CollectionPath" String="I_AIVS_Currency_Code" />

   <PropertyValue Property="SearchSupported" Bool="true" />

   <PropertyValue Property="Parameters">

    <Collection>

     <Record Type="Common.ValueListParameterInOut">

      <PropertyValue Property="LocalDataProperty" PropertyPath="CurrencyCode" />

      <PropertyValue Property="ValueListProperty" String="Currency_Code" />

     </Record>

     <Record Type="Common.ValueListParameterDisplayOnly">

      <PropertyValue Property="ValueListProperty" String="Currency_Code_Text" />

     </Record>

    </Collection>

   </PropertyValue>

  </Record>

 </Annotation>

</Annotations>
The target for this annotation will be the function import parameter CurrencyCode. See here open tab “Annotations” and click ValueList to get more insights.
7. Action dialog with drop down value list
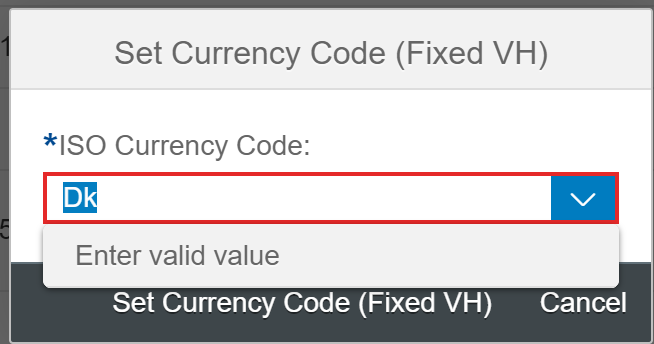
The action ‘Set Currency Code (Fixed VH)’ which can be found in the demo app [Start the DEMO app] is an example of an action dialog with a drop-down value help. If there is not enough space as on the picture below, the list opens to the top:

This is a value help which provides fixed values to the user. It is still possible for the user to type inside the input field, but there is a built-in validation. If the user types in a value which is not part of the drop-down menu the execution of the action won’t be possible, and the user gets an error message:
How to achieve that?
7.1 Steps in the in backend (e.g. CDS annotations)
To get this behavior, an annotation in addition to the “normal” value help annotation is needed. This annotation is not supported by CDS so far.
7.2 Steps in UI Project (e.g. local OData annotation file)
This annotation must be added manually into the local annotation file. The OData annotation for the fixed value help looks like this:
<Annotations xmlns="http://docs.oasis-open.org/odata/ns/edm" Target="STTA_SALES_ORDER_WD_20_SRV.STTA_SALES_ORDER_WD_20_SRV_Entities/C_STTA_SalesOrder_WD_20Setcurrencycodefixed/CurrencyCode">

 <Annotation Term="Common.ValueListWithFixedValues" Bool="true" />

</Annotations>
The target of this annotation is again the function import parameter. The annotation term which is used is ‘Common.ValueListWithFIxedValues” which must be set to true. See here, open tab “Annotations” and click ValueListWithFIxedValues to get more insights.
8. Field Control
Field controls are needed to manipulate the behavior of the fields dynamically. E.g., if a sales order is already shipped, it can’t be cancelled anymore. So, based on the data of the selected object, some fields are displayed, other are editable, actions are allowed and so on and so forth. The action ‘Set Opportunity ID with FC’ is an example of an action dialog with field control. For testing this action you can [Start the DEMO app].

In this example the first input field ‘Opportunity’ is the ‘real’ function import parameter. The second input field ‘0_1_7’ represents the field control property. This would usually be hidden and not editable but instead would be calculated dynamically. For demo purpose it is now an editable input field. The user can type in the different values (0, 1 or 7) to see the result on the first input field. The possible values are (can also be seen in here -> “Annotations” -> “FieldControl”):
- 0: ‘Hidden’: property should not be visible on user interface
- 1: ‘Read-Only’: property cannot be changed
- 3: ‘Optional’: property may contain a null value
- 7: ‘Mandatory’: property must not contain a null value
For more information about field control properties please see here.
How to achieve that?
Usually field control properties are part of the metadata but not part of the entity properties. These field control properties encode the behavior of an input field or filter which is bound against an entity property. In order to achieve this there is an attribute for the entity properties called ‘sap:field-control’. This attribute points to the field control property which contains the value which encodes the behavior of the input field.
8.1 Steps in the backend (e.g. CDS annotations)
Usually you get a field control property as soon as you annotate a field in your CDS view in the following way:
@ObjectModel.readOnly: ‘EXTERNAL_CALCULATION’

Status_fc
or:
@ObjectModel.mandatory: ‘EXTERNAL_CALCULATION’

Status_fc
Any of these annotations will result in a field control property ‘sap:field-control’ in the metadata. The ‘sap:field-control’ is calculated by the determination ACTION_AND_FIELD_CONTROL of the BOPF object. Then another field shown on the UI, can refer to the field control field in order to define the UI behavior of the field.
CDS Annotations inside the parameter structure definition of the function import are not possible. To still make use of the field control feature for function import parameters it must be set up manually by applying a chain of actions:
First a new field which acts as field control property for the function import parameter needs to be added to the main CDS view. This field should be of type ‘sadl_gw_dynamic_field_property’ and should be annotated as virtual element. The annotations which are needed for this look like this:
@ObjectModel.readOnly: true

@ObjectModel.virtualElement: true

@ObjectModel.virtualElementCalculatedBy: ‘ABAP:CL_MY_ABAP_CLASS’

Xyz_fc
The first annotation just marks the field as read only as a virtual element must always be read only. The second annotation marks the field as a virtual element whose value will be calculated at runtime. The last annotation sets the ABAP class (in this case the class is named ‘MY_ABAP_CLASS’) which is used for the calculation. This class will now act as a determination for our field control property. For more information about virtual elements and how to use them please refer to this link.
In our demo app the field with its annotations looks like this:
SalesOrder.op_id,

      @ObjectModel: {

        readOnly: true,

        virtualElement: true,

        virtualElementCalculatedBy: 'ABAP:CL_STTA_CALCULATE_OP_ID_FC'

      }

      cast( 0 as sadl_gw_dynamic_field_property preserving type )             as opid_fc,
After that we also need a function import parameter in the corresponding action which is named the same as the field in the CDS view (in our case ‘opid_fc’). This is important as the binding between those two fields only works if they are named equally:
@EndUserText.label : 'Parameter for action Set Opportunity ID'

@AbapCatalog.enhancementCategory : #NOT_EXTENSIBLE

define structure stta_s_a_setoppid {

  op_id   : snwd_op_id;

  opid_fc : sadl_gw_dynamic_field_property;


}
8.2 Steps in UI project (e.g. local OData annotation file)
In addition to the set up in the backend, a local OData annotation is needed to link the new field control property to the function import parameter. This annotation must be set manually, since not possible in CDS, as follows:
<Annotations xmlns="http://docs.oasis-open.org/odata/ns/edm" Target="STTA_SALES_ORDER_WD_20_SRV.STTA_SALES_ORDER_WD_20_SRV_Entities/C_STTA_SalesOrder_WD_20Setopportunityidfieldcontrol/Opportunity">

 <Annotation Term="com.sap.vocabularies.Common.v1.FieldControl" Path="oppid_fc” />

</Annotations>
The target of this annotation is the function import parameter. So, in this case it is the function import parameter ‘Opportunity’ of the function import ‘Set Opportunity Id Field Control’. The annotation term shows that this is a field control annotation. The path property of the annotation refers to the virtual element which was created earlier which is used as a field control property.
Now the last thing to do is to hide the field control parameter in the function import. For this we need another annotation which can be added via local annotations:
<Annotations xmlns="http://docs.oasis-open.org/odata/ns/edm" Target="STTA_SALES_ORDER_WD_20_SRV.STTA_SALES_ORDER_WD_20_SRV_Entities/C_STTA_SalesOrder_WD_20Setopportunityidfieldcontrol/oppid_fc">

 <Annotation Term="UI.Hidden"/>

</Annotations>
9. Action dialog changing labels
In the dialogs below you sometimes see a label value combination:

The label “ISO Currency Code” or “Opportunity ID” is drawn from the underlying entity type. This is based on property name equality. If there is no equal name, the technical name of the property is shown - as it is the case for "AreYouSure", "TimeToChange" and "DateToChange". You will see later how to change that.
How to achieve that?
Knowing the property name equality behavior, you just need to use the same property name for the function import parameter as for the entity type property. Then the label, the type of the value and possible value help will be used in the dialog.
9.1 Steps in the backend (e.g. CDS annotations)
Below we have a BOPF object with an action with a filled parameter structure.

The "Parameter Structure" "STTA_S_A_SETOPPID" contains 2 parameters. One is named "op_id". With the same name and within the main entity type, there is also a property named "op_id" which is again of type "SNWD_OP_ID". Therefore the action dialog label shows "Opportunity ID", taken from the "Medium" text.


The corresponding ODATA representation - fully generated from the backend - looks like this:
<FunctionImport Name="C_STTA_SalesOrder_WD_20Setopportunityid" ReturnType="STTA_SALES_ORDER_WD_20_SRV.DummyFunctionImportResult" m:HttpMethod="POST" sap:action-for="STTA_SALES_ORDER_WD_20_SRV.C_STTA_SalesOrder_WD_20Type" sap:applicable-path="Setopportunityid_ac">

   <Parameter Name="node_key" Type="Edm.Guid" Mode="In"/>

   <Parameter Name="IsActiveEntity" Type="Edm.Boolean" Mode="In"/>

   <Parameter Name="op_id" Type="Edm.String" Mode="In" MaxLength="35"/>

   <Parameter Name="opid_fc" Type="Edm.Byte" Mode="In"/>

</FunctionImport>
It contains the 2 explicitly defined parameters and also the key fields of the entity. Also generated is the property below. There you see where the label in the end is taken from.
<Property Name="op_id" Type="Edm.String" MaxLength="35" sap:display-format="UpperCase" sap:label="Opportunity ID" />
9.2 Steps in UI Project (e.g. local OData annotation file)
Since we don’t have a corresponding property in the entity type for all fields, like it is with “AreYouSure”, we need a local annotation as below - important here is to use translatable i18n keys in the label string:
<Annotations Target="STTA_SALES_ORDER_WD_20_SRV.STTA_SALES_ORDER_WD_20_SRV_Entities/C_STTA_SalesOrder_WD_20Setcurrencycodecomplex/AreYouSure">

	<Annotation Term="com.sap.vocabularies.Common.v1.Label" String="{@i18n>AreYouSure}"/>

</Annotations>
Then the UI will show the labels as on the following picture:
Known Limitations
This chapter will list the known limitations as of UI5 version 1.69 in regards of generating action dialogs. In order to achieve the following points the developer needs to create a breakout and develop his own dialog:
- Multi-line actions: Currently it is not possible to create an action with parameters which is executable for multiple selected records. Even if there are parameters specified the dialog will not be opened.
- More complex dialogs: Currently the framework is only able to generate a dialog with the former described capabilities of user input. If the developer wants to create a more complex dialog (e.g. a dialog with additional read only fields or different controls like charts or sliders) the developer needs to build the dialog by himself.
Authors
This is a common blog post of the following authors mentioned, along with their roles at the time when published.
 | jirsak - Developer in S/4 HANA Produce Manufacturing |
 | martin.steinhauser - Product Owner for SAP Fiori Elements List Report |
We hope that you as reader and possible Fiori application developer have enjoyed our blog post and are now (better) in the position to decide whether you can realize your action with dialog within the Fiori Elements possibilies using annotations or you need an app extension.
Best regards Peter and Martin
Labels:
36 Comments
You must be a registered user to add a comment. If you've already registered, sign in. Otherwise, register and sign in.
Labels in this area
-
ABAP CDS Views - CDC (Change Data Capture)
2 -
AI
1 -
Analyze Workload Data
1 -
BTP
1 -
Business and IT Integration
2 -
Business application stu
1 -
Business Technology Platform
1 -
Business Trends
1,658 -
Business Trends
92 -
CAP
1 -
cf
1 -
Cloud Foundry
1 -
Confluent
1 -
Customer COE Basics and Fundamentals
1 -
Customer COE Latest and Greatest
3 -
Customer Data Browser app
1 -
Data Analysis Tool
1 -
data migration
1 -
data transfer
1 -
Datasphere
2 -
Event Information
1,400 -
Event Information
66 -
Expert
1 -
Expert Insights
177 -
Expert Insights
298 -
General
1 -
Google cloud
1 -
Google Next'24
1 -
Kafka
1 -
Life at SAP
780 -
Life at SAP
13 -
Migrate your Data App
1 -
MTA
1 -
Network Performance Analysis
1 -
NodeJS
1 -
PDF
1 -
POC
1 -
Product Updates
4,577 -
Product Updates
344 -
Replication Flow
1 -
RisewithSAP
1 -
SAP BTP
1 -
SAP BTP Cloud Foundry
1 -
SAP Cloud ALM
1 -
SAP Cloud Application Programming Model
1 -
SAP Datasphere
2 -
SAP S4HANA Cloud
1 -
SAP S4HANA Migration Cockpit
1 -
Technology Updates
6,873 -
Technology Updates
421 -
Workload Fluctuations
1
Related Content
- Fiori Elements App - With Intent Based Navigation doesn't get rendered in Technology Q&A
- SAP Fiori Elements: Object Page - @UI.facet Type #COLLECTION and #FIELDGROUP_REFERENCE not working in Technology Q&A
- SAP Fiori Elements - Save Variant/Layout not working (and want to remove unnecessary column) in Technology Q&A
- SAP BTP SDK for iOS 24.4.0 is now available in Technology Blogs by SAP
- Enter the era of spatial computing for enterprise with SAP Build Code in Technology Blogs by SAP
Top kudoed authors
| User | Count |
|---|---|
| 38 | |
| 25 | |
| 17 | |
| 13 | |
| 7 | |
| 7 | |
| 7 | |
| 7 | |
| 6 | |
| 6 |