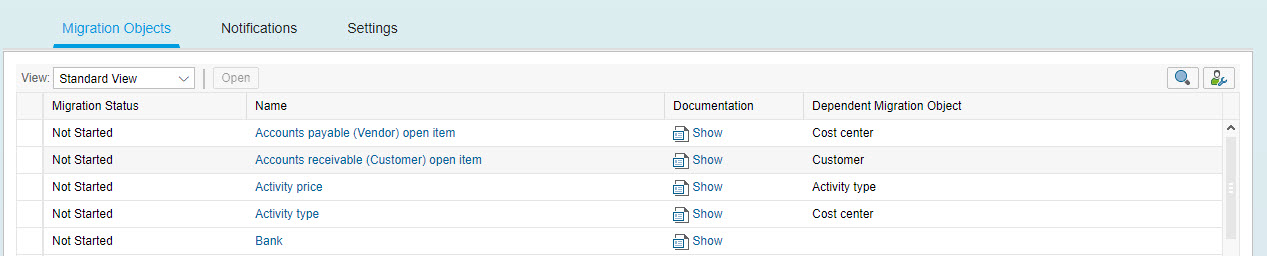
Migration cockpit provides standard object to create Sales Order (open SO). Here you see how to create your own migration objects to modify (Insert, Update & Delete) Sales order (for already created Sales Order ) with the migration object modeler.
Creating Z object in Migration Object to change the Sales Order
Process to Create Z object
Enter transaction
LTMC field to start Migration cockpit.

Choose
Create to create a new project

Enter <Change the SO> in the text field.
Select Transfer Data from File approach. The system automatically generates the mass transfer ID that is used for your project and it is unique.

Your newly created project is opened automatically.Here, you see the standard migration objects that are available in your current version.
Switch to easy access menu and enter transaction LTMOM start the migration object modeler.

If you want to create a new Migration object, you have to select the migration object you created earlier so that the same mass transfer ID is assigned to your newly created migration object.
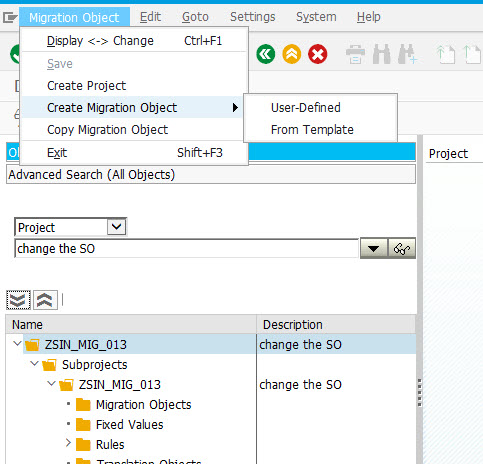
Select the project view and enter your project <change the SO>, which you created in Migration cockpit earlier

In the following steps, you create your own migration object.
Choose Migration Object ⇒ Create Migration Objec
t ⇒ User – defined.
Enter technical name for your migration object.
The system will add prefix Z_ to your technical name
Enter the description. Choose next.

complete the next information
- Enter BAPI_SALESORDER_CHANGE in the text field Name of Function Module and Press Enter
This is the function Module (FM -
BAPI_SALESORDER_CHANGE) that facilitates
Insert, Delete and Update of Sales Order. (
More Details can be found in BAPI documentation).

Options for processing Business Object Instances -
- Process One Instance at a Time - The system will only pass one instance at a time to the function module This means if N instances are read, the function module will be called N times.
- Process Multiple Instance at a Time: The system will pass all instances to the function module at once. This means that the function module is called only once.
Choose One instance per time.
Options for Return Parameter Settings -
- Return Parameter(Optional) - This should be a table with BAPIRET2 type that will store all the messages.Choose RETURN parameter
- Include for Handling the result parameter(Optional) - This will create an perform where you will be able to give some extra treatment to the messages
Options for Return Parameter Settings -
- Simulation Parameter(Optional), its the flag name that the object will know if its or not an test execution
- Value for Simulation(Optional), this is the value of the flag that will be used as a test flag
- Value for Writing Data(Optional), this is the value of the flag that will be used as a execute flag
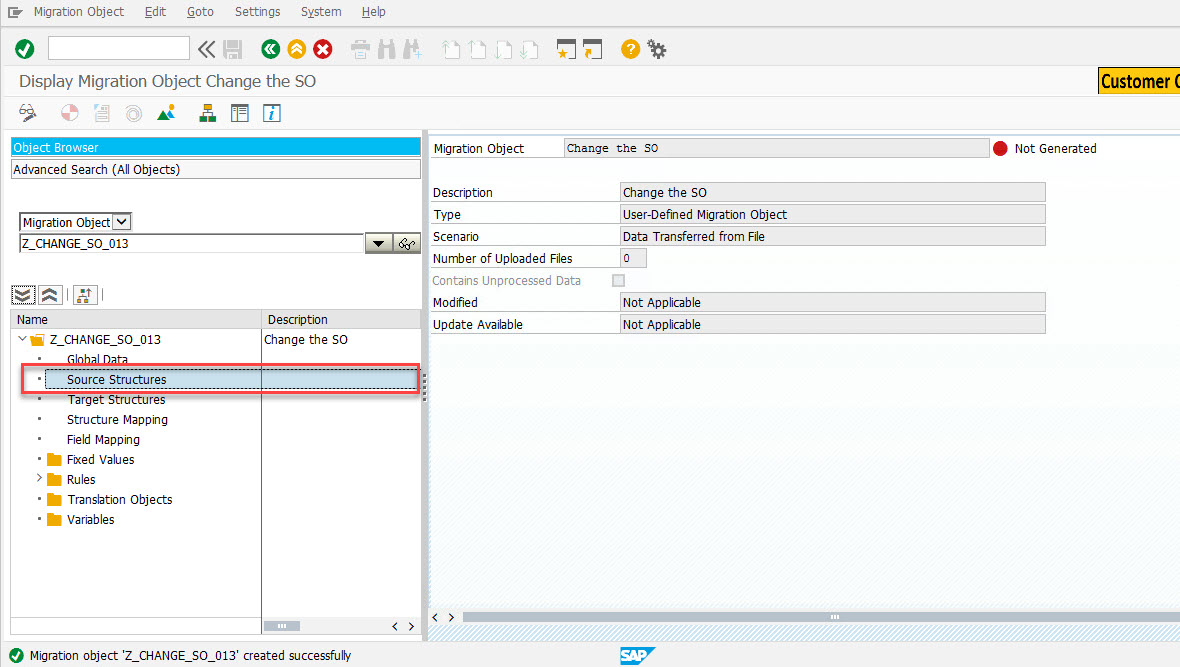
At this point your project was empty, now you will be able to check it in LTMOM.

Adding Fields to Structure
On the screen you can now see the newly created migration object Z_Change_SO_013.
Ensure that you are in Change mode. Double-click on Source structures to create relevant source structure.
Right Click on Source structure (in the middle screen) . Choose Append structure to Lower level

Enter the <header_so> as Name. Enter <Change the SO> in the Description field and press OK.

You can either add the source fields manually or select the upload button to upload the relevant source structure, if you have a csv file.
Here, we are adding the structure manually.
Choose Add field to add source structure fields

You can see the added source structure fields.
Save your changes.

Mapping Source structure and Target structure
Now you have to do structure mapping. Firstly, turn off the technical names
To change the technical names on/off
Goto settings→Technical names ON/OFF

Now map Source structure with target.
Source Structure |
Target Structure |
Header_SO |
R_SALESDOCUMENT |
|
R_ORDER_HEADER_IN |
|
R_ORDER_HEADER_INX |
|
R_ORDER_ITEM_IN |
|
R_SCHEDULE_LINES |
|
R_SCHEDULE_LINESX |
Drag and drop the source structure with target structure
Mapping Source Fields to Target Fields
Here you map source structure fields to target structure fields.
Double click Field - Mapping

In the Field mapping area, you can map fields from the source structure to fields in the target structure.

Mapping has to be done by moving source field with corresponding target field.
Source Structure Field
|
Target structure field
|
Header_SO - VBELN |
R_SALESDOCUMENT – SALES Document |

Source Structure Field
|
Target structure field
|
Header_SO - POSNR |
R_ORDER_ITEM_IN – ITM_NUMBER |
Header_SO - MATNR |
R_ORDER_ITEM_IN – MATERIAL |
Header_SO - WERKS |
R_ORDER_ITEM_IN – PLANT |

Source Structure Field
|
Target structure field
|
Header_SO - POSNR |
R_ORDER_ITEM_INX – ITM_NUMBER |
Header_SO - FLAG |
R_ORDER_ITEM_INX – UPDATE FLAG |
|
R_ORDER_ITEM_INX – MATERIAL
(Assign rule manually) |
|
R_ORDER_ITEM_INX – PLANT
(Assign rule manually) |
How to Assign rule manually –
Right Click on the PLANT → select Assign rule.
Enter MOVE in Rule name field, press enter.
Enter ‘X’ in Parameter value and save.
This will assign defined rules.

Source Structure Field
|
Target structure field
|
Header_SO - POSNR |
R_SCHEDULE_LINES – ITM_NUMBER |
Header_SO - ETRNR |
R_SCHEDULE_LINES – SCHED_LINE |
Header_SO - ETDAT |
R_SCHEDULE_LINES – REQ_DATE |
Header_SO - WMENG |
R_SCHEDULE_LINES – REQ_QTY |

Source Structure Field
|
Target structure field
|
Header_SO - POSNR |
R_SCHEDULE_LINESX – ITM_NUMBER |
Header_SO - ETENR |
R_SCHEDULE_LINESX – SCHED_LINE |
Header_SO - FLAG |
R_SCHEDULE_LINESX - UPDATEFLAG |
|
R_SCHEDULE_LINESX – REQ_DATE (Assign rule manually) |
|
R_SCHEDULE_LINESX – REQ_QTY (Assign rule Manually) |
How to Assign rule manually –
Right Click on the REQ_DATE ⇒
select Assign rule.

Enter MOVE in Rule name field, press enter.
Enter ‘X’ in Parameter value and save.
This will assign defined rules.

After assigning the rules, the structure should look something like this.

Generate the Migration Object
Click on save and choose Generate Runtime Object.
This generates the Runtime object and now you can download template in Migration cockpit.

As you can see in the display logs, the object was created without any errors.

Download Template file in the migration cockpit.

Finally, you can use this template to Update, Delete or Insert Sales order.One thing to be aware while updating the already processed records is Migration Cockpit keeps a record of the key of records to prevent duplicated key being import again.
So you need to clear the records using report DMC_FM_RESTART_COPY_DELETE in se38.

After above cleaning steps are done, you can modify your file and upload again.
Thank you for reading!
