
- SAP Community
- Products and Technology
- Enterprise Resource Planning
- ERP Blogs by SAP
- SAP S/4HANA – Process & key considerations to uplo...
Enterprise Resource Planning Blogs by SAP
Get insights and updates about cloud ERP and RISE with SAP, SAP S/4HANA and SAP S/4HANA Cloud, and more enterprise management capabilities with SAP blog posts.
Turn on suggestions
Auto-suggest helps you quickly narrow down your search results by suggesting possible matches as you type.
Showing results for
Associate
Options
- Subscribe to RSS Feed
- Mark as New
- Mark as Read
- Bookmark
- Subscribe
- Printer Friendly Page
- Report Inappropriate Content
09-09-2019
5:26 PM
Level 1: Medium; 20 minutes read
Audience: Subject Matter Experts
Author: Ramandeep Goyal, SAP S/4HANA RIG EMEA
Introduction
This blog explains the process to upload important PM objects using LTMC. It also covers the key considerations while uploading data using LTMC. This is the first document for PM objects and Functional location is covered in this document. Subsequent documents will be prepared to cover other PM objects.
User Role – Master Data Management Team
Dependency on other modules –
PM objects relevant for migration –
So, the correct order of migrating PM objects should be following –
Steps to upload Functional Locations–
Step1: Enter LTMC Transaction Code
Step 2: Select the project if it has already been created.

Otherwise, create a new project

You can decide if transfer will be via files or staging tables.
Step 3: Select the object (Functional Location in this case) for which you want to upload the data. Not all the objects are yet available in LTMC. Example – Measuring points & historical work orders are not yet available @ LTMC. However, new objects are added with every release.

Once selected, object will be copied into the project.
Step 4: Click “Download Template” to download the template file to fill in data. LTMC comes with a standard template file to fill in and upload data into SAP. The template is an “.XML” file which can be opened in excel for data upload. There are multiple worksheets in the file depending upon the type of object (single worksheet upload or multiple worksheet upload) but there will be minimum 3 worksheets in the file. In case, data needs to be uploaded into multiple work sheets (Example Task list), then sheets are codes with 2 different colors. Mandatory sheets are highlighted in Orange color and options sheets are highlighted in Blue color.
First worksheet “introduction” has some basic information about LTMC, file sizes, relevance of different work sheets (mandatory or optional) and working with different data types etc.
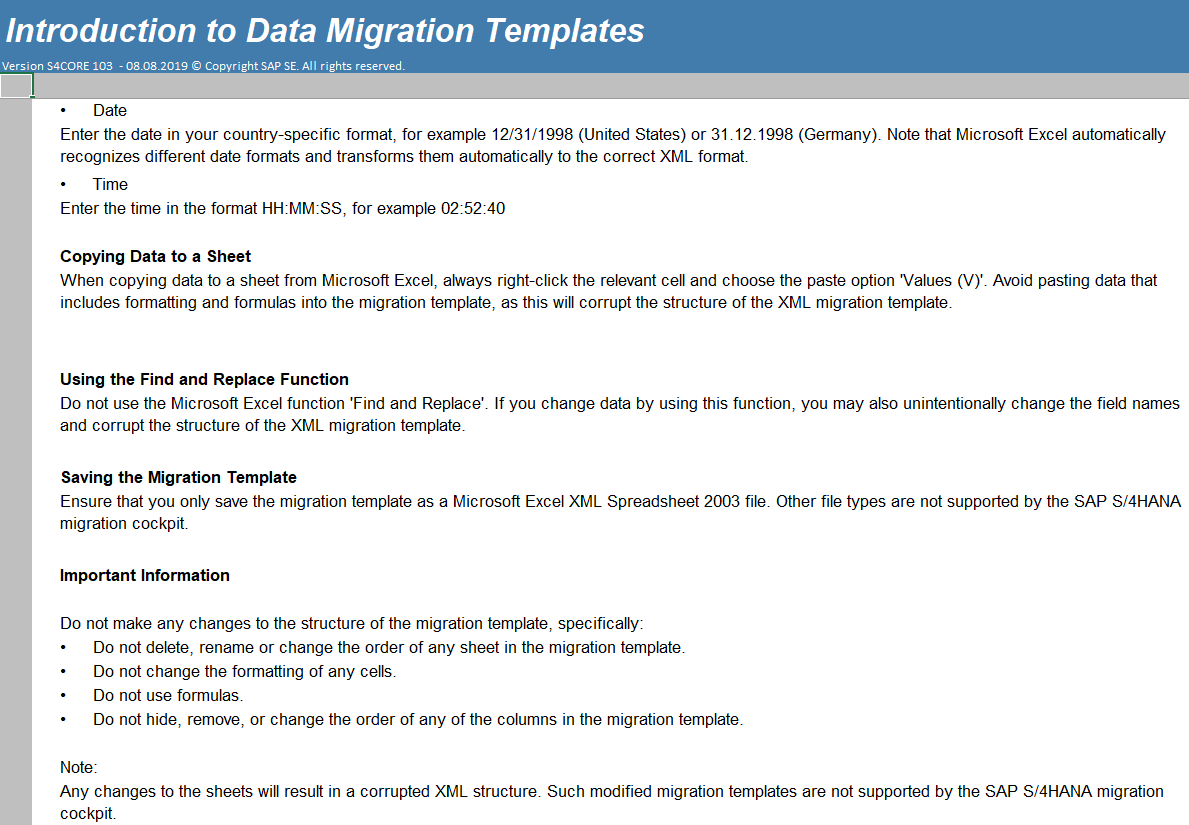
Second worksheet “Field List” explain the different fields which can be uploaded via LTMC, their description, data type, length and their importance (mandatory or optional).

In case, data is to be maintained into multiple work sheets; fields are arranged and explained for individual worksheets. Worksheet name is maintained and highlighted with the same color at the beginning of the fields list.
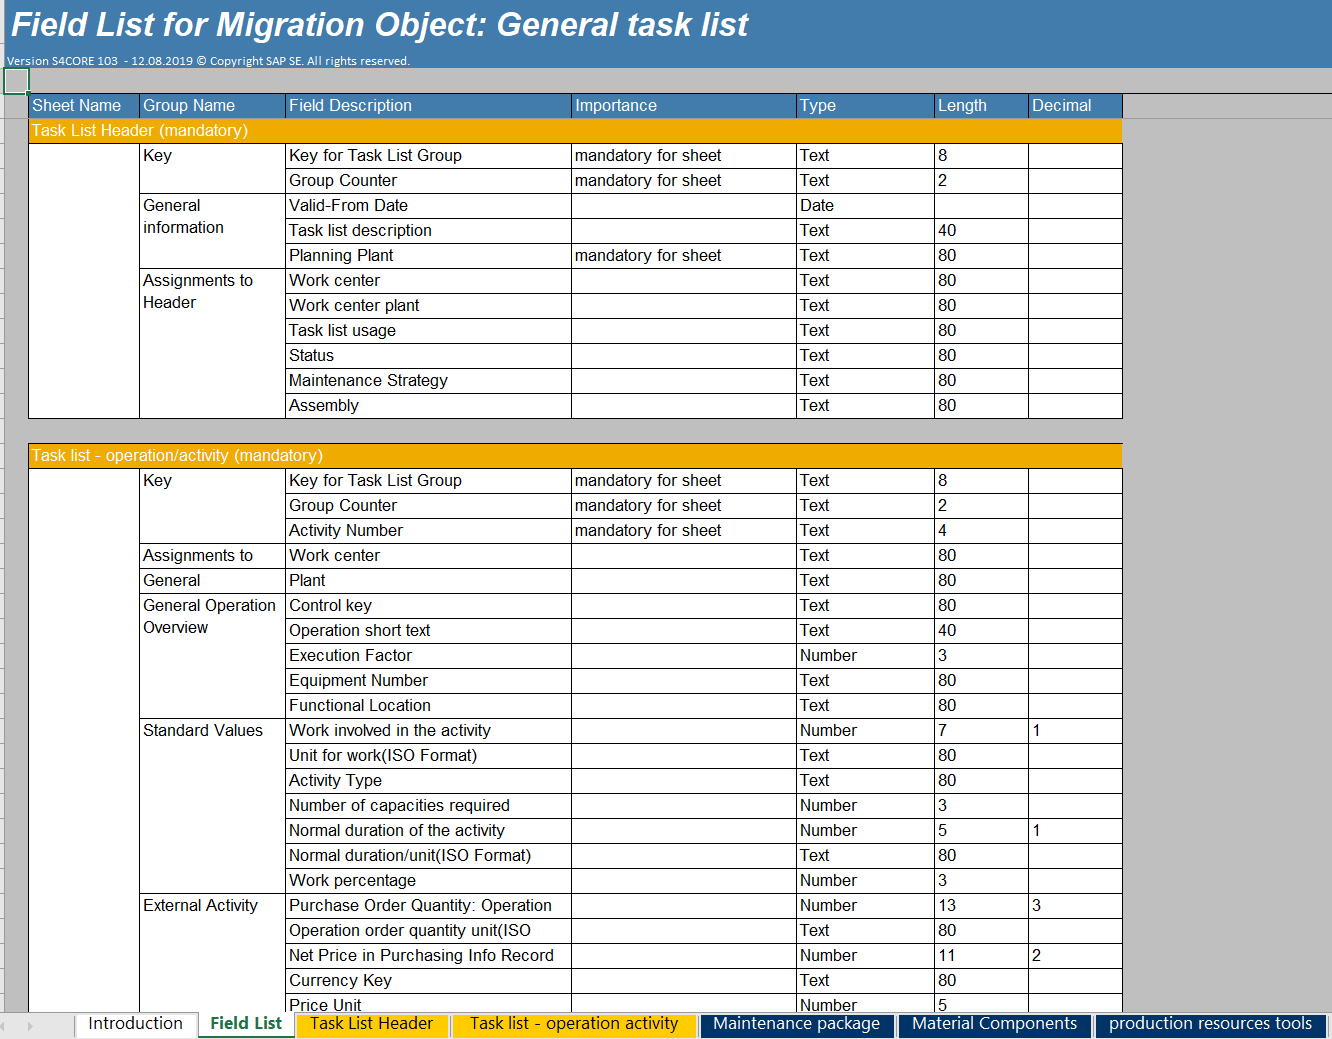
Third worksheet onwards are the sheets for actual data maintenance and upload. Examples – in case of Functional locations, there is only one worksheet to maintain data but in case of task lists there are multiple work sheets “Task List Header”, “Task list – operation activity” etc.
In this document, I will cover Functional locations (Single worksheet upload). I will be covering Task Lists (Multiple worksheet upload) in the next document.
Functional Location Data – Following data fields are mandatory while uploading data for functional locations –
All other fields are optional. Fill in the information as needed. Generally, for functional locations manufacturer information may not be relevant. This is mostly valid for equipments.

Step 5: Once data has been maintained into the template and available for upload, click “Upload File”. Browse & select the file in the pop-up window. An optional description and comments can be added. Click “Upload” once file has been selected.
Note: File name to be uploaded should be unique. System will throw an error message if the file with the same name has been added earlier and available for the object.


Step 6: Select and activate the file. System will issue a message if the file has been saved successfully. Please note that transfer can’t be initiated before activating the file. System will not enable the button “transfer” if file has not been activated yet.

Step 7: Click “Start Transfer” button so that system reads the data from the file. Transfer might take some time depending upon the data volume. You can select “Run in Background” and switch to background processing as well. This will allow you to work on other activities while system transfers the data.

Errors will be shown in the notification area in case there is any issue while validating the data. Otherwise, information messages will be displayed.
Note 1 – Transfer can only happen if a file has been uploaded and activated. Otherwise, transfer option will not be available. This helps users in following the process steps in the appropriate order.
Note 2 – System will transfer data from all the files with status “Not started” or “In Process”. So, it is recommended to delete the jobs which you don’t want to process. Otherwise, there might be conflicts due to duplicate master records. System will allow you to confirm to start the transfer. At any stage during migration, you can cancel the process if there are some corrections to be made to the data load files or value mapping etc. You can also delete the jobs if you don’t want to process them to avoid conflict with jobs to be processes in the future.
Note 3 – in this step, data will be validated for discrepancies. System will compare the values maintained in the file with values already available in the system. Example – Work centers, Maintenance plants etc. Error will be thrown in case any value maintained in the file is not available in the system. There are certain fields which should be maintained in combination otherwise system will throw an error. Example – Cost center and company code. Work center and maintenance plant. In case, you maintain cost center in your file and miss company code, system will throw an error while transferring the data. You may need to cancel the process at this stage and start all over.
Note 4 - While creating functional locations, system can automatically assign the superior functional location based upon the structure used by you. You can assign a different functional location if you want to deviate from the system proposal. While using LTMC, system will validate if the superior functional location (you want to assign) exists beforehand or not. System will throw an error message if superior functional location doesn’t exist before starting the upload.
Recommendation – In case you want to use LTMC to upload your functional locations; recommendation is to allow system to determine the superior functional location based upon the structure. In this case, system can dynamically assign superior functional location while creating a particular record. This functional location need not exist before starting the upload.
You should use other tools like LSMW or BDC (Batch Data Communication), in case your business scenario needs you to assign different superior function locations which are not recommended based upon the structure.
Step 8: Click “Next” to validate the data. On the next screen, field mappings can be defined if not done earlier. This is a onetime exercise for any field whenever a new value needs to be mapped into this field. Field mapping also allows you to perform some transformation on the data if needed.

There are 2 ways to confirm mapping values.
It will also show all the values which have already been confirmed. Select the rows which have not been confirmed earlier and press “Confirm Value”. As already explained, target value can be replaced before confirming. Press “Save” button after confirming all the values. This row will automatically disappear from the pending list. Similarly, you need to confirm all the values before proceeding to the next step.


Step 9: Once mapping is completed, click “Next” to start simulation. As the name suggest, system will read the data and simulates transfer to see if there is any discrepancy while posting the data into system. Error messages will be displayed in the notification area if there is any discrepancy with the data. Otherwise “Next” button will be activated to start the actual transfer.
Note – You can skip the simulation if you have uploaded the data using same template and you are confident on the data quality. Select “Skip ‘Simulate Import’” to skip the simulation of data and directly initiate the import.

Step 10: Click “Next” to start transfer of data into system. This will start the execution of data import into S/4 system. Data import may take some time and you can choose to run it in background as well. Once completed, information messages will be displayed in the notification area if transfer is successful. Otherwise, error messages will be shown.

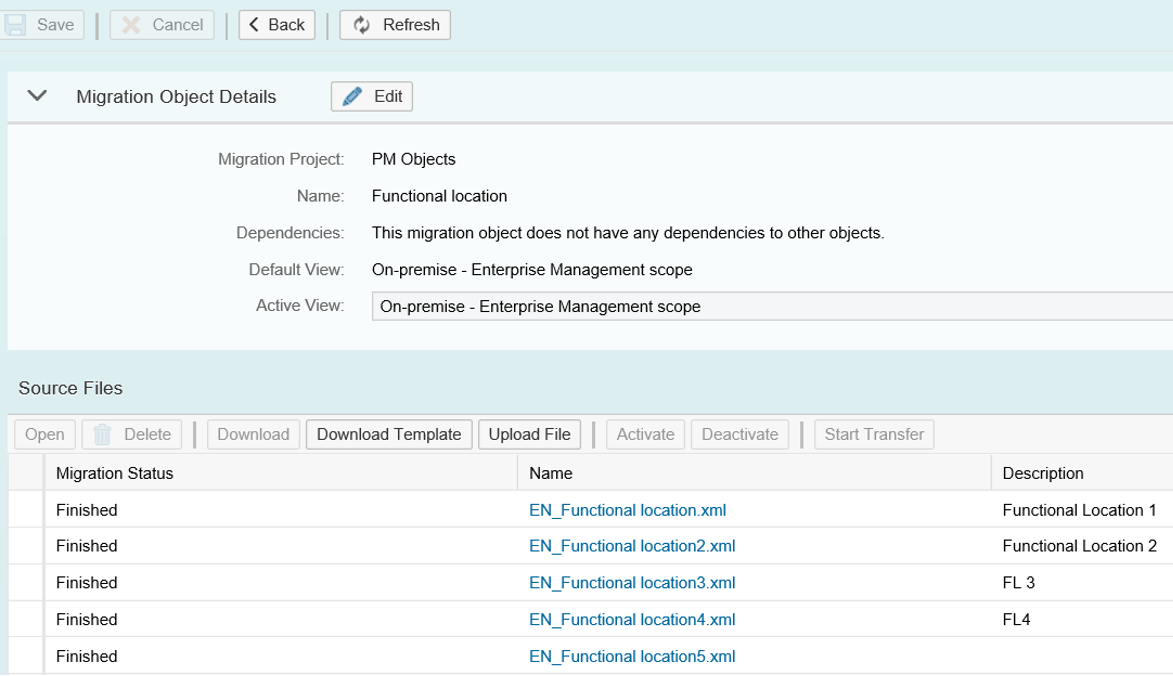
System will also issue a message “All files have been processed; choose "Finish" to complete the transfer”. Press “Finish” to complete this data load to return back to the project and start next object. All the finished jobs will be shown here on the screen.
Step 11: Check and verify if the objects have been created correctly.


I hope that this blog will help you in uploading functional locations using LTMC. Please let me know the PM objects which I should cover in subsequent blogs. Apart from that, I will be writing additional blogs to discuss task lists and the usage of LTMOM – Migration Object Modeler to add additional fields into PM objects.
SAP S/4HANA Discovery
Audience: Subject Matter Experts
Author: Ramandeep Goyal, SAP S/4HANA RIG EMEA
Introduction
This blog explains the process to upload important PM objects using LTMC. It also covers the key considerations while uploading data using LTMC. This is the first document for PM objects and Functional location is covered in this document. Subsequent documents will be prepared to cover other PM objects.
User Role – Master Data Management Team
Dependency on other modules –
- Chart of account (needed for activity types which are needed for work centers)
- Activity types (needed for work centers)
- Cost centers (needed for work centers, equipment master & functional locations)
- Material master
- HR master (needed for work centers)
- Classes & Characteristics
PM objects relevant for migration –
- Functional Location
- Equipments (dependency on functional locations, work centers, material bill of material to be assigned into construction type)
- Material - Bill of materials
- Equipment - Bill of materials (dependency on equipments)
- Functional location – Bill of materials (dependency on functional locations)
- Work Centers
- Measuring points & counters (dependency on functional locations & equipments)
- General task lists (dependency on work centers)
- Equipment task lists (dependency on work centers & equipments)
- Functional location task lists (dependency on work centers & functional locations)
- Maintenance Plans (dependency on work centers, task lists, functional locations & equipments)
So, the correct order of migrating PM objects should be following –
- Work Centers
- Material – Bill of materials
- Functional locations
- Equipments
- Equipment - Bill of materials (dependency on equipments)
- Functional location – Bill of materials (dependency on functional locations)
- Measuring points & counters (dependency on functional locations & equipments)
- General task lists (dependency on work centers)
- Equipment task lists (dependency on work centers & equipments)
- Functional location task lists (dependency on work centers & functional locations)
- Maintenance Plans (dependency on work centers, task lists, functional locations & equipments)
Steps to upload Functional Locations–
Step1: Enter LTMC Transaction Code
Step 2: Select the project if it has already been created.
Otherwise, create a new project
You can decide if transfer will be via files or staging tables.
Step 3: Select the object (Functional Location in this case) for which you want to upload the data. Not all the objects are yet available in LTMC. Example – Measuring points & historical work orders are not yet available @ LTMC. However, new objects are added with every release.
Once selected, object will be copied into the project.
Step 4: Click “Download Template” to download the template file to fill in data. LTMC comes with a standard template file to fill in and upload data into SAP. The template is an “.XML” file which can be opened in excel for data upload. There are multiple worksheets in the file depending upon the type of object (single worksheet upload or multiple worksheet upload) but there will be minimum 3 worksheets in the file. In case, data needs to be uploaded into multiple work sheets (Example Task list), then sheets are codes with 2 different colors. Mandatory sheets are highlighted in Orange color and options sheets are highlighted in Blue color.
First worksheet “introduction” has some basic information about LTMC, file sizes, relevance of different work sheets (mandatory or optional) and working with different data types etc.
Second worksheet “Field List” explain the different fields which can be uploaded via LTMC, their description, data type, length and their importance (mandatory or optional).
In case, data is to be maintained into multiple work sheets; fields are arranged and explained for individual worksheets. Worksheet name is maintained and highlighted with the same color at the beginning of the fields list.
Third worksheet onwards are the sheets for actual data maintenance and upload. Examples – in case of Functional locations, there is only one worksheet to maintain data but in case of task lists there are multiple work sheets “Task List Header”, “Task list – operation activity” etc.
In this document, I will cover Functional locations (Single worksheet upload). I will be covering Task Lists (Multiple worksheet upload) in the next document.
Functional Location Data – Following data fields are mandatory while uploading data for functional locations –
- External Functional Location Number
- Functional Location Structure Indicator
- Functional Location Category
All other fields are optional. Fill in the information as needed. Generally, for functional locations manufacturer information may not be relevant. This is mostly valid for equipments.
Step 5: Once data has been maintained into the template and available for upload, click “Upload File”. Browse & select the file in the pop-up window. An optional description and comments can be added. Click “Upload” once file has been selected.
Note: File name to be uploaded should be unique. System will throw an error message if the file with the same name has been added earlier and available for the object.
Step 6: Select and activate the file. System will issue a message if the file has been saved successfully. Please note that transfer can’t be initiated before activating the file. System will not enable the button “transfer” if file has not been activated yet.
Step 7: Click “Start Transfer” button so that system reads the data from the file. Transfer might take some time depending upon the data volume. You can select “Run in Background” and switch to background processing as well. This will allow you to work on other activities while system transfers the data.
Errors will be shown in the notification area in case there is any issue while validating the data. Otherwise, information messages will be displayed.
Note 1 – Transfer can only happen if a file has been uploaded and activated. Otherwise, transfer option will not be available. This helps users in following the process steps in the appropriate order.
Note 2 – System will transfer data from all the files with status “Not started” or “In Process”. So, it is recommended to delete the jobs which you don’t want to process. Otherwise, there might be conflicts due to duplicate master records. System will allow you to confirm to start the transfer. At any stage during migration, you can cancel the process if there are some corrections to be made to the data load files or value mapping etc. You can also delete the jobs if you don’t want to process them to avoid conflict with jobs to be processes in the future.
Note 3 – in this step, data will be validated for discrepancies. System will compare the values maintained in the file with values already available in the system. Example – Work centers, Maintenance plants etc. Error will be thrown in case any value maintained in the file is not available in the system. There are certain fields which should be maintained in combination otherwise system will throw an error. Example – Cost center and company code. Work center and maintenance plant. In case, you maintain cost center in your file and miss company code, system will throw an error while transferring the data. You may need to cancel the process at this stage and start all over.
Note 4 - While creating functional locations, system can automatically assign the superior functional location based upon the structure used by you. You can assign a different functional location if you want to deviate from the system proposal. While using LTMC, system will validate if the superior functional location (you want to assign) exists beforehand or not. System will throw an error message if superior functional location doesn’t exist before starting the upload.
Recommendation – In case you want to use LTMC to upload your functional locations; recommendation is to allow system to determine the superior functional location based upon the structure. In this case, system can dynamically assign superior functional location while creating a particular record. This functional location need not exist before starting the upload.
You should use other tools like LSMW or BDC (Batch Data Communication), in case your business scenario needs you to assign different superior function locations which are not recommended based upon the structure.
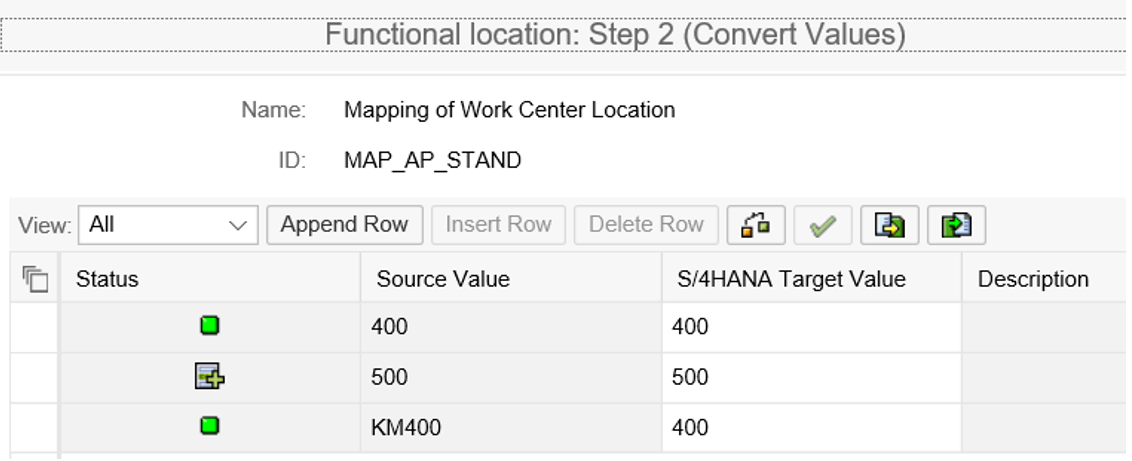
Step 8: Click “Next” to validate the data. On the next screen, field mappings can be defined if not done earlier. This is a onetime exercise for any field whenever a new value needs to be mapped into this field. Field mapping also allows you to perform some transformation on the data if needed.
There are 2 ways to confirm mapping values.
- Select any row and confirm the mapping on the second screen. System needs to determine if the source & target values are same or some transformation needs to happen. Example – Location “KM400” from the file should be read and updated as “400” in S/4HANA.
It will also show all the values which have already been confirmed. Select the rows which have not been confirmed earlier and press “Confirm Value”. As already explained, target value can be replaced before confirming. Press “Save” button after confirming all the values. This row will automatically disappear from the pending list. Similarly, you need to confirm all the values before proceeding to the next step.
- In case, you don’t want to confirm the mapping on the detailed screen and want to go ahead with system proposal, you can select the row and press “Confirm Mapping Values”. This will automatically confirm system proposals and remove the row from pending list.
Step 9: Once mapping is completed, click “Next” to start simulation. As the name suggest, system will read the data and simulates transfer to see if there is any discrepancy while posting the data into system. Error messages will be displayed in the notification area if there is any discrepancy with the data. Otherwise “Next” button will be activated to start the actual transfer.
Note – You can skip the simulation if you have uploaded the data using same template and you are confident on the data quality. Select “Skip ‘Simulate Import’” to skip the simulation of data and directly initiate the import.
Step 10: Click “Next” to start transfer of data into system. This will start the execution of data import into S/4 system. Data import may take some time and you can choose to run it in background as well. Once completed, information messages will be displayed in the notification area if transfer is successful. Otherwise, error messages will be shown.
System will also issue a message “All files have been processed; choose "Finish" to complete the transfer”. Press “Finish” to complete this data load to return back to the project and start next object. All the finished jobs will be shown here on the screen.
Step 11: Check and verify if the objects have been created correctly.
I hope that this blog will help you in uploading functional locations using LTMC. Please let me know the PM objects which I should cover in subsequent blogs. Apart from that, I will be writing additional blogs to discuss task lists and the usage of LTMOM – Migration Object Modeler to add additional fields into PM objects.
SAP S/4HANA Discovery
- SAP help.sap.com – S/4HANA 1809 , S/4HANA Cloud
- SAP Simplification Item Catalog
- SAP Best Practices Explorer – S/4HANA Enterprise Cloud , On premise
- SAP Roadmap Viewer – Cloud , On premise, Cloud – Single Tenant Edition
- SAP Fiori Library - https://fioriappslibrary.hana.ondemand.com/sap/fix/externalViewer/
Labels:
4 Comments
You must be a registered user to add a comment. If you've already registered, sign in. Otherwise, register and sign in.
Labels in this area
-
Artificial Intelligence (AI)
1 -
Business Trends
363 -
Business Trends
21 -
Customer COE Basics and Fundamentals
1 -
Digital Transformation with Cloud ERP (DT)
1 -
Event Information
461 -
Event Information
24 -
Expert Insights
114 -
Expert Insights
153 -
General
1 -
Governance and Organization
1 -
Introduction
1 -
Life at SAP
415 -
Life at SAP
2 -
Product Updates
4,685 -
Product Updates
213 -
Roadmap and Strategy
1 -
Technology Updates
1,502 -
Technology Updates
89
Related Content
- Futuristic Aerospace or Defense BTP Data Mesh Layer using Collibra, Next Labs ABAC/DAM, IAG and GRC in Enterprise Resource Planning Blogs by Members
- Mass Change Equipment User Status using Master Data Info. center Fiori tile - Error in Enterprise Resource Planning Q&A
- In Edit Functional Location page, Apply button is renamed as Save Is there any way to change? in Enterprise Resource Planning Q&A
- What is the best way to add Functional Locations to the EPPM Revenue Projects? in Enterprise Resource Planning Q&A
- Mass Change functional location of many equipments in Enterprise Resource Planning Q&A
Top kudoed authors
| User | Count |
|---|---|
| 11 | |
| 10 | |
| 7 | |
| 7 | |
| 4 | |
| 4 | |
| 4 | |
| 4 | |
| 3 | |
| 3 |