
- SAP Community
- Products and Technology
- Enterprise Resource Planning
- ERP Blogs by Members
- SAP ERP| Creating an LSMW (with ABAP Coding)
Enterprise Resource Planning Blogs by Members
Gain new perspectives and knowledge about enterprise resource planning in blog posts from community members. Share your own comments and ERP insights today!
Turn on suggestions
Auto-suggest helps you quickly narrow down your search results by suggesting possible matches as you type.
Showing results for
Sookriti_Mishra
Active Participant
Options
- Subscribe to RSS Feed
- Mark as New
- Mark as Read
- Bookmark
- Subscribe
- Printer Friendly Page
- Report Inappropriate Content
09-06-2019
9:06 AM
LSMW i.e. Legacy System Migration Workbench is a tool that supports the transfer of data from non-SAP systems (“Legacy Systems”) to SAP R/3 systems. This can be a one-time transfer as well as a periodic one.
In simple words, if you have a transaction to do, let, for example, update a particular field in let VA02 (Sales Order Change), and you have to do the same thing for multiple Sales Orders in VA02, then LSMW is your tool to do that. You, of course, have MASStransaction, but LSMW has got its own benefits.
Benefits?
Now, let us see, how do we do that?
Steps to follow:
Steps to follow:
1. Enter the TCode LSMW.
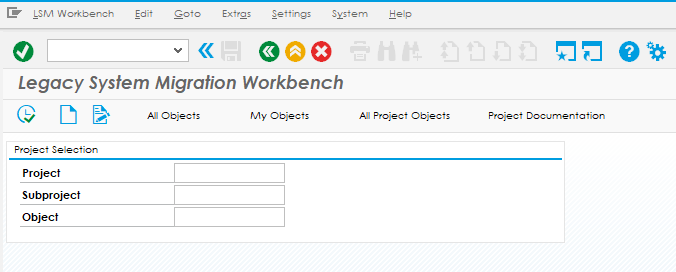
2. Enter a Project, Subproject and Object name. They can be same as in my case, and you can make it different. Some like creating one Project and then adding one Subproject after another.
3. Click on the Create icon next to Execute button and enter a breif description of your LSMW.
4. Now click on execute as highlighted.
5. An LSMW has 13 steps as you can see in the screenshot below:
6. Double click on the individual item or click on Execute button to enter into the steps.
STEP : 1 Define Object Attributes Select the "Batch Input Recording" and click on the highlighted button to create a recording.
Create Recording. Give a name to your recording.
Enter the Transaction Code/ the TCode.
Record your steps and click on "Save", and this is how your screen would look like after you save the Transaction. This where you can cross-check if all of your fields have been recorded successfully or not. Even the data records entered can be seen.
Without a miss, click on "Default All".
If you wish to remove unwanted fields which got captured while you were recording, then select the field, and click on the highlighted button to remove from selection. "Save" and come back to see the below screen.
Now, come back and select the Recording Field, and click F4 to fetch the Recording which you just recorded.
STEP : 3 Define Source Field
Before entering to this step, click on "Object Overview". Click on "Table" button.
Now, copy the below content to an excel sheet. Why? You are going to know that in the coming steps.
Now, go back and double click on your 3rd step and below is the screen that you should be able to see. Select the Structure and click on the highlighted button.
Now, copy the field names, length and other details from your excel sheet into this structure. Click on Save and come back to the enter into the next step.
STEP : 4 Define Structure Relations.
In this step, you just need to assign your Recording from Step 1, to the Structure you created in Step 2.
STEP : 5 Define Field Mapping and Conversion Rules.
This is a very crucial step, where you are supposed to assign source. This is the stage where you can assign Constants, add Prefix/ Suffix, and even ABAP Code for Custom Validations.
Select the field and then click on "Source Field" as highlighted to assign the Source Field.
Select the relevant Source Field
To write ABAP Code, select the field and click on Rule.
Select ABAP Code.

Write your custom validations and click on Save.
The next step is not required. I have never used it below. If you have, then please mention in the comments below.
Thus this completes your LSMW creation, the remaining steps are just where you make a data format in .txt file, and upload it to your system, Read, Convert and start the activity running the session of uploading the data.
Thanks for the read.
Hope it helps.
If you have any doubt, please feel free to drop a comment.
Thanks & Regards,
Sookriti Mishra
SAP C4C and CPI Consultant.
In simple words, if you have a transaction to do, let, for example, update a particular field in let VA02 (Sales Order Change), and you have to do the same thing for multiple Sales Orders in VA02, then LSMW is your tool to do that. You, of course, have MASStransaction, but LSMW has got its own benefits.
Benefits?
- It is faster.
- You can run it in the background, foreground and also trigger a stop event in case there is an error.
- It generates a log in the end.
- You can write ABAP code for custom validations.
- You can pass constants, add prefixes/ suffixes to your data record.
- etc.
Now, let us see, how do we do that?
Steps to follow:
Steps to follow:
1. Enter the TCode LSMW.
2. Enter a Project, Subproject and Object name. They can be same as in my case, and you can make it different. Some like creating one Project and then adding one Subproject after another.
3. Click on the Create icon next to Execute button and enter a breif description of your LSMW.
4. Now click on execute as highlighted.
5. An LSMW has 13 steps as you can see in the screenshot below:
6. Double click on the individual item or click on Execute button to enter into the steps.
STEP : 1 Define Object Attributes Select the "Batch Input Recording" and click on the highlighted button to create a recording.
Create Recording.
Give a name to your recording. Enter the Transaction Code/ the TCode.
Record your steps and click on "Save", and this is how your screen would look like after you save the Transaction. This where you can cross-check if all of your fields have been recorded successfully or not. Even the data records entered can be seen.
Without a miss, click on "Default All".
If you wish to remove unwanted fields which got captured while you were recording, then select the field, and click on the highlighted button to remove from selection.
"Save" and come back to see the below screen. Now, come back and select the Recording Field, and click F4 to fetch the Recording which you just recorded.
STEP : 2 Define Source Structures.

Now, the system should automatically take you to the next step.


Now, create a Structure, and mention a decription for it.
STEP : 3 Define Source Field
Before entering to this step, click on "Object Overview".
Click on "Table" button. Now, copy the below content to an excel sheet. Why? You are going to know that in the coming steps.
Now, go back and double click on your 3rd step and below is the screen that you should be able to see. Select the Structure and click on the highlighted button.
Now, copy the field names, length and other details from your excel sheet into this structure. Click on Save and come back to the enter into the next step.
STEP : 4 Define Structure Relations.
In this step, you just need to assign your Recording from Step 1, to the Structure you created in Step 2.
STEP : 5 Define Field Mapping and Conversion Rules.
This is a very crucial step, where you are supposed to assign source. This is the stage where you can assign Constants, add Prefix/ Suffix, and even ABAP Code for Custom Validations.
Select the field and then click on "Source Field" as highlighted to assign the Source Field.
Select the relevant Source Field
To write ABAP Code, select the field and click on Rule.
Select ABAP Code.
Write your custom validations and click on Save.
The next step is not required. I have never used it below. If you have, then please mention in the comments below.
Thus this completes your LSMW creation, the remaining steps are just where you make a data format in .txt file, and upload it to your system, Read, Convert and start the activity running the session of uploading the data.
Thanks for the read.
Hope it helps.
If you have any doubt, please feel free to drop a comment.
Thanks & Regards,
Sookriti Mishra
SAP C4C and CPI Consultant.
- SAP Managed Tags:
- SAP ERP
2 Comments
You must be a registered user to add a comment. If you've already registered, sign in. Otherwise, register and sign in.
Labels in this area
-
"mm02"
1 -
A_PurchaseOrderItem additional fields
1 -
ABAP
1 -
ABAP Extensibility
1 -
ACCOSTRATE
1 -
ACDOCP
1 -
Adding your country in SPRO - Project Administration
1 -
Advance Return Management
1 -
AI and RPA in SAP Upgrades
1 -
Approval Workflows
1 -
ARM
1 -
ASN
1 -
Asset Management
1 -
Associations in CDS Views
1 -
auditlog
1 -
Authorization
1 -
Availability date
1 -
Azure Center for SAP Solutions
1 -
AzureSentinel
2 -
Bank
1 -
BAPI_SALESORDER_CREATEFROMDAT2
1 -
BRF+
1 -
BRFPLUS
1 -
Bundled Cloud Services
1 -
business participation
1 -
Business Processes
1 -
CAPM
1 -
Carbon
1 -
Cental Finance
1 -
CFIN
1 -
CFIN Document Splitting
1 -
Cloud ALM
1 -
Cloud Integration
1 -
condition contract management
1 -
Connection - The default connection string cannot be used.
1 -
Custom Table Creation
1 -
Customer Screen in Production Order
1 -
Data Quality Management
1 -
Date required
1 -
Decisions
1 -
desafios4hana
1 -
Developing with SAP Integration Suite
1 -
Direct Outbound Delivery
1 -
DMOVE2S4
1 -
EAM
1 -
EDI
2 -
EDI 850
1 -
EDI 856
1 -
edocument
1 -
EHS Product Structure
1 -
Emergency Access Management
1 -
Energy
1 -
EPC
1 -
Financial Operations
1 -
Find
1 -
FINSSKF
1 -
Fiori
1 -
Flexible Workflow
1 -
Gas
1 -
Gen AI enabled SAP Upgrades
1 -
General
1 -
generate_xlsx_file
1 -
Getting Started
1 -
HomogeneousDMO
1 -
IDOC
2 -
Integration
1 -
Learning Content
2 -
LogicApps
2 -
low touchproject
1 -
Maintenance
1 -
management
1 -
Material creation
1 -
Material Management
1 -
MD04
1 -
MD61
1 -
methodology
1 -
Microsoft
2 -
MicrosoftSentinel
2 -
Migration
1 -
MRP
1 -
MS Teams
2 -
MT940
1 -
Newcomer
1 -
Notifications
1 -
Oil
1 -
open connectors
1 -
Order Change Log
1 -
ORDERS
2 -
OSS Note 390635
1 -
outbound delivery
1 -
outsourcing
1 -
PCE
1 -
Permit to Work
1 -
PIR Consumption Mode
1 -
PIR's
1 -
PIRs
1 -
PIRs Consumption
1 -
PIRs Reduction
1 -
Plan Independent Requirement
1 -
Premium Plus
1 -
pricing
1 -
Primavera P6
1 -
Process Excellence
1 -
Process Management
1 -
Process Order Change Log
1 -
Process purchase requisitions
1 -
Product Information
1 -
Production Order Change Log
1 -
Purchase requisition
1 -
Purchasing Lead Time
1 -
Redwood for SAP Job execution Setup
1 -
RISE with SAP
1 -
RisewithSAP
1 -
Rizing
1 -
S4 Cost Center Planning
1 -
S4 HANA
1 -
S4HANA
3 -
Sales and Distribution
1 -
Sales Commission
1 -
sales order
1 -
SAP
2 -
SAP Best Practices
1 -
SAP Build
1 -
SAP Build apps
1 -
SAP Cloud ALM
1 -
SAP Data Quality Management
1 -
SAP Maintenance resource scheduling
2 -
SAP Note 390635
1 -
SAP S4HANA
2 -
SAP S4HANA Cloud private edition
1 -
SAP Upgrade Automation
1 -
SAP WCM
1 -
SAP Work Clearance Management
1 -
Schedule Agreement
1 -
SDM
1 -
security
2 -
Settlement Management
1 -
soar
2 -
SSIS
1 -
SU01
1 -
SUM2.0SP17
1 -
SUMDMO
1 -
Teams
2 -
User Administration
1 -
User Participation
1 -
Utilities
1 -
va01
1 -
vendor
1 -
vl01n
1 -
vl02n
1 -
WCM
1 -
X12 850
1 -
xlsx_file_abap
1 -
YTD|MTD|QTD in CDs views using Date Function
1
- « Previous
- Next »
Related Content
- SAP S4HANA Cloud Public Edition Logistics FAQ in Enterprise Resource Planning Blogs by SAP
- Message_Type_X error when using BAPI in Enterprise Resource Planning Q&A
- How create a session timeout with a countdown timer in SAPUI5 app that interacts with ABAP backend? in Enterprise Resource Planning Q&A
- Building Low Code Extensions with Key User Extensibility in SAP S/4HANA and SAP Build in Enterprise Resource Planning Blogs by SAP
- VAKEY operation used in PCR to refers to custom ABAP code in Enterprise Resource Planning Q&A
Top kudoed authors
| User | Count |
|---|---|
| 5 | |
| 2 | |
| 2 | |
| 2 | |
| 2 | |
| 2 | |
| 2 | |
| 1 | |
| 1 |