

- SAP Community
- Products and Technology
- Technology
- Technology Blogs by SAP
- Connect kubectl to SAP Data Hub trial on AWS
Technology Blogs by SAP
Learn how to extend and personalize SAP applications. Follow the SAP technology blog for insights into SAP BTP, ABAP, SAP Analytics Cloud, SAP HANA, and more.
Turn on suggestions
Auto-suggest helps you quickly narrow down your search results by suggesting possible matches as you type.
Showing results for
Developer Advocate
Options
- Subscribe to RSS Feed
- Mark as New
- Mark as Read
- Bookmark
- Subscribe
- Printer Friendly Page
- Report Inappropriate Content
09-04-2019
1:46 PM
So, just like me, you created a trial edition of SAP Data Hub on AWS and now would like to see what is happening on the Kubernetes cluster underneath. Unfortunately AWS Cockpit does not have much to offer here: just some basic information about EKS cluster and a CloudFormation stack.

So, at a recent AWS event in Warsaw I asked one of their experts. He said that because EKS is all standard Kubernetes I should use all standard K8s tools -- installed by myself. He suggested I use Cloud9 instance to install these tools by following some online tutorials.
There were a few gotchas as I was working to get all pieces together, so I'd like to share with you my notes.

Go to Cloud9 service in the AWS region, where your Data Hub cluster has been already created.
Create a new Cloud9 environment. Give it the name (my was
In Step 2 "Configure settings" I changed the platform to
Review your settings in step 3 and start the creation process. It will take a few minutes.
Once the new environment is created it starts the Cloud9 IDE with a terminal already opened in the console area (at least for me :-).
Let me just switch the user displayed there (for a privacy reason when I am taking screen shots).

You can use an icon on the right to miximize/restore the terminal screen.
One of the Cloud9 advantages -- as I see it -- is that its instance comes with
By default Cloud9 environment gets AWS-managed temporary credentials stored in
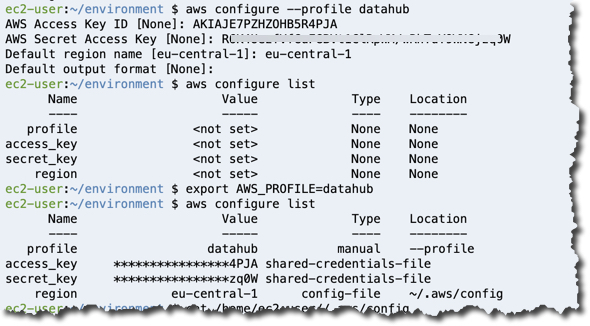
Now, to be able to work with my K8s cluster I need to configure credentials of my AWS user used to create that cluster. In case of a trial edition created from CAL, it is the user from the Account settings of the Instance.


Obviously you need to know both your access and secret keys for this user to proceed creating a local AWS profile. Hopefully you noted them down, when generating 😉 Luckily, I did.
Back to the terminal in Cloud9: type required values in
Check results with
Now, if your authorization was successful, you should see clusters from EKS with the command
Set your cluster as a context for K8s tools with

kubectl is the command-line tool that allows you running commands against Kubernetes clusters.
My Data Hub cluster version of K8s (as seen at EKS cockpit) is
Let's check packages available for that version with

The latest at the moment is
Check installation using the command
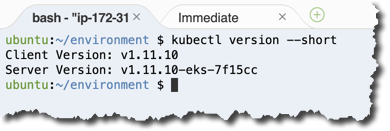
Client and server versions match, and this is what we wanted to see.
Let's run a few basic commands. First, check the context for kubectl.
Now, get the cluster information.

Then check worker nodes.

Now, let's check namespaces. There are two versions of this command (long and short - easier to read or faster to type), but both produce the same results.

Obviously, Data Hub's objects will be in

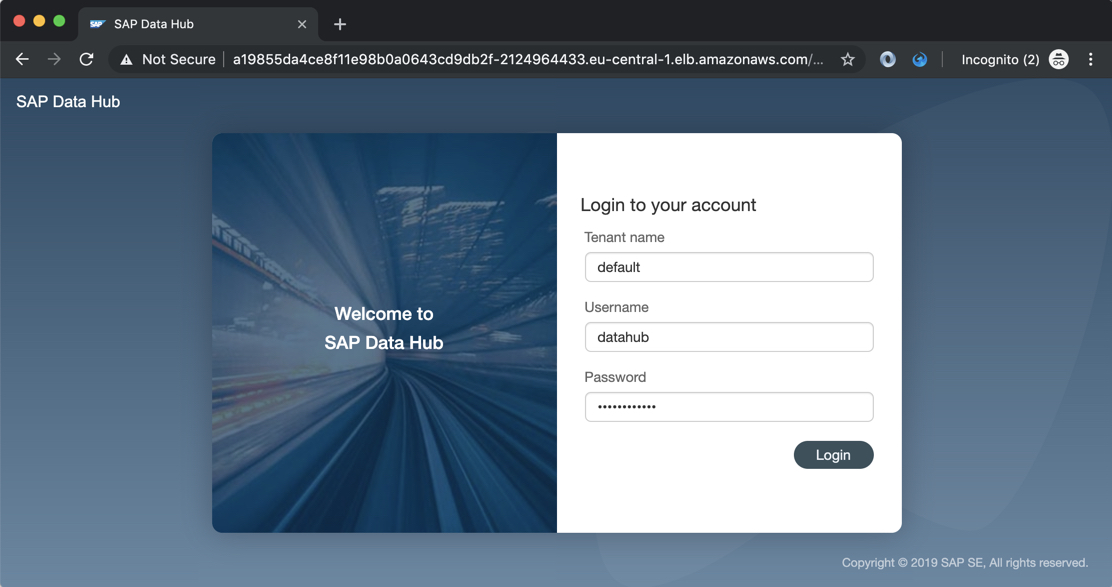
It returned the address that Data Hub cluster exposed to the outside world. Let's check it out.
Let's open this address in the web browser.
It displays a security warning at first, because the server is using a self-signed certificate. But once this "threat" is accepted, the SAP Data Hub logon screen of your trial instance is displayed!
I had to go through quite some amount of AWS and Kubernetes documentation to get these steps, which seem obvious now. Yet not everything from documentation was tested, so maybe there are other - faster or better - ways to achieve the same.
Eg. I haven't used
One thing I tried is doing the same on a regular laptop, instead of a Cloud9 instance. And it worked, obviously starting from the step 2. Actually I got even more recent
Happy datahubing,
-Vitaliy (aka @Sygyzmundovych)
So, at a recent AWS event in Warsaw I asked one of their experts. He said that because EKS is all standard Kubernetes I should use all standard K8s tools -- installed by myself. He suggested I use Cloud9 instance to install these tools by following some online tutorials.
There were a few gotchas as I was working to get all pieces together, so I'd like to share with you my notes.
1. Create Cloud9 instance
Go to Cloud9 service in the AWS region, where your Data Hub cluster has been already created.
Create a new Cloud9 environment. Give it the name (my was
Kubectl for SAPDH) in Step 1.In Step 2 "Configure settings" I changed the platform to
Ubuntu, as I am more familiar with it.Gotcha: AWS documentation says "You can create an AWS Cloud9 IDE in your cluster's VPC".
You can do it in step 2 in optional network settings. I tried both ways, and had no issues so far creating Cloud9 instance in other VPC. Let me know if you had any advantages/issues of using either option.
Review your settings in step 3 and start the creation process. It will take a few minutes.
Once the new environment is created it starts the Cloud9 IDE with a terminal already opened in the console area (at least for me :-).
Let me just switch the user displayed there (for a privacy reason when I am taking screen shots).
export PS1="\[\033[01;32m\]$USER\[\033[00m\]:\[\033[01;34m\]\w\[\033[00m\]$(__git_ps1 " (%s)" 2>/dev/null) $ "You can use an icon on the right to miximize/restore the terminal screen.
2. Check AWS CLI version
One of the Cloud9 advantages -- as I see it -- is that its instance comes with
aws CLI preinstalled.Gotcha: In Cloud9 instanceaws --versiondisplaysaws-cli/1.16.218at the time of writing this post, while the version installed on regular Ubuntu withsudo snap install aws-cli --classichas a versionaws-cli/1.16.148. It might be important as AWS documentation warns to have a version 1.16.156 or greater.
3. Configure AWS credentials
By default Cloud9 environment gets AWS-managed temporary credentials stored in
~/.aws/credentials file.Gotcha: First thing first, you need to switch off AWS managed credentials in Cloud9 preferences.
Now, to be able to work with my K8s cluster I need to configure credentials of my AWS user used to create that cluster. In case of a trial edition created from CAL, it is the user from the Account settings of the Instance.
Obviously you need to know both your access and secret keys for this user to proceed creating a local AWS profile. Hopefully you noted them down, when generating 😉 Luckily, I did.
Back to the terminal in Cloud9: type required values in
aws configure --profile datahub command and then switch to datahub AWS profile by assigning it to env variable AWS_PROFILE.Check results with
aws configure list command.4. Set Kubernetes context for AWS EKS cluster
Now, if your authorization was successful, you should see clusters from EKS with the command
aws eks list-clusters.Set your cluster as a context for K8s tools with
aws eks --region eu-central-1 update-kubeconfig --name <<cluster_name_from_the_list>>.5. Install kubectl
kubectl is the command-line tool that allows you running commands against Kubernetes clusters.
Gotcha: AWS documentation says "You must use a kubectl version that is within one minor version difference of your Amazon EKS cluster"
My Data Hub cluster version of K8s (as seen at EKS cockpit) is
1.11, so I should install matching version of kubectl, and not the latest.Let's check packages available for that version with
curl -s https://packages.cloud.google.com/apt/dists/kubernetes-xenial/main/binary-amd64/Packages | grep 'Version: 1.11' | sort | uniq | awk '{print $2}'The latest at the moment is
1.11.10-00, so let's install it.sudo apt-get update && sudo apt-get install -y apt-transport-https
curl -s https://packages.cloud.google.com/apt/doc/apt-key.gpg | sudo apt-key add -
echo "deb https://apt.kubernetes.io/ kubernetes-xenial main" | sudo tee -a /etc/apt/sources.list.d/kubernetes.list
sudo apt-get update
sudo apt-get install --allow-downgrades -qy kubectl=1.11.10-00Gotcha: Sometimes I've been running into different issues with apt-get here, like locked update files or missing PGP keys. They all have been resolved just with regular web search for those error messages.
Check installation using the command
kubectl version --short.Client and server versions match, and this is what we wanted to see.
6. Basic kubectl commands
Let's run a few basic commands. First, check the context for kubectl.
kubectl config get-contexts

kubectl config current-context
Now, get the cluster information.
kubectl cluster-infoThen check worker nodes.
kubectl get nodesNow, let's check namespaces. There are two versions of this command (long and short - easier to read or faster to type), but both produce the same results.
kubectl get namespaces

kubectl get ns
Obviously, Data Hub's objects will be in
datahub namespace. So, let's check what the application's ingress (entry point) is. Again, there is a possibility to use readable long form or faster short form of the command.Gotcha: You can change the namespace for all subsequent kubectl commands in that context with kubectl config set-context --current --namespace=datahub command.kubectl get ingresses --namespace=datahub
kubectl get ing -n datahubIt returned the address that Data Hub cluster exposed to the outside world. Let's check it out.
7. What is behind that Ingress address?
Let's open this address in the web browser.
It displays a security warning at first, because the server is using a self-signed certificate. But once this "threat" is accepted, the SAP Data Hub logon screen of your trial instance is displayed!
Any comments/feedback/suggestions?
I had to go through quite some amount of AWS and Kubernetes documentation to get these steps, which seem obvious now. Yet not everything from documentation was tested, so maybe there are other - faster or better - ways to achieve the same.
Eg. I haven't used
aws-iam-authenticator or aws sts assume-role, but maybe you have an idea how these or other commands can be used to improve this process. Please share in the comments. Thank you!One thing I tried is doing the same on a regular laptop, instead of a Cloud9 instance. And it worked, obviously starting from the step 2. Actually I got even more recent
aws CLI on my laptop using PIP.Happy datahubing,
-Vitaliy (aka @Sygyzmundovych)
- SAP Managed Tags:
- SAP Data Intelligence,
- Big Data,
- Cloud
Labels:
You must be a registered user to add a comment. If you've already registered, sign in. Otherwise, register and sign in.
Labels in this area
-
ABAP CDS Views - CDC (Change Data Capture)
2 -
AI
1 -
Analyze Workload Data
1 -
BTP
1 -
Business and IT Integration
2 -
Business application stu
1 -
Business Technology Platform
1 -
Business Trends
1,658 -
Business Trends
91 -
CAP
1 -
cf
1 -
Cloud Foundry
1 -
Confluent
1 -
Customer COE Basics and Fundamentals
1 -
Customer COE Latest and Greatest
3 -
Customer Data Browser app
1 -
Data Analysis Tool
1 -
data migration
1 -
data transfer
1 -
Datasphere
2 -
Event Information
1,400 -
Event Information
66 -
Expert
1 -
Expert Insights
177 -
Expert Insights
296 -
General
1 -
Google cloud
1 -
Google Next'24
1 -
Kafka
1 -
Life at SAP
780 -
Life at SAP
13 -
Migrate your Data App
1 -
MTA
1 -
Network Performance Analysis
1 -
NodeJS
1 -
PDF
1 -
POC
1 -
Product Updates
4,577 -
Product Updates
342 -
Replication Flow
1 -
RisewithSAP
1 -
SAP BTP
1 -
SAP BTP Cloud Foundry
1 -
SAP Cloud ALM
1 -
SAP Cloud Application Programming Model
1 -
SAP Datasphere
2 -
SAP S4HANA Cloud
1 -
SAP S4HANA Migration Cockpit
1 -
Technology Updates
6,873 -
Technology Updates
420 -
Workload Fluctuations
1
Related Content
- Connect to ABAP environment using RFC in Technology Q&A
- Easy way to automate and configure the setup of a BTP account and Cloud Foundry using Terraform. in Technology Blogs by Members
- Accelerate Business Process Development with SAP Build Process Automation Pre-Built Content in Technology Blogs by SAP
- ABAP Cloud Developer Trial 2022 Available Now in Technology Blogs by SAP
- Switch on gCTS (for existing packages) in Technology Blogs by SAP
Top kudoed authors
| User | Count |
|---|---|
| 36 | |
| 25 | |
| 17 | |
| 13 | |
| 8 | |
| 7 | |
| 7 | |
| 6 | |
| 6 | |
| 6 |