
- SAP Community
- Products and Technology
- Enterprise Resource Planning
- ERP Blogs by SAP
- Create a Z object in Migration Cockpit - User-Defi...
Enterprise Resource Planning Blogs by SAP
Get insights and updates about cloud ERP and RISE with SAP, SAP S/4HANA and SAP S/4HANA Cloud, and more enterprise management capabilities with SAP blog posts.
Turn on suggestions
Auto-suggest helps you quickly narrow down your search results by suggesting possible matches as you type.
Showing results for
former_member62
Explorer
Options
- Subscribe to RSS Feed
- Mark as New
- Mark as Read
- Bookmark
- Subscribe
- Printer Friendly Page
- Report Inappropriate Content
09-03-2019
8:49 AM
Guide for the creation of an Z object for Migration Cockpit
Here we are going to try to explain how to create a z object to try to cover all aspect in Migration Cockpit. We are going to explain witch aspects are required to create, the options that you have to create the object, different options and aspect about the data management.
We acquire this knowledge project after project and want to share this with the community
The main reason to create this blog its to have a step by step to use it as a simple guide.
To start you need to have a project or create a new one.
You can do this using the button " Create" from the LTMC Transaction.

The Next screen will show up:

Here you will set a name, the method of input, the mass transfer ID and Data retention time.
The main difference for the creation of an z object between Transfer Data from File and Transfer Data from Staging Tables is in the second option it will create a staging table for every structure that you declare. In File it will create an XML.
Once the project its created you will go to LTMOM
Inside the transaction you will select this option:

That option will display the next screen:

Here you have to select your project, give the object a name and a Description.
The description that you use here its the one that will be shown in the LTMC, and the name of the object its the one that you will see in the object list of LTMOM.
With all the information you will press "NEXT", and the next screen will appear

Here you need to complete the next information:
At this point if your project was empty, now you will be able to check it in LTMOM. Otherwise you can see your empty object in the list.
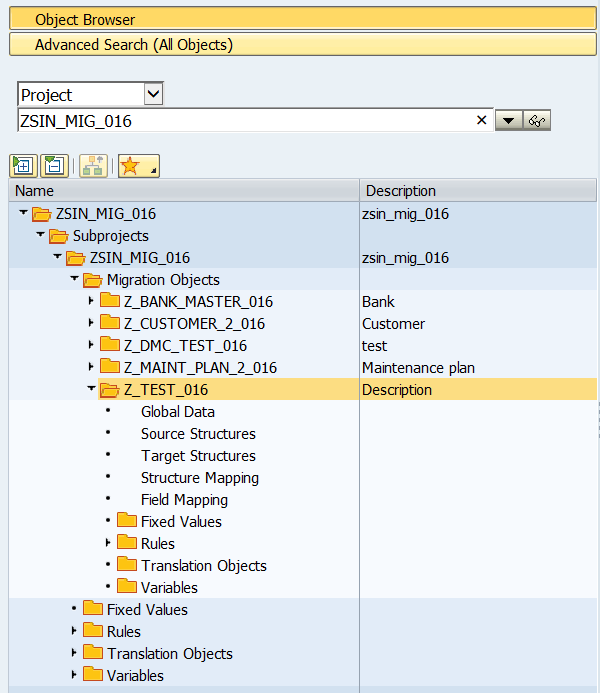
In you object you have 5 principal items that need to be filled up:
Different types of Rules:
a) Event Rules: This rules are used when an event like "start of loop", "start of record", "end of record", etc its trigger. This can help to initialization values, accumulate, etc
b) Field-Base Rules: This are abap code pieces that allowed to give a special treatment to the value.
c) Internal Rules:These are re-usable code modules which can shared across the other rules.This is triggered either with the field-based or event based rules
All of this rules can be global for all the project or local only for object:

The standard Rules available depends only in witch standard objects you have activate in your project.
With the rule there also Translation Objects, almost all standard rules have one.
This objects its just how its going to transform the values.

Here you can see the description and the parameters of the rule, then what its going to do if it have empty values. This will be execute in the Conversion Step.
How it going to handle the errors form the Source and the data conversion.
At first it going to be empty but after one it will be loaded with the data that was provide to the object. This its a very good point to see if there was some data error to correct.
Once you finish all the mapping you need to Generate the object. To do this you have 2 steps:
1) synchronize Structures:

*) If your object its from staging, this table will be created after the structure creation and when you synchronize. You can see it from S4 but not the content, to see the content it necessary to use HANA Studio.
2) Press the generate button . This will start Generating all the code required for the object. If it goes OK you will have in the bottom only green or yellow and green messages.

And the status of the object will change from to
to 
But if there is some errors, it will show like this:

In this case there's an error that need to be solved to generate the object. Once its solve the object will generate and it will be possible to execute.


After all you should be able to create an object to fulfill all requirements not cover in standard Migration Cockpit. Almost all function can be transform into a migration cockpit object even some transaction records, but have in mind that this will run in background.
If you have some issue creating a z object feel free to comment and i will try to respond as fast as i can.
Here we are going to try to explain how to create a z object to try to cover all aspect in Migration Cockpit. We are going to explain witch aspects are required to create, the options that you have to create the object, different options and aspect about the data management.
We acquire this knowledge project after project and want to share this with the community
The main reason to create this blog its to have a step by step to use it as a simple guide.
To start you need to have a project or create a new one.
You can do this using the button " Create" from the LTMC Transaction.
The Next screen will show up:
Here you will set a name, the method of input, the mass transfer ID and Data retention time.
The main difference for the creation of an z object between Transfer Data from File and Transfer Data from Staging Tables is in the second option it will create a staging table for every structure that you declare. In File it will create an XML.
Once the project its created you will go to LTMOM
Inside the transaction you will select this option:
That option will display the next screen:
Here you have to select your project, give the object a name and a Description.
The description that you use here its the one that will be shown in the LTMC, and the name of the object its the one that you will see in the object list of LTMOM.
With all the information you will press "NEXT", and the next screen will appear
Here you need to complete the next information:
- Name of Function Module, it can be standard or Z
- Process Instance, One or Multiple:
One, the system will only pass one instance at a time to the function module This means if N instances are read, the function module will be called N times.
Multiple, The system will pass all instances to the function module at once. This means that the function module is called only once. - Return Parameter(Optional), this should be a table with BAPIRET2 type that will store all the messages
- Include for Handling the result parameter(Optional), this will create an perform where you will be able to give some extra treatment to the messages
- Simulation Parameter(Optional), its the flag name that the object will know if its or not an test execution
- Value for Simulation(Optional), this is the value of the flag that will be used as a test flag
- Value for Writing Data(Optional), this is the value of the flag that will be used as a execute flag
At this point if your project was empty, now you will be able to check it in LTMOM. Otherwise you can see your empty object in the list.
In you object you have 5 principal items that need to be filled up:
- Global Data: create variables, constants, etc that can be used in the object
- Source Structure: create structures, that will be the ones to load the object.
To create an structure, in edit mode, right click over "Source Structures" and select "Append structure to lower level"

Then you need to give a name and a description, the description will be shown in the XML tab.
 This is the structure created
 You can only have one main Structure, but you can add as many as you need to fill your requirement.
To add a structure in a lower level, right click over the name of the structure and select "Append Structure to Lower Level". This will show the same dynpro that was shown before every time you need to create a new one.

Once you have you structure tree created, you need to fill the fields.
Its not necessary to create all the structures, you can create one, fill it and create the other This are the button available to fill the structure:
set foreignkey,add fields,remove fields,move,upload from field
 To start filling the structure, use the buttons to add. It will ask to complete some data:
a) Key Field(Flag), it will indicate if its the key from the structure. This will allow to match it with the other structures
b) Name, name of the field
c) Data Type, you can use all the standard types available. But as a trick try always to use "Char"
d) Length, amount of characters of the field
e) Amount Field(Flag), indicator of amount field
f) Column Header, Functional name of the field
g) Group Text, this will create a sub-type of the header. That will help the user to know for what is the field for.
*)You can use the button. You will need to create a excel with the same structure and upload it. This will create all the structure.
When its finish you will see your structure like this one:

Now you have to set witch field its required. Its not obligatory to have required fields. But it serves so that the most important information is always present.
To do that, right click over the structure you want to configure and select "Change View"

The next screen will be shown

Here you will set if the structure its required and witch of the fields its required.
To return to the Structure, right click over it and select "Change Structure"

With all of this you have the structure configure.
This is the main structure, that's why its not available. This button its to create a relation between structures.
If you have a sub-structure it will be available and you will have to match it using the all or a part of the key fields of the superior structure.
Just go to the sub-structure and click on the button shown before.
This will allow you create a relation between that two structures. You can have as much relations between each other as you need:

On the left you have the fields of the sub-structure, then the type of the foreign key(Field -> relation field to field, Literal -> equal to a specific value, Literal[Upper-/Lowercase] -> equal to a specific value case sensitive)
Then check table(witch of the superior structure will be related) and fields of check table or literal(which table of the check table will match, in this case we will use MATNR that is key in both structure)
Its not necessary to fill all the fields, but its the best to have as much as you can.
You will have to do this for all the structures you want to relational.
- Target Structures
Here you can modify almost all the parameters of the objects except the Function Module.

- Structure Mapping
In this item you will match the structures of the object to the structures of the Function Module
To do it just drag your source structure to the target strucure
 As shown in the image, ALWAYS match your main structure to the "Header"
Then you can match the structure as you need.

If you make double click, you can set how it will process.
 The main things to configure here its the access type, that can be:
a) Mapping Only, Direct Mapping
b) Loop At Table, to use this you need to have a superior structure as read table or mapping only. You can use default path or user defined path.
c) Read table, you have to set a user defined path. This its only to write the condition of the clause.Then you have to configure it is default path or user define path (Only for loop at table or read table)
a) Default Path, it will use as a clause build with the key field set in the "Source Structure" Step
b) User Defined Path, it will allow you yo create a custom clause.In Loop at table / read table to create the clause (Data Path) click this button on the right

- Field Mapping
 In this area you will match the source fields to the target fields.
It can be done in two ways:
a) Drag the source field to the target source, if it have a different length this message will appear:
 This message says, in this case, that the source field that we are using its bigger than the target, so if you press the
  it will note create the direct assignment although If you press enter it will do it but trimming the field to the target field lengthb) double click/ right click over the target field and select "Assign Rule"
 It will open the rule assignment screen but, if it doesn't have any rule assigned and it have a standard rule, you can select yes or no and use it.

If you press Yes, it will complete the name of the rule and it will request to fill the fields.

In the parameter Value box you will set the field of witch field will go into the rule and transform. In the case shown before, it will transform the SAKNR.
If you press No, you have 3 options.
a) Use the MOVE, its a direct assignment like the drag and drop. Its works at it was shown before.
b) Use the match-code(F4), and look for a rule that fulfill you requirement. When you select one it will complete everything and you only have to fill the import parameters. All the standard Rules are Global, this means that all objects can use it. You cand find it in the Project Level in the section Rules
c) Create a Rule
A rule its just a piece of ABAP code that allows you to have a custom transformation, to create a Rule, you need to enter a name and use the following button
This screen will show up:

Here you need to complete:
a) Description of the rule, just a description of what is it
b) Status, it can be: 0 New, 1 Tested, 2 Released, 3 Invalid. This helps if you are working in teams and develop rules to give the team some visibility if they can use or not that rule
c) Parameters, it can be many import parameter as needed but only one export parameter. the value in the export parameter it witch will be assigned to the target field that have the rule assigned.
d) Free code, in this section you can code the requirement.
To save the rule just press save on the top of the screen
Different types of Rules:
a) Event Rules: This rules are used when an event like "start of loop", "start of record", "end of record", etc its trigger. This can help to initialization values, accumulate, etc
b) Field-Base Rules: This are abap code pieces that allowed to give a special treatment to the value.
c) Internal Rules:These are re-usable code modules which can shared across the other rules.This is triggered either with the field-based or event based rules
All of this rules can be global for all the project or local only for object:
The standard Rules available depends only in witch standard objects you have activate in your project.
With the rule there also Translation Objects, almost all standard rules have one.
This objects its just how its going to transform the values.
Here you can see the description and the parameters of the rule, then what its going to do if it have empty values. This will be execute in the Conversion Step.
How it going to handle the errors form the Source and the data conversion.
At first it going to be empty but after one it will be loaded with the data that was provide to the object. This its a very good point to see if there was some data error to correct.
Once you finish all the mapping you need to Generate the object. To do this you have 2 steps:
1) synchronize Structures:
*) If your object its from staging, this table will be created after the structure creation and when you synchronize. You can see it from S4 but not the content, to see the content it necessary to use HANA Studio.
2) Press the generate button
. This will start Generating all the code required for the object. If it goes OK you will have in the bottom only green or yellow and green messages.And the status of the object will change from
But if there is some errors, it will show like this:
In this case there's an error that need to be solved to generate the object. Once its solve the object will generate and it will be possible to execute.
After all you should be able to create an object to fulfill all requirements not cover in standard Migration Cockpit. Almost all function can be transform into a migration cockpit object even some transaction records, but have in mind that this will run in background.
If you have some issue creating a z object feel free to comment and i will try to respond as fast as i can.
- SAP Managed Tags:
- SAP S/4HANA migration cockpit
Labels:
12 Comments
You must be a registered user to add a comment. If you've already registered, sign in. Otherwise, register and sign in.
Labels in this area
-
Artificial Intelligence (AI)
1 -
Business Trends
363 -
Business Trends
29 -
Customer COE Basics and Fundamentals
1 -
Digital Transformation with Cloud ERP (DT)
1 -
Event Information
461 -
Event Information
28 -
Expert Insights
114 -
Expert Insights
186 -
General
1 -
Governance and Organization
1 -
Introduction
1 -
Life at SAP
414 -
Life at SAP
2 -
Product Updates
4,679 -
Product Updates
267 -
Roadmap and Strategy
1 -
Technology Updates
1,499 -
Technology Updates
98
Related Content
- EHS Data Migration for SAP S/4hana on-premise in Enterprise Resource Planning Q&A
- LTMOM Migration Cockpit - how to filter on one table with two fields in key? in Enterprise Resource Planning Q&A
- Migration Cockpit Internal numbers mapping table in Enterprise Resource Planning Q&A
- How to mass upload Routing? in Enterprise Resource Planning Q&A
- Migration Cockpit for migrate from SAP TM Cloud extra stack in Enterprise Resource Planning Q&A
Top kudoed authors
| User | Count |
|---|---|
| 7 | |
| 6 | |
| 4 | |
| 4 | |
| 4 | |
| 3 | |
| 3 | |
| 3 | |
| 3 | |
| 3 |