
- SAP Community
- Products and Technology
- Enterprise Resource Planning
- ERP Blogs by SAP
- Example for a S/4HANA Cloud ES extension using In-...
Enterprise Resource Planning Blogs by SAP
Get insights and updates about cloud ERP and RISE with SAP, SAP S/4HANA and SAP S/4HANA Cloud, and more enterprise management capabilities with SAP blog posts.
Turn on suggestions
Auto-suggest helps you quickly narrow down your search results by suggesting possible matches as you type.
Showing results for
Advisor
Options
- Subscribe to RSS Feed
- Mark as New
- Mark as Read
- Bookmark
- Subscribe
- Printer Friendly Page
- Report Inappropriate Content
08-28-2019
11:48 PM
In a recent engagement a customer requested help with improving the workflow for Sales Orders for their S/4HANA Cloud Multi Tennant Edition (S4HC for the rest of this blog). The customer found some limitations with the S4HC inbuilt workflows and was looking for a more flexible option - something like the SCP Workflow Service provides. This was a great showcase for some of the extensibility options of S4HC and the SCP Workflow. I therefore decided to create a small PoC to illustrate the possibilities in this area.
The architecture I had in mind was the following

There are the following parts to setting up this functionality
So let's go through the steps one-by-one
S4HC provides configuration options to trigger internal or external approvals for the document categories Quotation and Standard Sales Order – unfortunately only these two categories are supported as of S4HC release 1905 – hopefully we will get some more options in the future! To configure these I went to the SSCUI for “Sales Document Approvals” in “Manage Your Solution” App.
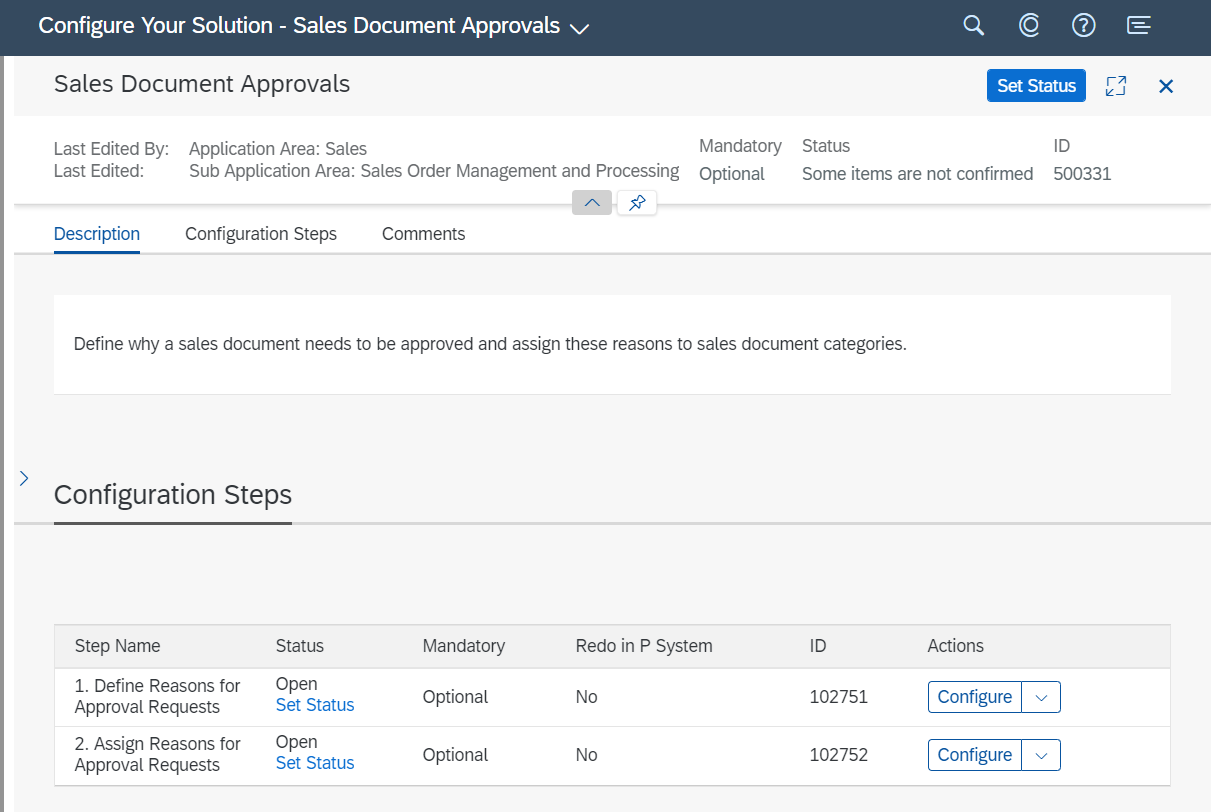
First step is to setup reasons for Approval Requests

I just required the External One but also created an internal one as well as I was on a roll...
Next I had to assign the Approval Request Reasons to the Document categories. I made the external Approval reason available for Standard Order (Category C) and also added the internal one (again, just for fun)

As you can see as of release 1905 the system offers the following impressive list of choices of document categories

That’s it for the Approval Configuration. To actually trigger the Approval / set the Approval Block I also had to implement the following BAdI in App “Custom Fields and Logic”

I put the following coding:
That will put each SO (Type OR) created or changed in approval status.
Quick test – I make a change to a sales order, save it and then try to go in change mode – system throws a hard error:

Checking the order in display mode I can see that the Approval Status is set with the Reason Text I had configured previously – so the configuration and BAdI work. That was the easy part, now I had to take care of the actual approval.

Fun fact: Initially I had hoped I can avoid using EMS by triggering the Workflow directly form the In-App extension (the “ABAP Light” in the S4HC BAdI supports HTTP calls after all via cl_ble_http_client). This worked great when changing a Sales Order, but when creating a Sales Order the Sales Order ID is not set in the input parameters of the BAdI when the BAdI is called. Ok, could have also gotten this little fact form the documentation before doing all the tedious coding – but who is reading documentation these days… At least I can put the coding in this Blog to show some nice example for Webservice Calls in S4HC In-App extensions (and it actually worked for changing SOs!). To make this coding work I also had to create two communication scenarios.
After finding out, that the In-App Webcall would not work I hit a lucky streak – a colleague working on another PoC had setup the EMS for Sales Orders – so I just had to add my a little parasitic Webhook to his EMS queue and go the rest for free. There are some good blogs / documentation on how to setup EMS, so I won’t go into detail here – e.g. check the online help
There are two ways us consume the EMS messages in SCP Cloud Foundry (CF) – you can create an Java app and link it to your EMS Instance (my colleague did this for his PoC and is seemed pretty cumbersome) or use a Webhook, which the EMS will call whenever a new message comes into the queue. I chose the latter. To use the Webhook I had to make sure the EMS Instance in SCP CF was created with the following JSON option – and luckily it was!
To create the Webhook I went to the EMS Instance, open the Dashboard and then navigate to Webhook subscriptions and click on “Create” – I used the following settings – there is a good online help on the webhooks

As explained in the help, the Webhook needs to make a successful Handshake call to the Webhook URL, before it becomes active. Basically, it calls the Webhook URL with an HTTP “OPTIONS” call (yes, there is such a thing) – and the Webhook Endpoint needs to reply with a response header WebHook-Allowed-Origin that match with the request header WebHook-Allowed-Origin or is “*”. I show in the next section how I did this in the node.js app. To trigger the handshake we use the little handshake icon, which will change the “Handshake Status” to Completed if the Webhook Endpoint is behaving as it should. From now on EMS sends a notification for each Queue entry to the Endpoint.

To use the EMS Webhook, I needed to create an endpoint to trigger the Workflow. I decided to create a node.js app for that purpose. I created an MTA project in the WebIDE with a single node.js module and deployed that to a Cloud Foundry tenant. Coding of the module below (it’s a PoC, so taking some shortcuts like hardcoding URLs, no error handling, etc..)
The above coding answers to the two types of requests coming from EMS:
If a request for a EMS queue entry comes in (which means a user created or changed a Sales Order in the S4HC System) the following things happen
I deployed this node.js App to my SCP CF Trail Account.
There are several good blogs out there, explaining the creation of Workflow. The Workflow Service comes with a very nice editor, where you can click together a Workflow in WebIDE. For the UIs to let the user approve items I had to create a separate SAPUI5 App. The Workflow will later embedded these UIs into the Workflow Inbox Standard App. I created the following simple flow with a 1 Level Approval in case of a Total Net Value <1000 and a 2 Level Approval otherwise.

The steps do the following:
A very simple logic to determine the two approves for the level 1 and level 2 approval based on the creator of the sales order. If we have no configuration for a specific creator, we use the default approvers. For this simple example we use the same approver for all approval levels (Imagine a very small company with one employee who likes to wear a lot of hats…). Once we find the approvers we add them to the Workflow context.
Instead of hard coding the rules for the approvers here, the Business Rules Service probably would be a good fit for a real implementation (or even a more sophisticated PoC).
Here I call a very simple FIORI UI, which represents the approval screen shown to the approver when they click on the approval request in their Inbox

The FIORI UI (separate app) contains this simple view
And the component.js, which contains the logic to deal with the Workflow Context. The workflow does not provide me the context automatically but I have to get it through a call to the Workflow API. I am using the destination bpmworkflowruntime, which gets created automatically when the Workflow Service gets enabled.
This results in the following UI Screen embedded in the standard “My Inbox” transaction (I know, pretty basic – but we are just doing a PoC):

Simple logic to determine, if we are good with one approval or whether we need a second approval because the total net value of the Sales Order is equal or bigger than 1000.
The Workflow execution will go down this path, if there is there is a next approver named in the Workflow context. (Which is the case if the Sales Order Total Net Value was >=1000)

This is the default Workflow Execution path for all other cases (meaning we only need one approval)

We call the same FIORI UI as in UserTask1 to get another approval for our “High Value” Sales Order – find details on the UI App above

If the Workflow Execution makes it to this step all approvals were given, and I need to finally Approve the Sales Order in S4HC via an API call. There is an extra API Endpoint in the Communication Scenario SAP_COM_0109 to release Sales Orders. The Sales Order ID is passed in the simple way via the URL parameter:

Voila – mission completed! I finished the setup of a S4HC-In-App-Extened-Enterprise-Messaging-Service-triggering-Webhook-with-Multi-Target-Application-Endpoint-executing-external-Worfklow-Approval Process (hope I did not forget any of the buzzwords here).
Hope you have fun building your own great S/4HANA Cloud SCP extensions.
The architecture I had in mind was the following
There are the following parts to setting up this functionality
- Setup S4HC to block every Sales Order for Approval (Configuration & In-App extension)
- Configure S4HC to trigger an Enterprise Messaging System (EMS) message in SCP
- Configure EMS in SCP with a Webhook
- Create Node.js Service with endpoints for EMS to trigger Workflow
- Create the Workflow
So let's go through the steps one-by-one
Configure S4HC to block every Sales Order for Approval (Configuration & In-App extension)
S4HC provides configuration options to trigger internal or external approvals for the document categories Quotation and Standard Sales Order – unfortunately only these two categories are supported as of S4HC release 1905 – hopefully we will get some more options in the future! To configure these I went to the SSCUI for “Sales Document Approvals” in “Manage Your Solution” App.
First step is to setup reasons for Approval Requests
I just required the External One but also created an internal one as well as I was on a roll...
Next I had to assign the Approval Request Reasons to the Document categories. I made the external Approval reason available for Standard Order (Category C) and also added the internal one (again, just for fun)
As you can see as of release 1905 the system offers the following impressive list of choices of document categories
That’s it for the Approval Configuration. To actually trigger the Approval / set the Approval Block I also had to implement the following BAdI in App “Custom Fields and Logic”
I put the following coding:
salesdocapprovalreason = 'ZEXT'.That will put each SO (Type OR) created or changed in approval status.
Quick test – I make a change to a sales order, save it and then try to go in change mode – system throws a hard error:
Checking the order in display mode I can see that the Approval Status is set with the Reason Text I had configured previously – so the configuration and BAdI work. That was the easy part, now I had to take care of the actual approval.
Fun fact: Initially I had hoped I can avoid using EMS by triggering the Workflow directly form the In-App extension (the “ABAP Light” in the S4HC BAdI supports HTTP calls after all via cl_ble_http_client). This worked great when changing a Sales Order, but when creating a Sales Order the Sales Order ID is not set in the input parameters of the BAdI when the BAdI is called. Ok, could have also gotten this little fact form the documentation before doing all the tedious coding – but who is reading documentation these days… At least I can put the coding in this Blog to show some nice example for Webservice Calls in S4HC In-App extensions (and it actually worked for changing SOs!). To make this coding work I also had to create two communication scenarios.
salesdocapprovalreason = 'ZEXT'.

* Exit added as Workflow triggered via via EMS. Just left sentimental purpose

Exit.


* Check if the outbound service is available

CHECK cl_ble_http_client=>is_service_available(

    communication_scenario = 'YY1_OAUTH_TOKEN'

    outbound_service       = 'YY1_OAUTH_REST'

) = abap_true.


* Create HTTP client to access the outbound service

DATA(lo_client0) = cl_ble_http_client=>create(

    communication_scenario = 'YY1_OAUTH_TOKEN'

    outbound_service       = 'YY1_OAUTH_REST'

).


CHECK cl_ble_http_client=>is_service_available(

    communication_scenario = 'YY1_WORKFLOW'

    outbound_service       = 'YY1_WORKFLOW_REST'

) = abap_true.


* Create HTTP client to access the outbound service

DATA(lo_client) = cl_ble_http_client=>create(

    communication_scenario = 'YY1_WORKFLOW'

    outbound_service       = 'YY1_WORKFLOW_REST'

).


DATA lv_request_body TYPE string.

Data lv_temp TYPE String.

lv_temp = salesdocument-totalnetamount.

CONCATENATE '{"definitionId": "workflowSO",  "context": {"SONr": "'  salesdocument-SALESDOCUMENT '","netval": "' lv_temp '","creator": "' salesdocument-createdbyuser '" }}' INTO lv_request_body.


* First we have to get the bearer token before we can make the actual request

DATA(request0) = cl_ble_http_request=>create( )->set_method( if_ble_http_request=>co_method-post )->set_body( lv_request_body ).

TRY.

DATA(response0) = lo_client0->send( request0 ).

DATA(lv_body1) = response0->get_body( ).

SPLIT lv_body1 AT '":"' INTO DATA(LV_NADA) DATA(LV_TAIL).

SPLIT LV_TAIL AT '","' INTO DATA(lv_bearer) DATA(LV_MORE_NADA).

CONCATENATE 'Bearer' lv_bearer INTO lv_bearer SEPARATED BY space.


* Creation of the service request

DATA(request) = cl_ble_http_request=>create(

* method that is used for the service call

)->set_method(

    if_ble_http_request=>co_method-post

)->set_body( lv_request_body

)->set_header_parameter(

EXPORTING

    name  = 'Content-Type'

    value = 'application/json'

    )->set_header_parameter(

EXPORTING

    name  = 'Authorization'

    value = lv_bearer

    )->set_header_parameter(

EXPORTING

    name  = 'Accept'

    value = '*/*'

    ).


* Send a request and receive a response.

    DATA(response) = lo_client->send( request ).


* Get the body of the response.

	DATA(lv_body) = response->get_body( ).
Configure S4HC to trigger an Enterprise Messaging System (EMS) message in SCP
After finding out, that the In-App Webcall would not work I hit a lucky streak – a colleague working on another PoC had setup the EMS for Sales Orders – so I just had to add my a little parasitic Webhook to his EMS queue and go the rest for free. There are some good blogs / documentation on how to setup EMS, so I won’t go into detail here – e.g. check the online help
Configure EMS in SCP with a Webhook
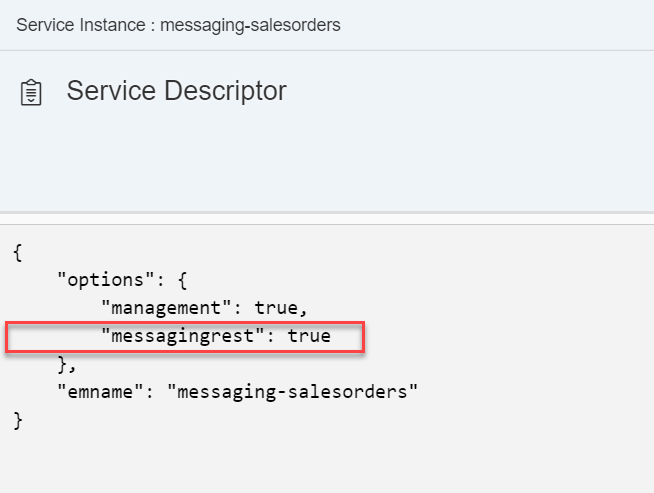
There are two ways us consume the EMS messages in SCP Cloud Foundry (CF) – you can create an Java app and link it to your EMS Instance (my colleague did this for his PoC and is seemed pretty cumbersome) or use a Webhook, which the EMS will call whenever a new message comes into the queue. I chose the latter. To use the Webhook I had to make sure the EMS Instance in SCP CF was created with the following JSON option – and luckily it was!
To create the Webhook I went to the EMS Instance, open the Dashboard and then navigate to Webhook subscriptions and click on “Create” – I used the following settings – there is a good online help on the webhooks
As explained in the help, the Webhook needs to make a successful Handshake call to the Webhook URL, before it becomes active. Basically, it calls the Webhook URL with an HTTP “OPTIONS” call (yes, there is such a thing) – and the Webhook Endpoint needs to reply with a response header WebHook-Allowed-Origin that match with the request header WebHook-Allowed-Origin or is “*”. I show in the next section how I did this in the node.js app. To trigger the handshake we use the little handshake icon, which will change the “Handshake Status” to Completed if the Webhook Endpoint is behaving as it should. From now on EMS sends a notification for each Queue entry to the Endpoint.
Configure EMS in SCP with a Webhook
To use the EMS Webhook, I needed to create an endpoint to trigger the Workflow. I decided to create a node.js app for that purpose. I created an MTA project in the WebIDE with a single node.js module and deployed that to a Cloud Foundry tenant. Coding of the module below (it’s a PoC, so taking some shortcuts like hardcoding URLs, no error handling, etc..)
/*eslint no-console: 0*/

"use strict";


var http = require("http");

var request = require("request");

var port = process.env.PORT || 3000;


http.createServer(function (req, res) {

	if (req.method === 'OPTIONS') {

//This is the branch taking care of the initial handshake

		console.log('OPTIONS request coming through…');

		var headers = {};

		headers["WebHook-Allowed-Origin"] = "*";

		res.writeHead(200, headers);

		res.end();

	} else {

		//EMS queue entry branch.. .

		res.writeHead(200, {

			"Content-Type": "text/plain"

		});

		let body = [];

		//rudimentary way to get the body of the EMS Webhook call containing the SO ID

		req.on('data', (chunk) => {

			body.push(chunk);

		}).on('end', () => {

			body = Buffer.concat(body).toString();

			console.log(body);

			//Getting more SO data, EMS only provides ID

			var auth = "Basic " + new Buffer('ZPH' + ":" + 'XXXX').toString("base64");

			var SONr = JSON.parse(body).data.KEY[0].SALESORDER;


			request({

					url: "https://my300187-api.s4hana.ondemand.com/sap/opu/odata/sap/API_SALES_ORDER_SRV/A_SalesOrder('" + SONr +

						"')?$format=json&saml2=disabled",

					headers: {

						"Authorization": auth

					}

				},

				function (error, response, body2) {

					console.log(body2);

					var value = JSON.parse(body2).d.TotalNetAmount;

					var created = JSON.parse(body2).d.CreatedByUser;

					//Compile JSON to trigger Workflow

					var wfdata = {

						"definitionId": "workflowSO",

						"context": {

							"SONr": SONr,

							"netval": value,

							"creator": created

						}

					};

					var auth2 = "Basic " + new Buffer('fd5cf1c8-5e1a-361d-b74c-1d08aaff5207' + ":" + 'XXXXXXX').toString("base64");

					//REST call to get assess token

					request({

							method: 'POST',

							url: "https://oauthasservices-i123456trial.hanatrial.ondemand.com:443/oauth2/api/v1/token?grant_type=client_credentials",

							form: JSON.stringify(wfdata),

							headers: {

								"Authorization": auth2

							}

						},

						function (error, response, body3) {

							console.log(body3);

							var token = JSON.parse(body3).access_token;

							//REST call to trigger Workflow

							request({

									method: 'POST',

									url: "https://bpmworkflowruntimewfs-i123456trial.hanatrial.ondemand.com:443/workflow-service/rest/v1/workflow-instances",

									headers: {

										"Authorization": "Bearer " + token,

										"Content-Type": "application/json"

									},

									json: wfdata

								},

								function (error, response, body3) {

									console.log(body3);

								}

							);


						}

					);


				}

			);


		});


		res.end("OK\n");

	}

}).listen(port);


console.log("Server listening on port %d", port);
The above coding answers to the two types of requests coming from EMS:
- OPTIONS requests for the initial handshake to setup the Webhook
- Notification requests triggered by queue entries
If a request for a EMS queue entry comes in (which means a user created or changed a Sales Order in the S4HC System) the following things happen
- Call to Sales Order API to get more information about the Sales Order – the EMS only provides the key (Sales Order ID) but for the workflow we want to show a bit more info – who will approve a Sales Order if he just sees and ID after all. In our case for the simple workflow I just use “creator” and “total net value” of the Sales Order. For this call to succeed I had to enable Communication Scenario SAP_COM_0109 in the S4HC system.
- Call to the OAuth Service to get an authorization token
- Call to the endpoint for the Workflow (that endpoint get’s created, when you activate the workflow service)
I deployed this node.js App to my SCP CF Trail Account.
Create the Workflow
There are several good blogs out there, explaining the creation of Workflow. The Workflow Service comes with a very nice editor, where you can click together a Workflow in WebIDE. For the UIs to let the user approve items I had to create a separate SAPUI5 App. The Workflow will later embedded these UIs into the Workflow Inbox Standard App. I created the following simple flow with a 1 Level Approval in case of a Total Net Value <1000 and a 2 Level Approval otherwise.
The steps do the following:
ScripTask1:
A very simple logic to determine the two approves for the level 1 and level 2 approval based on the creator of the sales order. If we have no configuration for a specific creator, we use the default approvers. For this simple example we use the same approver for all approval levels (Imagine a very small company with one employee who likes to wear a lot of hats…). Once we find the approvers we add them to the Workflow context.
Instead of hard coding the rules for the approvers here, the Business Rules Service probably would be a good fit for a real implementation (or even a more sophisticated PoC).
//Based on the creator we define the approvers for level 1 and level 2

var approvers = [{

		"creator": "CB9980002292",

		"approver": ["I123456", "I123456"]

	}];

//If we don’t have a configuration for an approver we use the default

var defaultapprover = ["I123456", "I123456"];


var result = null;


for (var i=0; i<approvers.length;i++)

{

	if (approvers[i].creator = $.context.creator) {result = approvers[i].approver;}

}


if (result == null ) { result = defaultapprover;}


$.context.approverarr = result;

$.context.nextapprover = result[0];
UserTask1:
Here I call a very simple FIORI UI, which represents the approval screen shown to the approver when they click on the approval request in their Inbox
The FIORI UI (separate app) contains this simple view
<mvc:View xmlns:mvc="sap.ui.core.mvc" xmlns="sap.m" controllerName="pkg1.WorkflowApp2.controller.View1" displayBlock="true">

	<Shell id="shell">

		<App id="app">

			<pages>

				<Page id="page" title="Debit Request Approval">

					<content>

					    <sap.ui.layout.form:SimpleForm xmlns:sap.ui.layout.form="sap.ui.layout.form" xmlns:sap.ui.core="sap.ui.core" editable="true" layout="ResponsiveGridLayout" id="form0">

					        <sap.ui.layout.form:content>

					            <sap.ui.core:Title text="Please Approve the creation of the following DR" id="title0"/>

					            <Label text="Net Value:" id="label0"/>

					            <Input width="100%" id="input0" value="{/netval}"/>

					            <Label text="Creator:" id="label1"/>

					            <Input width="100%" id="input2" value="{/creator}"/></sap.ui.layout.form:content>

					    </sap.ui.layout.form:SimpleForm>

					</content>

				</Page>

			</pages>

		</App>

	</Shell>

</mvc:View>
And the component.js, which contains the logic to deal with the Workflow Context. The workflow does not provide me the context automatically but I have to get it through a call to the Workflow API. I am using the destination bpmworkflowruntime, which gets created automatically when the Workflow Service gets enabled.
sap.ui.define([

	"sap/ui/core/UIComponent",

	"sap/ui/Device",

	"XXX/WorkflowApp2/model/models"

], function (UIComponent, Device, models) {

	"use strict";


	return UIComponent.extend("XXX.WorkflowApp2.Component", {


		metadata: {

			manifest: "json"

		},


		/**

		 * The component is initialized by UI5 automatically during the startup of the app and calls the init method once.

		 * @public

		 * @override

		 */

		init: function () {

			// call the base component's init function

			UIComponent.prototype.init.apply(this, arguments);


			// enable routing

			this.getRouter().initialize();


			// set the device model

			this.setModel(models.createDeviceModel(), "device");


			// get task data

var startupParameters = this.getComponentData().startupParameters;

var taskModel = startupParameters.taskModel;

var taskData = taskModel.getData();

var taskId = taskData.InstanceID;


// initialize model

var contextModel = new sap.ui.model.json.JSONModel("/bpmworkflowruntime/rest/v1/task-instances/" + taskId + "/context");

contextModel.setDefaultBindingMode(sap.ui.model.BindingMode.OneWay);

this.setModel(contextModel);


startupParameters.inboxAPI.addAction({

    action: "REJECT",

    label: "Reject"

}, function(button) {

    this._completeTask(taskId, false);

}, this);


startupParameters.inboxAPI.addAction({

    action: "APPROVE",

    label: "Approve"

}, function(button) {

    this._completeTask(taskId, true);

}, this);


		},


	_fetchToken: function() {

    var token;

    $.ajax({

        url: "/bpmworkflowruntime/rest/v1/xsrf-token",

        method: "GET",

        async: false,

        headers: {

            "X-CSRF-Token": "Fetch"

        },

        success: function(result, xhr, data) {

            token = data.getResponseHeader("X-CSRF-Token");

        }

    });

    return token;

},


_completeTask: function(taskId, approvalStatus) {

    var token = this._fetchToken();

    $.ajax({

        url: "/bpmworkflowruntime/rest/v1/task-instances/" + taskId,

        method: "PATCH",

        contentType: "application/json",

        async: false,

        data: "{\"status\": \"COMPLETED\", \"context\": {\"approved\":" + approvalStatus + "}}",

        headers: {

            "X-CSRF-Token": token

        }

    });

    if (approvalStatus === true) {sap.m.MessageToast.show("Task Approved!");} else {sap.m.MessageToast.show("Task Rejected!");}

    this._refreshTask(taskId);

},


_refreshTask: function(taskId) {

	this.getComponentData().startupParameters.inboxAPI.updateTask("NA",taskId);

}


	});

});
This results in the following UI Screen embedded in the standard “My Inbox” transaction (I know, pretty basic – but we are just doing a PoC):
ScriptTask2:
Simple logic to determine, if we are good with one approval or whether we need a second approval because the total net value of the Sales Order is equal or bigger than 1000.
if ($.context.netval <1000)

{

	$.context.nextapprover = ""}

else

{

	$.context.approverarr.shift();

	$.context.nextapprover = $.context.approverarr[0];

}
SequenceFlow8:
The Workflow execution will go down this path, if there is there is a next approver named in the Workflow context. (Which is the case if the Sales Order Total Net Value was >=1000)
SequenceFlow9:
This is the default Workflow Execution path for all other cases (meaning we only need one approval)
UserTask2:
We call the same FIORI UI as in UserTask1 to get another approval for our “High Value” Sales Order – find details on the UI App above
ServiceTaks1:
If the Workflow Execution makes it to this step all approvals were given, and I need to finally Approve the Sales Order in S4HC via an API call. There is an extra API Endpoint in the Communication Scenario SAP_COM_0109 to release Sales Orders. The Sales Order ID is passed in the simple way via the URL parameter:
Voila – mission completed! I finished the setup of a S4HC-In-App-Extened-Enterprise-Messaging-Service-triggering-Webhook-with-Multi-Target-Application-Endpoint-executing-external-Worfklow-Approval Process (hope I did not forget any of the buzzwords here).
Hope you have fun building your own great S/4HANA Cloud SCP extensions.
Labels:
6 Comments
You must be a registered user to add a comment. If you've already registered, sign in. Otherwise, register and sign in.
Labels in this area
-
Artificial Intelligence (AI)
1 -
Business Trends
363 -
Business Trends
21 -
Customer COE Basics and Fundamentals
1 -
Digital Transformation with Cloud ERP (DT)
1 -
Event Information
461 -
Event Information
24 -
Expert Insights
114 -
Expert Insights
152 -
General
1 -
Governance and Organization
1 -
Introduction
1 -
Life at SAP
415 -
Life at SAP
2 -
Product Updates
4,685 -
Product Updates
208 -
Roadmap and Strategy
1 -
Technology Updates
1,502 -
Technology Updates
88
Related Content
- Building Low Code Extensions with Key User Extensibility in SAP S/4HANA and SAP Build in Enterprise Resource Planning Blogs by SAP
- Environment, Health and Safety in SAP S/4HANA Cloud Public Edition 2402 in Enterprise Resource Planning Blogs by SAP
- Enhancements, evolutions, and enabled innovations across SAP’s Public Sector solution portfolio in Enterprise Resource Planning Blogs by SAP
- SAP Maintenance Assistant 2402 Now Available – What’s New? in Enterprise Resource Planning Blogs by SAP
- Sales in SAP S/4HANA Cloud Public Edition 2402 in Enterprise Resource Planning Blogs by SAP
Top kudoed authors
| User | Count |
|---|---|
| 8 | |
| 6 | |
| 5 | |
| 4 | |
| 4 | |
| 3 | |
| 3 | |
| 2 | |
| 2 | |
| 2 |