
- SAP Community
- Products and Technology
- Technology
- Technology Blogs by SAP
- Cloud Integration on CF - How to Setup Secure HTTP...
Technology Blogs by SAP
Learn how to extend and personalize SAP applications. Follow the SAP technology blog for insights into SAP BTP, ABAP, SAP Analytics Cloud, SAP HANA, and more.
Turn on suggestions
Auto-suggest helps you quickly narrow down your search results by suggesting possible matches as you type.
Showing results for
Advisor
Options
- Subscribe to RSS Feed
- Mark as New
- Mark as Read
- Bookmark
- Subscribe
- Printer Friendly Page
- Report Inappropriate Content
08-14-2019
1:00 PM
This blog describes how to setup secure inbound communication using client certificates when using SAP Cloud Integration in the Cloud Foundry environment. It describes the different configuration options available and gives a step by step description what needs to be configured where. Additional focus of the blog is using custom roles for inbound authorization.
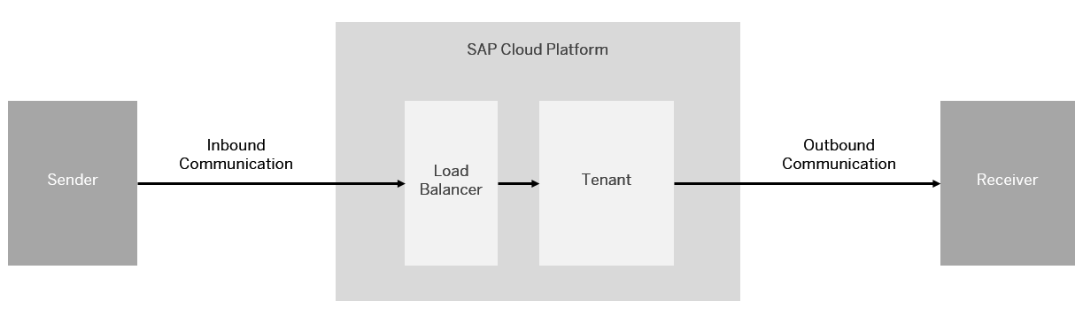
A typical task in an integration project is to connect remote systems to the SAP Cloud Integration Tenant. Before going into detailed configuration of the inbound communication let's first have a short look at the basics.
The remote system can act either as a sender or a receiver of messages. The setup and the detailed configuration procedure differ according to the communication direction that is being set up: whether a remote system is supposed to send a message to the integration platform or the other way around.
For more detailed information about the different authentication and authorization options refer to the SAP Cloud Integration Documentation, section ‘Connecting a Customer System to Cloud Integration’.
This blog focuses on inbound communication in the Cloud Foundry environment. Inbound communication in Neo environment is described in blog 'How to Setup Secure HTTP Inbound Connection with Client Certificates'. Outbound communication configuration for Neo and Cloud Foundry is described in blog ‘How to Setup Secure Outbound HTTP Connection using Keystore Monitor’.
For HTTPS based communication towards a Cloud Integration tenant no keystore needs to be maintained in the Integration tenant. Sender system and load balancer need to get the certificates and keys configured as described below. This setup can be used with basic authentication with user and password.
For client certificate-based authentication and authorization in the Cloud Integration tenant in Cloud Foundry the private key pair provisioned with the tenant (alias sap_cloudintegrationcertificate) needs to be available in the keystore and the client certificate used for the inbound call needs to be maintained in the service key. In case the deprecated option to configure the client certificate directly in the integration flow is used, the client certificate is required additionally in the service instance. This is different to the configuration in the Neo environment.
Add Root Certificate from Load Balancer
For secure inbound communication via HTTPS the sender system must trust the load balancer. Therefore the root certificate of the load balancer needs to be part of its trust store.
The easiest way to get the load balancer root certificate is to use the Connectivity Test on the Cloud Integration tenant. The Connectivity Test is available in the Operations View in Web, in section Manage Security. Selecting the Connectivity Tests tile from the Overview page opens the test tool offering tests for different protocols. To connect to a Cloud Integration tenant via the load balancer to get the root certificate select the TLS option. Enter the URL of your runtime node (the URL you want to call from your sender backend) in the Host field. The host name of the runtime node has the format: <tenant>.cfapps.<data center>.hana.ondemand.com. You can find this URL by selecting a tile under Manage Integration Content in the Operations view and selecting the integration flow which should be called.
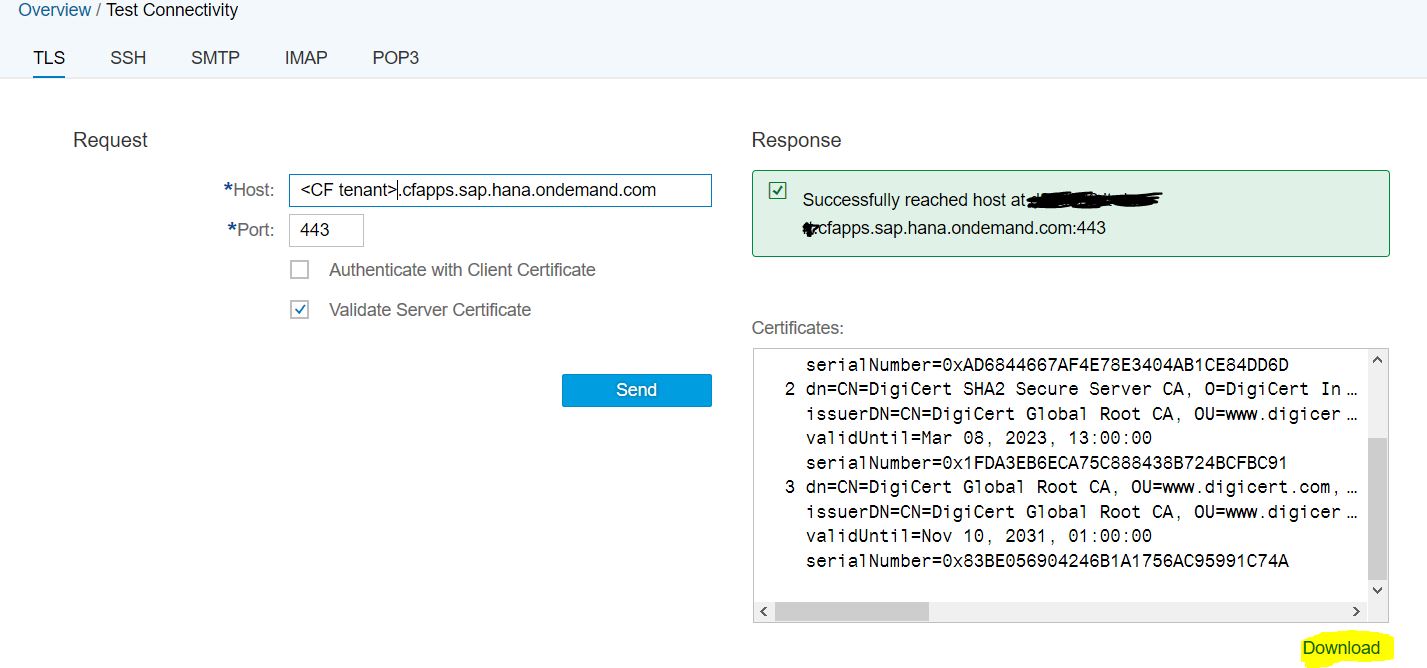
Execute the connectivity test. If there is in error you may have to uncheck the option 'Validate Server Certificate'. The response screen provides the list of certificates from the load balancer because the SSL/TLS connection is terminated by the load balancer. You can use the Download option to download the certificates. A certificates.zip file is created in your local download directory containing all the certificates. From the *zip file select the *.cer file of the root certificate and import this into the trust store of the sender system.
Create Client Certificate
Furthermore, if you want to use Client Certificate authentication, the sender system keystore needs to contain a key pair signed by one of the CAs supported by the load balancer.
Note, that only root certificates are being imported into the Keystore of the SAP Load Balancer. Therefore you as a customer must always assign the whole certificate chain to the certificate to enable the connected component to evaluate the chain of trust.
More information on the supported CAs: Load Balancer Root Certificates Supported by SAP.
Download the client certificate as PEM-encoded X.509 certificate, this is required later when the service key is created.
For secure inbound communication using client certificates, on the Cloud Integration tenant the provisioned private key pair with the alias sap_cloudintegrationcertificate is required in the keystore of the Cloud Integration tenant. Furthermore the client certificate needed for the client certificate-based authorization check needs to be configured. In general, there are two configuration options available:
Note: SAP does not recommend to use basic authentication because of security aspects, details can be found in documentation chapter 'Basic Authentication'.
The recommended configuration is to use User Role as authorization option in the integration flow sender channel and import the client certificates during service key creation.
First you need to decide if you want to use the SAP pre-delivered role ESBMessaging.send or use a user-defined role for calling the integration flow.
Use Role ESBMessaging.send
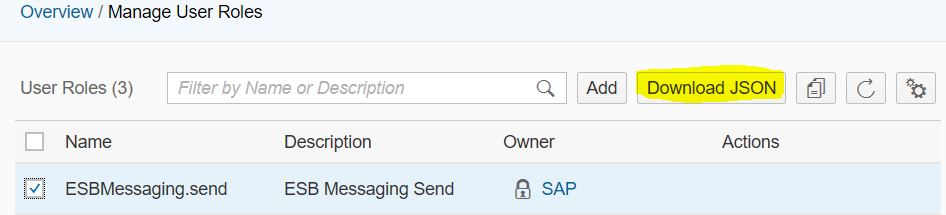
The easiest option for role-based authorization is to use the SAP pre-delivered role ESBMessaging.send. Differently to the Neo environment, where the user roles are configured in the cloud platform cockpit, in the Cloud Foundry environment a monitor exists in the Cloud Integration monitoring to maintain user roles. Open the User Role monitor in section Manage Security in the Monitoring section in the Cloud Integration tenant.
Select the pre-delivered role ESBMessaging.send and choose Download JSON.
The format of the downloaded JSON file looks like this:
You need this JSON snipped later in the creation of the service instance.
Use User-defined Role
If you want to secure the integration flow by a user-defined role you need to create a new role. In the Cloud Foundry environment a monitor exists in the Cloud Integration monitoring to maintain user roles. Open the User Role monitor in section Manage Security in the Monitoring section in the Cloud Integration tenant.
Create a new role by selecting the Add option.

In the creation dialog enter the role name and a description.

Select the newly created role and choose Download JSON.

The format of the downloaded JSON file looks like this:
You need this JSON snipped later in the creation of the service instance.
You configure the authorization option in the sender channel in the integration flow. For the adapters supporting client certificate-based authorization you find the Authorization configuration option in the Connection tab. If User Role is selected, an additional entry field for the role to be checked is shown.

The default role provided by SAP is ESBMessaging.send. This role can be used if no additional, integration flow-specific authorization checks are needed. In case only specific certificates/users shall be allowed to send messages to this integration flow you can enter your own role. See above how to create the custom user role in the User Roles monitor in the Cloud Integration monitoring page in section Manage Security.
Authorization
To configure and deploy Integrations flows in WebUI your user needs the role AuthGroup_IntegrationDeveloper.
As already stated, in the Cloud Foundry environment the SAP key pair provisioned on the tenant is required in the tenants keystore in order to use client certificate-based inbound authentication and authorization. Check in the Keystore monitor in section Manage Security that the key pair with alias sap_cloudintegrationcertificate is available and that the key is not expired.
Note that in Trial accounts no SAP key pair is provisioned. Because of this client certificate-based inbound authentication and authorization cannot be used. You can only use basic authentication.
In order to use client certificate-based inbound authentication, this authentication option has to be activated in the service instance in SAP Cloud Platform Cockpit. When creating the service instance to be used for client certificated-based authentication in the SAP Cloud Platform Cockpit, you need to specify client_credentials as grant type. Furthermore, specify the user role you defined in the integration flow in your sender channel.
The easiest way to configure this is to use the downloaded JSON snipped for the user role and extend it with the grant type client_credentials and the redirect-uris like shown here. Note that the grant type needs to be client_credentials even if you want to configure client certificates.
More details on creating service instances in Cloud Foundry can be found in the SAP online documentation at Creating Service Instance and Service Key for Inbound Authentication.
The client certificates that will be used to send messages to the integration flow, have to be configured in the service key in the SAP Cloud Platform Cockpit.
After the service instance is available, a service key for the instance needs to be created. In the Create Service Key dialog select the Form based key creation. To upload the external client certificate for the sender system select 'External Certificate' as Key Type, provide a Name and in the External Certificate field add the client certificate in the following PEM-encoded format:
Note that the client certificate is a PEM-encoded X.509 certificate.
Note that you can create multiple service keys for one service instance with different client certificates. But a client certificate can be assigned to one service instance only once.
More details on defining service keys in the Cloud Foundry environment can be found in the SAP online documentation at Creating Service Instance and Service Key for Inbound Authentication.
In future a view in the Cloud Integration monitoring section will make this configuration more user-friendly.
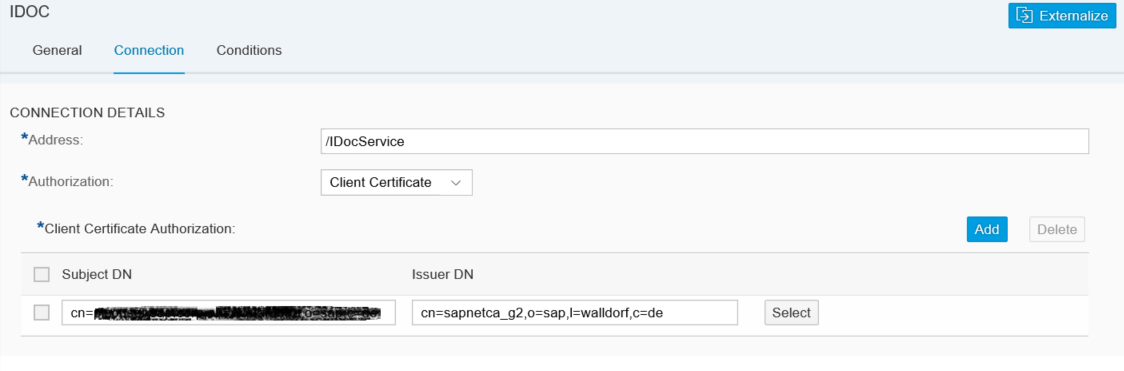
The second option is to configure the certificates for the authorization check directly in the integration flow. But this option is not recommended because changes to the certificate will always cause short downtimes as the integration flow needs to be restarted. Furthermore, in the Cloud Foundry environment the client certificate has to be added to the service key additionally.
In the sender channel in the integration flow authorization can be configured for the adapters supporting client certificate-based authorization. The Authorization configuration option is available in the Connection tab of the channel. If Client Certificate is selected a table is shown, where you can add the client certificates. Select Add to add a new row to the table. In the row you can open the upload dialog for a certificate. Via Upload from File System you can browse the certificate file and add it to the channel.
You can add several certificates to the integration flow sender channel. But be aware that each update in the integration flow needs a redeployment of the integration flow and so is always causing a short downtime. This means, also during certificate renewal of the client certificate you must redeploy the integration flow, causing a short downtime. Exactly because of this disadvantage SAP recommends to use the User Role Authorization option with user to certificate mapping.
Authorization
To configure Integrations flows your user needs the role AuthGroup_IntegrationDeveloper.
As already stated, in the Cloud Foundry environment the SAP key pair provisioned in the tenant is required in the keystore in order to use client certificate-based inbound authentication. Check in the Keystore monitor that it is available and that the key is not expired.
Note that in Trial accounts no SAP key pair is provisioned. Because of this client certificate-based inbound authentication cannot be used. You can only use basic authentication with clientid and clientsecret generated in the service key.
.
If you like to use client certificate-based inbound authentication, you have to activate this option in the service instance in SAP Cloud Platform Cockpit. When creating the service instance to be used for client certificated-based authentication in the SAP Cloud Platform Cockpit, you need to specify client_credentials as grant type.
Note that the grant type needs to be client_credentials even if you want to configure client certificates.
More details on creating service instances in Cloud Foundry can be found in the SAP online documentation at Creating Service Instance and Service Key for Inbound Authentication.
Configure the client certificate that will be used to send messages to the integration flow in the service key in the SAP Cloud Platform Cockpit.
After the service instance is available, a service key for the instance needs to be created. In the Create Service Key dialog select the Form based key creation. To upload the external client certificate for the sender system select 'External Certificate' as Key Type, provide a Name and in the External Certificate field add the client certificate in the following PEM-encoded format:
Note that the client certificate is a PEM-encoded X.509 certificate.
Note that you can create multiple service keys for one service instance with different client certificates. But a client certificate can be assigned to one service instance only once.
More details on defining service keys in the Cloud Foundry environment can be found in the SAP online documentation at Creating Service Instance and Service Key for Inbound Authentication.
How to setup OAuth client credential grant for API clients is described in Setup Inbound OAuth Client Credential Grant Authentication for API Clients.
Setup Secure HTTP Inbound Connection with Client Certificates and Custom Roles in Cloud Foundry
A typical task in an integration project is to connect remote systems to the SAP Cloud Integration Tenant. Before going into detailed configuration of the inbound communication let's first have a short look at the basics.
Basics of Secure System Configuration
The remote system can act either as a sender or a receiver of messages. The setup and the detailed configuration procedure differ according to the communication direction that is being set up: whether a remote system is supposed to send a message to the integration platform or the other way around.
For more detailed information about the different authentication and authorization options refer to the SAP Cloud Integration Documentation, section ‘Connecting a Customer System to Cloud Integration’.
This blog focuses on inbound communication in the Cloud Foundry environment. Inbound communication in Neo environment is described in blog 'How to Setup Secure HTTP Inbound Connection with Client Certificates'. Outbound communication configuration for Neo and Cloud Foundry is described in blog ‘How to Setup Secure Outbound HTTP Connection using Keystore Monitor’.
Secure Inbound Communication
For HTTPS based communication towards a Cloud Integration tenant no keystore needs to be maintained in the Integration tenant. Sender system and load balancer need to get the certificates and keys configured as described below. This setup can be used with basic authentication with user and password.
For client certificate-based authentication and authorization in the Cloud Integration tenant in Cloud Foundry the private key pair provisioned with the tenant (alias sap_cloudintegrationcertificate) needs to be available in the keystore and the client certificate used for the inbound call needs to be maintained in the service key. In case the deprecated option to configure the client certificate directly in the integration flow is used, the client certificate is required additionally in the service instance. This is different to the configuration in the Neo environment.
Configurations in Sender System
Add Root Certificate from Load Balancer
For secure inbound communication via HTTPS the sender system must trust the load balancer. Therefore the root certificate of the load balancer needs to be part of its trust store.
The easiest way to get the load balancer root certificate is to use the Connectivity Test on the Cloud Integration tenant. The Connectivity Test is available in the Operations View in Web, in section Manage Security. Selecting the Connectivity Tests tile from the Overview page opens the test tool offering tests for different protocols. To connect to a Cloud Integration tenant via the load balancer to get the root certificate select the TLS option. Enter the URL of your runtime node (the URL you want to call from your sender backend) in the Host field. The host name of the runtime node has the format: <tenant>.cfapps.<data center>.hana.ondemand.com. You can find this URL by selecting a tile under Manage Integration Content in the Operations view and selecting the integration flow which should be called.
Execute the connectivity test. If there is in error you may have to uncheck the option 'Validate Server Certificate'. The response screen provides the list of certificates from the load balancer because the SSL/TLS connection is terminated by the load balancer. You can use the Download option to download the certificates. A certificates.zip file is created in your local download directory containing all the certificates. From the *zip file select the *.cer file of the root certificate and import this into the trust store of the sender system.
Create Client Certificate
Furthermore, if you want to use Client Certificate authentication, the sender system keystore needs to contain a key pair signed by one of the CAs supported by the load balancer.
Note, that only root certificates are being imported into the Keystore of the SAP Load Balancer. Therefore you as a customer must always assign the whole certificate chain to the certificate to enable the connected component to evaluate the chain of trust.
More information on the supported CAs: Load Balancer Root Certificates Supported by SAP.
Download the client certificate as PEM-encoded X.509 certificate, this is required later when the service key is created.
Configurations on Cloud Integration Tenant in CF
For secure inbound communication using client certificates, on the Cloud Integration tenant the provisioned private key pair with the alias sap_cloudintegrationcertificate is required in the keystore of the Cloud Integration tenant. Furthermore the client certificate needed for the client certificate-based authorization check needs to be configured. In general, there are two configuration options available:
- Role based authorization
- Maintaining certificates directly in the integration flow (not recommended)
Note: SAP does not recommend to use basic authentication because of security aspects, details can be found in documentation chapter 'Basic Authentication'.
1. Option: Role-Based Authorization
The recommended configuration is to use User Role as authorization option in the integration flow sender channel and import the client certificates during service key creation.
Get JSON File for Role in the User Role Monitor
First you need to decide if you want to use the SAP pre-delivered role ESBMessaging.send or use a user-defined role for calling the integration flow.
Use Role ESBMessaging.send
The easiest option for role-based authorization is to use the SAP pre-delivered role ESBMessaging.send. Differently to the Neo environment, where the user roles are configured in the cloud platform cockpit, in the Cloud Foundry environment a monitor exists in the Cloud Integration monitoring to maintain user roles. Open the User Role monitor in section Manage Security in the Monitoring section in the Cloud Integration tenant.
Select the pre-delivered role ESBMessaging.send and choose Download JSON.
The format of the downloaded JSON file looks like this:
{"roles":["ESBMessaging.send"]}You need this JSON snipped later in the creation of the service instance.
Use User-defined Role
If you want to secure the integration flow by a user-defined role you need to create a new role. In the Cloud Foundry environment a monitor exists in the Cloud Integration monitoring to maintain user roles. Open the User Role monitor in section Manage Security in the Monitoring section in the Cloud Integration tenant.
Create a new role by selecting the Add option.
In the creation dialog enter the role name and a description.
Select the newly created role and choose Download JSON.
The format of the downloaded JSON file looks like this:
{"roles":["Role1"]}You need this JSON snipped later in the creation of the service instance.
Configure Sender Channel
You configure the authorization option in the sender channel in the integration flow. For the adapters supporting client certificate-based authorization you find the Authorization configuration option in the Connection tab. If User Role is selected, an additional entry field for the role to be checked is shown.
The default role provided by SAP is ESBMessaging.send. This role can be used if no additional, integration flow-specific authorization checks are needed. In case only specific certificates/users shall be allowed to send messages to this integration flow you can enter your own role. See above how to create the custom user role in the User Roles monitor in the Cloud Integration monitoring page in section Manage Security.
Authorization
To configure and deploy Integrations flows in WebUI your user needs the role AuthGroup_IntegrationDeveloper.
Check for Key Pair 'sap_cloudintegrationcertificate' in Keystore Monitor
As already stated, in the Cloud Foundry environment the SAP key pair provisioned on the tenant is required in the tenants keystore in order to use client certificate-based inbound authentication and authorization. Check in the Keystore monitor in section Manage Security that the key pair with alias sap_cloudintegrationcertificate is available and that the key is not expired.
Note that in Trial accounts no SAP key pair is provisioned. Because of this client certificate-based inbound authentication and authorization cannot be used. You can only use basic authentication.
Configure Client Certificate-Based Authentication and User Role in the Service Instance in SAP Cloud Platform Cockpit
In order to use client certificate-based inbound authentication, this authentication option has to be activated in the service instance in SAP Cloud Platform Cockpit. When creating the service instance to be used for client certificated-based authentication in the SAP Cloud Platform Cockpit, you need to specify client_credentials as grant type. Furthermore, specify the user role you defined in the integration flow in your sender channel.
The easiest way to configure this is to use the downloaded JSON snipped for the user role and extend it with the grant type client_credentials and the redirect-uris like shown here. Note that the grant type needs to be client_credentials even if you want to configure client certificates.
{

    "roles": ["ESBMessaging.send"],

    "grant-types":[ "client_credentials"],

    "redirect-uris":[],

}
More details on creating service instances in Cloud Foundry can be found in the SAP online documentation at Creating Service Instance and Service Key for Inbound Authentication.
Configure Client Certificate in the Service Key in SAP Cloud Platform Cockpit
The client certificates that will be used to send messages to the integration flow, have to be configured in the service key in the SAP Cloud Platform Cockpit.
After the service instance is available, a service key for the instance needs to be created. In the Create Service Key dialog select the Form based key creation. To upload the external client certificate for the sender system select 'External Certificate' as Key Type, provide a Name and in the External Certificate field add the client certificate in the following PEM-encoded format:
-----BEGIN CERTIFICATE-----MIIHyDCCBrCgAwIB[...]CAq8Tn7kSFDmVnrXe6v8hcQ==-----END CERTIFICATE-----Note that the client certificate is a PEM-encoded X.509 certificate.
Note that you can create multiple service keys for one service instance with different client certificates. But a client certificate can be assigned to one service instance only once.
More details on defining service keys in the Cloud Foundry environment can be found in the SAP online documentation at Creating Service Instance and Service Key for Inbound Authentication.
In future a view in the Cloud Integration monitoring section will make this configuration more user-friendly.
2. Option: Configure Certificates directly in Integration Flow
The second option is to configure the certificates for the authorization check directly in the integration flow. But this option is not recommended because changes to the certificate will always cause short downtimes as the integration flow needs to be restarted. Furthermore, in the Cloud Foundry environment the client certificate has to be added to the service key additionally.
Configure Sender Channel
In the sender channel in the integration flow authorization can be configured for the adapters supporting client certificate-based authorization. The Authorization configuration option is available in the Connection tab of the channel. If Client Certificate is selected a table is shown, where you can add the client certificates. Select Add to add a new row to the table. In the row you can open the upload dialog for a certificate. Via Upload from File System you can browse the certificate file and add it to the channel.
You can add several certificates to the integration flow sender channel. But be aware that each update in the integration flow needs a redeployment of the integration flow and so is always causing a short downtime. This means, also during certificate renewal of the client certificate you must redeploy the integration flow, causing a short downtime. Exactly because of this disadvantage SAP recommends to use the User Role Authorization option with user to certificate mapping.
Authorization
To configure Integrations flows your user needs the role AuthGroup_IntegrationDeveloper.
Check for Key Pair 'sap_cloudintegrationcertificate' in Keystore Monitor
As already stated, in the Cloud Foundry environment the SAP key pair provisioned in the tenant is required in the keystore in order to use client certificate-based inbound authentication. Check in the Keystore monitor that it is available and that the key is not expired.
Note that in Trial accounts no SAP key pair is provisioned. Because of this client certificate-based inbound authentication cannot be used. You can only use basic authentication with clientid and clientsecret generated in the service key.
.
Configure Client Certificate Based Authentication in the Service Instance in SAP Cloud Platform Cockpit
If you like to use client certificate-based inbound authentication, you have to activate this option in the service instance in SAP Cloud Platform Cockpit. When creating the service instance to be used for client certificated-based authentication in the SAP Cloud Platform Cockpit, you need to specify client_credentials as grant type.
Note that the grant type needs to be client_credentials even if you want to configure client certificates.
{

    "grant-types":[ "client_credentials"],

    "redirect-uris":[],

}
More details on creating service instances in Cloud Foundry can be found in the SAP online documentation at Creating Service Instance and Service Key for Inbound Authentication.
Configure Client Certificate in the Service Key in SAP Cloud Platform Cockpit
Configure the client certificate that will be used to send messages to the integration flow in the service key in the SAP Cloud Platform Cockpit.
After the service instance is available, a service key for the instance needs to be created. In the Create Service Key dialog select the Form based key creation. To upload the external client certificate for the sender system select 'External Certificate' as Key Type, provide a Name and in the External Certificate field add the client certificate in the following PEM-encoded format:
-----BEGIN CERTIFICATE-----MIIHyDCCBrCgAwIB[...]CAq8Tn7kSFDmVnrXe6v8hcQ==-----END CERTIFICATE-----Note that the client certificate is a PEM-encoded X.509 certificate.
Note that you can create multiple service keys for one service instance with different client certificates. But a client certificate can be assigned to one service instance only once.
More details on defining service keys in the Cloud Foundry environment can be found in the SAP online documentation at Creating Service Instance and Service Key for Inbound Authentication.
How to setup OAuth client credential grant for API clients is described in Setup Inbound OAuth Client Credential Grant Authentication for API Clients.
- SAP Managed Tags:
- SAP Integration Suite,
- Cloud Integration
Labels:
80 Comments
- « Previous
-
- 1
- 2
- Next »
You must be a registered user to add a comment. If you've already registered, sign in. Otherwise, register and sign in.
Labels in this area
-
ABAP CDS Views - CDC (Change Data Capture)
2 -
AI
1 -
Analyze Workload Data
1 -
BTP
1 -
Business and IT Integration
2 -
Business application stu
1 -
Business Technology Platform
1 -
Business Trends
1,658 -
Business Trends
91 -
CAP
1 -
cf
1 -
Cloud Foundry
1 -
Confluent
1 -
Customer COE Basics and Fundamentals
1 -
Customer COE Latest and Greatest
3 -
Customer Data Browser app
1 -
Data Analysis Tool
1 -
data migration
1 -
data transfer
1 -
Datasphere
2 -
Event Information
1,400 -
Event Information
66 -
Expert
1 -
Expert Insights
177 -
Expert Insights
296 -
General
1 -
Google cloud
1 -
Google Next'24
1 -
Kafka
1 -
Life at SAP
780 -
Life at SAP
13 -
Migrate your Data App
1 -
MTA
1 -
Network Performance Analysis
1 -
NodeJS
1 -
PDF
1 -
POC
1 -
Product Updates
4,577 -
Product Updates
342 -
Replication Flow
1 -
RisewithSAP
1 -
SAP BTP
1 -
SAP BTP Cloud Foundry
1 -
SAP Cloud ALM
1 -
SAP Cloud Application Programming Model
1 -
SAP Datasphere
2 -
SAP S4HANA Cloud
1 -
SAP S4HANA Migration Cockpit
1 -
Technology Updates
6,873 -
Technology Updates
420 -
Workload Fluctuations
1
Related Content
- Consuming SAP with SAP Build Apps - Mobile Apps for iOS and Android in Technology Blogs by SAP
- Exploring Integration Options in SAP Datasphere with the focus on using SAP extractors - Part II in Technology Blogs by SAP
- FAQ for C4C Certificate Renewal in Technology Blogs by SAP
- Mistral gagnant. Mistral AI and SAP Kyma serverless. in Technology Blogs by SAP
- 10+ ways to reshape your SAP landscape with SAP Business Technology Platform - Blog 5 in Technology Blogs by SAP
Top kudoed authors
| User | Count |
|---|---|
| 37 | |
| 25 | |
| 17 | |
| 13 | |
| 7 | |
| 7 | |
| 7 | |
| 6 | |
| 6 | |
| 6 |