
- SAP Community
- Products and Technology
- Technology
- Technology Blogs by SAP
- Quick Guide to Setup SAP Cloud Platform Process Vi...
Technology Blogs by SAP
Learn how to extend and personalize SAP applications. Follow the SAP technology blog for insights into SAP BTP, ABAP, SAP Analytics Cloud, SAP HANA, and more.
Turn on suggestions
Auto-suggest helps you quickly narrow down your search results by suggesting possible matches as you type.
Showing results for
Product and Topic Expert
Options
- Subscribe to RSS Feed
- Mark as New
- Mark as Read
- Bookmark
- Subscribe
- Printer Friendly Page
- Report Inappropriate Content
08-08-2019
7:41 AM
I am happy to introduce you to the brand new service of BPM family – SAP Cloud Platform Process Visibility. Read the latest announcement from tarunkamal.khiani
SAP Cloud Platform Process Visibility provides visibility into processes that run in the cloud, on-premise or in hybrid environments. Process Visibility works on events where SAP Cloud Platform Workflow or SAP or non-SAP Applications (cloud or on-premise) push events into process visibility. These events are persisted, correlated and enhanced to form end-to-end process instances with insights which are visualized by business users in their process workspace. The insights enable business users to identify process bottlenecks, track process performance, operational issues and act on them.
It is currently available in SAP Cloud Platform Cloud Foundry environment for AWS in Europe (Frankfurt) data centre. It will be available very soon in trial landscape.

In this blog, I will give you a quick overview on how to enable and setup this service in cloud foundry in 4 simple steps:
In cloud foundry environment, you typically create a service instance of the service and bind that instance to the application. Service instance is used for secure communications between the service and the application where the credentials are securely delivered to the application it is bound to. In later steps, we will create HTML application for process visibility and bind this service instance to the application configuration file.
Process visibility provides 5 roles:
All these 3 roles are provisioned via pvreuseservice - which is the process visibility application identifier or ID.
Process Visibility services comes with 4 pre-shipped applications:
These applications are available as tiles in Fiori Launchpad via Portal service. To use these process visibility application, you therefore need to do a one-time setup of multi-target application and configure Fiori Launchpad Modules.
It might be the case that you already have FLP Portal Site and want to integrate Process Visibility tiles in the existing portal, then you need to pick and choose the steps below. You can use the same app-router and FLP module with additional configurations as mentioned below.
This completes the mta.yaml file configuration. Do not forget to save the file.
5. Build and Deploy the application
This completes the setup of process visibility in your cloud foundry account.
Related Links
SAP Cloud Platform Process Visibility provides visibility into processes that run in the cloud, on-premise or in hybrid environments. Process Visibility works on events where SAP Cloud Platform Workflow or SAP or non-SAP Applications (cloud or on-premise) push events into process visibility. These events are persisted, correlated and enhanced to form end-to-end process instances with insights which are visualized by business users in their process workspace. The insights enable business users to identify process bottlenecks, track process performance, operational issues and act on them.
It is currently available in SAP Cloud Platform Cloud Foundry environment for AWS in Europe (Frankfurt) data centre. It will be available very soon in trial landscape.
Prerequisite
- You must have a global account in cloud foundry
- You must have the sub-account & spaces created
- You must have SAP Cloud Platform WebIDE Full-Stack and Portal enabled
- WebIDE is needed for building and deploying FLP Modules for accessing the process visibility applications on Fiori Launchpad (FLP)
- Portal service is needed for FLP configurations
In this blog, I will give you a quick overview on how to enable and setup this service in cloud foundry in 4 simple steps:
- Setup Global account and Subaccount with Process Visibility Entitlements
- Create Process Visibility service instance
- Assign desired roles
- Configure FLP modules to access process visibility applications
Step1: Setup Global account and sub account with Process Visibility Entitlements
1. As first step towards enablement, you need to have a global account and then the sub account created inside it. You can create sub account in Cloud Foundry environment, for Amazon Web Services (AWS) in Europe (Frankfurt) data centre.
2. Next you need to ensure that you have enabled Cloud Foundry in your subaccount.

Note:
- soon we will be releasing in Cloud Foundry trial and Australia (Sydney) and US East (VA) data centres.
- If you are working with trial, then you do not need to setup global and subaccount. It will already be available for you.
3. Add following service plans or entitlements into your subaccount:
- Application Runtime
- Portal
- Process Visibility


Note: Application Runtime quota completely depends on individual requirements. Please do not consider the screenshot as recommendation.
4. Create the Space in the subaccount, if not already done.
Step 2: Create Process Visibility service instance
In cloud foundry environment, you typically create a service instance of the service and bind that instance to the application. Service instance is used for secure communications between the service and the application where the credentials are securely delivered to the application it is bound to. In later steps, we will create HTML application for process visibility and bind this service instance to the application configuration file.
1. Navigate into the Space and select Services --> Service Marketplace
2. Search for Process Visibility (note: you will not see this option if you have not entitled for this service as shown in previous steps)

3. Click to navigate into Process Visibility service and click on Instances --> New Instance to create new instance for this service.

4. In the New Instance popup, select standard plan. Keep clicking next and then enter instance-name of your choice and click Finish.

- It will take some time to create the instance.

- You will see a green Created status once the instance is created successfully

5. Create service key for the service instance. This will be needed if you want to call API of process visibility to push events from other source systems.

Step 3: Assign desired roles
Process visibility provides 5 roles:
- Admin: this role is to handle admin activities like deleting scenario, schedule processing, viewing events provisioned etc. Once the user has this role, he would be able to work with pre-shipped Monitoring and Event Acquisition applications.
- Developer: this role is to work with business scenario via Configure Scenario application to create and activate business scenarios. With this role, user can only model, modify and activate scenario. Once business scenario is active, he is not authorised to delete until he has Admin role also.
- EventSender: this role is needed for LoB application who wants to push events to process visibility via APIs
- Operator: this role is mainly for business users who want to access process workspace.
- TenantOperator: this role is over and above Admin role to delete and manage events using Event Acquisition application or via APIs.
All these 3 roles are provisioned via pvreuseservice - which is the process visibility application identifier or ID.
- Create a role collection from Security --> Role Collections in your sub account

2. Navigate into the role collection and click Add Role to add the needed roles to the role collection.
- You will notice !b<some-number> after the application ID – this is unique per data centre. It will be made available once you create the service instance of the process visibility service.
- All the roles are mutually exclusive, and you need to add the needed role depending upon what you want to do with the different pre-shipped applications.


3. Assign the role collection to your user
- Navigate into Security --> Trust Configuration and navigate into the user management system or identity provider service configured with the subaccount
- Enter email address, select Show Assignments and then then assign roles using Assign Role Collection

Step 4: Configure FLP modules to access process visibility applications
Process Visibility services comes with 4 pre-shipped applications:
- Configure Business Scenario – to model and manage business scenarios
- Monitor Scenario – to view the running business scenario and get their processing details
- Event Acquisition – to view the events correlated from different source systems
- Process Workspace for each scenario – to track & trace daily business operations and key business KPIs.
These applications are available as tiles in Fiori Launchpad via Portal service. To use these process visibility application, you therefore need to do a one-time setup of multi-target application and configure Fiori Launchpad Modules.
It might be the case that you already have FLP Portal Site and want to integrate Process Visibility tiles in the existing portal, then you need to pick and choose the steps below. You can use the same app-router and FLP module with additional configurations as mentioned below.
Setup and Configure Process Visibility AppRouter
- Open WebIDE Full-Stack in Neo environment
- Configure and save the Cloud Foundry environment from the Preferences
- Enter the API Endpoint (you will get that from subaccount overview page in the cockpit under Cloud Foundry section)
- Once you enter the endpoint, the available organisations will be loaded automatically. Select the desired Organisation (you will get organization from subaccount overview page in cockpit under the Cloud Foundry section)
- Once you select the organization, all the available spaces will be automatically loaded. Select the desired Space

3. Create an MTA Project in the workspace. While creating do not forget to check “Use HTML5 Application Repository”

- You will see the structure like this:

- You will see the structure like this:
Note: if you do not see it then click on the eye icon in the toolbar ()
4. Delete the *_ui_deployer

Update the application manifest file
- Open yaml file in code editor. From resources, delete the entire block under “name: processvisibilityapp_html5_repo_host” The yaml must look like the screenshot below

- Update the modules section with two more additions in “requires” tag
- Process Visibility Instance name
- Process Visibility UAA name
- Update the modules section with two more additions in “requires” tag
- Update resources section with the following text:
- name: processvisibility

type: org.cloudfoundry.existing-service
- Create a new xs-security.json file with following text. Ensure to change the “xsappname” based on your app-router name

{

  "xsappname": "processvisibilityapp",

  "tenant-mode": "dedicated",

  "description": "Security profile of called application",

  "scopes": [

    {

      "name": "uaa.user",

      "description": "UAA"

    }

  ],

  "role-templates": [

    {

      "name": "Token_Exchange",

      "description": "UAA",

      "scope-references": [

        "uaa.user"

      ]

    }

  ]

}
- Update the “resources” section again for UAA information

This completes the mta.yaml file configuration. Do not forget to save the file.
Update the application configuration file
- Open xs-app.json and paste the code
{

  "welcomeFile": "/cp.portal",

  "authenticationMethod": "route"

}
- Update package.json to update the build version so that it is compatible with the latest available CF build. If you do not do this – the build will fail
"engines": {

  "node": "^10.15.3"

}
Setup and Configure Fiori Launchpad
- If you do not have any FLP Site, then create a new SAP Fiori Launchpad Site Module

2. Open CommonDataModel.json in Launchpad Editor:
- Edit the Default Site name to name of your choice. In below example, I have kept it as Process Visibility
- Click on + button and add the following the tiles
note: The App Title when you create the row will take App ID. Just leave it like that. It will automatically rename it to the respective names when launched as tile in FLP.
| App Title | App ID | Intent Navigation |
| Configure Business Scenarios | sap.pv.configurescenarios | pv-configurescenarios |
| Monitor Scenarios | sap.pv.monitorscenarios | pv-monitorscenarios |
| Monitor Event Acquisition | sap.pv.eventacquisition | pv-eventacquisition |

- From the Code Editor for the same json, enter the following code for “viz” section
"viz": [

  {

    "id": "sap.pv.instances",

    "vizId": "pv-showInstances"

  }

]
5. Build and Deploy the application

Once the build is successful, you will see the MTAR under mta_archives folder of your application. This is the deployable artefact.


- Click on the MTAR and select Deploy to SAP Cloud Platform.
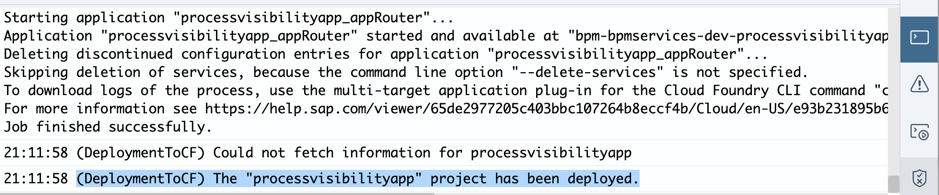
- In the popup, enter your CF API Endpoint, Organisation and Space and deploy the application and wait for the deployment to finish …
- Click on the MTAR and select Deploy to SAP Cloud Platform.
- Once the deployment finishes, you will see successful message

Access Process Visibility Applications
- In the cockpit you will see the app router application available and Started

- Go into the app router link and click to Application Routes link to open the FLP
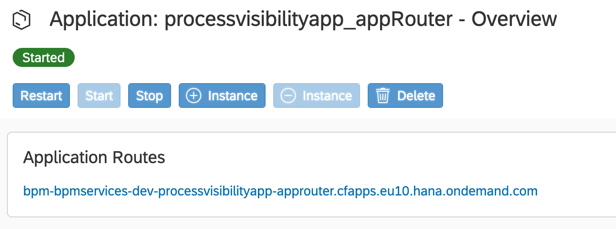
- You will see that application is already routed via /cp.portal as defined in the application configuration file.

This completes the setup of process visibility in your cloud foundry account.
Related Links
Labels:
3 Comments
You must be a registered user to add a comment. If you've already registered, sign in. Otherwise, register and sign in.
Labels in this area
-
ABAP CDS Views - CDC (Change Data Capture)
2 -
AI
1 -
Analyze Workload Data
1 -
BTP
1 -
Business and IT Integration
2 -
Business application stu
1 -
Business Technology Platform
1 -
Business Trends
1,661 -
Business Trends
85 -
CAP
1 -
cf
1 -
Cloud Foundry
1 -
Confluent
1 -
Customer COE Basics and Fundamentals
1 -
Customer COE Latest and Greatest
3 -
Customer Data Browser app
1 -
Data Analysis Tool
1 -
data migration
1 -
data transfer
1 -
Datasphere
2 -
Event Information
1,400 -
Event Information
64 -
Expert
1 -
Expert Insights
178 -
Expert Insights
267 -
General
1 -
Google cloud
1 -
Google Next'24
1 -
Kafka
1 -
Life at SAP
784 -
Life at SAP
10 -
Migrate your Data App
1 -
MTA
1 -
Network Performance Analysis
1 -
NodeJS
1 -
PDF
1 -
POC
1 -
Product Updates
4,579 -
Product Updates
315 -
Replication Flow
1 -
RisewithSAP
1 -
SAP BTP
1 -
SAP BTP Cloud Foundry
1 -
SAP Cloud ALM
1 -
SAP Cloud Application Programming Model
1 -
SAP Datasphere
2 -
SAP S4HANA Cloud
1 -
SAP S4HANA Migration Cockpit
1 -
Technology Updates
6,886 -
Technology Updates
388 -
Workload Fluctuations
1
Related Content
- CAP LLM Plugin – Empowering Developers for rapid Gen AI-CAP App Development in Technology Blogs by SAP
- Business Process Integration and Assimilation in a M&A and How to Accelerate Synergy Savings. in Technology Blogs by SAP
- Trustable AI thanks to - SAP AI Core & SAP HANA Cloud & SAP S/4HANA & Enterprise Blockchain 🚀 in Technology Blogs by Members
- Recap - SAP ALM at SAP Insider Las Vegas 2024 in Technology Blogs by SAP
- How to utilize the Trigger Workflow Action in SAP BPA Process Visibility in Technology Q&A
Top kudoed authors
| User | Count |
|---|---|
| 18 | |
| 15 | |
| 11 | |
| 10 | |
| 9 | |
| 9 | |
| 9 | |
| 9 | |
| 9 | |
| 8 |