
- SAP Community
- Products and Technology
- Product Lifecycle Management
- PLM Blogs by Members
- How to work with field conditions in SAP Portfolio...
Product Lifecycle Management Blogs by Members
Get insider knowledge about product lifecycle management software from SAP. Tap into insights and real-world experiences with community member blog posts.
Turn on suggestions
Auto-suggest helps you quickly narrow down your search results by suggesting possible matches as you type.
Showing results for
TudorRiscutia
Active Participant
Options
- Subscribe to RSS Feed
- Mark as New
- Mark as Read
- Bookmark
- Subscribe
- Printer Friendly Page
- Report Inappropriate Content
07-24-2019
3:47 PM
This month fellow community member vamsixk mentioned me in a blog about his encounters with SAP PPM and as it has been a while since I posted anything related to this topic, I decided to follow his lead and share something as well. And here it goes...
The following is a bottom-up approach to enhancing the Project Management application in SAP PPM with an additional field. More precisely, we will add an Airline ID (from SAP SCARR demo model) field in the Basic Data tab of the Project Definition as seen in the following screenshot:

With the condition that the new field is only visible and maintainable for certain project types.
Note: This example is built on SAP Portfolio and Project Management 6.1. I am not sure up to which previous version are these enhancement steps available.
We will want to persist the content of the new field in one of the standard DPR_* tables. In this example, we are focused on the Project Definition (table DPR_PROJECT), but the same mechanism is available for other object types (DPR_PHASE, DPR_TASK, etc.).
The DPR framework automatically takes care of persisting new fields if they are added in the customer include CI_DPR_PROJECT.

Note: Each DPR object table that can be enhanced this way, contains a corresponding CI_DPR_* structure.
Tip: Although the new fields can be added directly into CI_DPR_PROJECT, in my experience it is a good practice to group together attributes that belong to a certain enhancement into a structure and include the structure instead. This will make things much easier on the long run for maintenance and other developers to figure out which fields belong to which add-on.

Tip: Personally, I prefer creating data elements for each additional field in the ZDPR_TV_* namespace, even if they are already existing in the SAP system. This allows the maintenance of own labels and search helps as well as the change documents property (this is important in SAP PPM since the framework does this automatically). Sometimes it is necessary to create own domains as well in order to add own conversion routines.
2.1. Before we perform the actual customizing, we need to regenerate the mapping for the all the DPR_PROJECT customer fields. We can do this by executing report DPR_CUST_FLDS_IN_FC_MAP for the corresponding DDIC structure. In this example we are interested in structure DPR_TS_PROJECT_EXTENDED_ATTR:

2.2. Go to SAP Customizing Implementation Guide (Transaction code SPRO) and navigate to the following activity:
2.3. Select the corresponding Field Control profile:

As we are not allowed to make changes in the SAP namespace, we will usually use one of the Z* field control profiles.
2.4. Select the object category Project Definition (DPO):

2.5. We need to assign the new field to a field group:

Group ID G001 is a standard Group for changeable attributes of users with Admin authorization. This means the field will always be visible and changeable if you are marked as Admin in the Roles tab of the operative project.

2.6. Let’s define a new condition Z001 (Is airline project type?):

Tip: As we want our new condition to be reusable, we shouldn’t link it directly to the Airline ID field, but rather determine if the project type is airline-related.
2.7. Go to the Field Ctrl Acc. To Addit. Conditions (per Field) and create a new entry with the following parameters:

Condition (ID): Z001
External Structure: DPR_TS_API_PROJECT_O
External Attribute: ZZAIRLINE_ID
Condition Fulfilled: Changeable
Condition Not Fulfilled: Private
3.1. In order to implement the logic of our new condition, we need to define a new ABAP program with type INCLUDE. It is important that the name this object starts with Z_EVAL_CONDS_ followed by the condition number. In our example this will be Z_EVAL_CONDS_Z001.
Note: This is not very well documented, but with some debugging we get to class CL_DPR_FC_GENERATOR and find the following code extract:

The source code of the INCLUDE should look something like this:
The />EVAL_CI_<condition_id></ and />END</ will contain the logic of our evaluation. The available parameters can be found by examining one of the standard condition implementations (see next step).
Note: Make sure that none of the source code lines exceeds 72 characters. Otherwise, the generation of the condition will fail.
3.2. As a best practice, in order to avoid having to generate the conditions with every change, we can encapsulate the actual condition implementation in a separate class. For example:
Run report GENERATE_CUSTOM_FIELD_CONTROL and select the field control profile we used in the first part.

The code we wrote in the Z_EVAL_Z001 include should now be copied into a generated class /1CPR/CL_001_ZZ0SAP_DPO.
Note: Notice the name of the class. An implementation will be generated for each combination of field control profile and object type:

Note: For whatever reason, the people that developed this solution decided to exercise some over-engineering. As a result, this complex unsafe mechanism was born.
Nevertheless, the newly generate EVALUATE_CONDITION_Z001 method should contain the source code we wrote in the previous step:

Here we can also examine the available parameters (both in the method signature and in the class attributes).
5.1. Next, we need to create an enhancement for Web Dynpro component DPR_DET_DATA_PROJECT_O. This will allow us to change the VIEWDATA node defined in the component controller:

Here the newly added ZZ* field(s) should already be visible:

5.2. We need to create a post-exit for component controller method GET_UI_FIELDS:

This method is called for each view and determines the fields that are to be processed. In this example we are interested in Basic Data (BAS):
5.3. Navigate to the context tab of view VI_DET_BAS_DPO and update the mappings of node VIEWDATA:

The attribute ZZAIRLINE_ID should now be visible when expanding the node.
5.4. Go to the Layout tab and add the actual input field at the bottom of the view.
Select the ROOTUIELEMENTCONTAINER from the view layout and click on the Web Dynpro Code Wizzard button:

Select the Form layout template:

Make sure that InputField is selected as a standard cell editor and set the binding of field ZZAIRLINE_ID to enabled:

As a result, the new InputField and a corresponding Label have been added to the bottom of the view:

Note: Notice the long element IDs generated by Web Dynpro. Although they don’t cause any technical issue, it will make it easier for maintenance to rename them according to the PPM convention (keeping in mind we are performing an enhancement):

The correct properties of the InputField should have already been set by the wizard as seen below:

The properties of the Label must be manually maintained. Particularly the visible property:

Also, we might want to set the layout data property to MatrixHeadData:

Note: That's it for the UI. IMHO this is a very complicated and sometimes unnecessary mechanism, but it works and should be followed in order to have a single approach for field control.
You might have already noticed that behind this mechanism there are a lot of customizing tables and data to be loaded. If all this data would be loaded with every interaction, the application we would get into some serious performance troubles.
This is solved by using the ABAP shared memory. You can find more information about the shared memory here: https://blogs.sap.com/2015/02/19/how-to-use-shared-object-memory-and-sap-memory-to-share-the-objects...
Since all the field control data is already loaded, we need to delete the buffers and refresh the application.
6.1. Start the shared memory monitoring (transaction SHMM), select and delete all instances of area CL_DPR_FC_MAP_AREA:

Don’t worry, the data will be reloaded the first time you reopen the Project Management dashboard.
Going into the Project Management application we can now see that by changing the project type, the Airline Data section is visible or hidden according to our condition implementation.
If we change the project type from Consulting to Development, the Airline field should be now visible:

The next step will be to add a transient field Airline Name next to the Airline ID.
Introduction
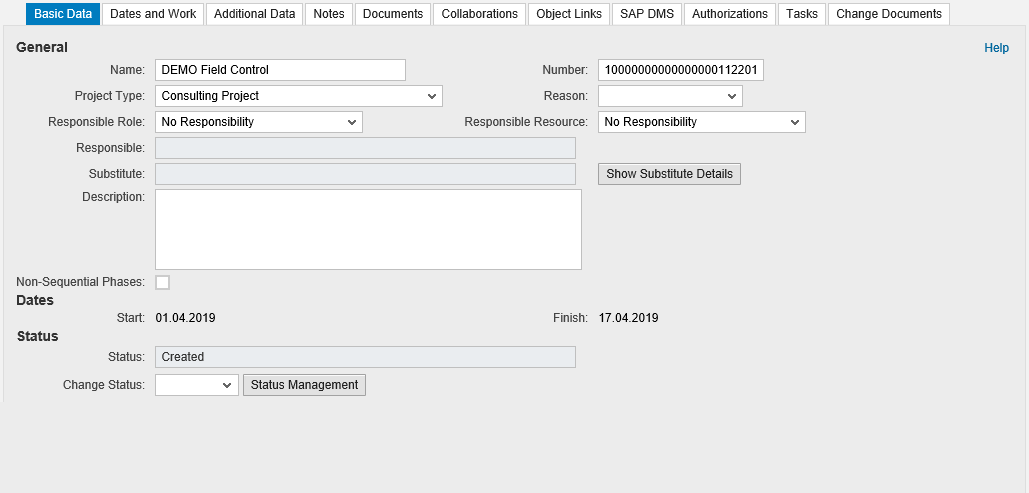
The following is a bottom-up approach to enhancing the Project Management application in SAP PPM with an additional field. More precisely, we will add an Airline ID (from SAP SCARR demo model) field in the Basic Data tab of the Project Definition as seen in the following screenshot:
With the condition that the new field is only visible and maintainable for certain project types.
Note: This example is built on SAP Portfolio and Project Management 6.1. I am not sure up to which previous version are these enhancement steps available.
1. Database
We will want to persist the content of the new field in one of the standard DPR_* tables. In this example, we are focused on the Project Definition (table DPR_PROJECT), but the same mechanism is available for other object types (DPR_PHASE, DPR_TASK, etc.).
The DPR framework automatically takes care of persisting new fields if they are added in the customer include CI_DPR_PROJECT.
Note: Each DPR object table that can be enhanced this way, contains a corresponding CI_DPR_* structure.
Tip: Although the new fields can be added directly into CI_DPR_PROJECT, in my experience it is a good practice to group together attributes that belong to a certain enhancement into a structure and include the structure instead. This will make things much easier on the long run for maintenance and other developers to figure out which fields belong to which add-on.
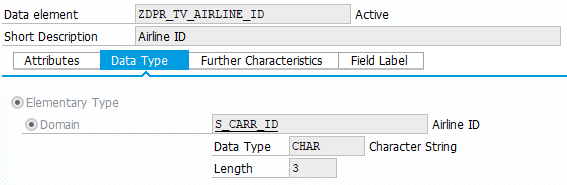
Tip: Personally, I prefer creating data elements for each additional field in the ZDPR_TV_* namespace, even if they are already existing in the SAP system. This allows the maintenance of own labels and search helps as well as the change documents property (this is important in SAP PPM since the framework does this automatically). Sometimes it is necessary to create own domains as well in order to add own conversion routines.
2. Customizing
2.1. Before we perform the actual customizing, we need to regenerate the mapping for the all the DPR_PROJECT customer fields. We can do this by executing report DPR_CUST_FLDS_IN_FC_MAP for the corresponding DDIC structure. In this example we are interested in structure DPR_TS_PROJECT_EXTENDED_ATTR:
2.2. Go to SAP Customizing Implementation Guide (Transaction code SPRO) and navigate to the following activity:
> SAP Portfolio and Project Management
> Project Management
> Global Enhancements to Project Elements
> Set Up Field Control
2.3. Select the corresponding Field Control profile:
As we are not allowed to make changes in the SAP namespace, we will usually use one of the Z* field control profiles.
2.4. Select the object category Project Definition (DPO):
2.5. We need to assign the new field to a field group:
Group ID G001 is a standard Group for changeable attributes of users with Admin authorization. This means the field will always be visible and changeable if you are marked as Admin in the Roles tab of the operative project.
2.6. Let’s define a new condition Z001 (Is airline project type?):
Tip: As we want our new condition to be reusable, we shouldn’t link it directly to the Airline ID field, but rather determine if the project type is airline-related.
2.7. Go to the Field Ctrl Acc. To Addit. Conditions (per Field) and create a new entry with the following parameters:
Condition (ID): Z001
External Structure: DPR_TS_API_PROJECT_O
External Attribute: ZZAIRLINE_ID
Condition Fulfilled: Changeable
Condition Not Fulfilled: Private
3. Implement the condition logic
3.1. In order to implement the logic of our new condition, we need to define a new ABAP program with type INCLUDE. It is important that the name this object starts with Z_EVAL_CONDS_ followed by the condition number. In our example this will be Z_EVAL_CONDS_Z001.
Note: This is not very well documented, but with some debugging we get to class CL_DPR_FC_GENERATOR and find the following code extract:
The source code of the INCLUDE should look something like this:
*&---------------------------------------------------------------------*

*& !!!!!!!!!!!!!!!!!!!!!!!!!DO NOT USE Pretty Printer !!!!!!!!!!!!!

*&---------------------------------------------------------------------*

/>EVAL_CI_Z001</


INSERT VALUE ts_condition_per_node(

  node_name       = iv_node_name

  node            = ir_object

  condition_id    = 'MV_Z001'

  condition_value = zcl_dpr_conditions=>evaluate_z001(

    ir_root_object ) ) INTO TABLE mt_conditions.


/>END</
The />EVAL_CI_<condition_id></ and />END</ will contain the logic of our evaluation. The available parameters can be found by examining one of the standard condition implementations (see next step).
Note: Make sure that none of the source code lines exceeds 72 characters. Otherwise, the generation of the condition will fail.
3.2. As a best practice, in order to avoid having to generate the conditions with every change, we can encapsulate the actual condition implementation in a separate class. For example:
CLASS zcl_dpr_conditions DEFINITION PUBLIC ABSTRACT FINAL CREATE PUBLIC.

  PUBLIC SECTION.

    CLASS-METHODS evaluate_z001

      IMPORTING

        ir_root_object            TYPE REF TO object

      RETURNING

        VALUE(rv_condition_value) TYPE boole_d.


ENDCLASS.


CLASS zcl_dpr_conditions IMPLEMENTATION.

  METHOD evaluate_z001.


    DATA: lo_project TYPE REF TO cl_dpr_project_o.


    lo_project ?= ir_root_object.


    IF lo_project->get_project_type( ) <> '000000000000001'.

      rv_condition_value = cl_dpr_co=>sc_true.

    ELSE.

      rv_condition_value = cl_dpr_co=>sc_false.

    ENDIF.


  ENDMETHOD.

ENDCLASS.
4. Generate condition evaluation class
Run report GENERATE_CUSTOM_FIELD_CONTROL and select the field control profile we used in the first part.
The code we wrote in the Z_EVAL_Z001 include should now be copied into a generated class /1CPR/CL_001_ZZ0SAP_DPO.
Note: Notice the name of the class. An implementation will be generated for each combination of field control profile and object type:
Note: For whatever reason, the people that developed this solution decided to exercise some over-engineering. As a result, this complex unsafe mechanism was born.
Nevertheless, the newly generate EVALUATE_CONDITION_Z001 method should contain the source code we wrote in the previous step:
Here we can also examine the available parameters (both in the method signature and in the class attributes).
5. Enhancing the User Interface
5.1. Next, we need to create an enhancement for Web Dynpro component DPR_DET_DATA_PROJECT_O. This will allow us to change the VIEWDATA node defined in the component controller:
Here the newly added ZZ* field(s) should already be visible:
5.2. We need to create a post-exit for component controller method GET_UI_FIELDS:
This method is called for each view and determines the fields that are to be processed. In this example we are interested in Basic Data (BAS):
 CASE iv_view.

    WHEN 'BAS'.

      APPEND 'ZZAIRLINE_ID' TO rt_fields.


 ENDCASE.
5.3. Navigate to the context tab of view VI_DET_BAS_DPO and update the mappings of node VIEWDATA:
The attribute ZZAIRLINE_ID should now be visible when expanding the node.
5.4. Go to the Layout tab and add the actual input field at the bottom of the view.
Select the ROOTUIELEMENTCONTAINER from the view layout and click on the Web Dynpro Code Wizzard button:
Select the Form layout template:
Make sure that InputField is selected as a standard cell editor and set the binding of field ZZAIRLINE_ID to enabled:
As a result, the new InputField and a corresponding Label have been added to the bottom of the view:
Note: Notice the long element IDs generated by Web Dynpro. Although they don’t cause any technical issue, it will make it easier for maintenance to rename them according to the PPM convention (keeping in mind we are performing an enhancement):
The correct properties of the InputField should have already been set by the wizard as seen below:
The properties of the Label must be manually maintained. Particularly the visible property:
Also, we might want to set the layout data property to MatrixHeadData:
Note: That's it for the UI. IMHO this is a very complicated and sometimes unnecessary mechanism, but it works and should be followed in order to have a single approach for field control.
6. Reloading the field control in the shared memory
You might have already noticed that behind this mechanism there are a lot of customizing tables and data to be loaded. If all this data would be loaded with every interaction, the application we would get into some serious performance troubles.
This is solved by using the ABAP shared memory. You can find more information about the shared memory here: https://blogs.sap.com/2015/02/19/how-to-use-shared-object-memory-and-sap-memory-to-share-the-objects...
Since all the field control data is already loaded, we need to delete the buffers and refresh the application.
6.1. Start the shared memory monitoring (transaction SHMM), select and delete all instances of area CL_DPR_FC_MAP_AREA:
Don’t worry, the data will be reloaded the first time you reopen the Project Management dashboard.
Conclusion
Going into the Project Management application we can now see that by changing the project type, the Airline Data section is visible or hidden according to our condition implementation.
If we change the project type from Consulting to Development, the Airline field should be now visible:
The next step will be to add a transient field Airline Name next to the Airline ID.
- SAP Managed Tags:
- SAP Commercial Project Management,
- SAP cProject Suite,
- SAP Portfolio and Project Management
2 Comments
You must be a registered user to add a comment. If you've already registered, sign in. Otherwise, register and sign in.
Labels in this area
-
Automation
1 -
Billing plan
1 -
Milestone
1 -
Monitoring
1 -
PFAS
1 -
SAP DM
1 -
SAP DMC
1 -
SAP Production Connector
1 -
SPC Control Charts
1
Related Content
- Quick Start guide for PLM system integration 3.0 Implementation in Product Lifecycle Management Blogs by SAP
- Striking the Perfect Balance in Product Lifecycle Management Blogs by SAP
- A Comprehensive Breakdown: The Pros and Cons of Product Lifecycle Management in Product Lifecycle Management Blogs by SAP
- Extending SAP Digital Manufacturing with Azure, Part II: Applying the reference architecture to a visual inspection scenario in Product Lifecycle Management Blogs by Members
- Extending SAP Digital Manufacturing with Azure, Part I: Reference architecture in Product Lifecycle Management Blogs by Members