
- SAP Community
- Products and Technology
- Technology
- Technology Blogs by Members
- How to Send Notifications from UI5 App over CPI Fl...
Technology Blogs by Members
Explore a vibrant mix of technical expertise, industry insights, and tech buzz in member blogs covering SAP products, technology, and events. Get in the mix!
Turn on suggestions
Auto-suggest helps you quickly narrow down your search results by suggesting possible matches as you type.
Showing results for
vvdries
Contributor
Options
- Subscribe to RSS Feed
- Mark as New
- Mark as Read
- Bookmark
- Subscribe
- Printer Friendly Page
- Report Inappropriate Content
07-21-2019
1:53 PM
Ping! 
What if you have a lot of users working in different departments and you need to notify them with custom messages? Knowing your departments and users are saved in a database and you still have to build your message and send it to them.
Then you search and use notification/message services, or you create a solution your own!
That's exact what we are going to do in this blog, we will build our own End-to-End Notification Flow.
This by developing a UI5 App to write our message content and send it to all users from a specific department. These departments and users are saved in a HANA MDC Database.
The notification content and selected department in the UI5 App will be send to a CPI-Flow endpoint. This flow will get all the users from the HANA DB and send a personal mail to all of them.
In this blog, I chose to send every employee an individual email. This way I can demonstrate the use of the Iteration Splitter. You might consider to send one email and place all the employees of a department into the 'to' of your email. But that's not what I will demonstrate today.
Here is a high-level architecture of the whole End-to-End scenario:

These steps will be taken throughout the whole flow:
Let us go over all the required technical steps, starting with the database which will be consumed by our UI5 app and CPI-flow. Next we will model our CPI-Flow and finish with the UI5 App.
Let's start!
In the SAP CP you create a HANA MDC Database and assign the required roles to the user you want to use.
To create a new database user and assign the correct roles and privileges you can refer to this detailed Wiki documentation by SAP Mentors.
Create Developer User and assign Roles and Privileges
An overview of all the files that will be created in our package called 'CpiNotificationApp':

1.1 The .xsaccess file
The application-access (.xsaccess) file allows you to specify whether to expose package content or not, which authentication method is used to grant access, and what content is visible.
In here we place the following JSON-Strucutre:
The exposed key is set to true so we can expose our content via OData.
The prevent_xsrf key is set to true to protect applications from cross-site request-forgery (XSRF) attacks.
For more information about this .xsaccess file you can refer to the following SAP Documentation:
https://help.sap.com/viewer/400066065a1b46cf91df0ab436404ddc/2.0.02/en-US/a9fc5c220d744180850996e2f5...
1.2 The .xsapp file
The application descriptor is the core file that you use to describe an application's framework within SAP HANA XS.
In this case we can leave it with an empty JSON-Object:
For more information about this .xsapp file you can refer to the following SAP Documentation:
https://help.sap.com/viewer/400066065a1b46cf91df0ab436404ddc/2.0.02/en-US/fac9ec6995a0426c840f85ae5a...
1.3 The .User.hdbdd file
In this database file we perform the following steps:
1.4 The .CpiNotification.xsodata file
The OData service definition is a configuration file you use to specify which data (for example, views or tables) is exposed as an OData collection for analysis and display by client applications.
For more information about this .xsodata file you can refer to the following SAP Documentation:
https://help.sap.com/viewer/b3d0daf2a98e49ada00bf31b7ca7a42e/2.0.00/en-US/d6b3fe1a380f45e6b8845744dd...
In this service definition we define the following logic:
1.5 Add data to the usergroup and user tables
First add the desired departments:

Next add the users in the user table and place in the userGroup field the id for which department you want them to work.

These are all fictive chosen names. If they would match real existing names it would be a coincidence.
Nice, we finished all the steps that need to be taken in the HANA Editor and Catalog.
1.6 Test the OData Service
You can test your OData service in the browser by pressing the green run button:

Next a new tab with your service will be opened. Here the usergroup and user collection are displayed.

The URLs to call your data via the OData Service:
Root url that will show all the Collections: https://devpYOURUSERNUMBERtrial.hanatrial.ondemand.com/CpiNotificationApp/CpiNotification.xsodata
Followed by one of the following urls:
The next step is to create a CPI-Flow that will be triggered by the UI5 App.
In this blog we will use a Gmail-account to send our mails to the users.
Therefor we will perform the following steps:
2.1 Add the username and password from you sending email address to the Security Material
In the Operations view select the Security Material tile under the Manage Security section:

Select 'Add' and choose User Credentials:

Fill in the required fields and password of course. Next press the 'deploy' button.
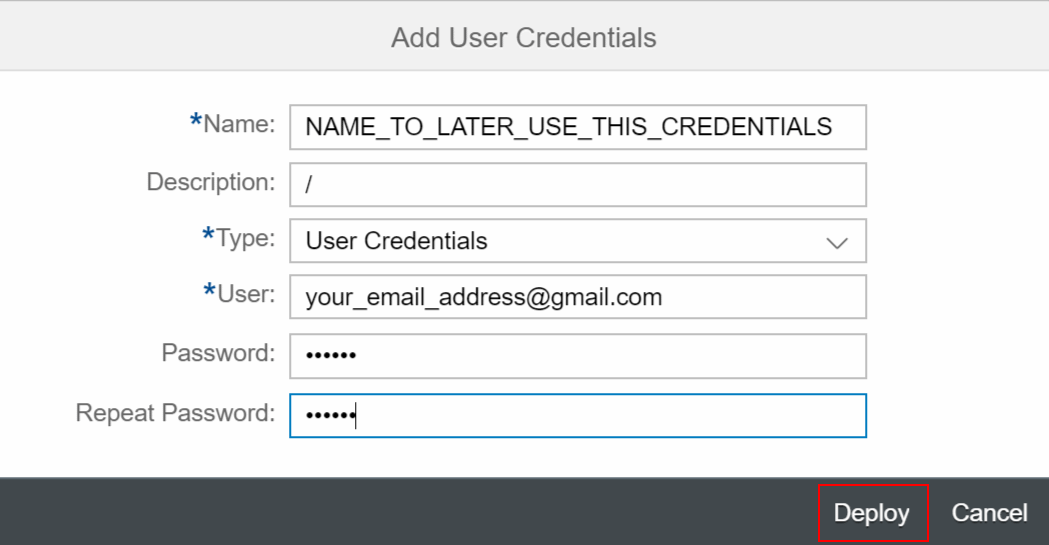
Confirm your deployed credentials are deployed. First it will display in the status that it is Stored. After refreshing the page it will display Deployed.

2.2 Retrieve the Gmail Certificates through the CPI Connectivity Test
BE SURE YOU ENABLED IMAP IN YOUR GMAIL ACCOUNT CONFIGURATION AND YOU ENABLED THIRD PARTY APPS TO USER YOUR GMAIL.
To use the Mail Adapter later in our CPI-Flow, we need to add the certificates to the key-store in our CPI environment.
This certificates can be retrieved by using the CPI Connectivity Test. Which is another tile under the Operations view.
In the Connectivity test, choose SMTP, and add the following values:
(when successful, download the certificates)

2.3 Add the Certificates to the CPI Key-store
Now we can add these certificates to the key-store. To do so, go to the operations overview and select the Key-store tile.
Now unzip the certificates from the zip-file.
Next choose Add > Certificate.

Provide an Alias for the certificate, select the certificate and deploy it.
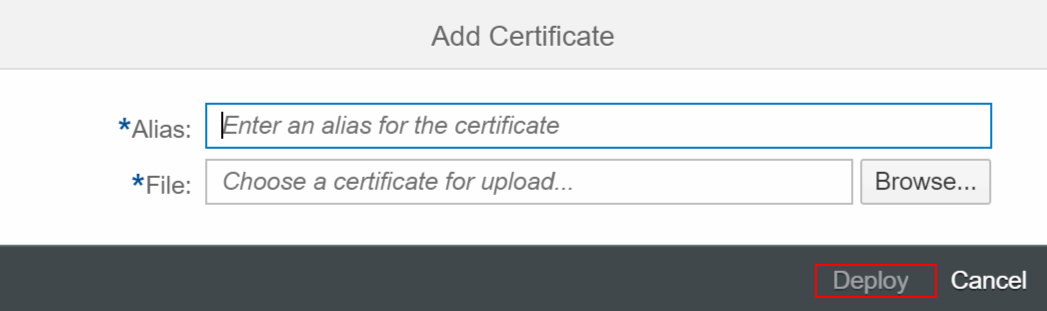
As last check if your certificate is deployed successfully.
2.4 Build the CPI-Flow
Create you Package and add an Artifact. In this case we choose an Integration-Flow.

We will build the following Integration-Flow:
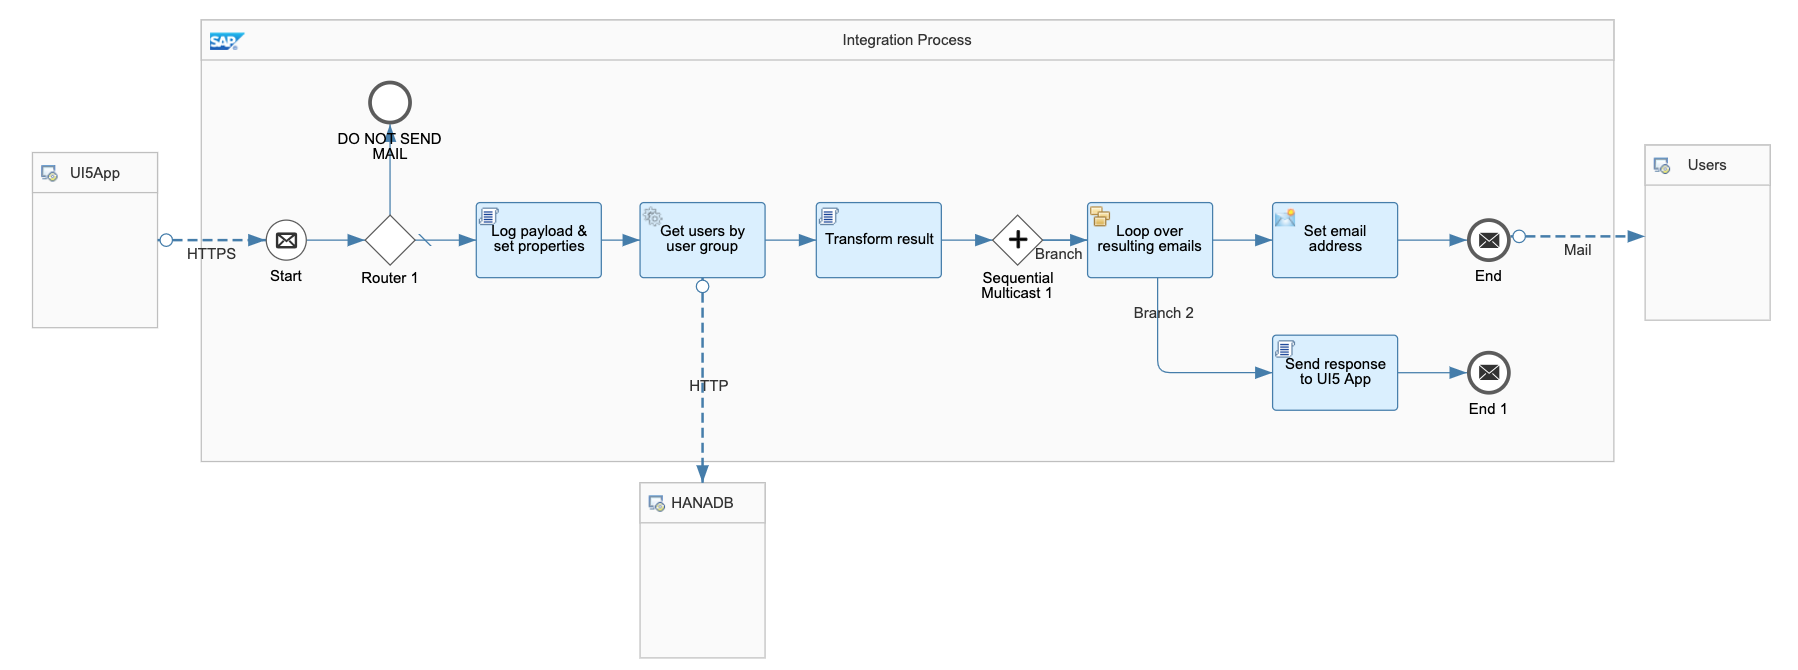
Let's go over all the steps in this flow:
2.4.1 HTTP Session Reuse
To set the HTTP Session Reuse, select outside the flow (with background) and go to the 'Runtime Configuration' tab.
Select the value: 'On Integration Flow' for the HTTP Session Reuse.
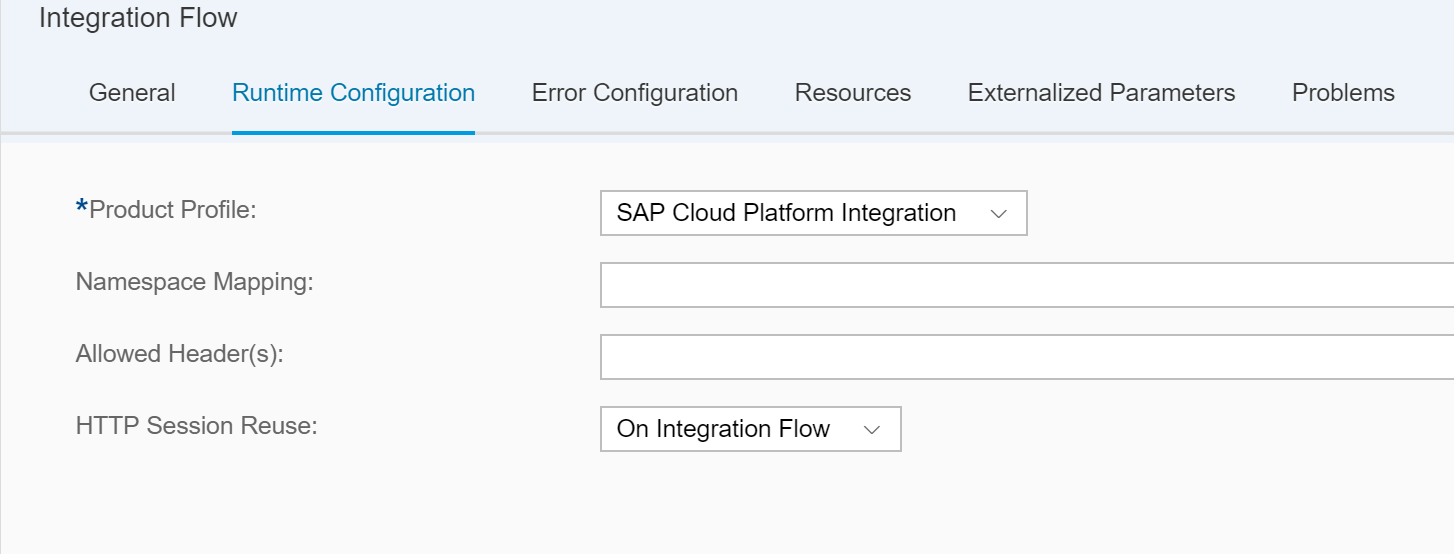
This will make sure that the session will be reused for all message exchanges for the Integration Flow. Only used for stateless services.
Stateless means there is no record of previous interactions and each interaction request has to be handled based entirely on information that comes with it.
2.4.2 Configure the Inbound HTTPS Connection
The inbound HTTPS Connection can be configured by drawing a connection line from the Sender to the start message. When selecting this connection select the Connection tab.

In here we perform the following 4 configurations:
When the start message control is hit we continue with a router. Here we decide based on conditions, if we want to continue the flow or drop and navigate to a dead end in the flow.
Because CSRF Protected is enabled we need to pass a X-CSRF-Token when we post something to the endpoint that triggers our flow. If we do not add the X-CSRF-Token with our POST call, we will receive a 403-Forbidden response code.
So the condition in this case is very easy. We drop everything thats is NOT a POST Request. This way we ensure that we only continue in our flow when it is a POST request. Since we enabled the CSRF Protect, it also checks if a token was passed when posting to the endpoint. So good to go!

The condition in the router:

So when not POST, we drop. This achieved by the following condition:
${header.CamelHttpMethod} != 'POST'
At this point we finished the X-CSRF Security steps.
For more information on how to protect your Integration Flow against Cross-Site Request Forgery (CSRF) attacks, you can refer to this amazing blog by vadim.klimov:
Inbound HTTPS with CSRF Protection in CPI Integration Flows
2.4.5 Log the Payload and Set Flow Properties
When we met our condition en are allowed to continue our flow, we use a Groovy-Script to log our payload and set some properties which we will use later on in our flow.

The script:
HANDY TOOL TO CREATE AND TEST GROOVY SCRIPTS:
Groovy Playground
2.4.6 Add your SAP HANA Username and Password to the Security Material in the CPI-Tenant
Like we did in step 2.1, we now add our SAP HANA username and password to the Security Material. This so we can later on call our OData Service.
2.4.7 Log the Payload and Set Flow Properties
After we logged our Payload and have set our properties for our flow, we will call all our users for the respective department. That was passed in our POST Call to the CPI-endpoint.
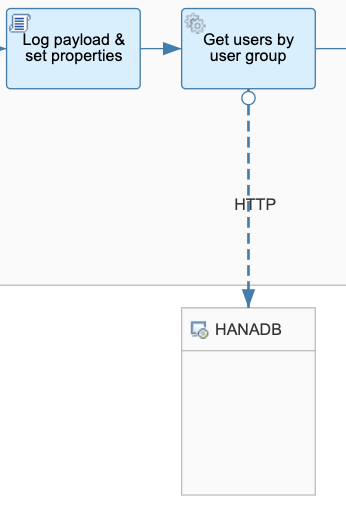
When you drew and select the HTTP-connection to the receiver you provide the following configuration:
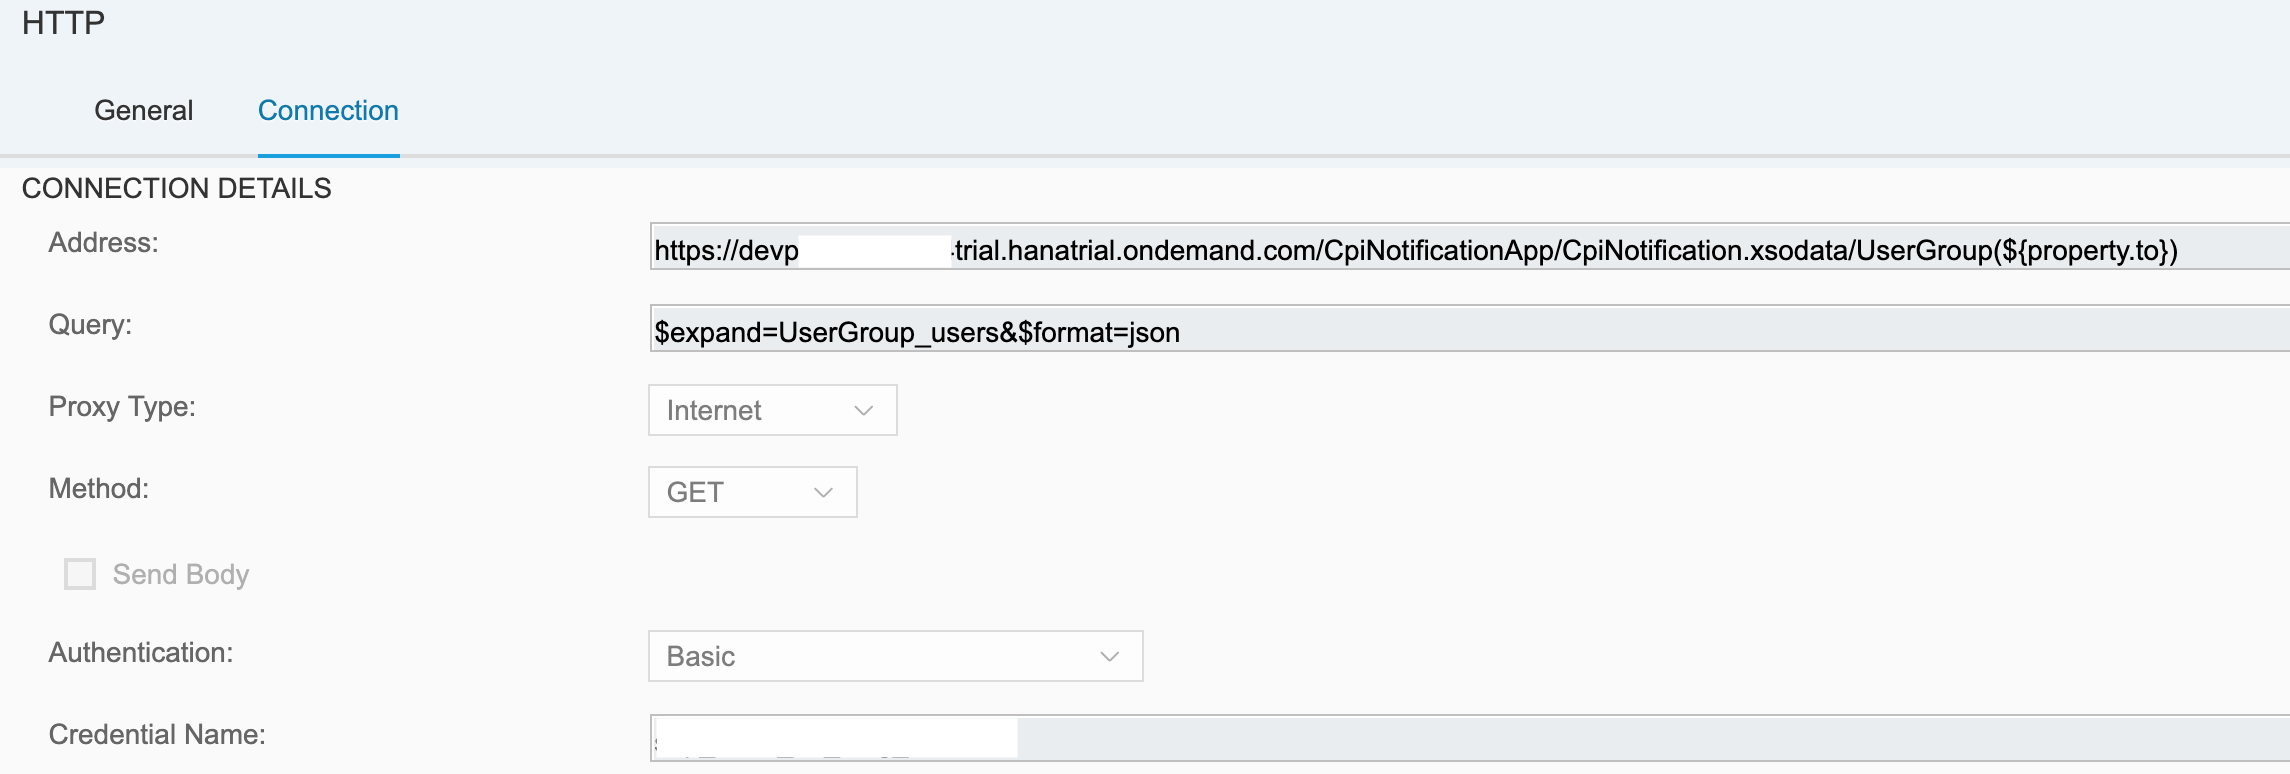
With this address and expand property we request all the users from the department provided by the UI5 App.
We pass the usergroup id in the address. We can call it with the variable ${property.to}.
We have set this variable in step 2.4.5 in our Groovy-Script.
As last Query parameter we pass the format JSON parameter. This is just because I like to work with JSON. This is not necessary. If you do not pass this parameter here you will have to make some adjustments yourself in the rest of the flow which is yet to come.
2.4.8 Transform the result from the OData Call
When our OData Call was successful we transform the result so we can continue with our desired result. This transformation takes place in a Groovy-Script:
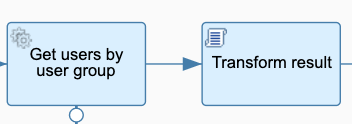
The Script:
2.4.9 Loop over the resulting emails of the users and send an email
After we transformed our result of the OData call and built our own XML result, we will loop over it.
But before we start looping we place a Sequential Multicast control, when we finished looping over the emails we can go the the second step of the multicast and send a custom response to the caller of the CPI-Endpoint.

Since we built our own xml result we choose for the Expression Type XPath and we provide the XPath Expression (Path) to all the users to loop over.
For every user, so every time we are in the loop, we perform the following:

We set the email-address of the user and we send an email.
The email-address and username is set in the Content Modifier under the tab Exchange Property:

We create a new name and emailAddress variable based on the value of the final XML we created our own. This by navigating into the XPath.
Then the last step is sending the email. Therefor we set our Mail Adapter with an outgoing request from the end message to the Receiver.
When selecting the arrow to the receiver, select Mail Adapter and provide the following values:
In the Credential Name, provide the name of the credential you created in step 2.1.

In the 'from' field you pass the email-address you want to send emails from. So obviously the email-address you provided in step 2.1.
The 'to' property and subject and body and name accessed the same way we did in step 2.4.7 to access our usergroup id.

2.4.10 Send a custom response message when finished looping over email-addresses
When we finished looping over all the users we want to notify, we set a custom message as response. This by setting the second branch in our Sequential Multicast. In here we create a Groovy-Script and set the response message:
The script:
Awesome we finished building our CPI-Flow!
Time to deploy it!
2.5 Deploy the CPI-Flow
You can deploy the integration flow by pressing the Deploy button.

Next go to the Operations view and select the All tile under the Manage Integration Content.
Here you will see the status of your flow and the endpoint on how to trigger your CPI-Flow.

2.6 Add the Role ESB-Messaging.send to your SAP CP User
Go to the SAP CP subaccount of your integration tenant and assign the role ESB-Messaging.send to your user. This can be done under the Security/Authorizations tab. Provide your user and assign the ESBMessaging.send Role to your user.

If you do not assign this role you will not be able to trigger the CPI-Flow by its endpoint!
Awesome our CPI-Flow is ready!
Time to build our UI5 App!
In our UI5 Application we want to use a Rich Text Editor to write the body for our notification. Together with a combobox that provides all the departments (from the HANA DB). Also we provide an input field to fill in the subject.
3.1 Destinations in the SAP CP
Before we start developing our application we will configure our 2 necessary destinations in the SAP CP.
These 2 destinations are:
3.1.1 SAP HANA OData Service Destination
To be able to use the data from our HANA DB in our UI5 app we need to configure the destination for this.
Values for the destination:

3.1.1 SAP Cloud Platform Integration Flow Endpoint Destination
To trigger the CPI-Flow to send our notification we need to set the destination.

Allright, the destinations for our app are configured, time for the development!
3.2 Write the code
3.2.1 Neo-app.json
In the neo-app.json file we add the following json-objects to the routes-array:
The first one is to call our CPI-Flow endpoint. We refer to the destination we created earlier by providing the destination name. Next we provide the entryPath to tell the call where to go in our destination. The path keyword will be used in the app to call the CPI-Flow.
The second one is the HANA DB destination, this does not need an entryPath. We will use this OData Service as a model and so configure this in the manifest.json file.
3.2.2 Manifest.json
In the manifest.json file or App Descriptor file we add the following json-object in the sap.app:
This datasource will be used in our model. We called it mainService and the URI here is built by starting with the value of the path key-word in the neo-app.json file for the HANA DB destination. Next you provide the rest of the path for the OData service.
As last in the manifest.json file we add a model to the models in the sap.ui5 json-object:
For this model we configure our dataSource as the mainService we created.
3.2.3 Controller.js
Here the skeleton of our controller.js file. We define the jsonmodel, messagetoast and messagebox in here so we can use it later in our controller.
In the controller.js file we will have 4 functions:
3.2.3.1 The onInit function:
In here we create a new jsonmodel and set this model to the view. We name it 'mailModel'.
3.2.3.2 The http function:
This function is based on the following MDN Web Docs documentation Promise XMLHttpRequest()
Basically this function provides us the possibility to perform http calls via ajax/xmlhttprequest via promises. It will build our path/url to call the OData service.
If you take a look at the client.onload function you will see some adjustments. When you create a record in the db you can receive a status of 201 = created. In this case we also want to resolve our promise. We will not get this status code in the app, but just for the record.
Next we create a oResult json-object where we will store the response of the call and where we will save the x-csrf-token we receive by performing the GET call. We need this token to later on post our notification to the cpi-flow.
3.2.3.3 The onGroupSelection function:
When we select a group/department from the combobox we will save the key of this group in a property called '/to' in our mailModel. This because we will later need it when we send our mail.
3.2.3.4 The sendMail function:
In this function we will send the mail obviously.
We start with showing a busy indicator. Followed by getting our mailModel from the view.
Next we created a oMail object, here we store the to, subject and body values. These values are bound to our mailModel and can be accessed by the getProperty function.
A oHeaders object is created that will be passed to our first call to get the x-csrf-token. This with the value 'fetch' to get the token via the GET call.
When we received the x-csrf-token we set the oHeaders object equal to this token, accessed via the responseHeaders.
So in the POST call we pass the x-csrf-token via the oHeaders object and all our mail content via the oMail object.
When success we hide the busy indicator and show a success message. The opposite for an error.
Controller file done!
3.2.4 View.xml
At the top of the xml view file import the 'sap.ui.richtexteditor.RichTextEditor' class. This with the following line: (Now we are able to use the RichTextEditor control)
In the view.xml file we place a combobox to display all our departments from the HANA DB. By providing the path to it. This is being read from our OData model. Next the onGroupSelection is added.
The Input control its value is bound to the mailModel subject property, this way we can access it in our controller like we did.
Finally time to use the RichTextEditor, this control created by first providing the classname we chose 'rte' followed by the control name 'RichTextEditor'. Again the value bound to the mail model.
The last step is providing a send button the send the mail.
Awesome we finished the development of our UI5 App!
Time to test it!
When we open the app we select a department, provide a subject and some content.
Since I work for the development department (because we placed it so in our HANA DB) I will select this department in the combobox.

And let's check our mailbox......
YES!
The sending email-address that we used in the CPI-Flow sent us an email with a personal greeting and the subject and content. Perfect!

5. Time for some recap
So we performed a lot of steps and development. Let us make a summary of what we did:
As you can see I created this blog to go cover a few SAP services in one demo and show the awesome possibilities they offer. This was the purpose of the whole blog from the beginning.
NOTE!!! : In real cases you can encounter some problems with the amount of mails you want so end via the SMTP protocol. Because you are sending too many emails in a small time period it looks like spam. You can consider using the Microsoft Graph api in this case. This will allow you to send a lot of emails in a small period.
Thanks for reading my blog about 'How to Send Notifications from UI5 App over CPI Flow with Data from HANA DB'. I hope you found it interesting and it helps you out with starting or using these services in the future.
Kind regards,
Dries

Introduction
What if you have a lot of users working in different departments and you need to notify them with custom messages? Knowing your departments and users are saved in a database and you still have to build your message and send it to them.
Then you search and use notification/message services, or you create a solution your own!
That's exact what we are going to do in this blog, we will build our own End-to-End Notification Flow.
This by developing a UI5 App to write our message content and send it to all users from a specific department. These departments and users are saved in a HANA MDC Database.
The notification content and selected department in the UI5 App will be send to a CPI-Flow endpoint. This flow will get all the users from the HANA DB and send a personal mail to all of them.
In this blog, I chose to send every employee an individual email. This way I can demonstrate the use of the Iteration Splitter. You might consider to send one email and place all the employees of a department into the 'to' of your email. But that's not what I will demonstrate today.
Architecture & Steps
Here is a high-level architecture of the whole End-to-End scenario:
These steps will be taken throughout the whole flow:
- In the UI5 App we can select a department and we write the text for our notification/mail.
- The CPI-flow will be triggered by the UI5 app.
- The CPI-flow will fetch all the employees of the department (passed by the UI5 app) from the HANA DB.
- The CPI-flow will send an email via the mail adapter to all the users.
Building the Database, Flow & App
Let us go over all the required technical steps, starting with the database which will be consumed by our UI5 app and CPI-flow. Next we will model our CPI-Flow and finish with the UI5 App.
Let's start!
1. Create, Populate & Expose (OData) the HANA DB
In the SAP CP you create a HANA MDC Database and assign the required roles to the user you want to use.
To create a new database user and assign the correct roles and privileges you can refer to this detailed Wiki documentation by SAP Mentors.
Create Developer User and assign Roles and Privileges
An overview of all the files that will be created in our package called 'CpiNotificationApp':
1.1 The .xsaccess file
The application-access (.xsaccess) file allows you to specify whether to expose package content or not, which authentication method is used to grant access, and what content is visible.
In here we place the following JSON-Strucutre:
{

    "exposed": true,

    "prevent_xsrf": true

}
The exposed key is set to true so we can expose our content via OData.
The prevent_xsrf key is set to true to protect applications from cross-site request-forgery (XSRF) attacks.
For more information about this .xsaccess file you can refer to the following SAP Documentation:
https://help.sap.com/viewer/400066065a1b46cf91df0ab436404ddc/2.0.02/en-US/a9fc5c220d744180850996e2f5...
1.2 The .xsapp file
The application descriptor is the core file that you use to describe an application's framework within SAP HANA XS.
In this case we can leave it with an empty JSON-Object:
{}For more information about this .xsapp file you can refer to the following SAP Documentation:
https://help.sap.com/viewer/400066065a1b46cf91df0ab436404ddc/2.0.02/en-US/fac9ec6995a0426c840f85ae5a...
1.3 The .User.hdbdd file
namespace CpiNotificationApp;

@Schema : 'CPI_NOTIFICATION_APP'


context User {

@Catalog.tableType: #COLUMN


    entity User {

        key id: Integer not null;

        name: String(25);

        groupId: Integer not null;

        email: String(50);

    }


    entity UserGroup {

        key id: Integer not null;

        name: String(25);

        users: Association[*] to User on users.groupId = id;

    }

}
In this database file we perform the following steps:
- Define the namespace.
- Add a Schema.
- Create your context.
- Define the tabletype.
- Create the User entity, with its id (pk), name, groupid (fk) and email.
- Create the UserGroup entity, with its id (pk), name and users association (1 usergroup can have multiple users. association based on the pk (usergroup) and fk (user)).
1.4 The .CpiNotification.xsodata file
The OData service definition is a configuration file you use to specify which data (for example, views or tables) is exposed as an OData collection for analysis and display by client applications.
For more information about this .xsodata file you can refer to the following SAP Documentation:
https://help.sap.com/viewer/b3d0daf2a98e49ada00bf31b7ca7a42e/2.0.00/en-US/d6b3fe1a380f45e6b8845744dd...
service {

    //SCHEMANAME.TABLENAME FROM CATALOG

    "CPI_NOTIFICATION_APP"."CpiNotificationApp::User.UserGroup" as "UserGroup" navigates ("UserGroup_users" as "UserGroup_users");

    "CPI_NOTIFICATION_APP"."CpiNotificationApp::User.User" as "User";


    association "UserGroup_users" principal "UserGroup"("id") multiplicity "1" dependent "User"("groupId") multiplicity "*";

}
In this service definition we define the following logic:
- Expose the usergroups as 'UserGroup' with a navigation property to all its corresponding users, called 'UserGroup_users'.
- Expose the users as 'User'.
- Create the association between the tables in the OData on the navigation property. This on the usergroup its 'id' and the user its 'groupid'. The primary key of usergroup table and the foreign-key of user table. One usergroup can have multiple users.
1.5 Add data to the usergroup and user tables
First add the desired departments:
Next add the users in the user table and place in the userGroup field the id for which department you want them to work.
These are all fictive chosen names. If they would match real existing names it would be a coincidence.
Nice, we finished all the steps that need to be taken in the HANA Editor and Catalog.
1.6 Test the OData Service
You can test your OData service in the browser by pressing the green run button:
Next a new tab with your service will be opened. Here the usergroup and user collection are displayed.
The URLs to call your data via the OData Service:
Root url that will show all the Collections: https://devpYOURUSERNUMBERtrial.hanatrial.ondemand.com/CpiNotificationApp/CpiNotification.xsodata
Followed by one of the following urls:
| OData URL | OData Content |
| /UserGroup | Show all Usergroups |
| /User | Show all Users |
| /UserGroup(1000) | Show specific usergroup with id 1000 |
| /UserGroup(1000)/UserGroup_users | Show all users from usergroup with id 1000 |
| /UserGroup(1000)?$expand=UserGroup_users | Show users of department 1000 and department data |
2. Model, Design & Deploy the CPI-Flow
The next step is to create a CPI-Flow that will be triggered by the UI5 App.
In this blog we will use a Gmail-account to send our mails to the users.
Therefor we will perform the following steps:
2.1 Add the username and password from you sending email address to the Security Material
In the Operations view select the Security Material tile under the Manage Security section:
Select 'Add' and choose User Credentials:
Fill in the required fields and password of course. Next press the 'deploy' button.
Confirm your deployed credentials are deployed. First it will display in the status that it is Stored. After refreshing the page it will display Deployed.
2.2 Retrieve the Gmail Certificates through the CPI Connectivity Test
BE SURE YOU ENABLED IMAP IN YOUR GMAIL ACCOUNT CONFIGURATION AND YOU ENABLED THIRD PARTY APPS TO USER YOUR GMAIL.
To use the Mail Adapter later in our CPI-Flow, we need to add the certificates to the key-store in our CPI environment.
This certificates can be retrieved by using the CPI Connectivity Test. Which is another tile under the Operations view.
In the Connectivity test, choose SMTP, and add the following values:
(when successful, download the certificates)
2.3 Add the Certificates to the CPI Key-store
Now we can add these certificates to the key-store. To do so, go to the operations overview and select the Key-store tile.
Now unzip the certificates from the zip-file.
Next choose Add > Certificate.
Provide an Alias for the certificate, select the certificate and deploy it.
As last check if your certificate is deployed successfully.
2.4 Build the CPI-Flow
Create you Package and add an Artifact. In this case we choose an Integration-Flow.
We will build the following Integration-Flow:
Let's go over all the steps in this flow:
2.4.1 HTTP Session Reuse
To set the HTTP Session Reuse, select outside the flow (with background) and go to the 'Runtime Configuration' tab.
Select the value: 'On Integration Flow' for the HTTP Session Reuse.
This will make sure that the session will be reused for all message exchanges for the Integration Flow. Only used for stateless services.
Stateless means there is no record of previous interactions and each interaction request has to be handled based entirely on information that comes with it.
2.4.2 Configure the Inbound HTTPS Connection
The inbound HTTPS Connection can be configured by drawing a connection line from the Sender to the start message. When selecting this connection select the Connection tab.
In here we perform the following 4 configurations:
| Field | Purpose |
| Address | The endpoint which you will post your request to from the UI5 App. Prefixed by a /. We choose '/sendMail'. |
| Authorization | The way you want to authorize, we select the User Role option. |
| User Role | The role you need to call the endpoint. 'ESBMessaging' |
| CSRF Protected | Set to true/enabled to protect against Cross-Site Request Forgery (CSRF) attacks . |
When the start message control is hit we continue with a router. Here we decide based on conditions, if we want to continue the flow or drop and navigate to a dead end in the flow.
Because CSRF Protected is enabled we need to pass a X-CSRF-Token when we post something to the endpoint that triggers our flow. If we do not add the X-CSRF-Token with our POST call, we will receive a 403-Forbidden response code.
So the condition in this case is very easy. We drop everything thats is NOT a POST Request. This way we ensure that we only continue in our flow when it is a POST request. Since we enabled the CSRF Protect, it also checks if a token was passed when posting to the endpoint. So good to go!
The condition in the router:
So when not POST, we drop. This achieved by the following condition:
${header.CamelHttpMethod} != 'POST'
At this point we finished the X-CSRF Security steps.
For more information on how to protect your Integration Flow against Cross-Site Request Forgery (CSRF) attacks, you can refer to this amazing blog by vadim.klimov:
Inbound HTTPS with CSRF Protection in CPI Integration Flows
2.4.5 Log the Payload and Set Flow Properties
When we met our condition en are allowed to continue our flow, we use a Groovy-Script to log our payload and set some properties which we will use later on in our flow.
The script:
import com.sap.gateway.ip.core.customdev.util.Message;

import java.util.HashMap;

import groovy.json.*;

def Message processData(Message message) {


    def body = message.getBody(java.lang.String) as String;

    // Log the incoming payload message

    def messageLog = messageLogFactory.getMessageLog(message);

    if(messageLog != null){

        messageLog.setStringProperty("Logging#1", "Printing Payload As Attachment")

        messageLog.addAttachmentAsString("ResponsePayload:", body, "text/plain");

     }


    // Create json slurper and pare the payload into object variable

    def jsonSlurper = new JsonSlurper();

    def object = jsonSlurper.parseText(body);


    // Set variables equal to object property

    def to = object.to;

    def subject = object.subject;

    def mailBody = object.body;


    // Set the variable into a flow property

    message.setProperty("to", to);

    message.setProperty("subject", subject);

    message.setProperty("body", mailBody);


    return message;

}
HANDY TOOL TO CREATE AND TEST GROOVY SCRIPTS:
Groovy Playground
2.4.6 Add your SAP HANA Username and Password to the Security Material in the CPI-Tenant
Like we did in step 2.1, we now add our SAP HANA username and password to the Security Material. This so we can later on call our OData Service.
2.4.7 Log the Payload and Set Flow Properties
After we logged our Payload and have set our properties for our flow, we will call all our users for the respective department. That was passed in our POST Call to the CPI-endpoint.
When you drew and select the HTTP-connection to the receiver you provide the following configuration:
| Field | Value |
| Address | https://devpYOURUSERtrial.hanatrial.ondemand.com/CpiNotificationApp/CpiNotification.xsodata/UserGroup(${property.to}) |
| Query | $expand=UserGroup_users&$format=json |
| Proxy Type | Internet |
| Method | GET |
| Send Body | False/disabled |
| Authentication | Basic |
| Credential Name | The name you provided to your credential in step 2.4.6. |
With this address and expand property we request all the users from the department provided by the UI5 App.
We pass the usergroup id in the address. We can call it with the variable ${property.to}.
We have set this variable in step 2.4.5 in our Groovy-Script.
As last Query parameter we pass the format JSON parameter. This is just because I like to work with JSON. This is not necessary. If you do not pass this parameter here you will have to make some adjustments yourself in the rest of the flow which is yet to come.
2.4.8 Transform the result from the OData Call
When our OData Call was successful we transform the result so we can continue with our desired result. This transformation takes place in a Groovy-Script:
The Script:
import com.sap.gateway.ip.core.customdev.util.Message;

import java.util.HashMap;

import groovy.json.*;

import groovy.xml.*

def Message processData(Message message) {


    // Get the body from the incoming message

    def body = message.getBody(java.lang.String) as String;


    // Create a JSON jsonSlurper and parse the body

    def jsonSlurper = new JsonSlurper()

    def object = jsonSlurper.parseText(body);


    //List of items represented as a map

    def users = [];


    // Add all the users with an email address to the users array

    object.d.UserGroup_users.results.each {

        if(it.email != null && it.email != ""){

            users.push([email: it.email, name: it.name])

        }

    }


    // Create a StringWriter and build your final XML result

    def writer = new StringWriter()

    def xml = new MarkupBuilder(writer)


    // Add all the users as a single xml record to your final XML result

    xml.Users{

        users.each { user->

            User{

                email(user.email)

                name(user.name)

            }

        }

    }


    // Write your XML as a String and set it to the message body -> passed to the next control in the flow

    def result = writer.toString();

    message.setBody(result);


    // Log the result xml message

    def messageLog = messageLogFactory.getMessageLog(message);

    if(messageLog != null){

        messageLog.setStringProperty("Logging#1", "Printing Payload As Attachment")

        messageLog.addAttachmentAsString("ResponsePayload:", "Xml to loop: " + writer, "text/plain");

     }


    return message;

}
2.4.9 Loop over the resulting emails of the users and send an email
After we transformed our result of the OData call and built our own XML result, we will loop over it.
But before we start looping we place a Sequential Multicast control, when we finished looping over the emails we can go the the second step of the multicast and send a custom response to the caller of the CPI-Endpoint.
Since we built our own xml result we choose for the Expression Type XPath and we provide the XPath Expression (Path) to all the users to loop over.
For every user, so every time we are in the loop, we perform the following:
We set the email-address of the user and we send an email.
The email-address and username is set in the Content Modifier under the tab Exchange Property:
We create a new name and emailAddress variable based on the value of the final XML we created our own. This by navigating into the XPath.
Then the last step is sending the email. Therefor we set our Mail Adapter with an outgoing request from the end message to the Receiver.
When selecting the arrow to the receiver, select Mail Adapter and provide the following values:
In the Credential Name, provide the name of the credential you created in step 2.1.
In the 'from' field you pass the email-address you want to send emails from. So obviously the email-address you provided in step 2.1.
The 'to' property and subject and body and name accessed the same way we did in step 2.4.7 to access our usergroup id.
2.4.10 Send a custom response message when finished looping over email-addresses
When we finished looping over all the users we want to notify, we set a custom message as response. This by setting the second branch in our Sequential Multicast. In here we create a Groovy-Script and set the response message:
The script:
import com.sap.gateway.ip.core.customdev.util.Message;

import java.util.HashMap;

def Message processData(Message message) {

    //Body

       def body = message.getBody();

       message.setBody("Mail sent successfully!");

       return message;

}
Awesome we finished building our CPI-Flow!
Time to deploy it!
2.5 Deploy the CPI-Flow
You can deploy the integration flow by pressing the Deploy button.
Next go to the Operations view and select the All tile under the Manage Integration Content.
Here you will see the status of your flow and the endpoint on how to trigger your CPI-Flow.
2.6 Add the Role ESB-Messaging.send to your SAP CP User
Go to the SAP CP subaccount of your integration tenant and assign the role ESB-Messaging.send to your user. This can be done under the Security/Authorizations tab. Provide your user and assign the ESBMessaging.send Role to your user.
If you do not assign this role you will not be able to trigger the CPI-Flow by its endpoint!
Awesome our CPI-Flow is ready!
Time to build our UI5 App!
3. Develop the UI5 Application
In our UI5 Application we want to use a Rich Text Editor to write the body for our notification. Together with a combobox that provides all the departments (from the HANA DB). Also we provide an input field to fill in the subject.
3.1 Destinations in the SAP CP
Before we start developing our application we will configure our 2 necessary destinations in the SAP CP.
These 2 destinations are:
- SAP HANA OData Service Destination
- Cloud Platform Integration Flow Endpoint
3.1.1 SAP HANA OData Service Destination
To be able to use the data from our HANA DB in our UI5 app we need to configure the destination for this.
Values for the destination:
| Field | Value |
| Name | HANAMDC |
| Type | HTTP |
| Description | A description |
| URL | https://devpYOURUSERtrial.hanatrial.ondemand.com (This is the root path of your OData Service URL) |
| Proxy Type | Internet |
| Authentication | BasicAuthentication |
| User | The User Name that you use to login in the SAP HANA Editor or the OData Service |
| Password | Password of this user |
| Additional Properties | Value |
| WebIDEEnabled | True |
| WebIDESystem | HANAMDC |
| WebIDEUsage | odata_xs, odata_gen |
| Use default JDK truststore | True/Enabled |
3.1.1 SAP Cloud Platform Integration Flow Endpoint Destination
To trigger the CPI-Flow to send our notification we need to set the destination.
| Field | Value |
| Name | cpi |
| Type | HTTP |
| Description | A description |
| URL | https://YOURSUBACCOUNT-iflmap.YOURDOMAIN.eu1.hana.ondemand.com (root url of the flow that you see when you deployed it. See step 2.5) |
| Proxy Type | Internet |
| Authentication | BasicAuthentication |
| User | The user which you use to logon on the CPI subaccount |
| Password | The password for this user |
Allright, the destinations for our app are configured, time for the development!
3.2 Write the code
3.2.1 Neo-app.json
In the neo-app.json file we add the following json-objects to the routes-array:
{

		"path": "/sendMail",

		"target": {

			"type": "destination",

			"name": "cpi",

			"entryPath": "/http/sendMail"

		},

		"description": "cpi mail"

	}, {

		"path": "/HANAMDC",

		"target": {

			"type": "destination",

			"name": "HANAMDC"

		},

		"description": "HANAMDC"

	}
The first one is to call our CPI-Flow endpoint. We refer to the destination we created earlier by providing the destination name. Next we provide the entryPath to tell the call where to go in our destination. The path keyword will be used in the app to call the CPI-Flow.
The second one is the HANA DB destination, this does not need an entryPath. We will use this OData Service as a model and so configure this in the manifest.json file.
3.2.2 Manifest.json
In the manifest.json file or App Descriptor file we add the following json-object in the sap.app:
"dataSources": {

	"mainService": {

		"uri": "/HANAMDC/CpiNotificationApp/CpiNotification.xsodata/",

		"type": "OData",

		"settings": {

			"odataVersion": "2.0",

			"localUri": "localService/metadata.xml"

		}

	}

}
This datasource will be used in our model. We called it mainService and the URI here is built by starting with the value of the path key-word in the neo-app.json file for the HANA DB destination. Next you provide the rest of the path for the OData service.
As last in the manifest.json file we add a model to the models in the sap.ui5 json-object:
"": {

	"dataSource": "mainService",

	"preload": true,

	"settings": {

		"defaultBindingMode": "TwoWay"

	}

}
For this model we configure our dataSource as the mainService we created.
3.2.3 Controller.js
Here the skeleton of our controller.js file. We define the jsonmodel, messagetoast and messagebox in here so we can use it later in our controller.
sap.ui.define([

	"sap/ui/core/mvc/Controller",

	"sap/ui/model/json/JSONModel",

	'sap/m/MessageToast',

	'sap/m/MessageBox'

], function (Controller, JSONModel, MessageToast, MessageBox) {

	"use strict";


	return Controller.extend("be.MailCPIConnect.MailCPIConnect.controller.View1", {


    });

});
In the controller.js file we will have 4 functions:
- onInit
- http
- onGroupSelection
- sendMail
3.2.3.1 The onInit function:
In here we create a new jsonmodel and set this model to the view. We name it 'mailModel'.
onInit: function () {

	var oMdel = new JSONModel();

	this.getView().setModel(oMdel, "mailModel");

},
3.2.3.2 The http function:
This function is based on the following MDN Web Docs documentation Promise XMLHttpRequest()
Basically this function provides us the possibility to perform http calls via ajax/xmlhttprequest via promises. It will build our path/url to call the OData service.
// https://developer.mozilla.org/nl/docs/Web/JavaScript/Reference/Global_Objects/Promise

		http: function (url) {

			var core = {

				ajax: function (method, url, headers, args, mimetype) {

					var promise = new Promise(function (resolve, reject) {

						var client = new XMLHttpRequest();

						var uri = url;

						if (args && method === 'GET') {

							uri += '?';

							var argcount = 0;

							for (var key in args) {

								if (args.hasOwnProperty(key)) {

									if (argcount++) {

										uri += '&';

									}

									uri += encodeURIComponent(key) + '=' + encodeURIComponent(args[key]);

								}

							}

						}

						if (args && (method === 'POST' || method === 'PUT')) {

							var data = {};

							for (var keyp in args) {

								if (args.hasOwnProperty(keyp)) {

									data[keyp] = args[keyp];

								}

							}

						}

						client.open(method, uri);

						if (method === 'POST' || method === 'PUT') {

							client.setRequestHeader("accept", "application/json");

							client.setRequestHeader("content-type", "application/json");

						}

						for (var keyh in headers) {

							if (headers.hasOwnProperty(keyh)) {

								client.setRequestHeader(keyh, headers[keyh]);

							}

						}

						if (data) {

							client.send(JSON.stringify(data));

						} else {

							client.send();

						}

						client.onload = function () {

							if (this.status == 200 || this.status == 201) {

								var oResult = {

									response: this.response,

									responseHeaders: client.getResponseHeader("x-csrf-token")

								};

								resolve(oResult);

							} else {

								reject(this.statusText);

							}

						};

						client.onerror = function () {

							reject(this.statusText);

						};

					});

					return promise;

				}

			};


			return {

				'get': function (headers, args) {

					return core.ajax('GET', url, headers, args);

				},

				'post': function (headers, args) {

					return core.ajax('POST', url, headers, args);

				},

				'put': function (headers, args) {

					return core.ajax('PUT', url, headers, args);

				},

				'delete': function (headers, args) {

					return core.ajax('DELETE', url, headers, args);

				}

			};

		}
If you take a look at the client.onload function you will see some adjustments. When you create a record in the db you can receive a status of 201 = created. In this case we also want to resolve our promise. We will not get this status code in the app, but just for the record.
Next we create a oResult json-object where we will store the response of the call and where we will save the x-csrf-token we receive by performing the GET call. We need this token to later on post our notification to the cpi-flow.
client.onload = function () {

	if (this.status == 200 || this.status == 201) {

		var oResult = {

			response: this.response,

			responseHeaders: client.getResponseHeader("x-csrf-token")

		};

		resolve(oResult);

	} else {

		reject(this.statusText);

	}

};
3.2.3.3 The onGroupSelection function:
When we select a group/department from the combobox we will save the key of this group in a property called '/to' in our mailModel. This because we will later need it when we send our mail.
onGroupSelection: function (oEvent) {

	var oMailModel = this.getView().getModel("mailModel");

	oMailModel.setProperty("/to", oEvent.getSource().getSelectedKey());

}
3.2.3.4 The sendMail function:
In this function we will send the mail obviously.
We start with showing a busy indicator. Followed by getting our mailModel from the view.
Next we created a oMail object, here we store the to, subject and body values. These values are bound to our mailModel and can be accessed by the getProperty function.
A oHeaders object is created that will be passed to our first call to get the x-csrf-token. This with the value 'fetch' to get the token via the GET call.
When we received the x-csrf-token we set the oHeaders object equal to this token, accessed via the responseHeaders.
So in the POST call we pass the x-csrf-token via the oHeaders object and all our mail content via the oMail object.
When success we hide the busy indicator and show a success message. The opposite for an error.
sendMail: function () {

			sap.ui.core.BusyIndicator.show();


			var oMailModel = this.getView().getModel("mailModel");


			var oMail = {

				to: oMailModel.getProperty("/to"),

				subject: oMailModel.getProperty("/subject"),

				body: oMailModel.getProperty("/body")

			};


			var oHeaders = {

				"X-CSRF-TOKEN": "fetch"

			};


			this.http("/sendMail").get(oHeaders).then(function (result) {

				oHeaders = {

					"X-CSRF-TOKEN":  result.responseHeaders

				};

				this.http("/sendMail").post(oHeaders, oMail).then(function () {

					sap.ui.core.BusyIndicator.hide();

					var oBundle = this.getView().getModel("i18n").getResourceBundle();

					var sMsg = oBundle.getText("NotificationSentSuccess");

					return MessageToast.show(sMsg);

				}.bind(this)).catch(function () {

					sap.ui.core.BusyIndicator.hide();

					var oBundle = this.getView().getModel("i18n").getResourceBundle();

					MessageBox.error(oBundle.getText("sendNotificationError"));

				}.bind(this));

			}.bind(this));

		},
Controller file done!
3.2.4 View.xml
At the top of the xml view file import the 'sap.ui.richtexteditor.RichTextEditor' class. This with the following line: (Now we are able to use the RichTextEditor control)
xmlns:rte="sap.ui.richtexteditor"In the view.xml file we place a combobox to display all our departments from the HANA DB. By providing the path to it. This is being read from our OData model. Next the onGroupSelection is added.
The Input control its value is bound to the mailModel subject property, this way we can access it in our controller like we did.
Finally time to use the RichTextEditor, this control created by first providing the classname we chose 'rte' followed by the control name 'RichTextEditor'. Again the value bound to the mail model.
The last step is providing a send button the send the mail.
<mvc:View controllerName="be.MailCPIConnect.MailCPIConnect.controller.View1" xmlns:mvc="sap.ui.core.mvc" xmlns:f="sap.ui.layout.form"

	xmlns:rte="sap.ui.richtexteditor" xmlns:core="sap.ui.core" displayBlock="true" xmlns="sap.m">

	<Shell id="shell">

		<App id="app">

			<pages>

				<Page id="page" title="{i18n>title}">

					<content>

						<Panel width="auto" class="sapUiResponsiveMargin" accessibleRole="Region">

							<content>

								<VBox>

									<Label text="{i18n>GroupToNotify}"/>

									<ComboBox items="{ path: '/UserGroup', sorter: { path: 'name' } }" selectionChange=".onGroupSelection">

										<core:Item key="{id}" text="{name}"/>

									</ComboBox>

									<Label text="{i18n>subject}"/>

									<Input value="{mailModel>/subject}" class="sapUiTinyMarginBottom"/>

								</VBox>

								<Label text="{i18n>body}"/>

								<rte:RichTextEditor id="RTextEditor" width="100%" height="350px" customToolbar="true" showGroupFont="true" showGroupLink="true"

									showGroupInsert="true" editorType="TinyMCE4" value="{mailModel>/body}"/>

								<FlexBox class="sapUiSmallMarginTop" alignItems="End" justifyContent="End">

									<items>

										<Button text="{i18n>sendNotification}" press=".sendMail" type="Emphasized"/>

									</items>

								</FlexBox>

							</content>

						</Panel>

					</content>

				</Page>

			</pages>

		</App>

	</Shell>

</mvc:View>
Awesome we finished the development of our UI5 App!
Time to test it!
4. Test the application
When we open the app we select a department, provide a subject and some content.
Since I work for the development department (because we placed it so in our HANA DB) I will select this department in the combobox.
And let's check our mailbox......
YES!
The sending email-address that we used in the CPI-Flow sent us an email with a personal greeting and the subject and content. Perfect!
5. Time for some recap 
So we performed a lot of steps and development. Let us make a summary of what we did:
- Create your own HANA MDC Database with tables and content. Exposed via an OData Service.
- Model and build your own CPI-Flow to send the email. Secured against x-csrf-attacks. With thanks to Vadim!
- Create a UI5 App with the rich text editor to create a nice notification.
As you can see I created this blog to go cover a few SAP services in one demo and show the awesome possibilities they offer. This was the purpose of the whole blog from the beginning.
NOTE!!! : In real cases you can encounter some problems with the amount of mails you want so end via the SMTP protocol. Because you are sending too many emails in a small time period it looks like spam. You can consider using the Microsoft Graph api in this case. This will allow you to send a lot of emails in a small period.
Thanks for reading my blog about 'How to Send Notifications from UI5 App over CPI Flow with Data from HANA DB'. I hope you found it interesting and it helps you out with starting or using these services in the future.
Kind regards,
Dries
- SAP Managed Tags:
- SAPUI5,
- Cloud Integration,
- SAP HANA,
- SAP Business Technology Platform
17 Comments
You must be a registered user to add a comment. If you've already registered, sign in. Otherwise, register and sign in.
Labels in this area
-
"automatische backups"
1 -
"regelmäßige sicherung"
1 -
505 Technology Updates 53
1 -
ABAP
14 -
ABAP API
1 -
ABAP CDS Views
2 -
ABAP CDS Views - BW Extraction
1 -
ABAP CDS Views - CDC (Change Data Capture)
1 -
ABAP class
2 -
ABAP Cloud
2 -
ABAP Development
5 -
ABAP in Eclipse
1 -
ABAP Platform Trial
1 -
ABAP Programming
2 -
abap technical
1 -
absl
1 -
access data from SAP Datasphere directly from Snowflake
1 -
Access data from SAP datasphere to Qliksense
1 -
Accrual
1 -
action
1 -
adapter modules
1 -
Addon
1 -
Adobe Document Services
1 -
ADS
1 -
ADS Config
1 -
ADS with ABAP
1 -
ADS with Java
1 -
ADT
2 -
Advance Shipping and Receiving
1 -
Advanced Event Mesh
3 -
AEM
1 -
AI
7 -
AI Launchpad
1 -
AI Projects
1 -
AIML
9 -
Alert in Sap analytical cloud
1 -
Amazon S3
1 -
Analytical Dataset
1 -
Analytical Model
1 -
Analytics
1 -
Analyze Workload Data
1 -
annotations
1 -
API
1 -
API and Integration
3 -
API Call
2 -
Application Architecture
1 -
Application Development
5 -
Application Development for SAP HANA Cloud
3 -
Applications and Business Processes (AP)
1 -
Artificial Intelligence
1 -
Artificial Intelligence (AI)
4 -
Artificial Intelligence (AI) 1 Business Trends 363 Business Trends 8 Digital Transformation with Cloud ERP (DT) 1 Event Information 462 Event Information 15 Expert Insights 114 Expert Insights 76 Life at SAP 418 Life at SAP 1 Product Updates 4
1 -
Artificial Intelligence (AI) blockchain Data & Analytics
1 -
Artificial Intelligence (AI) blockchain Data & Analytics Intelligent Enterprise
1 -
Artificial Intelligence (AI) blockchain Data & Analytics Intelligent Enterprise Oil Gas IoT Exploration Production
1 -
Artificial Intelligence (AI) blockchain Data & Analytics Intelligent Enterprise sustainability responsibility esg social compliance cybersecurity risk
1 -
ASE
1 -
ASR
2 -
ASUG
1 -
Attachments
1 -
Authorisations
1 -
Automating Processes
1 -
Automation
1 -
aws
2 -
Azure
1 -
Azure AI Studio
1 -
B2B Integration
1 -
Backorder Processing
1 -
Backup
1 -
Backup and Recovery
1 -
Backup schedule
1 -
BADI_MATERIAL_CHECK error message
1 -
Bank
1 -
BAS
1 -
basis
2 -
Basis Monitoring & Tcodes with Key notes
2 -
Batch Management
1 -
BDC
1 -
Best Practice
1 -
bitcoin
1 -
Blockchain
3 -
BOP in aATP
1 -
BOP Segments
1 -
BOP Strategies
1 -
BOP Variant
1 -
BPC
1 -
BPC LIVE
1 -
BTP
11 -
BTP Destination
2 -
Business AI
1 -
Business and IT Integration
1 -
Business application stu
1 -
Business Architecture
1 -
Business Communication Services
1 -
Business Continuity
1 -
Business Data Fabric
3 -
Business Partner
12 -
Business Partner Master Data
10 -
Business Technology Platform
2 -
Business Trends
1 -
CA
1 -
calculation view
1 -
CAP
3 -
Capgemini
1 -
CAPM
1 -
Catalyst for Efficiency: Revolutionizing SAP Integration Suite with Artificial Intelligence (AI) and
1 -
CCMS
2 -
CDQ
12 -
CDS
2 -
Cental Finance
1 -
Certificates
1 -
CFL
1 -
Change Management
1 -
chatbot
1 -
chatgpt
3 -
CL_SALV_TABLE
2 -
Class Runner
1 -
Classrunner
1 -
Cloud ALM Monitoring
1 -
Cloud ALM Operations
1 -
cloud connector
1 -
Cloud Extensibility
1 -
Cloud Foundry
3 -
Cloud Integration
6 -
Cloud Platform Integration
2 -
cloudalm
1 -
communication
1 -
Compensation Information Management
1 -
Compensation Management
1 -
Compliance
1 -
Compound Employee API
1 -
Configuration
1 -
Connectors
1 -
Consolidation Extension for SAP Analytics Cloud
1 -
Controller-Service-Repository pattern
1 -
Conversion
1 -
Cosine similarity
1 -
cryptocurrency
1 -
CSI
1 -
ctms
1 -
Custom chatbot
3 -
Custom Destination Service
1 -
custom fields
1 -
Customer Experience
1 -
Customer Journey
1 -
Customizing
1 -
Cyber Security
2 -
Data
1 -
Data & Analytics
1 -
Data Aging
1 -
Data Analytics
2 -
Data and Analytics (DA)
1 -
Data Archiving
1 -
Data Back-up
1 -
Data Governance
5 -
Data Integration
2 -
Data Quality
12 -
Data Quality Management
12 -
Data Synchronization
1 -
data transfer
1 -
Data Unleashed
1 -
Data Value
8 -
database tables
1 -
Datasphere
2 -
datenbanksicherung
1 -
dba cockpit
1 -
dbacockpit
1 -
Debugging
2 -
Delimiting Pay Components
1 -
Delta Integrations
1 -
Destination
3 -
Destination Service
1 -
Developer extensibility
1 -
Developing with SAP Integration Suite
1 -
Devops
1 -
digital transformation
1 -
Documentation
1 -
Dot Product
1 -
DQM
1 -
dump database
1 -
dump transaction
1 -
e-Invoice
1 -
E4H Conversion
1 -
Eclipse ADT ABAP Development Tools
2 -
edoc
1 -
edocument
1 -
ELA
1 -
Embedded Consolidation
1 -
Embedding
1 -
Embeddings
1 -
Employee Central
1 -
Employee Central Payroll
1 -
Employee Central Time Off
1 -
Employee Information
1 -
Employee Rehires
1 -
Enable Now
1 -
Enable now manager
1 -
endpoint
1 -
Enhancement Request
1 -
Enterprise Architecture
1 -
ETL Business Analytics with SAP Signavio
1 -
Euclidean distance
1 -
Event Dates
1 -
Event Driven Architecture
1 -
Event Mesh
2 -
Event Reason
1 -
EventBasedIntegration
1 -
EWM
1 -
EWM Outbound configuration
1 -
EWM-TM-Integration
1 -
Existing Event Changes
1 -
Expand
1 -
Expert
2 -
Expert Insights
1 -
Fiori
14 -
Fiori Elements
2 -
Fiori SAPUI5
12 -
Flask
1 -
Full Stack
8 -
Funds Management
1 -
General
1 -
Generative AI
1 -
Getting Started
1 -
GitHub
8 -
Grants Management
1 -
groovy
1 -
GTP
1 -
HANA
5 -
HANA Cloud
2 -
Hana Cloud Database Integration
2 -
HANA DB
1 -
HANA XS Advanced
1 -
Historical Events
1 -
home labs
1 -
HowTo
1 -
HR Data Management
1 -
html5
8 -
Identity cards validation
1 -
idm
1 -
Implementation
1 -
input parameter
1 -
instant payments
1 -
Integration
3 -
Integration Advisor
1 -
Integration Architecture
1 -
Integration Center
1 -
Integration Suite
1 -
intelligent enterprise
1 -
Java
1 -
job
1 -
Job Information Changes
1 -
Job-Related Events
1 -
Job_Event_Information
1 -
joule
4 -
Journal Entries
1 -
Just Ask
1 -
Kerberos for ABAP
8 -
Kerberos for JAVA
8 -
Launch Wizard
1 -
Learning Content
2 -
Life at SAP
1 -
lightning
1 -
Linear Regression SAP HANA Cloud
1 -
local tax regulations
1 -
LP
1 -
Machine Learning
2 -
Marketing
1 -
Master Data
3 -
Master Data Management
14 -
Maxdb
2 -
MDG
1 -
MDGM
1 -
MDM
1 -
Message box.
1 -
Messages on RF Device
1 -
Microservices Architecture
1 -
Microsoft Universal Print
1 -
Middleware Solutions
1 -
Migration
5 -
ML Model Development
1 -
Modeling in SAP HANA Cloud
8 -
Monitoring
3 -
MTA
1 -
Multi-Record Scenarios
1 -
Multiple Event Triggers
1 -
Neo
1 -
New Event Creation
1 -
New Feature
1 -
Newcomer
1 -
NodeJS
2 -
ODATA
2 -
OData APIs
1 -
odatav2
1 -
ODATAV4
1 -
ODBC
1 -
ODBC Connection
1 -
Onpremise
1 -
open source
2 -
OpenAI API
1 -
Oracle
1 -
PaPM
1 -
PaPM Dynamic Data Copy through Writer function
1 -
PaPM Remote Call
1 -
PAS-C01
1 -
Pay Component Management
1 -
PGP
1 -
Pickle
1 -
PLANNING ARCHITECTURE
1 -
Popup in Sap analytical cloud
1 -
PostgrSQL
1 -
POSTMAN
1 -
Process Automation
2 -
Product Updates
4 -
PSM
1 -
Public Cloud
1 -
Python
4 -
Qlik
1 -
Qualtrics
1 -
RAP
3 -
RAP BO
2 -
Record Deletion
1 -
Recovery
1 -
recurring payments
1 -
redeply
1 -
Release
1 -
Remote Consumption Model
1 -
Replication Flows
1 -
Research
1 -
Resilience
1 -
REST
1 -
REST API
1 -
Retagging Required
1 -
Risk
1 -
Rolling Kernel Switch
1 -
route
1 -
rules
1 -
S4 HANA
1 -
S4 HANA Cloud
1 -
S4 HANA On-Premise
1 -
S4HANA
3 -
S4HANA_OP_2023
2 -
SAC
10 -
SAC PLANNING
9 -
SAP
4 -
SAP ABAP
1 -
SAP Advanced Event Mesh
1 -
SAP AI Core
8 -
SAP AI Launchpad
8 -
SAP Analytic Cloud Compass
1 -
Sap Analytical Cloud
1 -
SAP Analytics Cloud
4 -
SAP Analytics Cloud for Consolidation
2 -
SAP Analytics Cloud Story
1 -
SAP analytics clouds
1 -
SAP BAS
1 -
SAP Basis
6 -
SAP BODS
1 -
SAP BODS certification.
1 -
SAP BTP
20 -
SAP BTP Build Work Zone
2 -
SAP BTP Cloud Foundry
5 -
SAP BTP Costing
1 -
SAP BTP CTMS
1 -
SAP BTP Innovation
1 -
SAP BTP Migration Tool
1 -
SAP BTP SDK IOS
1 -
SAP Build
11 -
SAP Build App
1 -
SAP Build apps
1 -
SAP Build CodeJam
1 -
SAP Build Process Automation
3 -
SAP Build work zone
10 -
SAP Business Objects Platform
1 -
SAP Business Technology
2 -
SAP Business Technology Platform (XP)
1 -
sap bw
1 -
SAP CAP
2 -
SAP CDC
1 -
SAP CDP
1 -
SAP Certification
1 -
SAP Cloud ALM
4 -
SAP Cloud Application Programming Model
1 -
SAP Cloud Integration for Data Services
1 -
SAP cloud platform
8 -
SAP Companion
1 -
SAP CPI
3 -
SAP CPI (Cloud Platform Integration)
2 -
SAP CPI Discover tab
1 -
sap credential store
1 -
SAP Customer Data Cloud
1 -
SAP Customer Data Platform
1 -
SAP Data Intelligence
1 -
SAP Data Migration in Retail Industry
1 -
SAP Data Services
1 -
SAP DATABASE
1 -
SAP Dataspher to Non SAP BI tools
1 -
SAP Datasphere
9 -
SAP DRC
1 -
SAP EWM
1 -
SAP Fiori
2 -
SAP Fiori App Embedding
1 -
Sap Fiori Extension Project Using BAS
1 -
SAP GRC
1 -
SAP HANA
1 -
SAP HCM (Human Capital Management)
1 -
SAP HR Solutions
1 -
SAP IDM
1 -
SAP Integration Suite
9 -
SAP Integrations
4 -
SAP iRPA
2 -
SAP Learning Class
1 -
SAP Learning Hub
1 -
SAP Odata
2 -
SAP on Azure
1 -
SAP PartnerEdge
1 -
sap partners
1 -
SAP Password Reset
1 -
SAP PO Migration
1 -
SAP Prepackaged Content
1 -
SAP Process Automation
2 -
SAP Process Integration
2 -
SAP Process Orchestration
1 -
SAP S4HANA
2 -
SAP S4HANA Cloud
1 -
SAP S4HANA Cloud for Finance
1 -
SAP S4HANA Cloud private edition
1 -
SAP Sandbox
1 -
SAP STMS
1 -
SAP SuccessFactors
2 -
SAP SuccessFactors HXM Core
1 -
SAP Time
1 -
SAP TM
2 -
SAP Trading Partner Management
1 -
SAP UI5
1 -
SAP Upgrade
1 -
SAP-GUI
8 -
SAP_COM_0276
1 -
SAPBTP
1 -
SAPCPI
1 -
SAPEWM
1 -
sapmentors
1 -
saponaws
2 -
SAPUI5
4 -
schedule
1 -
Secure Login Client Setup
8 -
security
9 -
Selenium Testing
1 -
SEN
1 -
SEN Manager
1 -
service
1 -
SET_CELL_TYPE
1 -
SET_CELL_TYPE_COLUMN
1 -
SFTP scenario
2 -
Simplex
1 -
Single Sign On
8 -
Singlesource
1 -
SKLearn
1 -
soap
1 -
Software Development
1 -
SOLMAN
1 -
solman 7.2
2 -
Solution Manager
3 -
sp_dumpdb
1 -
sp_dumptrans
1 -
SQL
1 -
sql script
1 -
SSL
8 -
SSO
8 -
Substring function
1 -
SuccessFactors
1 -
SuccessFactors Time Tracking
1 -
Sybase
1 -
system copy method
1 -
System owner
1 -
Table splitting
1 -
Tax Integration
1 -
Technical article
1 -
Technical articles
1 -
Technology Updates
1 -
Technology Updates
1 -
Technology_Updates
1 -
Threats
1 -
Time Collectors
1 -
Time Off
2 -
Tips and tricks
2 -
Tools
1 -
Trainings & Certifications
1 -
Transport in SAP BODS
1 -
Transport Management
1 -
TypeScript
2 -
unbind
1 -
Unified Customer Profile
1 -
UPB
1 -
Use of Parameters for Data Copy in PaPM
1 -
User Unlock
1 -
VA02
1 -
Validations
1 -
Vector Database
1 -
Vector Engine
1 -
Visual Studio Code
1 -
VSCode
1 -
Web SDK
1 -
work zone
1 -
workload
1 -
xsa
1 -
XSA Refresh
1
- « Previous
- Next »
Related Content
- Auto close/update all open Notifications work orders and maintenance plans for Decommissioned asset in Technology Q&A
- Receive a notification when your storage quota of SAP Cloud Transport Management passes 85% in Technology Blogs by SAP
- I cannot cancel an import in SAP Analytics Cloud from SAP Hana. in Technology Q&A
- How to configure Custom SAPUI5 app to Fiori launchpad in S/4 HANA 2022 on premise? in Technology Q&A
- Capture Your Own Workload Statistics in the ABAP Environment in the Cloud in Technology Blogs by SAP
Top kudoed authors
| User | Count |
|---|---|
| 9 | |
| 9 | |
| 7 | |
| 6 | |
| 4 | |
| 4 | |
| 3 | |
| 3 | |
| 3 | |
| 3 |