
- SAP Community
- Products and Technology
- CRM and Customer Experience
- CRM and CX Blogs by Members
- SAP C4C Integration with SAP CPQ
CRM and CX Blogs by Members
Find insights on SAP customer relationship management and customer experience products in blog posts from community members. Post your own perspective today!
Turn on suggestions
Auto-suggest helps you quickly narrow down your search results by suggesting possible matches as you type.
Showing results for
nikhilwalsetwar
Contributor
Options
- Subscribe to RSS Feed
- Mark as New
- Mark as Read
- Bookmark
- Subscribe
- Printer Friendly Page
- Report Inappropriate Content
07-09-2019
12:49 PM
Lead to cash scenario for C4 HANA sales cloud is enriched with new 1905 release of SAP C4C and SAP CPQ (formally known as Callidus CPQ). In this blog post we will concentrate on configuring updated user journey for lead to cash scenario for configurable products.
The enriched user journey is as below,

Before initiating the integration process we must make sure that below mandatory configurations in both systems are done and are in sync.

Prerequisites – Opportunities, Sales Quotes and Sales Order should be enabled.
1.1. Go to Project scoping and navigate to path “Communication and Information Exchange -> Integration with External Applications and Solutions” and enable “Integration Scenarios with Cloud Solutions from SAP”.

1.2. Go to Step 4 Questions and navigate to path “Communication and Information Exchange -> Integration with External Applications and Solutions -> Integration Scenarios with Cloud Solutions from SAP” and select “Do you want to create and view sales quotes in SAP CPQ application from with your cloud solution?”

1.3. Create communication system and arrangement.
1.3.1. Create communication system (Path: Administrator -> General Settings -> Communication System -> New). Maintain below details as,
ID- Any unique communication id
1.3.2. Create communication arrangement for newly created communication system –
Scenario to be used – “Sales Quote Replication from SAP Business Suite”
Please note this System Instance id. This will be required while setting up CPI system.

Disable the outbound service. (Service Name - Confirm Customer Quote confirmation to SAP Business Suite)

1.3.3. Click on the Edit basic settings and set the communication password. Note this user id and password. It will be required while setting up SAP CPI system.
Save and Activate it.
1.4. Sales Quote Document type configuration.
1.4.1. Navigate to following path “Business Configuration-> Implementation Project -> Open activity list -> Sales Quote activity” to configure sales quote document type.

1.4.2. Click on Maintain Document Types and add new document type as highlighted below,
Please ensure “CPQ” checkbox is ticked for new document type. Save and close the activity.
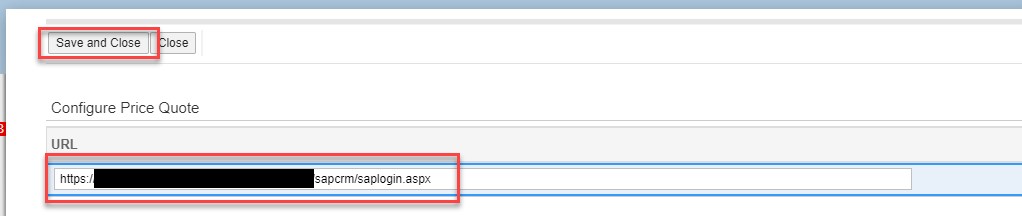
1.5. Navigate to path: “Administrator-> Sales and Campaign Settings” in order to configure CPQ landing URL.

Enter the URL created and copied in step 3.2.2.
2. Configurations in SAP CPI
2.1. Login to CPI using https://<tenant management node URL>/itspaces
2.2. Navigate to Discover tab and search for “SAP Cloud for Customer Integration with SAP CPQ”.

2.3. Copy above package and navigate to overview tab.
2.4. Create security material by clicking on

2.4.1. Create a security material ‘C4C_SOAP_API’. The user will be the credentials set in Step 1.3.3.

2.4.2. Create a security material ‘OData_User’. Please note that the user which we’re providing here will be a C4C business user with full access rights without any restrictions.

2.5. Navigate to Design tab and then to ‘SAP Cloud for Customer Integration with SAP CPQ’ package to configure all artifacts
2.5.1. To configure ‘Replicate Quote from SAP CPQ’ click on configure as highlighted,

2.5.1.1.Navigate to Receiver tab to maintain C4C details. Please maintain below details as,
C4C- Hostname – C4C login url without https prefix.
Credentials name – security artifact created in step 2.4.1.

2.5.1.2. Click on Save and deploy.
2.5.2. To configure ‘Replicate Quote to SAP CPQ’ click on configure as highlighted,

2.5.2.1. Navigate to Receiver tab to maintain C4C details.Please maintain below details as,
C4C- Hostname – C4C login url without https prefix.
Credentials name – security artifact created in step 2.4.2.

Navigate to More tab to set the system parameter,
This ExternalSystemID is the id copied from step 1.3.2.

2.5.2.2. Click on Save and then deploy.
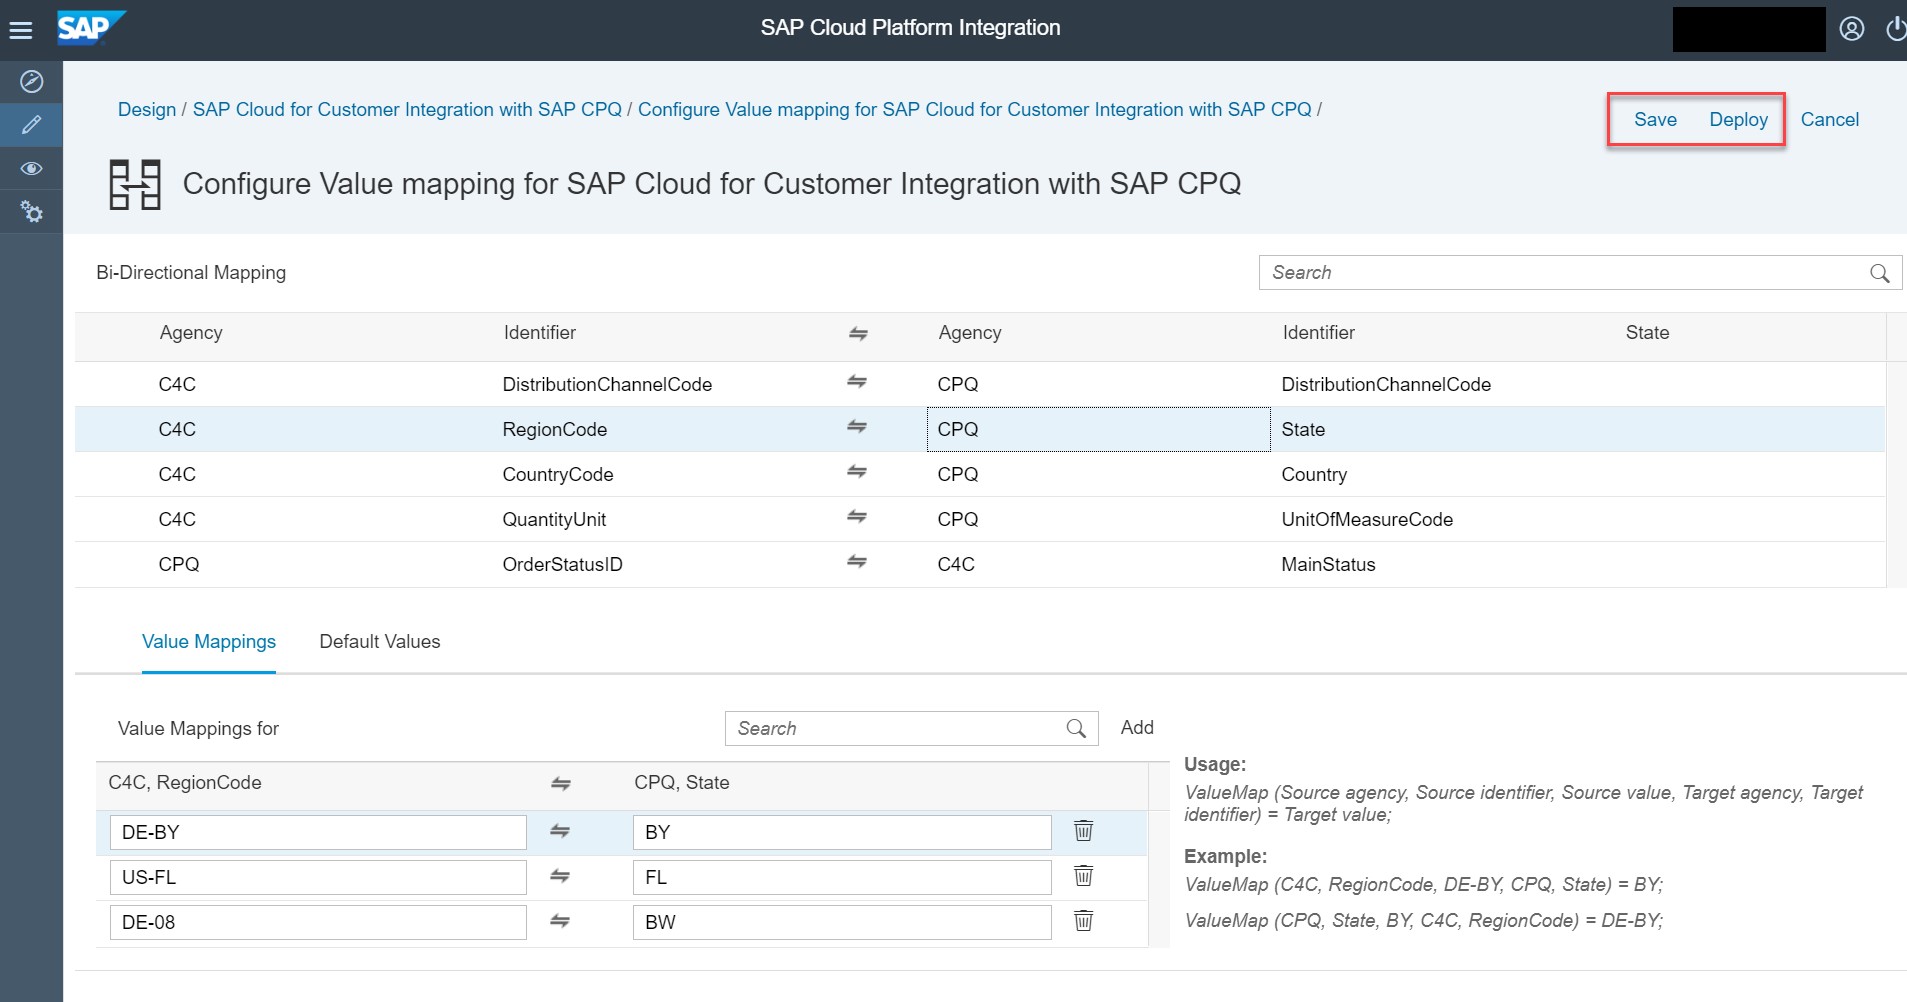
2.5.3. To configure ‘Value mapping for SAP Cloud for Customer Integration with SAP CPQ’ click on configure as highlighted,

As per the requirement configure the value mapping and click on Save and then deploy the value mapping artifact
2.5.4. Check the successful deployment of the above artifacts and copy the highlighted path. This path will be used in SAP CPQ Configuration.

Login to SAP CPQ with admin credentials.
3.1. Generation of federation URL – This is the SSO landing URL generation process. This URL will be used when we’ll be configuring the SAP C4C settings.
3.1.1. To create a SSO federation URL navigate to Providers -> Federation settings menu from left side navigation bar. And click on Add new Identity provider

3.1.2. Add details as below,
Name – CPQ domain name
Upload metadata file of IDP system – Check step ‘’ on how to download IDP metadata file.
3.1.3. Do not change any other prepopulated details And add routings by clicking on ‘Edit’ -> ‘Add’ the routing rules. Please make sure that you’ve selected the value appearing under column ‘Sign on relay state’. Save the changes.
Click on Activate the federation settings. The system will show the job details. Check the system for federation SSO URL after 5-10 mins of job scheduling time.

3.2. Navigate to “Providers tab -> SAP -> SAP Cloud Platform” to configure the SAP CPI settings.
3.2.1. Select common settings tab and add below details,
Authentication mode – Basic
Integration Username – The user which will have access to SAP CPI with ‘ESBMessagingSend’ role.
Integration Password- Above user’s password.
Rest base API URL – Paste the iflmap url, highlighted in the step 2.5.4.
Click on save.

3.2.2. Navigate to C4C CRM Settings tab and configure details as below,
Endpoint that gets sales quote details in case when landing and creating a new quote -> CPQ/C4C/GetQuoteInformation
Endpoint that updates SAP sales quote from CPQ quote data -> CPQ/C4C/SaleQuote
Also, please copy the highlighted landing URL, We’ll be using it in SAP C4C configuration ( in step 1.5)
Save the settings.

If you're still facing any issues then please visit my blogpost on Frequent issues in SAP C4C + SAP CPQ Integration
In this way we can enable SAP C4C and SAP CPQ integration with 1905 feature to provide seamless and enriched experience for lead to cash scenario for configurable products. Keep integrating 🙂
Cheers,
Nikhil
References - SAP CPQ documentation , SAP Integration guide
The enriched user journey is as below,
Integration Prerequisites –
Before initiating the integration process we must make sure that below mandatory configurations in both systems are done and are in sync.
SAP C4C –
- Configuration of Organization Structure.
- Configuration of Distribution Channel (note this id).
- Admin user should be setup with full access rights and authorizations.
- SSO configurations for single sign on with any identity provider settings.
SAP CPQ –
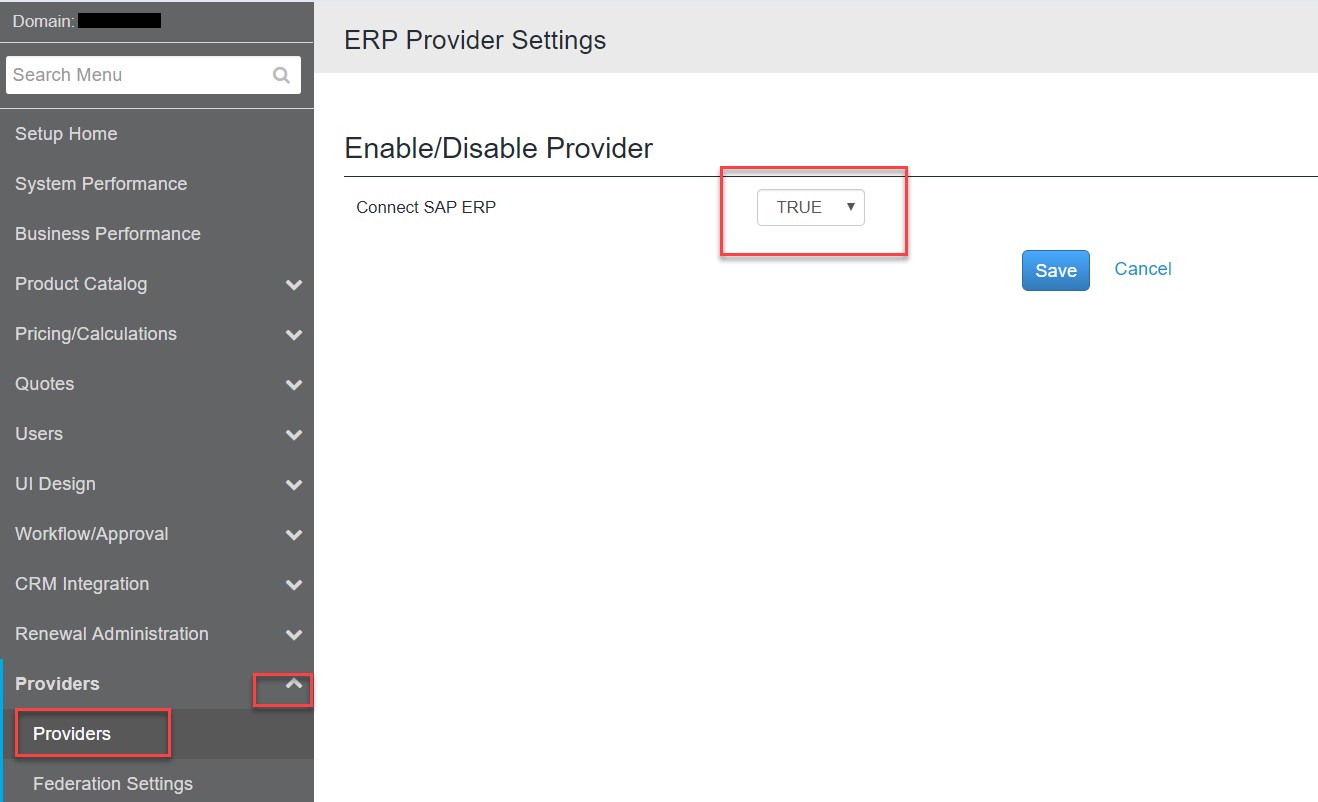
- Configure Market in SAP CPQ. Please ensure that market ID configured in CPQ must be C4C Sales Organization's External ID.
- SSO configurations for single sign on with the same identity provider as that of SAP C4C.
- Configure Pricebook for above market and assign distribution channel to it.
(Note) If distribution channel field is disabled for editing, then please enable ERP integration under Providers-> SAP ->ERP -> Select True in connect SAP ERP.
This integration configuration is divided in to 3 sections as,
- Configurations in SAP C4C
- Configurations in SAP CPI
- Configurations in SAP CPQ
1. Configurations in SAP C4C –
Prerequisites – Opportunities, Sales Quotes and Sales Order should be enabled.
1.1. Go to Project scoping and navigate to path “Communication and Information Exchange -> Integration with External Applications and Solutions” and enable “Integration Scenarios with Cloud Solutions from SAP”.
1.2. Go to Step 4 Questions and navigate to path “Communication and Information Exchange -> Integration with External Applications and Solutions -> Integration Scenarios with Cloud Solutions from SAP” and select “Do you want to create and view sales quotes in SAP CPQ application from with your cloud solution?”
1.3. Create communication system and arrangement.
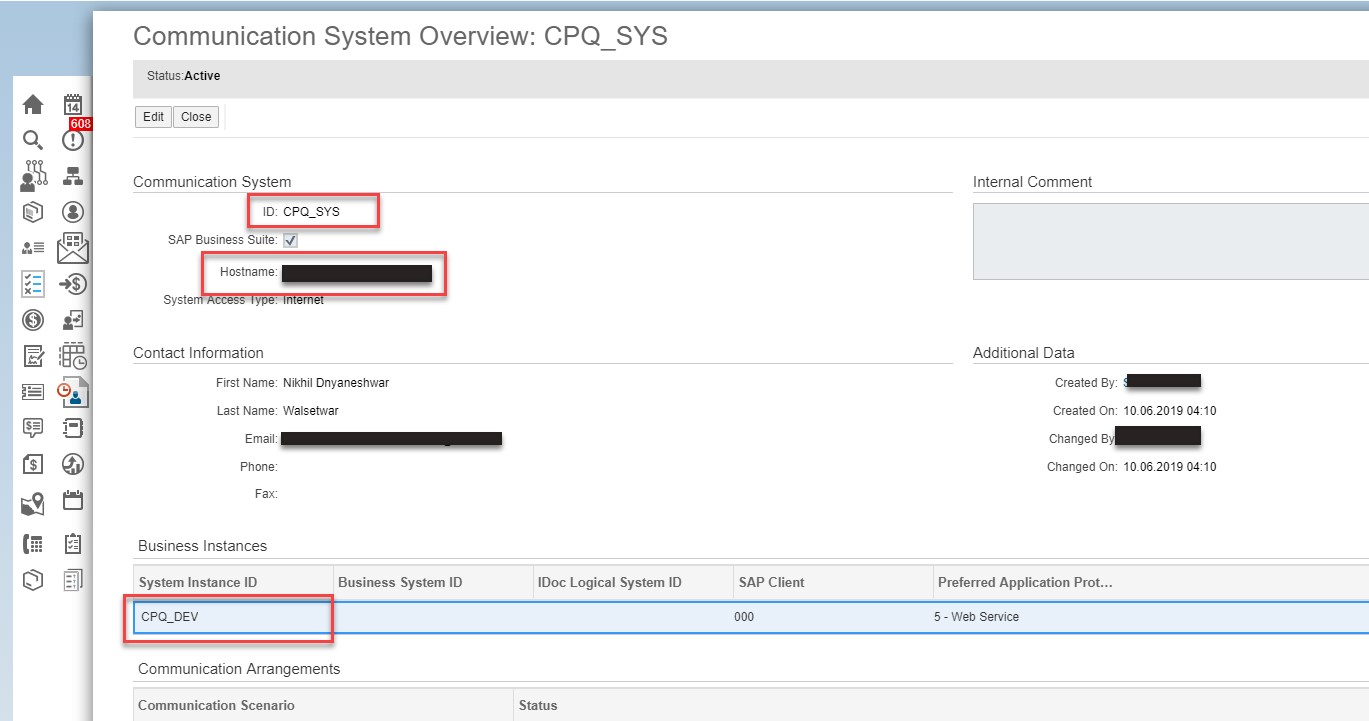
1.3.1. Create communication system (Path: Administrator -> General Settings -> Communication System -> New). Maintain below details as,
ID- Any unique communication id
Hostname – SAP CPQ System URL
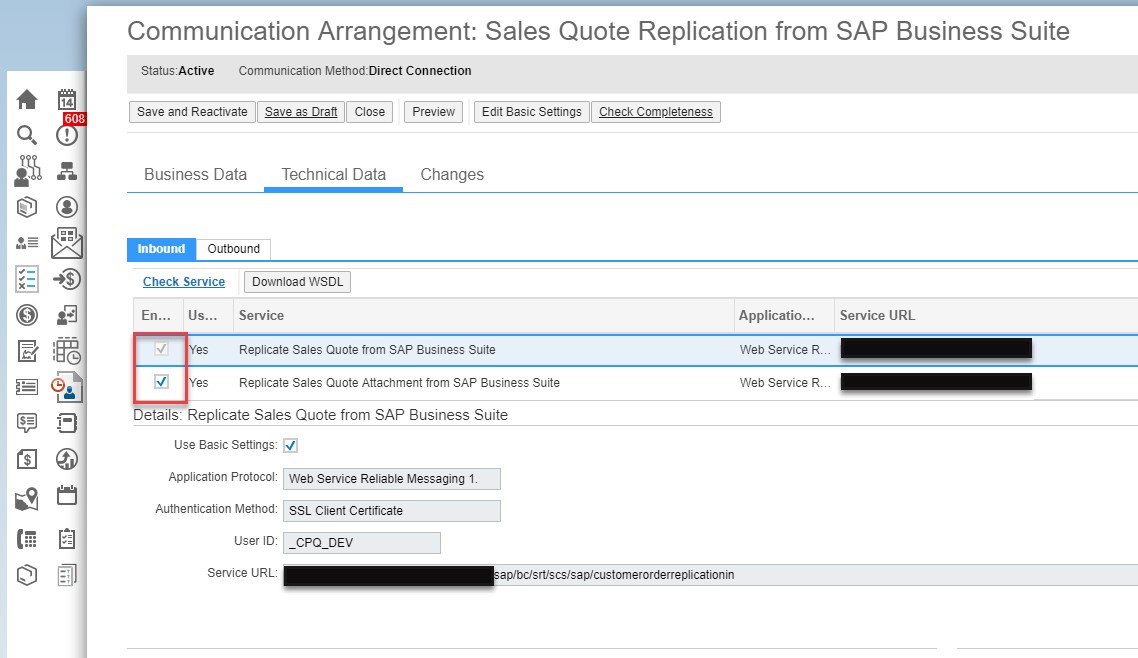
1.3.2. Create communication arrangement for newly created communication system –
Scenario to be used – “Sales Quote Replication from SAP Business Suite”
Please note this System Instance id. This will be required while setting up CPI system.
Disable the outbound service. (Service Name - Confirm Customer Quote confirmation to SAP Business Suite)
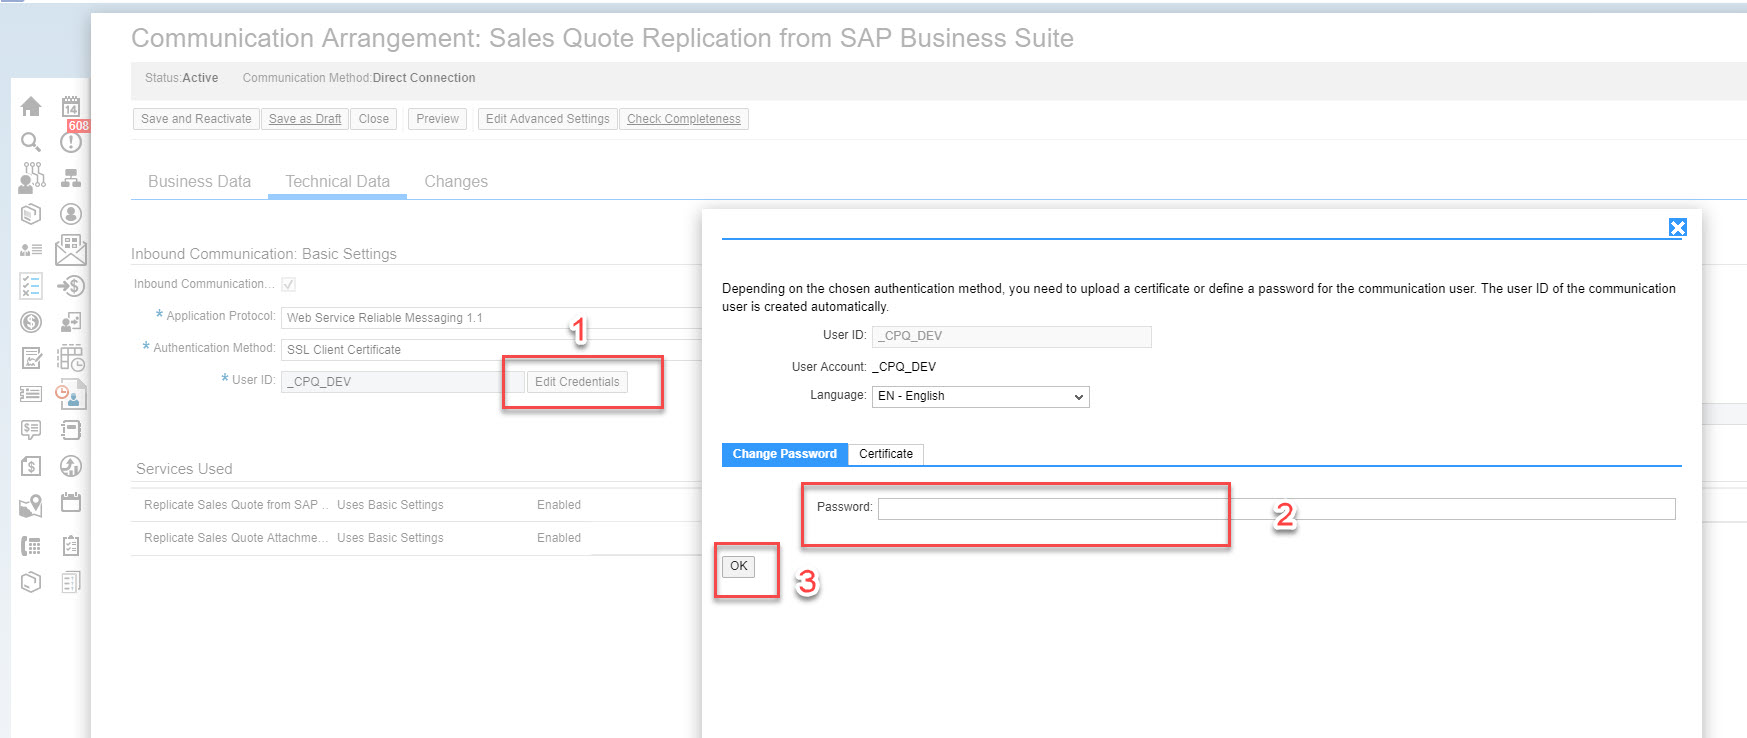
1.3.3. Click on the Edit basic settings and set the communication password. Note this user id and password. It will be required while setting up SAP CPI system.
Save and Activate it.
1.4. Sales Quote Document type configuration.
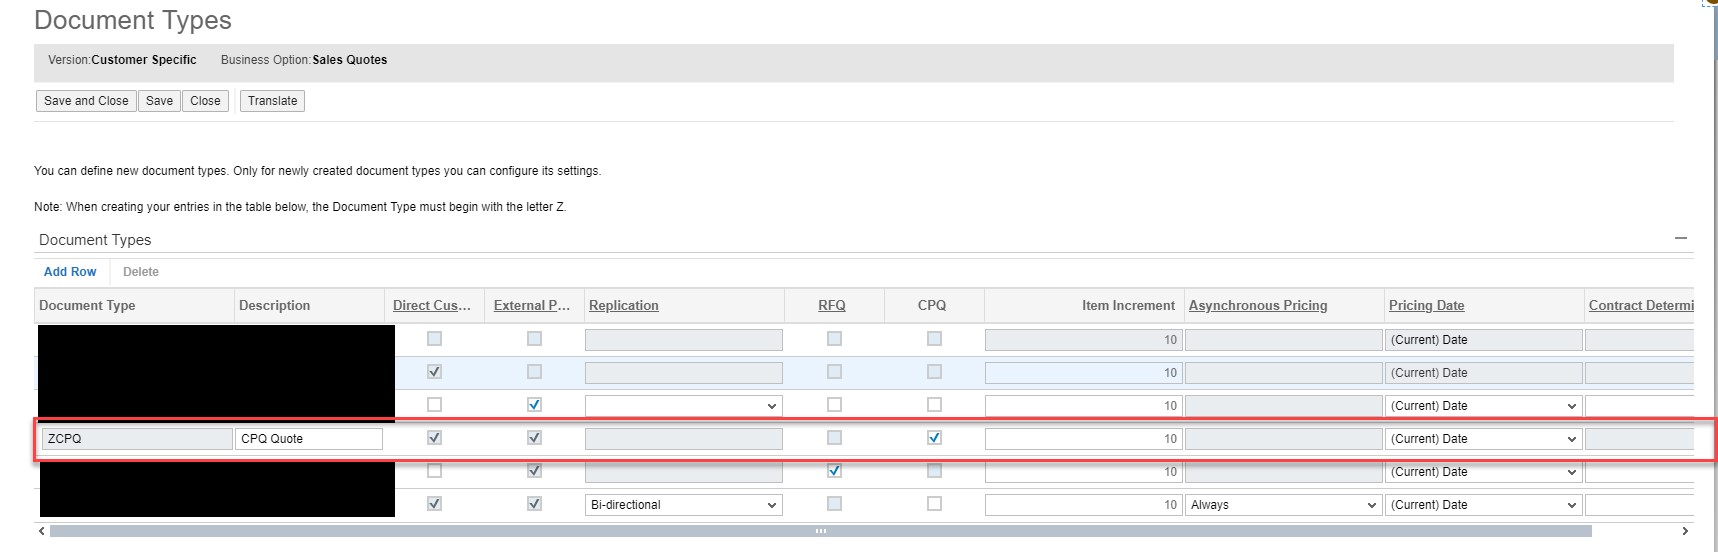
1.4.1. Navigate to following path “Business Configuration-> Implementation Project -> Open activity list -> Sales Quote activity” to configure sales quote document type.
1.4.2. Click on Maintain Document Types and add new document type as highlighted below,
Please ensure “CPQ” checkbox is ticked for new document type. Save and close the activity.
1.5. Navigate to path: “Administrator-> Sales and Campaign Settings” in order to configure CPQ landing URL.
Enter the URL created and copied in step 3.2.2.
2. Configurations in SAP CPI
2.1. Login to CPI using https://<tenant management node URL>/itspaces
2.2. Navigate to Discover tab and search for “SAP Cloud for Customer Integration with SAP CPQ”.
2.3. Copy above package and navigate to overview tab.
2.4. Create security material by clicking on
2.4.1. Create a security material ‘C4C_SOAP_API’. The user will be the credentials set in Step 1.3.3.
2.4.2. Create a security material ‘OData_User’. Please note that the user which we’re providing here will be a C4C business user with full access rights without any restrictions.
2.5. Navigate to Design tab and then to ‘SAP Cloud for Customer Integration with SAP CPQ’ package to configure all artifacts
2.5.1. To configure ‘Replicate Quote from SAP CPQ’ click on configure as highlighted,
2.5.1.1.Navigate to Receiver tab to maintain C4C details. Please maintain below details as,
C4C- Hostname – C4C login url without https prefix.
Credentials name – security artifact created in step 2.4.1.
2.5.1.2. Click on Save and deploy.
2.5.2. To configure ‘Replicate Quote to SAP CPQ’ click on configure as highlighted,
2.5.2.1. Navigate to Receiver tab to maintain C4C details.Please maintain below details as,
C4C- Hostname – C4C login url without https prefix.
Credentials name – security artifact created in step 2.4.2.
Navigate to More tab to set the system parameter,
This ExternalSystemID is the id copied from step 1.3.2.
2.5.2.2. Click on Save and then deploy.
2.5.3. To configure ‘Value mapping for SAP Cloud for Customer Integration with SAP CPQ’ click on configure as highlighted,
As per the requirement configure the value mapping and click on Save and then deploy the value mapping artifact
2.5.4. Check the successful deployment of the above artifacts and copy the highlighted path. This path will be used in SAP CPQ Configuration.
3. Configuration in SAP CPQ –
Login to SAP CPQ with admin credentials.
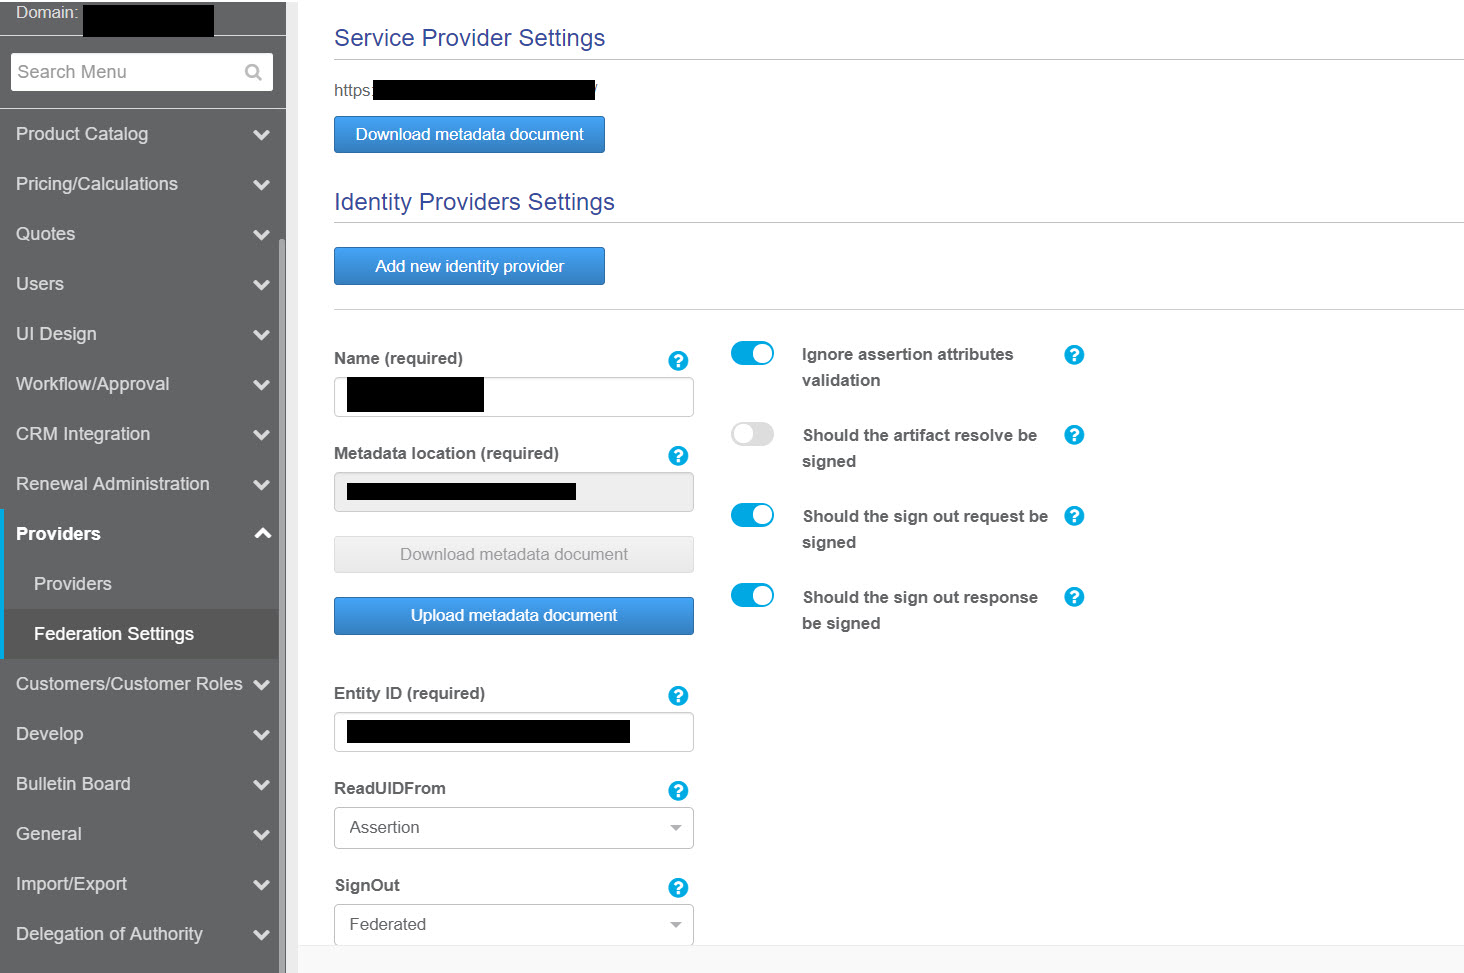
3.1. Generation of federation URL – This is the SSO landing URL generation process. This URL will be used when we’ll be configuring the SAP C4C settings.
3.1.1. To create a SSO federation URL navigate to Providers -> Federation settings menu from left side navigation bar. And click on Add new Identity provider
3.1.2. Add details as below,
Name – CPQ domain name
Upload metadata file of IDP system – Check step ‘’ on how to download IDP metadata file.
3.1.3. Do not change any other prepopulated details And add routings by clicking on ‘Edit’ -> ‘Add’ the routing rules. Please make sure that you’ve selected the value appearing under column ‘Sign on relay state’. Save the changes.
Click on Activate the federation settings. The system will show the job details. Check the system for federation SSO URL after 5-10 mins of job scheduling time.
3.2. Navigate to “Providers tab -> SAP -> SAP Cloud Platform” to configure the SAP CPI settings.
3.2.1. Select common settings tab and add below details,
Authentication mode – Basic
Integration Username – The user which will have access to SAP CPI with ‘ESBMessagingSend’ role.
Integration Password- Above user’s password.
Rest base API URL – Paste the iflmap url, highlighted in the step 2.5.4.
Click on save.
3.2.2. Navigate to C4C CRM Settings tab and configure details as below,
Endpoint that gets sales quote details in case when landing and creating a new quote -> CPQ/C4C/GetQuoteInformation
Endpoint that updates SAP sales quote from CPQ quote data -> CPQ/C4C/SaleQuote
Also, please copy the highlighted landing URL, We’ll be using it in SAP C4C configuration ( in step 1.5)
Save the settings.
If you're still facing any issues then please visit my blogpost on Frequent issues in SAP C4C + SAP CPQ Integration
In this way we can enable SAP C4C and SAP CPQ integration with 1905 feature to provide seamless and enriched experience for lead to cash scenario for configurable products. Keep integrating 🙂
Cheers,
Nikhil
References - SAP CPQ documentation , SAP Integration guide
- SAP Managed Tags:
- SAP Integration Suite,
- Cloud Integration,
- SAP CPQ,
- C4C Sales
28 Comments
You must be a registered user to add a comment. If you've already registered, sign in. Otherwise, register and sign in.
Labels in this area
-
ABAP
1 -
API Rules
1 -
CRM
1 -
Custom Key Metrics
1 -
Customer Data
1 -
Determination
1 -
Determinations
1 -
Introduction
1 -
KYMA
1 -
Kyma Functions
1 -
open SAP
1 -
Sales and Service Cloud Version 2
1 -
Sales Cloud v2
1 -
SAP
1 -
SAP Community
1 -
SAP CPQ
1 -
SAP CRM Web UI
1 -
SAP Customer Data Cloud
1 -
SAP Customer Experience
1 -
SAP Integration Suite
1 -
SAP Sales Cloud v2
1 -
SAP Service Cloud v2
1 -
SAP Service Cloud Version 2
1 -
Service Cloud v2
1 -
Validation
1 -
Validations
1
Related Content
- Utility Product Integration Layer (UPIL) in S/4HANA Utilities for Customer Engagement – Part 1 in CRM and CX Blogs by Members
- How to integrate sap build work zone for knowledge base in agent desktop as a mashup? in CRM and CX Questions
- Integration SAP Sales Cloud with SAP Customer Data Platform in CRM and CX Questions
- How to Extend Order Integration from SAP Order Management Foundation to SAP S/4HANA in CRM and CX Blogs by SAP
- SAP Commerce Cloud Q1 ‘24 Release Highlights in CRM and CX Blogs by SAP