
- SAP Community
- Products and Technology
- Technology
- Technology Blogs by SAP
- Leveraging SCP Neo Workflow from the SCP ABAP Envi...
Technology Blogs by SAP
Learn how to extend and personalize SAP applications. Follow the SAP technology blog for insights into SAP BTP, ABAP, SAP Analytics Cloud, SAP HANA, and more.
Turn on suggestions
Auto-suggest helps you quickly narrow down your search results by suggesting possible matches as you type.
Showing results for
Developer Advocate
Options
- Subscribe to RSS Feed
- Mark as New
- Mark as Read
- Bookmark
- Subscribe
- Printer Friendly Page
- Report Inappropriate Content
07-09-2019
3:47 PM
I recently worked on a project which gave me the opportunity to learn a little about Workflow on SAP Cloud Platform Neo as well as jump head first into SAP Cloud Platform, ABAP Environment(aka Steampunk). My task on the project was to integrate an application running on Steampunk with Workflow running on SCP Neo. Firstly, I have to say it just felt right working with ABAP again. ? Very welcomed change to be honest. Next, I found some very good resources on workflow which did help me through the process. I found the tutorials on the developer center very helpful in getting me started with setting up Workflow on Neo. Christian’s zombie blog was definitely helpful as it shows an on-prem version of how to do this ABAP integration. As most of you know, the Steampunk environment is a restricted version of an on-prem ABAP system, where you are only allowed to use white-listed objects. Also, the documentation for the Workflow API for Neo is quite good and super helpful. In this blog, I’d like to share my learning experience with the community and show how to leverage workflow from an ABAP class in Steampunk.
Before we take a look at the ABAP code, lets see what I’ve done with the workflow definition itself. After doing the initial workflow setup on my SCP trial account, I created a workflow project in the SAP Web IDE Full Stack IDE called ApproveProductWFProj. This workflow is very simple in that it basically has one user task called “Approve Product”. Take note that I am setting the Business Key in the definition to a context value. This is so that I can query the instances by this Business Key value later on.

I’ve defined a form which is used as the test user interface, where the end user has the ability to “Approve” or “Reject” the product. It shows just a couple fields such as Product ID, Description, and Approver User ID.


After the user task approval is done(either by the end user or programmatically), the workflow will trigger a script task called “Set Status”. I wanted to be able to capture the user’s decision from the “Approve Product” user task, so here I’m capturing that decision and filling the corresponding variable in the instance context. In doing so, I will always be able to extract this decision via the API from ABAP.


Finally, I have a very simple email task as well, where an email is sent to the recipient notifying them of the status, “Approved” or “Rejected”. Assumption is that you have correctly configured the Workflow Mail Service on your SCP account already.

So now I have all of the components I need for my workflow and I have successfully deployed them to SCP Neo. Now I need to be able to create instances of my workflow as well as interact with those instances from Steampunk. Lets take a look at the ABAP code.
Firstly, when first starting my coding, I quickly realized that I was not going to be able to use existing examples that I’ve had laying around over the years. The interfaces that I’m used to using such as IF_HTTP_CLIENT are not white-listed in Steampunk. Luckily, I’ve found some new white-listed classes/interfaces that I can use for HTTP connectivity. Problem solved. ? Be advised as of the time of this writing, these new HTTP connectivity APIs are only supported in the Steampunk environment. So what I’ve done here is basically wrapped many of the SCP Neo Workflow API endpoints with ABAP methods, in an attempt to remove the complexity of handling the request/response from the rest of my application. I did not create wrappers for all endpoints of the API, only what I needed for my application really. So this is in no way a complete API implementation. Also, this API class assumes you have all of the required authorizations to perform these actions on the workflow definitions/instances. The required authorizations are documented in the API documentation for the Workflow API for Neo.

All of these wrapper methods then leverage one common private method called EXECUTE_WORKFLOW_REQUEST which is the method that does all of the work. Notice the use of the new HTTP connectivity APIs CL_HTTP_DESTINATION_PROVIDER and CL_WEB_HTTP_CLIENT_MANAGER.

We can now use this workflow API class in our application. For this, I have created class ZCL_SCP_WORKFLOW_TEST to show how to call the API methods. In a productive application, you would probably not have all of these API calls stacked inside of one execution, but for our purposes here, I just wanted to show how to call all of these APIs in one single execution. So don't read into the fact that we are deleting all instances, creating new instances, and updating/completing those instances all at the same time.
First we need to create an instance of the API class, passing the workflow runtime URL, SCP user and password.

This next section of code shows how to call the API to get the workflow definition, the definition model, and the workflow instances of the workflow definition by the status, for example, get all RUNNING instances.

The next section shows how to delete instances of the workflow definition by the status, RUNNING, COMPLETED, or ERRONEOUS.

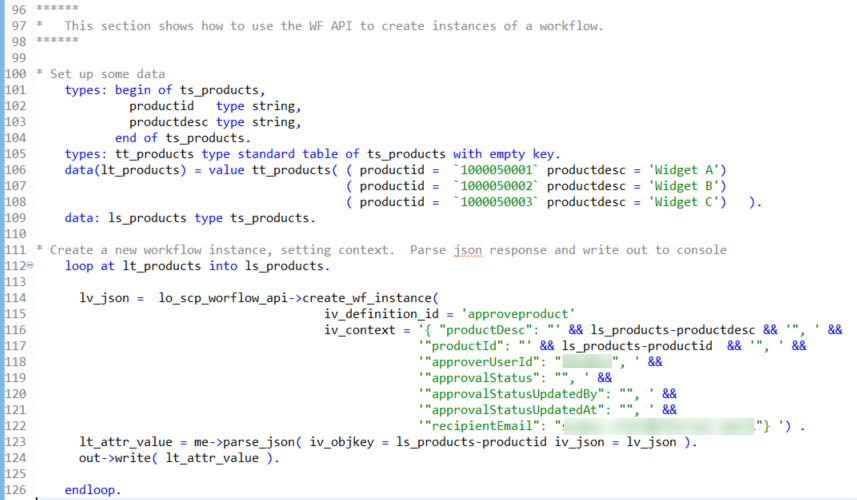
This next section shows how to create workflow instances of the workflow definition and set its context. Its important to pass a valid SCP user id as the "approverUserId" and a valid email address to the "recipientEmail", otherwise the Workflow will not work correctly.
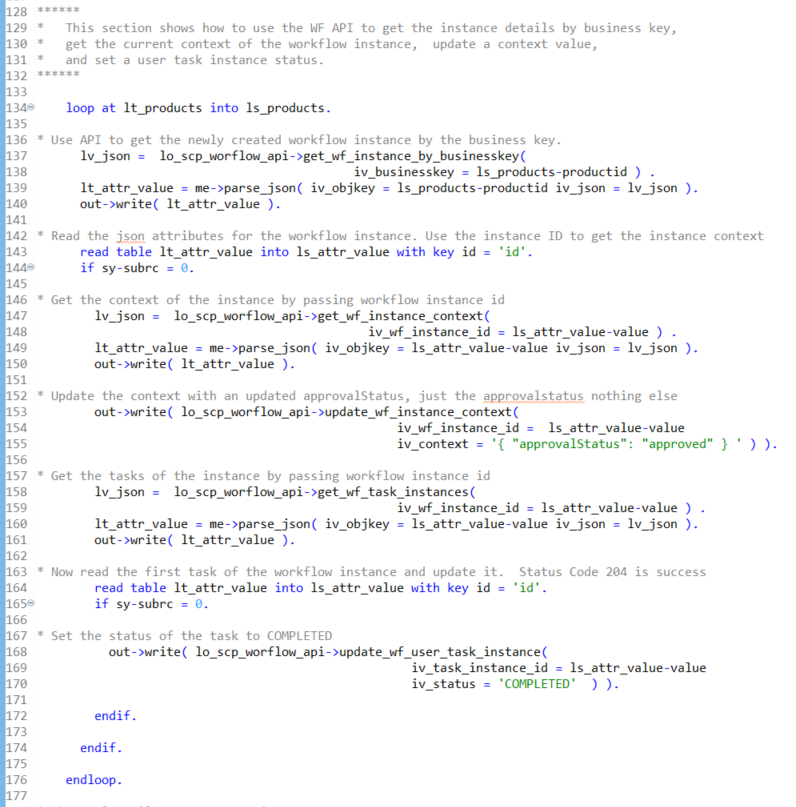
Finally, this last section of code shows how to interact with the workflow instances. First there is a call to the API to get the instance details by business key, from there we can get the workflow instance context and read its values. We can also then update the workflow instance context. Finally, we can get the details of the workflow task instances, and update them as well.
You may also notice the use of the PARSE_JSON method in the previous code. This method parses the json response returned by the Workflow API calls. This method is meant to be very generic in nature to be used across the different API calls. Due to the fact that my usual JSON parsing and RTTS classes are not currently white-listed, this method ended up being kind of messy, hence the reason I'm not showing that code here. I very much plan to rewrite that mess as soon as humanly possible, the way I wanted to from the start. 🙂 But for now, it works and does what it is suppose to. Moving on....
Now if we run this test class, and view our workflow instances in the Workflow Monitor we should see 3 instances(you may have to change the filter on this screen to show COMPLETED status). Of course, the workflow has been completed since we had programmatically set that status. We can also see that the context was updated. The context value “approvalStatus” is now set to “approved”.

If we look at the execution log of the workflow instance, we see that all of the steps have been captured in the log.

That just about wraps up this project. I have to say it was a lot of fun working on ABAP again, and of course the challenge of learning something new( the Workflow piece ) is always fun. On to the next one! Hopefully I'll be back in a couple months with some more cool stuff. Until then...
Before we take a look at the ABAP code, lets see what I’ve done with the workflow definition itself. After doing the initial workflow setup on my SCP trial account, I created a workflow project in the SAP Web IDE Full Stack IDE called ApproveProductWFProj. This workflow is very simple in that it basically has one user task called “Approve Product”. Take note that I am setting the Business Key in the definition to a context value. This is so that I can query the instances by this Business Key value later on.
I’ve defined a form which is used as the test user interface, where the end user has the ability to “Approve” or “Reject” the product. It shows just a couple fields such as Product ID, Description, and Approver User ID.
After the user task approval is done(either by the end user or programmatically), the workflow will trigger a script task called “Set Status”. I wanted to be able to capture the user’s decision from the “Approve Product” user task, so here I’m capturing that decision and filling the corresponding variable in the instance context. In doing so, I will always be able to extract this decision via the API from ABAP.
Finally, I have a very simple email task as well, where an email is sent to the recipient notifying them of the status, “Approved” or “Rejected”. Assumption is that you have correctly configured the Workflow Mail Service on your SCP account already.
So now I have all of the components I need for my workflow and I have successfully deployed them to SCP Neo. Now I need to be able to create instances of my workflow as well as interact with those instances from Steampunk. Lets take a look at the ABAP code.
Firstly, when first starting my coding, I quickly realized that I was not going to be able to use existing examples that I’ve had laying around over the years. The interfaces that I’m used to using such as IF_HTTP_CLIENT are not white-listed in Steampunk. Luckily, I’ve found some new white-listed classes/interfaces that I can use for HTTP connectivity. Problem solved. ? Be advised as of the time of this writing, these new HTTP connectivity APIs are only supported in the Steampunk environment. So what I’ve done here is basically wrapped many of the SCP Neo Workflow API endpoints with ABAP methods, in an attempt to remove the complexity of handling the request/response from the rest of my application. I did not create wrappers for all endpoints of the API, only what I needed for my application really. So this is in no way a complete API implementation. Also, this API class assumes you have all of the required authorizations to perform these actions on the workflow definitions/instances. The required authorizations are documented in the API documentation for the Workflow API for Neo.
All of these wrapper methods then leverage one common private method called EXECUTE_WORKFLOW_REQUEST which is the method that does all of the work. Notice the use of the new HTTP connectivity APIs CL_HTTP_DESTINATION_PROVIDER and CL_WEB_HTTP_CLIENT_MANAGER.
We can now use this workflow API class in our application. For this, I have created class ZCL_SCP_WORKFLOW_TEST to show how to call the API methods. In a productive application, you would probably not have all of these API calls stacked inside of one execution, but for our purposes here, I just wanted to show how to call all of these APIs in one single execution. So don't read into the fact that we are deleting all instances, creating new instances, and updating/completing those instances all at the same time.
First we need to create an instance of the API class, passing the workflow runtime URL, SCP user and password.
This next section of code shows how to call the API to get the workflow definition, the definition model, and the workflow instances of the workflow definition by the status, for example, get all RUNNING instances.
The next section shows how to delete instances of the workflow definition by the status, RUNNING, COMPLETED, or ERRONEOUS.
This next section shows how to create workflow instances of the workflow definition and set its context. Its important to pass a valid SCP user id as the "approverUserId" and a valid email address to the "recipientEmail", otherwise the Workflow will not work correctly.
Finally, this last section of code shows how to interact with the workflow instances. First there is a call to the API to get the instance details by business key, from there we can get the workflow instance context and read its values. We can also then update the workflow instance context. Finally, we can get the details of the workflow task instances, and update them as well.
You may also notice the use of the PARSE_JSON method in the previous code. This method parses the json response returned by the Workflow API calls. This method is meant to be very generic in nature to be used across the different API calls. Due to the fact that my usual JSON parsing and RTTS classes are not currently white-listed, this method ended up being kind of messy, hence the reason I'm not showing that code here. I very much plan to rewrite that mess as soon as humanly possible, the way I wanted to from the start. 🙂 But for now, it works and does what it is suppose to. Moving on....
Now if we run this test class, and view our workflow instances in the Workflow Monitor we should see 3 instances(you may have to change the filter on this screen to show COMPLETED status). Of course, the workflow has been completed since we had programmatically set that status. We can also see that the context was updated. The context value “approvalStatus” is now set to “approved”.
If we look at the execution log of the workflow instance, we see that all of the steps have been captured in the log.
That just about wraps up this project. I have to say it was a lot of fun working on ABAP again, and of course the challenge of learning something new( the Workflow piece ) is always fun. On to the next one! Hopefully I'll be back in a couple months with some more cool stuff. Until then...
Labels:
13 Comments
You must be a registered user to add a comment. If you've already registered, sign in. Otherwise, register and sign in.
Labels in this area
-
ABAP CDS Views - CDC (Change Data Capture)
2 -
AI
1 -
Analyze Workload Data
1 -
BTP
1 -
Business and IT Integration
2 -
Business application stu
1 -
Business Technology Platform
1 -
Business Trends
1,658 -
Business Trends
92 -
CAP
1 -
cf
1 -
Cloud Foundry
1 -
Confluent
1 -
Customer COE Basics and Fundamentals
1 -
Customer COE Latest and Greatest
3 -
Customer Data Browser app
1 -
Data Analysis Tool
1 -
data migration
1 -
data transfer
1 -
Datasphere
2 -
Event Information
1,400 -
Event Information
66 -
Expert
1 -
Expert Insights
177 -
Expert Insights
294 -
General
1 -
Google cloud
1 -
Google Next'24
1 -
Kafka
1 -
Life at SAP
780 -
Life at SAP
13 -
Migrate your Data App
1 -
MTA
1 -
Network Performance Analysis
1 -
NodeJS
1 -
PDF
1 -
POC
1 -
Product Updates
4,577 -
Product Updates
341 -
Replication Flow
1 -
RisewithSAP
1 -
SAP BTP
1 -
SAP BTP Cloud Foundry
1 -
SAP Cloud ALM
1 -
SAP Cloud Application Programming Model
1 -
SAP Datasphere
2 -
SAP S4HANA Cloud
1 -
SAP S4HANA Migration Cockpit
1 -
Technology Updates
6,873 -
Technology Updates
419 -
Workload Fluctuations
1
Related Content
- Demystifying the Common Super Domain for SAP Mobile Start in Technology Blogs by SAP
- Exploring Integration Options in SAP Datasphere with the focus on using SAP extractors - Part II in Technology Blogs by SAP
- How to use AI services to translate Picklists in SAP SuccessFactors - An example in Technology Blogs by SAP
- New Machine Learning features in SAP HANA Cloud in Technology Blogs by SAP
- Top Picks: Innovations Highlights from SAP Business Technology Platform (Q1/2024) in Technology Blogs by SAP
Top kudoed authors
| User | Count |
|---|---|
| 36 | |
| 25 | |
| 16 | |
| 13 | |
| 7 | |
| 7 | |
| 6 | |
| 6 | |
| 6 | |
| 6 |