
- SAP Community
- Products and Technology
- Technology
- Technology Blogs by SAP
- SAP Cloud Application Programming Model: Deep Inse...
Technology Blogs by SAP
Learn how to extend and personalize SAP applications. Follow the SAP technology blog for insights into SAP BTP, ABAP, SAP Analytics Cloud, SAP HANA, and more.
Turn on suggestions
Auto-suggest helps you quickly narrow down your search results by suggesting possible matches as you type.
Showing results for
Product and Topic Expert
Options
- Subscribe to RSS Feed
- Mark as New
- Mark as Read
- Bookmark
- Subscribe
- Printer Friendly Page
- Report Inappropriate Content
07-08-2019
8:55 AM
This tutorial describes
As a CAP developer you’re used to getting everything for free:
Just define a CDS model and you're ready to execute GET and CREATE requests on the generated OData service.
However, sad but true, In case of Deep Insert this is not the case
This tutorial will show how to do the required implementation in Java
Experienced users may jump to the code
Interested readers may go ahead to learn what's that: deep insert
Note:
We're going to showcase java coding, but at the end of the day, there are only few lines of code which are relevant.
So it will be easy for you to adapt the code to your preferred language
Some experience with the SAP Cloud Application Programming Model are required
(see here or here to get started)
A good alternative to get started with modelling CDS could be this series of tutorials
In our example scenario, we imagine that a manager is maintaining relationships to customer companies
For that, he’s using an OData service which displays a list of companies and a list of contact persons
Furthermore, he wants to create new customer companies and contacts
Below steps explain in detail the behavior of OData service and the required implementation
We will discuss the straight-forward case and a second case with some additional tasks
Assuming you’re already familiar with CAP project creation, let’s skip the details, and just mention the names, to be on the same page
Project name: DeepInsertDemo
Java package: com.example.deep
OData version: 2
db module: yes
For this tutorial, we need just a very simple model with 2 associated entities
(See here and here for info about associations in CDS)
CDS Model
Note:
In tutorials, I like to use names which very clearly identify what it is about.
E.g.linkToContact
I believe such names are very helpful when explaining the code below
But obviously, this is not a recommendation for productive use.
Note:
If you need UUID: jump to Part 2
Service definition
Before deployment, 2 points to consider
mta.yaml
If you’re working in Trial account, you have to change the service-plan of xsuaa service instance in the generated mta.yaml
Open the mta.yaml file in the root project folder
Find the resources section at the end of the file, then find the uaa resource and the service-plan parameter
Change the default value “default” to “application”:
Furthermore, I suggest to increase the memory for java module in the mta, since the generated value (512) turns out to be too small
In order to use the new OData service, we invoke the metadata (we need for composing the CREATE requests) and the empty collections:
Try the service
https://...deepinsertdemo-srv.cfapps..../odata/v2/RelationService/$metadata
https://...deepinsertdemo-srv.cfapps..../odata/v2/RelationService/ContactEntity
https://...deepinsertdemo-srv.cfapps..../odata/v2/RelationService/CompanyEntity
In my example, the URL looks like this:
Create Contact
To fill the empty collections, we create first a ContactEntity:
Create Company
Afterwards we can create a ComanyEntity which uses the id of the created ContactEntity in the foreign-key property
Navigation
Now that we have 2 entities and they are associated via the foreign-key, we can test the navigation:
https://.../v2/RelationService/CompanyEntity(1)/linkToContact
Result should be the value of the contact created before
$expand
Now the manager viewing his customer companies is tired of navigation steps.
He wants to see all info at once: the company and the contact person in one request
This can be achieved with the $expand parameter, which is appended to the URL.
To compose the URL:
after the entity set “CompanyEntity”, append the ? then the parameter $expand with value <name of navigation property>
In our example:
https://.../v2/RelationService/CompanyEntity/?$expand=contact
The result of the $expand can be seen in below screenshot.
Each entry of the collection contains – on top of the properties - the links to associated entities.
These are links, which can be followed by the user (or the application)
In case of $expand, the corresponding link (in our case, the “linkToContact” navigation property) contains a child tag called “<inline>”
It contains the content of the target.
This inline entry has the same content like we got when we used navigation
https://.../v2/RelationService/CompanyEntity(1)/linkToContact
The only difference is that we get both (Company and Contact) with only one HTTP request.
Note:
Using $expand on collections might have performance impacts
Note:
$expand can also be applied to single READ requests, e.g.
https://.../v2/RelationService/CompanyEntity(1)/?$expand=linkToContact
Note:
In our example, the inline section contains one <entry>, because we defined a 1:1 association.
In case of 1-to-many association, it would be a <feed> containing list of ContactEntities
Now let's repeat the same request, but this time we want the response formatted in JSON
(we'll need it later)
https://.../RelationService/CompanyEntity?$expand=linkToContact&$format=json

Expanded Create
Now the other way ‘round:
In our example, the manager wants to create new customers.
And he wants to create the customer company AND the corresponding contact in ONE request
Of course: Expanded Create doesn't exist...
In OData, such a request is called Deep Insert.
Because it is a deep create, it creates a parent entity and a nested child (or multiple child entities, in case of to-many)
Try the Deep Insert
How does a Deep Insert look like?
To realize a deep insert creation (POST request) in OData, we go the usual way:
First, do a single GET request, then take the response and paste it in a POST request body:
In our case we call a single company with $expand
https://.../RelationService/CompanyEntity(1)/?$expand=linkToContact&$format=json
Note:
We use the JSON payload because it is easier and smaller, but the same can be done with xml format
Then we need to clean up a little bit the response payload:
remove the top level node
remove the metadata nodes
With other words:
To compose a deep insert, we compose the parent-entity section as usual:
propertyName:propertyValue
for the nested entity, we add a new line:
navigationPropertyName:<value: the nested entity>
Finally, the following deep insert request can be executed
Note:
Of course, the request body can also be sent in xml, with the corresponding contant-type header
Result:
Error: CDSRuntimeException.QUERY_FAILED
In the logs (cf logs CapDeep-srv –recent ) we can see:
invalid column name: LINKTOCONTACT
OK, we can understand that:
In our CDS model, we defined the property "linkToContact" as an association, not a "normal" property
As such there’s no column with that name in the table COM_RELATION_COMPANIES of the final database
With other words: The generic handler of CAP is not able to generically handle a deep insert
So don't panic: It is not your fault...!
And now, finally, it comes:
We've drastically demonstrated that Deep Insert is not supported out-of-the-box by the framework.
Again: don't panic.
Almost everything can be solved by overriding the generic framework implementation with own code.
For that purpose, the FWK provides hooks or exits
In the srv module of your CAP project, go to the generated (empty) java package com.example.deep and create a Java class with a name of your choice, e.g. ServiceImplementation.java
Add a method with name of your choice, e.g. createCompany.
The relevant part is the annotation which indicates the FWK to invoke this method instead of the generic FWK implementation. It also indicates that it should be used if a CREATE operation is executed for entity “Companies” of service “RelationService”
And this is the full implementation of the CREATE method:
Explanation:
Remember the problem we had above:
the FWK doesn’t know that the property “linkToContact” is not a column. It is an association.
So what we have to do in the code is exactly that:
Tell the FWK about the association
At the end of the day, 2 entities have to be created, so some FWK layer will execute SQL inserts into 2 tables (in our example)
For that, FWK has to know the name of tables and name of key columns
That’s why the object “EntityData” carries not only info about properties, but also about entityName and key properties
If you’ve already worked with EntityData, you know:
When creating a "normal" instance of EntityData we must pass keyElement information:

In case of deep insert it is a bit more complicated:
Since there are multiple entities, we need to name multiple keyElements and it must be clear to which entity they belong.
So we need a map.
The map contains a mapping of key property to its entity
Note that the key can be composed of multiple key properties, so the object to carry the keyElement information is a List:
Now we add the first entry to the map:
In case of parent entity, it is easy: entity name and key property name (wrapped in a list)
In case of inline entity, it is a bit different:
Instead of entity name, the name of association has to be used.
It is mapped to the key field of the target entity
The target entity itself can be determined by the FWK via the association info
In our example, we have 2 entities, so that’s already all we have to do.
Finally, to create the EntityData instance which will be used to create the data in the database, we call the method which supports deep insert.
We pass the 3 required parameters:
the map containing the data,
the map containing the key properties and
the name of the entity.
Note:
Make sure to pass the correct qualified name: "RelationService.CompanyEntity"
It is composed by concatenating service name with entity name
From where to get the hard-coded strings?
All the info about the hard-coded names can be viewed in the CDS, CSN, or in the edmx files.
CDS:

CSN:

edmx:

OK.
We’ve discussed the implementation task for enabling creation of data in 2 tables, via deep insert
The structured data (nested maps) coming from the request had to be mapped to some metadata (key field information)
The rest of the implementation is just daily work:
Retrieve the request payload from the createRequest instance. Which is the data to be created in the backend database.
Furthermore trigger the actual creation in the database.
Finally, compose the response of our OData service CREATE operation (POST request)
That’s it.
Test the Deep Insert Implementation
After changing the Java module, we can push the Java project only. We don’t need to redeploy the whole mtar.
Then try the deep insert again
This time we receive a success response and if we check the collections, we can see that both the entries for CompanyEntity and ContactEntity have been created
Also the navigation should work as expected
If the OData service should support deep insert, then the CREATE operation has to be overridden with own implementation
The deep insert request contains nested entities whose key properties have to be identified
Those key properties have to be assigned to the corresponding entities via Association name (navigation property name)
In the next part, we'll quickly discuss the implementation required for CDS models which use the data type for generated key values: UUID
It should be relevant for most users, so don't miss it !
If you're interested in executing deep insert on a remote service (manual code) see part 4
You deploy initially the MTA application (.mtar archive file) and receive the following error message:
Service "DeepInsertDemo-db-hdi-container" creation with service offering "hanatrial" failed with "403 Forbidden: A service instance for the selected plan cannot be created in this organization. The plan is visible because another organization you belong to has access to it."
Possible Reason:
You're working on a Trial account, in a subaccount which doesn't have quota assigned
Check in cockpit: service marketplace: is the Hana service available?
If not, the reason might be:
In your trial account you have 2 subaccounts and you’re deploying to the subaccount which doesn’t have entitlement for Hana service
Solution
Go to Entitlements and assign quota to your current subaccount.
Press Edit, remove quota from other subaccount. Press Save. Then press Edit, add quota to your current subaccount, press save
SAP Cloud Application Programming Model:
Intro
SAP Help Portal
OData V2: operations
OData V4: expand
OData V4: Deep Insert
CDS tutorials: see this blog series
Consume remote service with generic library: 1 - 2 - 3
data-model.cds
cat-service.cds
ServiceImplementation.java
mta.yaml
How to implement
Deep Insert
in
SAP Cloud Application Programming Model
(Part 1: the basics)
Quicklinks:
Implementation
Sample Project files
Part 2: with UUID
Part 3: Multi-Level
Part 4: Consume Remote Service
Part 5: Remote Service with SDK
As a CAP developer you’re used to getting everything for free:
Just define a CDS model and you're ready to execute GET and CREATE requests on the generated OData service.
However, sad but true, In case of Deep Insert this is not the case
This tutorial will show how to do the required implementation in Java
Experienced users may jump to the code
Interested readers may go ahead to learn what's that: deep insert
Note:
We're going to showcase java coding, but at the end of the day, there are only few lines of code which are relevant.
So it will be easy for you to adapt the code to your preferred language
Prerequisites
Some experience with the SAP Cloud Application Programming Model are required
(see here or here to get started)
A good alternative to get started with modelling CDS could be this series of tutorials
Scenario
In our example scenario, we imagine that a manager is maintaining relationships to customer companies
For that, he’s using an OData service which displays a list of companies and a list of contact persons
Furthermore, he wants to create new customer companies and contacts
Below steps explain in detail the behavior of OData service and the required implementation
We will discuss the straight-forward case and a second case with some additional tasks
Project
Assuming you’re already familiar with CAP project creation, let’s skip the details, and just mention the names, to be on the same page
Project name: DeepInsertDemo
Java package: com.example.deep
OData version: 2
db module: yes
CDS
For this tutorial, we need just a very simple model with 2 associated entities
(See here and here for info about associations in CDS)
CDS Model
namespace com.relation;


entity CompanyEntity {

  key companyId : Integer;

  companyName  : String;

  linkToContact  : Association to ContactEntity;

}


entity ContactEntity {

	key contactId : String;

	contactName : String;

	contactPhone : Integer;

}
Note:
In tutorials, I like to use names which very clearly identify what it is about.
E.g.linkToContact
I believe such names are very helpful when explaining the code below
But obviously, this is not a recommendation for productive use.
Note:
If you need UUID: jump to Part 2
Service definition
using com.relation from '../db/data-model';


service RelationService {

   entity CompanyEntity as projection on relation.CompanyEntity;

   entity ContactEntity as projection on relation.ContactEntity;

}
Deploy
Before deployment, 2 points to consider
mta.yaml
If you’re working in Trial account, you have to change the service-plan of xsuaa service instance in the generated mta.yaml
Open the mta.yaml file in the root project folder
Find the resources section at the end of the file, then find the uaa resource and the service-plan parameter
Change the default value “default” to “application”:
  - name: DeepInsertDemo-uaa

    type: org.cloudfoundry.managed-service

    parameters:

      service-plan: application

      service: xsuaa

      config:

        xsappname: DeepInsertDemo-${space}

        tenant-mode: dedicated
Furthermore, I suggest to increase the memory for java module in the mta, since the generated value (512) turns out to be too small
  - name: DeepInsertDemo-srv

    type: java

    path: srv

    parameters:

      memory: 1024M
Test the OData service
In order to use the new OData service, we invoke the metadata (we need for composing the CREATE requests) and the empty collections:
Try the service
https://...deepinsertdemo-srv.cfapps..../odata/v2/RelationService/$metadata
https://...deepinsertdemo-srv.cfapps..../odata/v2/RelationService/ContactEntity
https://...deepinsertdemo-srv.cfapps..../odata/v2/RelationService/CompanyEntity
In my example, the URL looks like this:
https://p1234567891trial-bssubaccount-betaspace-deepinsertdemo-srv.cfapps.eu10.hana.ondemand.com/oda...Create Contact
To fill the empty collections, we create first a ContactEntity:
| HTTP Verb |
| POST |
| URL |
| https://...deepinsertdemo-srv.cfapps..../odata/v2/RelationService/ContactEntity |
| Headers |
| Content-Type: application/json |
| Request body |
| { "contactId": "ContactForPetShop", "contactName": "Jack", "contactPhone": 123456 } |
Create Company
Afterwards we can create a ComanyEntity which uses the id of the created ContactEntity in the foreign-key property
| HTTP Verb |
| POST |
| URL |
| https://...deepinsertdemo-srv.cfapps..../odata/v2/RelationService/CompanyEntity |
| Headers |
| Content-Type: application/json |
| Request body |
| { "companyId": 1, "companyName": "PetShop", "linkToContact_contactId": "ContactForPetShop" } |
Navigation
Now that we have 2 entities and they are associated via the foreign-key, we can test the navigation:
https://.../v2/RelationService/CompanyEntity(1)/linkToContact
Result should be the value of the contact created before
$expand
Now the manager viewing his customer companies is tired of navigation steps.
He wants to see all info at once: the company and the contact person in one request
This can be achieved with the $expand parameter, which is appended to the URL.
To compose the URL:
after the entity set “CompanyEntity”, append the ? then the parameter $expand with value <name of navigation property>
In our example:
https://.../v2/RelationService/CompanyEntity/?$expand=contact
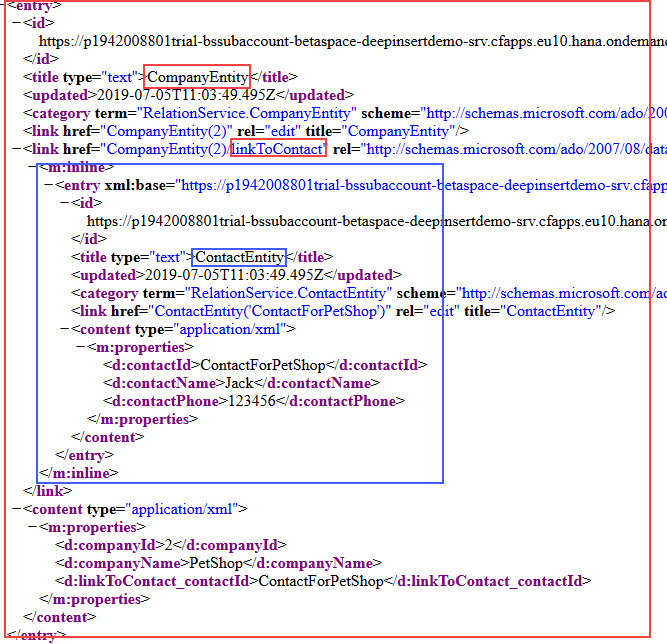
The result of the $expand can be seen in below screenshot.
Each entry of the collection contains – on top of the properties - the links to associated entities.
These are links, which can be followed by the user (or the application)
In case of $expand, the corresponding link (in our case, the “linkToContact” navigation property) contains a child tag called “<inline>”
It contains the content of the target.
This inline entry has the same content like we got when we used navigation
https://.../v2/RelationService/CompanyEntity(1)/linkToContact
The only difference is that we get both (Company and Contact) with only one HTTP request.
Note:
Using $expand on collections might have performance impacts
Note:
$expand can also be applied to single READ requests, e.g.
https://.../v2/RelationService/CompanyEntity(1)/?$expand=linkToContact
Note:
In our example, the inline section contains one <entry>, because we defined a 1:1 association.
In case of 1-to-many association, it would be a <feed> containing list of ContactEntities
Now let's repeat the same request, but this time we want the response formatted in JSON
(we'll need it later)
https://.../RelationService/CompanyEntity?$expand=linkToContact&$format=json
Expanded Create
Now the other way ‘round:
In our example, the manager wants to create new customers.
And he wants to create the customer company AND the corresponding contact in ONE request
Of course: Expanded Create doesn't exist...
In OData, such a request is called Deep Insert.
Because it is a deep create, it creates a parent entity and a nested child (or multiple child entities, in case of to-many)
Try the Deep Insert
How does a Deep Insert look like?
To realize a deep insert creation (POST request) in OData, we go the usual way:
First, do a single GET request, then take the response and paste it in a POST request body:
In our case we call a single company with $expand
https://.../RelationService/CompanyEntity(1)/?$expand=linkToContact&$format=json
Note:
We use the JSON payload because it is easier and smaller, but the same can be done with xml format
Then we need to clean up a little bit the response payload:
remove the top level node
remove the metadata nodes
With other words:
To compose a deep insert, we compose the parent-entity section as usual:
propertyName:propertyValue
for the nested entity, we add a new line:
navigationPropertyName:<value: the nested entity>
Finally, the following deep insert request can be executed
| HTTP Verb |
| POST |
| URL |
| https://...deepinsertdemo-srv.cfapps..../odata/v2/RelationService/CompanyEntity |
| Headers |
| Content-Type: application/json |
| Request body |
| { "companyId": 3, "companyName": "BeerShop", "linkToContact_contactId": "ContactForBeerShop", "linkToContact": { "contactId": "ContactForBeerShop", "contactName": "Peter", "contactPhone": 9876543 } |
Note:
Of course, the request body can also be sent in xml, with the corresponding contant-type header
Result:
Error: CDSRuntimeException.QUERY_FAILED
In the logs (cf logs CapDeep-srv –recent ) we can see:
invalid column name: LINKTOCONTACT
OK, we can understand that:
In our CDS model, we defined the property "linkToContact" as an association, not a "normal" property
As such there’s no column with that name in the table COM_RELATION_COMPANIES of the final database
With other words: The generic handler of CAP is not able to generically handle a deep insert
So don't panic: It is not your fault...!
And now, finally, it comes:
How to implement Deep Insert
We've drastically demonstrated that Deep Insert is not supported out-of-the-box by the framework.
Again: don't panic.
Almost everything can be solved by overriding the generic framework implementation with own code.
For that purpose, the FWK provides hooks or exits
In the srv module of your CAP project, go to the generated (empty) java package com.example.deep and create a Java class with a name of your choice, e.g. ServiceImplementation.java
Add a method with name of your choice, e.g. createCompany.
The relevant part is the annotation which indicates the FWK to invoke this method instead of the generic FWK implementation. It also indicates that it should be used if a CREATE operation is executed for entity “Companies” of service “RelationService”
@Create(entity = "CompanyEntity", serviceName = "RelationService")

public CreateResponse createCompany(CreateRequest createRequest, ExtensionHelper extensionHelper) throws DatasourceException{
And this is the full implementation of the CREATE method:
@Create(entity = "CompanyEntity", serviceName = "RelationService")

public CreateResponse createCompany(CreateRequest createRequest, ExtensionHelper extensionHelper) throws DatasourceException{

   // 1) retrieve the request payload, the data to create in backend

   Map<String, Object> mapForCreation = createRequest.getData().asMap();


   // 2) our actual task is: specify key field for navigation entity

   Map<String, List<String>> keyMap = new HashMap<String, List<String>>();

   // the key map for the parent entity: Companies. Here, the key field is "companyId"

   keyMap.put("CompanyEntity", Collections.singletonList("companyId"));

   // here we assign the key field (contactId) of navigation target entity (Contacts) to the navigationProperty name (contact)

   keyMap.put("linkToContact", Collections.singletonList("contactId"));


   // 3) send data to database, including the info about keys

   EntityData entityDataToCreate = EntityData.createFromDeepMap(mapForCreation, keyMap, "RelationService.CompanyEntity");


   // execute it in database

   EntityData result = extensionHelper.getHandler().executeInsertWithAssociations(entityDataToCreate, true);

   return CreateResponse.setSuccess().setData(result).response();

}
Explanation:
Remember the problem we had above:
the FWK doesn’t know that the property “linkToContact” is not a column. It is an association.
So what we have to do in the code is exactly that:
Tell the FWK about the association
At the end of the day, 2 entities have to be created, so some FWK layer will execute SQL inserts into 2 tables (in our example)
For that, FWK has to know the name of tables and name of key columns
That’s why the object “EntityData” carries not only info about properties, but also about entityName and key properties
If you’ve already worked with EntityData, you know:
When creating a "normal" instance of EntityData we must pass keyElement information:
In case of deep insert it is a bit more complicated:
Since there are multiple entities, we need to name multiple keyElements and it must be clear to which entity they belong.
So we need a map.
The map contains a mapping of key property to its entity
Note that the key can be composed of multiple key properties, so the object to carry the keyElement information is a List:
Map<String, List<String>> keyMap = new HashMap<String, List<String>>();Now we add the first entry to the map:
In case of parent entity, it is easy: entity name and key property name (wrapped in a list)
keyMap.put("CompanyEntity", Collections.singletonList("companyId"));
In case of inline entity, it is a bit different:
Instead of entity name, the name of association has to be used.
It is mapped to the key field of the target entity
The target entity itself can be determined by the FWK via the association info
keyMap.put("linkToContact", Collections.singletonList("contactId"));In our example, we have 2 entities, so that’s already all we have to do.
Finally, to create the EntityData instance which will be used to create the data in the database, we call the method which supports deep insert.
We pass the 3 required parameters:
the map containing the data,
the map containing the key properties and
the name of the entity.
Note:
Make sure to pass the correct qualified name: "RelationService.CompanyEntity"
It is composed by concatenating service name with entity name
EntityData entityDataToCreate = EntityData.createFromDeepMap(

                                  mapForCreation,

                                  keyMap,

                                  "RelationService.CompanyEntity");
From where to get the hard-coded strings?
All the info about the hard-coded names can be viewed in the CDS, CSN, or in the edmx files.
CDS:
CSN:
edmx:
OK.
We’ve discussed the implementation task for enabling creation of data in 2 tables, via deep insert
The structured data (nested maps) coming from the request had to be mapped to some metadata (key field information)
The rest of the implementation is just daily work:
Retrieve the request payload from the createRequest instance. Which is the data to be created in the backend database.
Furthermore trigger the actual creation in the database.
Finally, compose the response of our OData service CREATE operation (POST request)
That’s it.
Test the Deep Insert Implementation
After changing the Java module, we can push the Java project only. We don’t need to redeploy the whole mtar.
Then try the deep insert again
This time we receive a success response and if we check the collections, we can see that both the entries for CompanyEntity and ContactEntity have been created
Also the navigation should work as expected
Summary
If the OData service should support deep insert, then the CREATE operation has to be overridden with own implementation
The deep insert request contains nested entities whose key properties have to be identified
Those key properties have to be assigned to the corresponding entities via Association name (navigation property name)
Next Steps
In the next part, we'll quickly discuss the implementation required for CDS models which use the data type for generated key values: UUID
It should be relevant for most users, so don't miss it !
If you're interested in executing deep insert on a remote service (manual code) see part 4
Troubleshooting
You deploy initially the MTA application (.mtar archive file) and receive the following error message:
Service "DeepInsertDemo-db-hdi-container" creation with service offering "hanatrial" failed with "403 Forbidden: A service instance for the selected plan cannot be created in this organization. The plan is visible because another organization you belong to has access to it."
Possible Reason:
You're working on a Trial account, in a subaccount which doesn't have quota assigned
Check in cockpit: service marketplace: is the Hana service available?
If not, the reason might be:
In your trial account you have 2 subaccounts and you’re deploying to the subaccount which doesn’t have entitlement for Hana service
Solution
Go to Entitlements and assign quota to your current subaccount.
Press Edit, remove quota from other subaccount. Press Save. Then press Edit, add quota to your current subaccount, press save
Links
SAP Cloud Application Programming Model:
Intro
SAP Help Portal
OData V2: operations
OData V4: expand
OData V4: Deep Insert
CDS tutorials: see this blog series
Consume remote service with generic library: 1 - 2 - 3
Appendix: Sample Project files
data-model.cds
namespace com.relation;


entity CompanyEntity {

   key companyId : Integer;

   companyName  : String;

   linkToContact  : Association to ContactEntity;

}


entity ContactEntity {

   key contactId : String;

   contactName : String;

   contactPhone : Integer;

}
cat-service.cds
using com.relation from '../db/data-model';


service RelationService {

   entity CompanyEntity as projection on relation.CompanyEntity;

   entity ContactEntity as projection on relation.ContactEntity;

}
ServiceImplementation.java
package com.example.deep;


import java.util.ArrayList;

import java.util.Collections;

import java.util.HashMap;

import java.util.List;

import java.util.Map;

import java.util.UUID;


import org.slf4j.Logger;

import org.slf4j.LoggerFactory;


import com.sap.cloud.sdk.service.prov.api.DataSourceHandler;

import com.sap.cloud.sdk.service.prov.api.EntityData;

import com.sap.cloud.sdk.service.prov.api.EntityMetadata;

import com.sap.cloud.sdk.service.prov.api.ExtensionHelper;

import com.sap.cloud.sdk.service.prov.api.exception.DatasourceException;

import com.sap.cloud.sdk.service.prov.api.operations.Create;

import com.sap.cloud.sdk.service.prov.api.request.CreateRequest;

import com.sap.cloud.sdk.service.prov.api.response.CreateResponse;


public class ServiceImplementation {

	private static Logger logger = LoggerFactory.getLogger(ServiceImplementation.class);


	@Create(entity = "CompanyEntity", serviceName = "RelationService")

	public CreateResponse createCompany(CreateRequest createRequest, ExtensionHelper extensionHelper) throws DatasourceException{

		// 1) retrieve the request payload, the data to create in backend

	    Map<String, Object> mapForCreation = createRequest.getData().asMap();


        // 2) our actual task is: specify key field for navigation entity

        //This the map to carry the keys of all entities of the deep insert

        Map<String, List<String>> keyMap = new HashMap<String, List<String>>();

        // Parent entity: CompanyEntity. Here, the key field is "companyId"

        keyMap.put("CompanyEntity", Collections.singletonList("companyId"));

        // For nested entity: assign the key field (contactId) of navigation target entity (ContactEntity) to the navigationProperty name (linkToContact)

        keyMap.put("linkToContact", Collections.singletonList("contactId"));


        // 3) send data to database, including the info about keys

        EntityData entityDataToCreate = EntityData.createFromDeepMap(mapForCreation, keyMap, "RelationService.CompanyEntity");

         // execute it in database

        EntityData result = extensionHelper.getHandler().executeInsertWithAssociations(entityDataToCreate, true);

        return CreateResponse.setSuccess().setData(result).response();

	}

}
mta.yaml
_schema-version: 2.0.0

ID: DeepInsertDemo

version: 1.0.0

modules:

  - name: DeepInsertDemo-db

    type: hdb

    path: db

    parameters:

      memory: 256M

      disk-quota: 256M

    requires:

      - name: DeepInsertDemo-db-hdi-container

  - name: DeepInsertDemo-srv

    type: java

    path: srv

    parameters:

      memory: 990M

    provides:

      - name: srv_api

        properties:

          url: ${default-url}

    requires:

      - name: DeepInsertDemo-db-hdi-container

        properties:

          JBP_CONFIG_RESOURCE_CONFIGURATION: '[tomcat/webapps/ROOT/META-INF/context.xml:

            {"service_name_for_DefaultDB" : "~{hdi-container-name}"}]'

      - name: DeepInsertDemo-uaa

resources:

  - name: DeepInsertDemo-db-hdi-container

    type: com.sap.xs.hdi-container

    properties:

      hdi-container-name: ${service-name}

  - name: DeepInsertDemo-uaa

    type: org.cloudfoundry.managed-service

    parameters:

      service-plan: application

      service: xsuaa

      config:

        xsappname: DeepInsertDemo-${space}

        tenant-mode: dedicated
Labels:
4 Comments
You must be a registered user to add a comment. If you've already registered, sign in. Otherwise, register and sign in.
Labels in this area
-
ABAP CDS Views - CDC (Change Data Capture)
2 -
AI
1 -
Analyze Workload Data
1 -
BTP
1 -
Business and IT Integration
2 -
Business application stu
1 -
Business Technology Platform
1 -
Business Trends
1,661 -
Business Trends
85 -
CAP
1 -
cf
1 -
Cloud Foundry
1 -
Confluent
1 -
Customer COE Basics and Fundamentals
1 -
Customer COE Latest and Greatest
3 -
Customer Data Browser app
1 -
Data Analysis Tool
1 -
data migration
1 -
data transfer
1 -
Datasphere
2 -
Event Information
1,400 -
Event Information
64 -
Expert
1 -
Expert Insights
178 -
Expert Insights
269 -
General
1 -
Google cloud
1 -
Google Next'24
1 -
Kafka
1 -
Life at SAP
784 -
Life at SAP
10 -
Migrate your Data App
1 -
MTA
1 -
Network Performance Analysis
1 -
NodeJS
1 -
PDF
1 -
POC
1 -
Product Updates
4,578 -
Product Updates
317 -
Replication Flow
1 -
RisewithSAP
1 -
SAP BTP
1 -
SAP BTP Cloud Foundry
1 -
SAP Cloud ALM
1 -
SAP Cloud Application Programming Model
1 -
SAP Datasphere
2 -
SAP S4HANA Cloud
1 -
SAP S4HANA Migration Cockpit
1 -
Technology Updates
6,886 -
Technology Updates
388 -
Workload Fluctuations
1
Related Content
- Unlocking Full-Stack Potential using SAP build code - Part 1 in Technology Blogs by Members
- Consuming CAPM Application's OData service into SAP Fiori Application in Business Application Studio in Technology Blogs by Members
- Upload Excel using SAP RAP Only in Technology Blogs by Members
- SAP SABRIX UPGRADE in Technology Blogs by Members
- Experiencing Embeddings with the First Baby Step in Technology Blogs by Members
Top kudoed authors
| User | Count |
|---|---|
| 12 | |
| 12 | |
| 11 | |
| 9 | |
| 9 | |
| 9 | |
| 9 | |
| 8 | |
| 8 | |
| 8 |