
- SAP Community
- Products and Technology
- Enterprise Resource Planning
- ERP Blogs by SAP
- Calling a BAPI in the SAP S/4 HANA Cloud from an o...
Enterprise Resource Planning Blogs by SAP
Get insights and updates about cloud ERP and RISE with SAP, SAP S/4HANA and SAP S/4HANA Cloud, and more enterprise management capabilities with SAP blog posts.
Turn on suggestions
Auto-suggest helps you quickly narrow down your search results by suggesting possible matches as you type.
Showing results for
former_member13
Explorer
Options
- Subscribe to RSS Feed
- Mark as New
- Mark as Read
- Bookmark
- Subscribe
- Printer Friendly Page
- Report Inappropriate Content
06-18-2019
12:10 PM
Introduction
In the first part of this series I explained the background of my little endeavour and which preparations were necessary to implement the test cases. In this blog post you will learn the easiest type of cal (at least from my point of view). In case you haven't read the first part of the blog, please do so, especially the section "BAPIs in SAP S/4HANA Cloud – When And How To Use Them".
Calling a BAPI from an SAP ERP System
This is a straightforward scenario and the standard for the direct coupling scenarios as they are available in the Best Practice Explorer. But instead of calling from an application I simply used the Function Module Test Transaction SE37 in the SAP ERP System. But it illustrates the principle just the same.

Preparation
What I used
- A functional SAP Cloud Connector Instance + user with administrative privileges (or see the Appendix at the end of this blog post)
- An SAP S/4 HANA Public Cloud Tenant + user with administrative privileges
- An SAP ERP Backend System + user with RFC privileges
What I did
- Prepare the SAP S/4 HANA Public Cloud System (as described in my first blog post)
- Set up an RFC Service Channel in the SAP Cloud Connector
- Set up a RFC Destination in the ERP Backend
- Run a test in transaction SE37
Set up the Service Channel in SAP Cloud Connector
This step sets up the RFC connection to the S/4 HANA Public Cloud System
- Log on to the SAP Cloud Connector
- Go to “Service Channels -> OnPremise to Cloud”

- Press the “+” sign to create a new channel
- Pick type “S/4HANA Cloud”

- Fill in the API-tenant of your Cloud. Add a “-api” after the my300xxx” part of the URL just like this: my1234567-api.s4hana.ondemand.com
- The local instance number can be set to “00”.
- If all is fine the status should be green.
- Pick type “S/4HANA Cloud”
Settings in the SAP ERP Backend
Then I set up the RFC Destination towards the SAP S/4 HANA Cloud System. It is a test system called EAF. The connection goes via the SAP Cloud Connector and that is why I called this RFC Destination SCC_EAF.
- Go to transaction SM59
- Create a new ABAP connection (Type 3)
- Maintain the server details. Target Host is the SAP Cloud Connector Server Address or IP:

- Maintain the user name and password (Inbound User in the Communication Arrangement SAP_COM_0319 as described in my first blog post).

- Save the configuration and do a connection test:
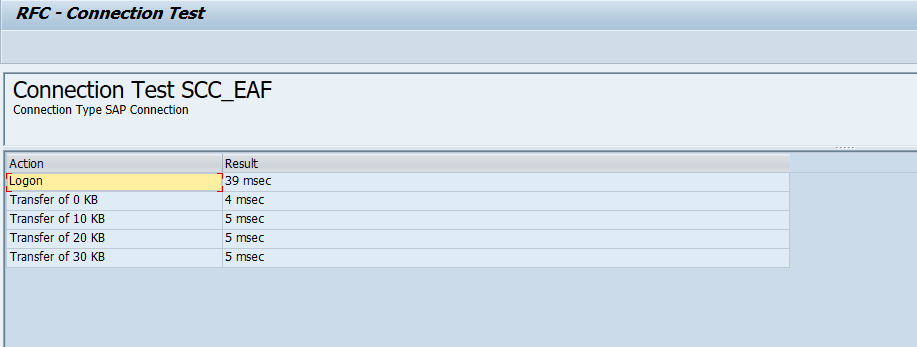
If you get a similar output then you configuration was successful!
Test your configuration
- Call transaction SE37 (Function Builder). Enter "BAPI_EQUI_GETDETAIL" and press the test button.
- The Test Function Module Initial Screen will come up:Enter the RFC-Destination you just maintained and the number of an equipment that exists and press “Execute”:

- Enjoy the result!

Conclusion
What I learned from this test case
The most important learning was the preparation of this scenario, mainly the set up of the SAP Cloud Connector (as described in my first blog post). I even installed a local version of the SAP Cloud Connector on my notebook and connected it the Cloud Platform Account. That worked fine. Please see the detailed steps in the section I named "Appendix" a little bit further down if you want to learn about a local installation.
Once all was running and configured, the calling of the BAPI was relatively easy and worked just like doing an RFC from OnPrem to Onprem.
In this scenario I have called the BAPI from the Test Transaction for Function Modules. But an ABAP Program would work as well.
Your Feedback
Please let me know if the description was helpful and you were able to set up the same test case. Any feedback how to improve this blog post is welcomed! Please put it in the comment section.
What's next
In the next post of this series I will show you how my colleague Hoang set up the same call via SAP Process Orchestration. So you will learn all the steps you need to perform for that!
---------------------------------------------------------
Appendix
---------------------------------------------------------
How I set up the SAP Cloud Connector
This part sort of repeats what can be found in the SAP Help Online Documentation and what has been described in Blogs/Blog Posts of other people (e.g. here). The intention is to list all the steps I performed to make the scenario. I do it also a little bit as reference for myself.
So all in all, setting up the SAP Cloud Connector is only complicated the first time you do it!
Get the picture
This picture shows how the SAP Cloud Connector establishes the connection. What makes it so easy and useful is the fact that Cloud Connector initiates the connection. So an outgoing call establishes a tunnel which is later used for incoming calls, too!

The first step-stone of the configuration is the association of Cloud Tenant, Cloud Platform Subaccount and Cloud Connector:
- Log on to your SAP Cloud Platform Account (https://account.hana.ondemand.com). You may also use a trial account (https://account.hanatrial.ondemand.com)
- Navigate to the subaccount you want to use for the association:

- Note down the subaccount information. You will need them later:
- Display Name – in this case v0371
- Technical Name – in this case af8dcb6d4

Prepare and Configure the Cloud System
- This step is executed to connect the Cloud System Tenant to the respective subaccount above. It sets up the secure tunnel connection as depicted in the picture. You do the configuration via the apps for Communication Management. First you create the Communication System (which is actually your Cloud Platform Subaccount above) and after that you maintain the settings for Communication Arrangement SAP_COM_0200.

- Maintain the Communication System
- Start App “Communication Systems”
- Create a new Communication System

- Maintain System ID and Name. In the example the ID is the Display Name of the Subaccount (v0371) and the name SCP-v0371.
- Maintain the user for the Outbound Communication. Make sure to pick an Administrative User of the Subaccount! Use the Subaccount password of this administrative user int Outbound Communication Settings.

- Maintain Communication Arrangement SAP_COM_0200
- Only do this if there is no SAP_COM_0200 configured in the system yet! I haven't tried what happens if another arrangement of the same type is setup simultaneously so I recommend not doing it.
If SAP_COM_0200 is already present, you need to connect the SAP Cloud Connector to the Subaccount configured in the CommArrangement (see below). - Anyway, here I assume no SAP_COM_0200 is present.
- Start App “Communication Arrangements”
- Create a new arrangement choosing Scenario “SAP_COM_0200”
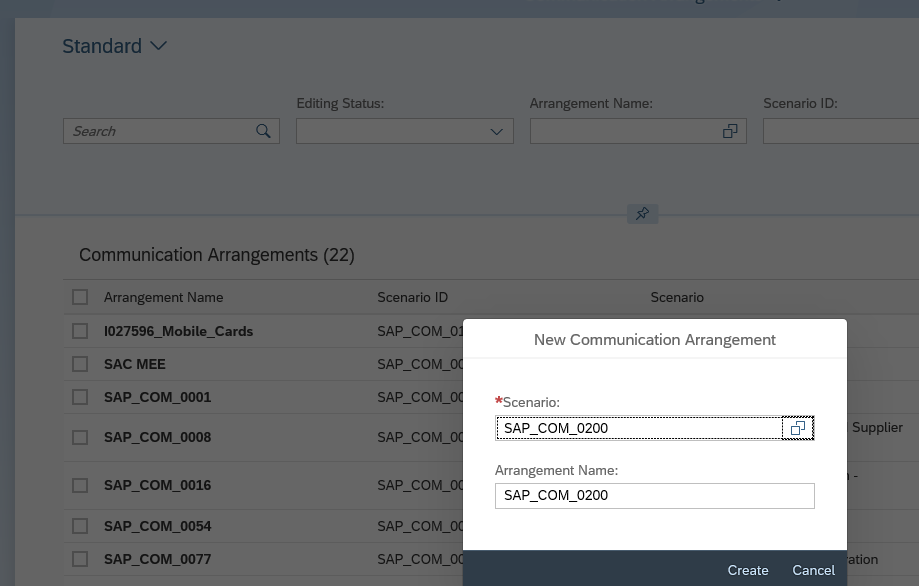
- Only do this if there is no SAP_COM_0200 configured in the system yet! I haven't tried what happens if another arrangement of the same type is setup simultaneously so I recommend not doing it.
- Choose the Communication System you just created, add the Technical Subaccount Name of your Cloud Platform account and make sure the Administrative user from above has been picked.
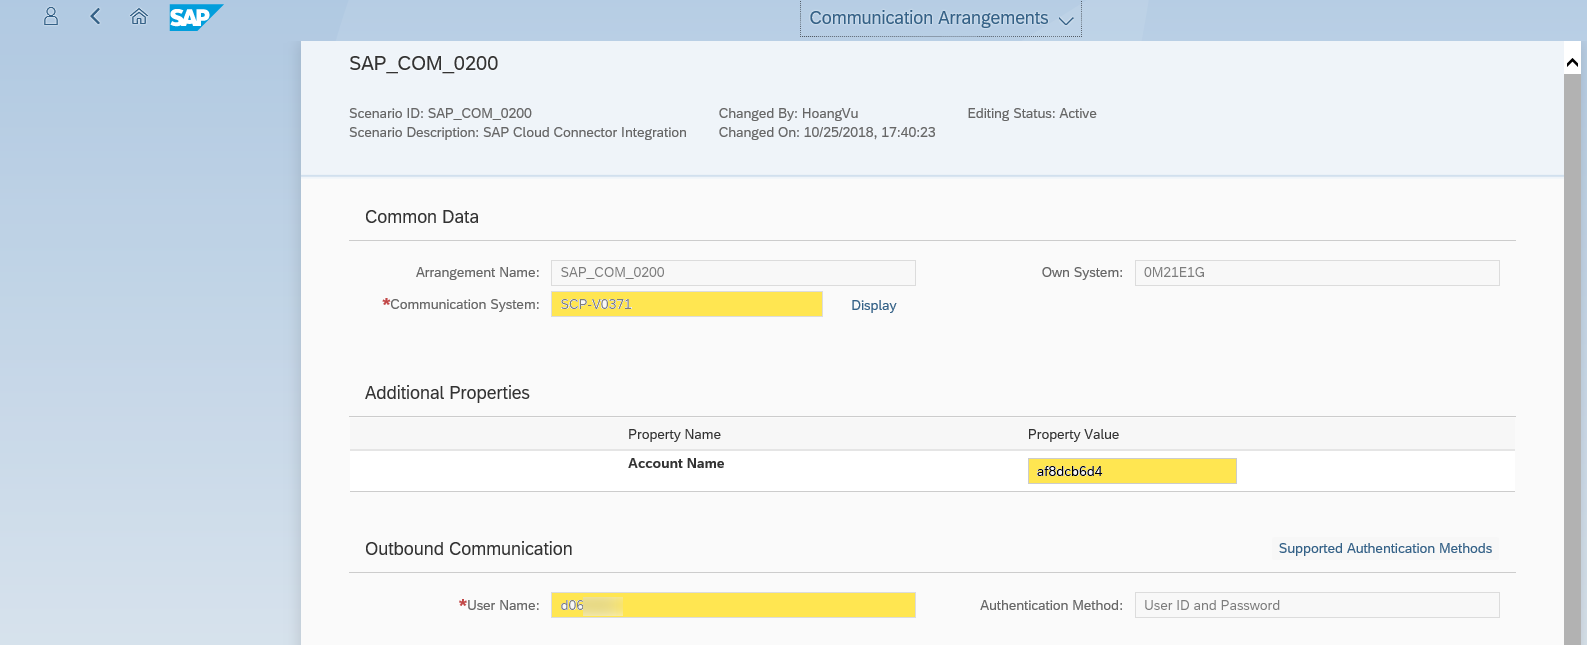
- Choose the Communication System you just created, add the Technical Subaccount Name of your Cloud Platform account and make sure the Administrative user from above has been picked.
Install the SAP Cloud Connector locally
Example for a local installation on a Windows10 machine.
- Check Prerequisites
- You need to have a 64bit JRE
- The local installation runs w/o administrative priviliges
- Download the Cloud Connector Software
- Go to https://tools.hana.ondemand.com/#cloud
- Download the appropriate version
- Install & start the SAP Cloud Connector
- Unpack the zip-file to a directory of your own choosing
- Open a console window in that directory
- Run Go.bat
- In case you get an error-message saying “JAVA Home is not set correctly” open the script Go.bat and check from line 39 beginning. In my case the concatenation of the JAVA_EXE environment variable didn’t work because of my JAVA_HOME setting. I had to change the line to make it fit.

- You can now log on to the SAP Cloud Connector local instance.
Configure the Cloud Connector
- Log on as Administrator with password manager. You are requested to change the password.
- Add your Subaccount. For the connection you do not need the administrative Subaccount user. The assignment of the groups below should be sufficient. In this example a Location ID was entered because another SAP Cloud Connector was already connected to the Subaccount. The Location ID makes it possible to connect more than one SAP Cloud Connector to a Subaccount, e.g. from different network segments.


If all went fine, you see the status “Connected” in section “Tunnel Information”.
End of the appendix
This appendix showed the steps I performed to get the connection going. As already mentioned there are already a lot of guides for this available but I wanted to add it for the reason of completeness.
- SAP Managed Tags:
- NW ABAP Remote Function Call (RFC),
- SAP S/4HANA Public Cloud
Labels:
2 Comments
You must be a registered user to add a comment. If you've already registered, sign in. Otherwise, register and sign in.
Labels in this area
-
Artificial Intelligence (AI)
1 -
Business Trends
363 -
Business Trends
21 -
Customer COE Basics and Fundamentals
1 -
Digital Transformation with Cloud ERP (DT)
1 -
Event Information
461 -
Event Information
24 -
Expert Insights
114 -
Expert Insights
154 -
General
1 -
Governance and Organization
1 -
Introduction
1 -
Life at SAP
415 -
Life at SAP
2 -
Product Updates
4,685 -
Product Updates
216 -
Roadmap and Strategy
1 -
Technology Updates
1,502 -
Technology Updates
89
Related Content
- Debugging transaction MD04 in SAP S/4HANA in Enterprise Resource Planning Blogs by SAP
- FAQ: S/4HANA Cloud, public edition - Sales in Enterprise Resource Planning Blogs by SAP
- Is it possible to manage bindings and users in the System Landscape Directory on Premise via API in Enterprise Resource Planning Q&A
- SAP Table Creation, Maintenance, and Authorization in Enterprise Resource Planning Blogs by Members
- Data Quality Management( DQM ) Derivation in SAP Master Data Central Governance in Enterprise Resource Planning Blogs by Members
Top kudoed authors
| User | Count |
|---|---|
| 12 | |
| 11 | |
| 8 | |
| 6 | |
| 6 | |
| 4 | |
| 4 | |
| 4 | |
| 3 | |
| 3 |