

- SAP Community
- Products and Technology
- Technology
- Technology Blogs by SAP
- SAP Landscape Management Authentication Methods
Technology Blogs by SAP
Learn how to extend and personalize SAP applications. Follow the SAP technology blog for insights into SAP BTP, ABAP, SAP Analytics Cloud, SAP HANA, and more.
Turn on suggestions
Auto-suggest helps you quickly narrow down your search results by suggesting possible matches as you type.
Showing results for
Advisor
Options
- Subscribe to RSS Feed
- Mark as New
- Mark as Read
- Bookmark
- Subscribe
- Printer Friendly Page
- Report Inappropriate Content
06-13-2019
11:36 PM
Introduction
SAP NetWeaver Java provides several authentication mechanisms. Since SAP Landscape Management (LaMa) runs on NetWeaver it will support all the authentication methods it provides.
This blog is a basic how-to for setting up some of the popular authentication methods. We will do some simple verification and you can also test these methods via the LaMa REST APIs blog.
LaMa installs by default with basic authentication with username/password with HTTP. In this blog we will first cover how to add SSL with basic authentication since this is a prerequisite to use of the other methods covered here. Next we will cover X.509 certificate based authentication and OAuth 2.0 authentication. There are additional mechanisms supported by NetWeaver such as Kerberos and SAML. However, at this time these will not be covered but may be added to this blog at a later time. See the full list of supported methods here.
Prerequisite
You should have a non-production LaMa available when first starting to play with these configuration setting or later use it for testing APIs. You can easily mess things up if you do it in production.
Sections
- Setting Up SSL
- X.509 Client Certificate Authentication
- OAuth 2.0 Authentication
Setting Up SSL
Enable access to NetWeaver Administrator console. This requires SAP Note 1451753
- cd /usr/sap/<SID>/SYS/global/security/data (e.g. /usr/sap/J2E/SYS/global/security/data)
- vi icm_filter_rules.txt
- Comment out all entries (note this is not secure so save the orig file so you revert back after done with NetWeaver administration steps)
- Restart LaMa
- sudo su – <SID>adm (e.g. j2eadm)Restart LaMa
- stopsap && startsap
Use NetWeaver Administrator to configure SSL.
- In your browser go to http://<IP address of LaMa>:50000/nwa and login as Administrator
- Go to ‘Configuration’ tab
- Click on SSL
- Edit -> Add
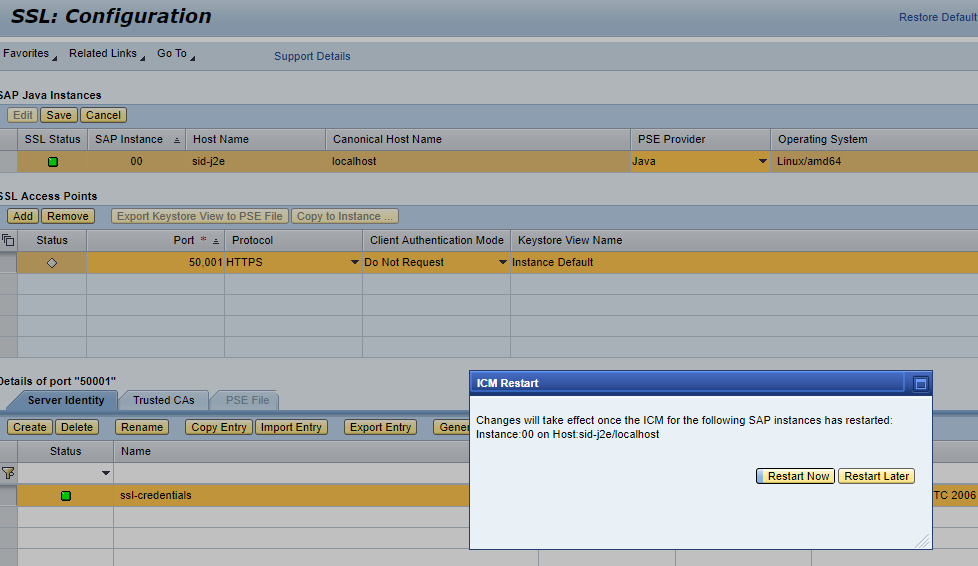
- Enter the port 50001 followed by Save. You will now be prompted to restart ICM – respond with Restart Now
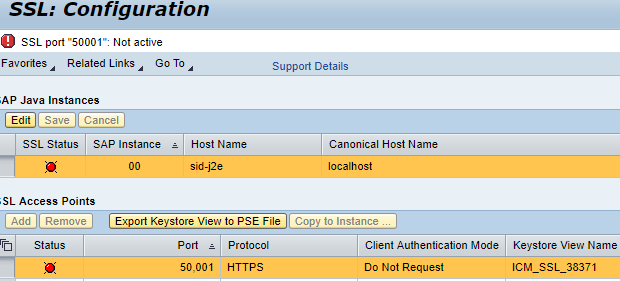
- If the SSL status is green then we are good to go and can jump to step 4. If status is red then we need to follow SAP Note 2510099.
Apply SAP Note 2510099 (https://launchpad.support.sap.com/#/notes/0002510099)
- Restart LaMa
- sudo su – <SID>adm (e.g. j2eadm)
- stopsap && startsap
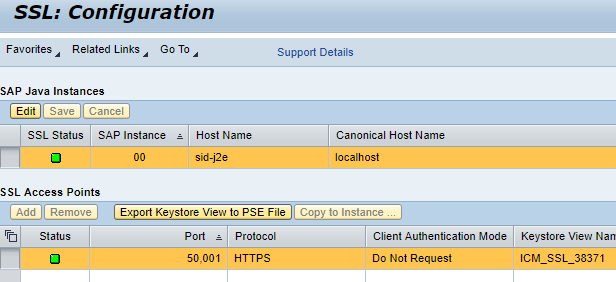
- Verify SSL Status
Validate
- Now you should be able to go to https://<IP address of LaMa>:50001/lama via a browser (using Administrator login)
X.509 Client Certificate Authentication
In this exercise we will configure LaMa to allow "Administrator" login using certificates. There are various ways to generate certificates (also known as SSL key pairs) such as:
- SAP CLI command "sapgenpse"
- Key Storage Service for NetWeaver Java
- Opensource utility OpenSSL.
We will only cover the last two methods. Whichever method is used to generate the certificates, the configuration steps to use the certificates for authentication are similar.
Generate certificates
- Using SAP NetWeaver Key Storage Service
- Go to https:<IP address of LaMa>:50000/nwa
- Open the Key Storage Content
- Configuration -> Certificates and KeysOpen the Key Storage Content
- Select the view "LVMview" and in the View Entries tab choose Create


- As we are self signing the certificate we will skip the next screen
- After preview screen choose Finish
- You will now see the key file and certificate stored

- What we have done here is created an RSA private key entry (PKCS#8) and a self-signed certificate.
- Note that you could have used a CA authority to sign the certificate
- We can now download the Key Pair File to our client system for use later on
- Highlight the PRIVATE KEY and click on Export Entry, select format of "PKCS#12 Key Pair"
- Enter the passphrase and click on Generate
- This should produce a file for download

- What we have downloaded is a complex format file that includes both the certificate and the private key. This file can be imported into a web browser
- Some tools such as the command "curl" require separate certificate and private key files in the PEM format. We can now split the downloaded file using the OpenSSL utility on a Linux system. You will be prompted for the passphrase that you specified when the certificate was created.
openssl pkcs12 -in lama_admin.p12 -out lama_admin.crt.pem -clcerts -nokeys

openssl pkcs12 -in lama_admin.p12 -out lama_admin.key.pem -nocerts -nodes
Using OpenSSL
- This can be done on:
- A Linux system that has OpenSSL installed or
- A Windows system with OpenSSL installed (e.g. https://slproweb.com/products/Win32OpenSSL.html)
- You can get more information on OpenSSL via the free cookbook https://www.feistyduck.com/library/openssl-cookbook/
- Generate the SSL key pair (self signed)
openssl req -x509 -newkey rsa:4096 -sha256 -keyout openssl_admin.key -out openssl_admin.crt -days 600 -subj "/C=US/L=Palo Alto/O=SAP SE/CN=sap.com"
- You should be prompted for a passphrase (note this down)
- After command is completed you will end up with 2 files - openssl_admin.key (which is the private key file) and openssl_admin.crt (the self-signed certificate)
- We will now create a PKCS#12 (PFX) key and certificate. This is a complex format file that can store and protect a server key along with an entire certificate chain. This format is needed when we import the certificate to a browser or Postman running on Windows system.
- We will use the above 2 files to create this.
openssl pkcs12 -export -name "lama" -out openssl_admin.pfx -inkey openssl_admin.key -in openssl_admin.crt
- You will be prompted to enter the passphrase previously used for the key file
- You will be prompted to enter a new passphrase for the .pfx file (can be the same password)
- The file openssl_admin.pfx will be generated
- You can strip the passphrase from the key file if needed (for example when using with curl)
openssl rsa -in openssl_admin.key -out openssl_admin_nopass.key
Import the certificates to /nwa service_ssl
- Certificate created with SAP NetWeaver Key Storage Service
- Go back to NetWeaver Key Storage Service
- Go to https:<IP address of LaMa>:50000/nwa
- Open the Key Storage Content
- Configuration -> Certificates and Keys
- Open the Key Storage Content
- Highlight the currently used view for your SSL (example ICM_SSL_38371)
- Click on Copy Entry so that we can copy the key file we created earlier

- Repeat for the certificate

- View will now have 2 new entries and look something like this:

- Certificate created with OpenSSL
- Go back to NetWeaver Key Storage Service
- Go to https:<IP address of LaMa>:50000/nwa
- Open the Key Storage Content
- Configuration -> Certificates and Keys
- Highlight the currently used view for your SSL (example ICM_SSL_38371)
- Click on Import Entry
- In the new pop-up window select entry type of X.509 Certificate
- Click on Choose File and locate the certificate file we created earlier with OpenSSL
- Go back to NetWeaver Key Storage Service
You will now end up with a new entry similar to below

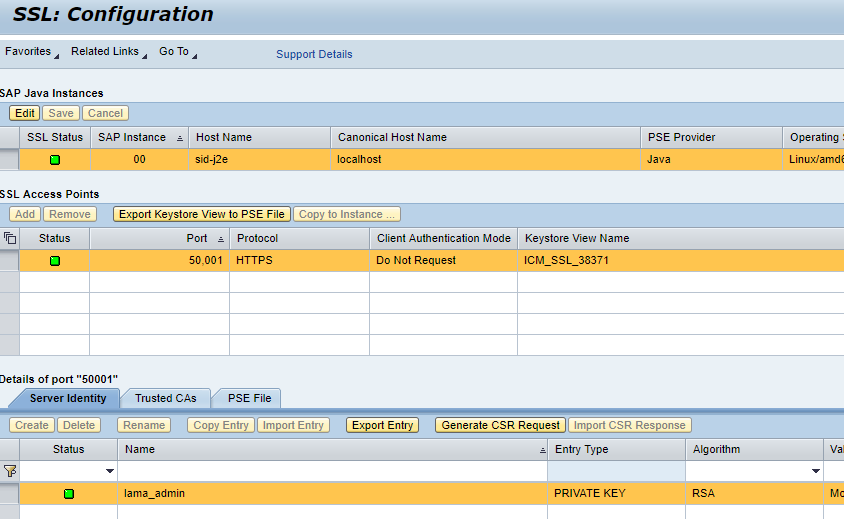
Since we made changes to a keystore view, we have to update the PSE file
- Go to /nwa -> configuration -> SSL
- You will a warning message that PSE file is not updated. But first we must delete the old private key as only one can be used
- Click on edit and then highlight the key ssl-credentials
- Click Delete -> Save -> ICM Restart Now

- Update of ICM should update the PSE file but if you still get a warning then we can update PSE file
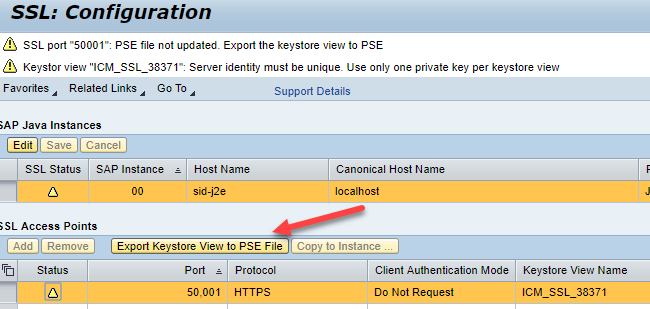
- Click on Export Keystore to PSE File
- Final view of SSL Configuration
- Make sure that SSL is still functioning correctly by going to https://<IP address of LaMa>:50001/nwa
At this time SSL is still functioning with username/password authentication but using the new certificates we generated. Now we need to follow the steps below to get authentication based on the certificates we are using.
Change UME setting
- Go to /nwa -> Configuration -> Identity Management -> Configuration -> Expert Mode
- Search for ume.logon.allow_cert
- Click Modify
- Change the parameter value from false to true and click Save


- Close Expert Mode
Configure VCLIENT profile parameter of ICM.
This parameter needs to be set so that the server when connected with SSL asks the client to pass an X.509 certificate. The are 3 possible values of VCLIENT:
- 0: No certification is required and the server does not ask for one
- 1: The server asks the client to transfer a certificate. If the client does not send a certificate, authentication is carried out by another method, for example, basic authentication.
- 2: The client must transfer a valid certificate to the server, otherwise access is denied
In our example we will set the value to 1 but can also set it to 2.
- Go to directory /usr/sap/<SID>/SYS/profile (e.g. /usr/sap/J2E/SYS/profile)
- Find the file that has the current setting for VCLIENT
grep VCLIENT *
- Edit the file and change value of VCLIENT to 1. Example
- Before:

- After:

Change the Login Policy to use Stored Certificate Mapping.
This means that when there is a certificate match we will allow login for a particular user_id (in our case user_id of Administrator). The user Administrator is matched because we will import the certificate for this user and it will be matched. There is a more granular option that uses rules based on client certificate subject name. We will be covering only a match of the whole client certificate.
- Go to /nwa -> Configuration -> Security -> Authentication and Single Sign-On
- In the Authentication tab we will change the policy configuration name of "ticket"
- Make changes so that login module stack is as below
| Login Module | Flag | Options |
| EvaluateTicketLoginModule | SUFFICIENT | ume.configuration.active=true |
| ClientCertLoginModule | OPTIONAL | |
| CreateTicketLoginModule | SUFFICIENT | ume.configuration.active=true |
| BasicPasswordLoginModule | OPTIONAL | |
| CreateTicketLoginModule | SUFFICIENT | ume.configuration.active=true |
- To add a login module, highlight "ticket" then click Edit
- In the Login Modules section click on Add
- Choose the module "ClientCertLoginModule"
- Remove the rules in the options section for this
- Change Flag to "OPTIONAL"
- Repeat the process until you have all the modules in the stack
- Change the Options for the 3 of the modules as shown in the table above

- Use the Move Up and Move Down buttons so that the order of the stack matches the table above
- Old view

- New view

- Click on Save after you are satisfied with the changes
- Restart the LaMa system so that the certificate tab appears in the User Administration UI (because we changed the UME setting in step 5)
- sudo su - <sid>adm
- stopsap && startsap
- After the restart go to User Administration UI
- /nwa -> Configuration -> Security -> Identity Management
- Search for User "Administrator"

- Go to Certificates tab -> Modify
- Choose the Certificate file location (which you previously used when downloading or creating the certificate) and click Upload Certificate
- Click Save
Now we can use the above Login Policy and apply it to the applications we want to have certificate based authentication. For example we may only want the LaMa APIs to be authenticated in this way.
The steps below will enable this whenever a client uses the URL https://<IP address of LaMa>:50001/lama-api
- Go to /nwa -> Configuration -> Security -> Authentication and Single Sign-On
- In Authentication tab, change the filter of Type to Web and apply filter

- Now search for lama-api

- Click Edit
- In the Authentication Stack section use the drop down menu change "basic" to "ticket"
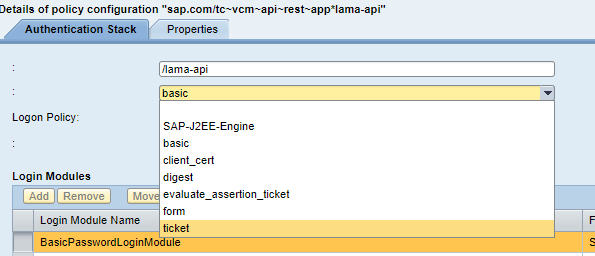
- Login Modules section should change to look like:

- Save the change
We should now be set and can perform a basic test using Curl (assuming key/certificate are in the current directory)
- NetWeaver Key Storage Service generated key pair
curl -k -E ./lama_admin.crt.pem --key ./lama_admin.key.pem https://<IP address of LaMa>:50001/lama-api/instances
- OpenSSL generated key pair
curl -k -E ./openssl_admin.crt --key ./openssl_admin_nopass.key https://<IP address of LaMa>:50001/lama-api/instances
- The output of the above command should produce a lot of text in which you should find the instances that are being managed by LaMa

- What has been demonstrated with this test is that we were automatically authenticated without having to specify username or password
- If you were to use the NetWeaver Java Troubleshooting Wizard to run a trace, you will see the authentication happening as user "Administrator". Refer to SAP Note 1332726
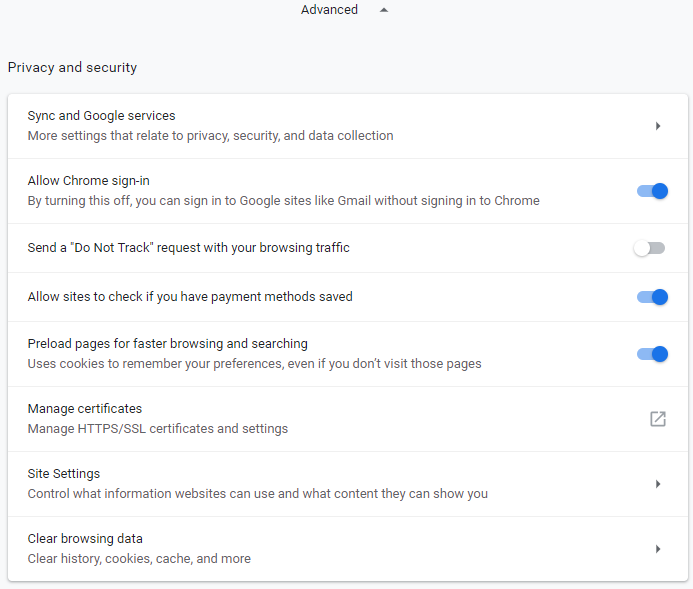
For a browser test you first need to import the certificate into your browser. Below is an example of using the Chrome browser
- Open the setting screen
- Go to Advanced section
- Click on "Manage certificates"
- Click on Import

- Click Next
- Click Browse and choose file type of "Personal Information Exchange"
- Choose lama_admin.p12 file (NetWeaver generated) or openssl_admin.pfx (OpenSSL generated)
- Click Next and enter the password (used when you created the certificate)
- Click Next
- Click Next
- Click Finish
- You should get pop up to indicate import was successful and the certificate listed

- Now go to the URL https://<IP address of LaMa>:50001/lama-api/instances
- You will be prompted to select a certificate
- Select the just imported certificate above
- You should get the list of your LaMa managed instances without being prompted for username/password

- If you need to repeat this test you will need to remove all cookies and restart the browser
OAuth 2.0 Authentication
SAP NetWeaver Java supports authentication based on OAuth 2.0 and therefore LaMa can be configured to use this mechanism. OAuth 2.0 is used for constrained access to web services without a requirement to pass login credentials. There are 3 main components of OAuth 2.0 namely the Client (e.g. Curl, Chrome browser, Postman), Authorization Server (grants access/abbreviated as AS) and Resource Server (provides the services/abbreviated as RS).
Typically the AS is a separate system (NetWeaver or a 3rd party application) while LaMa (via NetWeaver) is the RS. In this example we will use the same NetWeaver instance to act as the AS and the RS. We will access LaMa REST API with this mechanism.
An example of OAuth authorization flow (diagram from SAP community)
- End user connects to the LaMa API (e.g. https://<IP address of LaMa>:50001/lama-api/instances)
- Client gets redirected to the AS where per the RFC of OAuth 2.0 and interactive authorization happens and user is asked to give permission. An authorization code is sent back (expires after a few minutes - or as configured)
- The client now sends the authorization code to receive a token from the AS
- The token can now be used to access the LaMa API
In the procedure we will assume that the end user will be the Administrator.
- Add the roles SAP_OAUTH_ADMIN and SAP_OAUTH_USER to User Administrator
- Go to http://<IP Address of LaMa>:50000/nwa -> Configuration -> Security -> Identity Management
- Search for User Administrator
- Click Assigned Roles tab
- Click Modify
- In the Available Roles section on the left, search for SAP_OAUTH_ADMIN

- Highlight the role and click on Add
- Search for the role SAP_OAUTH_USER and add
- Click Save
- You will now see the 2 roles assigned
![]()
- Change the Login Policy to use OAuth
- Go to /nwa -> Configuration -> Security -> Authentication and Single Sign-On
- In the Authentication tab we will change the policy configuration name of "ticket"
- Make changes so that "OAuth2LoginModule" is inserted after "EvaluateTicketLoginModule". The stack may look like this:
| Login Module | Flag | Options |
| EvaluateTicketLoginModule | SUFFICIENT | ume.configuration.active=true |
| OAuth2LoginModule | SUFFICIENT | ume.configuration.active=true |
| ClientCertLoginModule | OPTIONAL | |
| CreateTicketLoginModule | SUFFICIENT | ume.configuration.active=true |
| BasicPasswordLoginModule | OPTIONAL | |
| CreateTicketLoginModule | SUFFICIENT | ume.configuration.active=true |
- For steps on how to change the login policy refer to section X.509 Client Certificate Authentication
- .The login stack for policy "ticket" should now look like:

- Since we are going to use this for lama-api we need to ensure that the policy "ticket" is used when we go to the URL /lama-api. To assign this refer to section above. If you have used this blog to configure X.509 certificate authentication then the policy should already be assigned.
- Now we need to register our client
- Access the administration UI at https://<IP Address of LaMa>:50001/oauth/admin
- Open CLIENTS view
- Go to the Data tab and choose the Register New Client button
- Fill in the details as shown

- Now go to the Scopes tab and add the roles SAP_OAUTH_ADMIN and SAP_OAUTH_USER

- Click save
- You can view other information by going to the ENDPOINTS tab (URL for Authorization and Token endpoints)
- Restart LaMa
- sudo su - <sid>adm
- stopsap && startsap
- The authentication mechanism should now work.
- Test using Postman -- refer to this blog
- Test using Curl -- refer to this blog
- Please note that you can view the token assignment by going to https://<IP Address of LaMa>:50001/oauth.
- Here you can view the tokens assigned to clients and can also revoke a token if needed
Conclusion
The above covered the configuration procedures for some of the authentication mechanisms you can use with LaMa (based on NetWeaver Java). For additional information please refer to the links below.
Labels:
1 Comment
You must be a registered user to add a comment. If you've already registered, sign in. Otherwise, register and sign in.
Labels in this area
-
ABAP CDS Views - CDC (Change Data Capture)
2 -
AI
1 -
Analyze Workload Data
1 -
BTP
1 -
Business and IT Integration
2 -
Business application stu
1 -
Business Technology Platform
1 -
Business Trends
1,661 -
Business Trends
87 -
CAP
1 -
cf
1 -
Cloud Foundry
1 -
Confluent
1 -
Customer COE Basics and Fundamentals
1 -
Customer COE Latest and Greatest
3 -
Customer Data Browser app
1 -
Data Analysis Tool
1 -
data migration
1 -
data transfer
1 -
Datasphere
2 -
Event Information
1,400 -
Event Information
64 -
Expert
1 -
Expert Insights
178 -
Expert Insights
273 -
General
1 -
Google cloud
1 -
Google Next'24
1 -
Kafka
1 -
Life at SAP
784 -
Life at SAP
11 -
Migrate your Data App
1 -
MTA
1 -
Network Performance Analysis
1 -
NodeJS
1 -
PDF
1 -
POC
1 -
Product Updates
4,577 -
Product Updates
325 -
Replication Flow
1 -
RisewithSAP
1 -
SAP BTP
1 -
SAP BTP Cloud Foundry
1 -
SAP Cloud ALM
1 -
SAP Cloud Application Programming Model
1 -
SAP Datasphere
2 -
SAP S4HANA Cloud
1 -
SAP S4HANA Migration Cockpit
1 -
Technology Updates
6,886 -
Technology Updates
403 -
Workload Fluctuations
1
Related Content
- Receive a notification when your storage quota of SAP Cloud Transport Management passes 85% in Technology Blogs by SAP
- 10+ ways to reshape your SAP landscape with SAP Business Technology Platform - Blog 7 in Technology Blogs by SAP
- 10+ ways to reshape your SAP landscape with SAP Business Technology Platform – Blog 4 in Technology Blogs by SAP
- Top Picks: Innovations Highlights from SAP Business Technology Platform (Q1/2024) in Technology Blogs by SAP
- How to delete an ABAP system from Cloud ALM Landscape Management? in Technology Q&A
Top kudoed authors
| User | Count |
|---|---|
| 12 | |
| 10 | |
| 9 | |
| 7 | |
| 7 | |
| 7 | |
| 6 | |
| 6 | |
| 5 | |
| 4 |