
- SAP Community
- Products and Technology
- Human Capital Management
- HCM Blogs by Members
- Creating Custom Groups for Mass Form Routing
Human Capital Management Blogs by Members
Gain valuable knowledge and tips on SAP SuccessFactors and human capital management from member blog posts. Share your HCM insights with a post of your own.
Turn on suggestions
Auto-suggest helps you quickly narrow down your search results by suggesting possible matches as you type.
Showing results for
kemartinez
Explorer
Options
- Subscribe to RSS Feed
- Mark as New
- Mark as Read
- Bookmark
- Subscribe
- Printer Friendly Page
- Report Inappropriate Content
06-04-2019
3:20 PM
Introduction
I recently came across a unique request from a SuccessFactors client regarding their Compensation Process. The issue revolved around a specific group in the company who was on a unique time schedule that needed to be routed through a step all at once. While the Mass Routing Form in the Compensation Inbox is an option when the forms are in only a few inboxes, this is not always the case. We needed an alternative to maintain continuity and minimal administration work.
My first instinct was the Route Form tool. I navigated to the tool to try to find some potential quick filtering options and to my surprise there was a general lack of possibilities for my situation, and quite a few others that I thought of as well. However, I was intrigued by the “Group” option but to my surprise clicking it was empty. Unlike other “Groups” I have worked with on SuccessFactors, there was no create new group option.

Through quite some digging, I was able to determine how to successfully use this group option to easily and quickly select groups of forms to route at once. The purpose of this blog is to share with you how to create and maintain these groups from an administration side.
With many system solutions, it is important to be aware of the limitations and exceptions. I will share those I have found throughout this process but I have summed them up in the end of the article for easy reference.
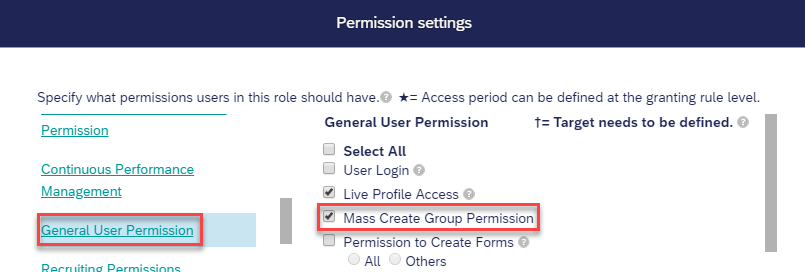
Permission Groups Tool Through RBP
There is a unique groups tool that can be turned on per user from their home icon. In order to permission this group making tool, navigate to the Permission Role tool. Select the Permission Role you want to grant this access to or create a new role as needed. The permission can be found under General User Permissions --> Mass Create Group Permission.
Accessing Groups
The groups can be accessed from the User Drop Down and selecting Options.

When permission is granted to the user, there will be a sub-tab called Groups.

Creating Groups using Creation Tool
The suite wide grouping tool is used. Similar to all other groups, you can create both Dynamic or Static groups here. I would always recommend Dynamic groups as they are easier to maintain year to year during the Compensation or Performance cycles, however, choose the best option depending on the requirements you have.

Name the group to something that will be easily identified, it may help to mark that the group is for Compensation, Performance, or any other module you are using it for.

When you have chose all the individuals who should be in the group, select Done to see the group appear. You can always navigate back to this page to edit the group in the future as needed. If you chose to go with a Static Group type, it is important you check the individuals in the group each time you are doing a performance or compensation cycle for accuracy to any changes.

Please Note: When referring to Static vs. Dynamic group for this method, I am referring to groups that are based on criteria being dynamic (i.e. Department, Location, etc.) versus choosing individual users as shown in the screenshots which is static. The tool has a category that lists the groups as Static or Dynamic, this simply refers to whether the groups were created using the tool (dynamic) or imported through a .csv file (static).
Creating Groups Through Import Option
The second option that may be better for some circumstances in the import groups tool.

Upon selecting this tool, you will see a pop up, here you can download the .csv template to help with the proper format for importing back into the system.

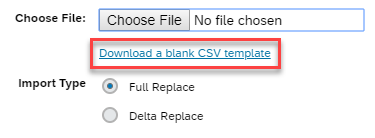
The template will have two columns, Group Name and USERID. Fill this out accordingly. Note that you can import multiple Groups at once using different Group Name keys for each.

Using Group in Route Form Tool
Once you have saved this group, you will now be able to access it from the Route Forms Advanced Options button under the filter Groups. Once you select the group and search based on the Template, you will be able to route this group at once using the standard Mass Routing options.

Limitations
The biggest limitation to note for this solution is that the grouping tool is based on the user. What this means is if I make a group under my login, only those logged in as myself or proxying me will see that group in the Route Form tool. With this in mind, I recommend creating the groups under an admin user such as Compensation Admin or System Admin so that the groups can be accessed by all those who need it as time and system roles change. This method can also help maintain security as you can permission proxy access by individual users.
You must be a registered user to add a comment. If you've already registered, sign in. Otherwise, register and sign in.
Labels in this area
-
1H 2024 Product Release
5 -
2H 2023 Product Release
1 -
ACCRUAL TRANSFER
1 -
Advanced Workflow
1 -
Anonymization
1 -
BTP
1 -
Business Rules
1 -
Canvas Report
1 -
Career Development
1 -
Certificate-Based Authentication
1 -
Cloud Platform Integration
1 -
Compensation
1 -
Compensation Information Management
1 -
Compensation Management
1 -
Compliance
2 -
Content
1 -
Conversational AI
2 -
Custom Data Collection
1 -
custom portlet
1 -
Data & Analytics
1 -
Data Integration
1 -
Dayforce
1 -
deep link
1 -
deeplink
1 -
Delimiting Pay Components
1 -
Deprecation
1 -
Employee Central
1 -
Employee Central Global Benefits
1 -
Employee Central Payroll
1 -
employee profile
1 -
Employee Rehires
1 -
external terminal
1 -
external time events
1 -
Generative AI
2 -
Getting Started
1 -
Global Benefits
1 -
Guidelines
1 -
H2 2023
1 -
HR
2 -
HR Data Management
1 -
HR Transformation
1 -
ilx
1 -
Incentive Management Setup (Configuration)
1 -
Integration Center
2 -
Integration Suite
1 -
internal mobility
1 -
Introduction
1 -
learning
3 -
LMS
2 -
LXP
1 -
Massively MDF attachments download
1 -
Mentoring
1 -
Metadata Framework
1 -
Middleware Solutions
1 -
OCN
1 -
OData APIs
1 -
ONB USA Compliance
1 -
Onboarding
2 -
Opportunity Marketplace
1 -
Pay Component Management
1 -
Platform
1 -
portlet
1 -
POSTMAN
1 -
Predictive AI
2 -
Recruiting
1 -
recurring payments
1 -
Role Based Permissions (RBP)
2 -
SAP CPI (Cloud Platform Integration)
1 -
SAP HCM (Human Capital Management)
2 -
SAP HR Solutions
2 -
SAP Integrations
1 -
SAP release
1 -
SAP successfactors
5 -
SAP SuccessFactors Customer Community
1 -
SAP SuccessFactors OData API
1 -
SAP Workzone
1 -
SAP-PAYROLL
1 -
skills
1 -
Skills Management
1 -
sso deeplink
1 -
Stories in People Analytics
3 -
Story Report
1 -
SuccessFactors
2 -
SuccessFactors Employee central home page customization.
1 -
SuccessFactors Onboarding
1 -
successfactors onboarding i9
1 -
Table Report
1 -
talent
1 -
Talent Intelligence Hub
2 -
talents
1 -
Tax
1 -
Tax Integration
1 -
Time Accounts
1 -
Workflows
1 -
XML Rules
1
Related Content
- Beginner's Guide to Recruiting Posting in Human Capital Management Blogs by Members
- How to limit/hide content from an ADMIN permission role in SuccessFactors - Employee Central? in Human Capital Management Q&A
- SAP Enable Now Information Sessions (European Friendly Times) in Human Capital Management Blogs by SAP
- Controlling the Visibility of SAP Enable Now and SAP Companion Content in Human Capital Management Blogs by SAP
- Would it be possible to create a user group and use it as an exclusion rule in all Assignments Profi in Human Capital Management Q&A
Top kudoed authors
| User | Count |
|---|---|
| 12 | |
| 8 | |
| 4 | |
| 2 | |
| 2 | |
| 2 | |
| 1 | |
| 1 | |
| 1 | |
| 1 |