
- SAP Community
- Products and Technology
- Technology
- Technology Blogs by SAP
- Update your SAP Web IDE MTA applications to use th...
Technology Blogs by SAP
Learn how to extend and personalize SAP applications. Follow the SAP technology blog for insights into SAP BTP, ABAP, SAP Analytics Cloud, SAP HANA, and more.
Turn on suggestions
Auto-suggest helps you quickly narrow down your search results by suggesting possible matches as you type.
Showing results for
Advisor
Options
- Subscribe to RSS Feed
- Mark as New
- Mark as Read
- Bookmark
- Subscribe
- Printer Friendly Page
- Report Inappropriate Content
06-03-2019
12:00 PM
SAP recently released a new SAP Cloud Platform Portal and HTML5 Repository Service that provide a rich set of new capabilities for development of Enterprise Full stack Applications with SAP Fiori experience for SAP Cloud Application on Cloud Foundry.
The new services are fully integrated into Multi-Target Application (MTA) and provide multiple new capabilities:
New MTA Projects created in SAP Web IDE are already making use of these new capabilities.
In this guide we want to explain how to update an existing Multi-Target Application (MTA) to use the new HTML5 application repository and Portal Service on the SAP Cloud Platform Cloud Foundry environment.
We will use SAP Web IDE Full-Stack to create a new MTA Project and then we will take the required parts from the new project and add them to the old project.
Create an MTA project and add an HTML5 module

2. Select Multi-Target Application and click Next.
3. Enter a name for your project
4. Select the Use HTML5 Application Repository This is mandatory because the
SAP Fiori launchpad solution stores static resources in the HTML5 repository.
A project was created in your SAP Web IDE workspace.


Manual changes required to make use of HTML5 application repository and FLP Service in your project
As you now have a new project that uses the HTML5 application repository, you can compare it with the existing project to understand the differences and in order to make the needed adjustments in your project.
Add the new appRouter and ui_Deployer modules to your project
The appRouter and ui_Deployer modules are hidden in the project tree. To make them visible, click on the eye icon above your workspace.
The appRouter module is responsible for the interaction with applications, services, and resources during runtime.
The ui_Deployer module is responsible for uploading the HTMl5 module content to the HTML5 Application Repository.
2. Paste the copied folder under your original project’s root folder.
3. Copy the ui_Deployer module and paste it in your project the same way you copied the AppRouter.
4. Open the modules file located in the .che folder of your original project.
5. Add the names of the newly added modules.


The HTML5 Application Repository consists of two service plans, the app-host which is responsible for the deployment of HTML5 applications to the repository, and the app-runtime which consumes HTML5 applications from the HTML5 application repository.
11. Copy the app-runtime and app-host section under the resources section and paste it
in the yaml file of the original application
12. Now you can build your application. From the context menu of your project select Build

15. The deployment process deploys the app-router application. In order to launch
your application, you should construct the app URL in the following format:
https://<app-router URL>/<application name>/index.html
The app router URL can be copied from the console after deployment or from the deployed application in the cockpit

The application name is the app.id in manifest.json without the dots
16. If the deployment fails, go to the marketplace in your cockpit, click on the
HTML5 Application Repository service and verify that you have 2 service plans
(app-runtime and app-host)

If you don't have the app-host service plan you should ask your administrator to assign some quota of app-host service plan to your global account (in MB) and entitle your sub account in the cockpit entitlements to use part of this quota.
The new services are fully integrated into Multi-Target Application (MTA) and provide multiple new capabilities:
- Integrated FLP Design Time Content Development with a Visual Editor
- High speed content serving from HTML5 repository in runtime
- New Portal Service providing End User Settings and Personalization for Launchpad and HTML5/Fiori Applications
- Development of multiple HTML5/Fiori Applications including routes within one MTA
- and more
New MTA Projects created in SAP Web IDE are already making use of these new capabilities.
In this guide we want to explain how to update an existing Multi-Target Application (MTA) to use the new HTML5 application repository and Portal Service on the SAP Cloud Platform Cloud Foundry environment.
We will use SAP Web IDE Full-Stack to create a new MTA Project and then we will take the required parts from the new project and add them to the old project.
Create an MTA project and add an HTML5 module
- In SAP Web IDE Full-Stack, right-click on the workspace and create a new Project from Template.
2. Select Multi-Target Application and click Next.
3. Enter a name for your project
4. Select the Use HTML5 Application Repository This is mandatory because the
SAP Fiori launchpad solution stores static resources in the HTML5 repository.
- Click Finish.
A project was created in your SAP Web IDE workspace.
- Add an SAPUI5 module.
- Right-click on your newly created project and select HTML5 Module.
- Select SAPUI5 Application and click
- Provide the module name and namespace, click Next and then Finish. The SAPUI5 module is now added to your project.
Manual changes required to make use of HTML5 application repository and FLP Service in your project
As you now have a new project that uses the HTML5 application repository, you can compare it with the existing project to understand the differences and in order to make the needed adjustments in your project.
Add the new appRouter and ui_Deployer modules to your project
The appRouter and ui_Deployer modules are hidden in the project tree. To make them visible, click on the eye icon above your workspace.
The appRouter module is responsible for the interaction with applications, services, and resources during runtime.
The ui_Deployer module is responsible for uploading the HTMl5 module content to the HTML5 Application Repository.
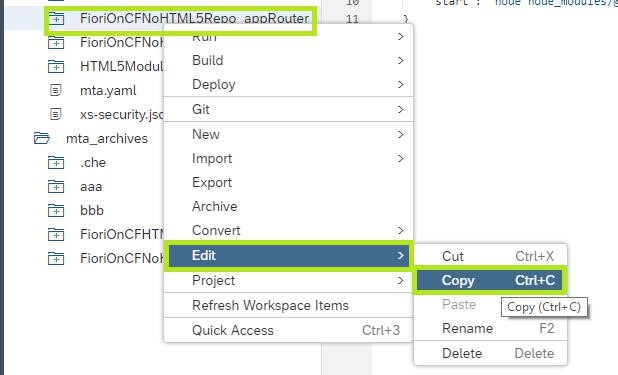
- Copy the appRouter module and paste it in your project. In the new project, right-click on the appRouter folder, select Edit and then Copy.
2. Paste the copied folder under your original project’s root folder.
3. Copy the ui_Deployer module and paste it in your project the same way you copied the AppRouter.
4. Open the modules file located in the .che folder of your original project.
5. Add the names of the newly added modules.
- The project contains an yaml file. It is a descriptor of the project and its resources. Let's update it to contain the changes we've made in the previous steps.
- Open the yaml file in the new project, copy the deploy_mode parameter and add it to the mta.yaml of your original project.
- Add the appRouter and ui_Deployer modules to the yaml under the modules section.
- Open the mta.yaml file in the new project, copy the appRouter and ui_Deployer sections, and add them to the yaml of the original project.
- Add the required dependencies for the appRouter (UAA, Portal Service, Backend Destination, HTML5 Repo runtime, etc).
- Add all the HTML5 modules in your project under the ui_deployer build-parameters section to connect the UI modules to the ui_deployer.
- Open the xs-app.json file in each of your HTML modules and add the HTML5 Application Repository routing configuration
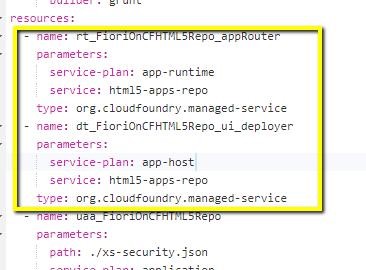
The HTML5 Application Repository consists of two service plans, the app-host which is responsible for the deployment of HTML5 applications to the repository, and the app-runtime which consumes HTML5 applications from the HTML5 application repository.
11. Copy the app-runtime and app-host section under the resources section and paste it
in the yaml file of the original application
12. Now you can build your application. From the context menu of your project select Build
- Expand the folder with your project name under the mta_archives folder to find the MTAR file (Multi target application archive) that was created in the build process
- From the context menu of the mtar file select Deploy and Deploy to SAP Cloud Platform
15. The deployment process deploys the app-router application. In order to launch
your application, you should construct the app URL in the following format:
https://<app-router URL>/<application name>/index.html
The app router URL can be copied from the console after deployment or from the deployed application in the cockpit
The application name is the app.id in manifest.json without the dots
16. If the deployment fails, go to the marketplace in your cockpit, click on the
HTML5 Application Repository service and verify that you have 2 service plans
(app-runtime and app-host)
If you don't have the app-host service plan you should ask your administrator to assign some quota of app-host service plan to your global account (in MB) and entitle your sub account in the cockpit entitlements to use part of this quota.
- SAP Managed Tags:
- SAP Web IDE
Labels:
5 Comments
You must be a registered user to add a comment. If you've already registered, sign in. Otherwise, register and sign in.
Labels in this area
-
ABAP CDS Views - CDC (Change Data Capture)
2 -
AI
1 -
Analyze Workload Data
1 -
BTP
1 -
Business and IT Integration
2 -
Business application stu
1 -
Business Technology Platform
1 -
Business Trends
1,658 -
Business Trends
92 -
CAP
1 -
cf
1 -
Cloud Foundry
1 -
Confluent
1 -
Customer COE Basics and Fundamentals
1 -
Customer COE Latest and Greatest
3 -
Customer Data Browser app
1 -
Data Analysis Tool
1 -
data migration
1 -
data transfer
1 -
Datasphere
2 -
Event Information
1,400 -
Event Information
66 -
Expert
1 -
Expert Insights
177 -
Expert Insights
298 -
General
1 -
Google cloud
1 -
Google Next'24
1 -
Kafka
1 -
Life at SAP
780 -
Life at SAP
13 -
Migrate your Data App
1 -
MTA
1 -
Network Performance Analysis
1 -
NodeJS
1 -
PDF
1 -
POC
1 -
Product Updates
4,577 -
Product Updates
344 -
Replication Flow
1 -
RisewithSAP
1 -
SAP BTP
1 -
SAP BTP Cloud Foundry
1 -
SAP Cloud ALM
1 -
SAP Cloud Application Programming Model
1 -
SAP Datasphere
2 -
SAP S4HANA Cloud
1 -
SAP S4HANA Migration Cockpit
1 -
Technology Updates
6,873 -
Technology Updates
421 -
Workload Fluctuations
1
Related Content
- My inbox application with multiple backends(ECC,CRM) configuration Guide in Technology Q&A
- SAP Build Process Automation Pre-built content for Finance Use cases in Technology Blogs by SAP
- sap.ui.RichTextEditor conflicting with sap cap application validation message popup in Technology Q&A
- Consuming SAP with SAP Build Apps - Mobile Apps for iOS and Android in Technology Blogs by SAP
- Demystifying the Common Super Domain for SAP Mobile Start in Technology Blogs by SAP
Top kudoed authors
| User | Count |
|---|---|
| 39 | |
| 25 | |
| 17 | |
| 13 | |
| 7 | |
| 7 | |
| 7 | |
| 7 | |
| 6 | |
| 6 |