
- SAP Community
- Products and Technology
- Technology
- Technology Blogs by SAP
- SAP Cloud Platform Backend service: Tutorial [22]:...
Technology Blogs by SAP
Learn how to extend and personalize SAP applications. Follow the SAP technology blog for insights into SAP BTP, ABAP, SAP Analytics Cloud, SAP HANA, and more.
Turn on suggestions
Auto-suggest helps you quickly narrow down your search results by suggesting possible matches as you type.
Showing results for
Product and Topic Expert
Options
- Subscribe to RSS Feed
- Mark as New
- Mark as Read
- Bookmark
- Subscribe
- Printer Friendly Page
- Report Inappropriate Content
06-03-2019
7:55 AM
This blog is part of a series of tutorials explaining the usage of SAP Cloud Platform Backend service in detail.
Recap
In a previous tutorial, we’ve created a node.js application running in the cloud and calling a Backend service API.
We’ve bound our app to a service instance of XSUAA to avoid hard-coding the required params
But still we hard-coded the URL of the OData service (API)
Hard-coding is never a good idea.
What's the problem with a service URL?
For example, if the version of the API changes, then the URL is different.
Other example would be that the host changes, a different data center in the cloud.
You could decide to go for ODAta V4 instead of V2
OK, thanks, I got it
OK, in the present blog we want to improve that
Improve what?
Don't have URL strings in the application anymore
Externalize the string into a config file?
No, externalize the string into the cloud
Wow, sounds spacy...
It is cool
Furthermore, we improve the way of reading environment variables
That sounds boring...
It is nice
Overview
In this tutorial we’re going to learn how to use the destination service
We’re going to cover 3 aspects:
Create destination service in the cloud cockpit (Admin)
Create destination configuration in the cloud cockpit (Admin)
Use destination in the node.js code (Developer)
What is it all about: destinations?
A destination is used to encapsulate connection information.
So if an application needs to connect to a remote service, it is a good idea to extract some parts of the connection data out of the code and store it in the environment.
That’s why we have destinations.
How does it work?
Basically, in the cloud cockpit there's a screen, where you create a destination, to store the URL and other parameters
And my string in the code?
In the application code, you don’t write the URL, but instead, you point to the destination
Hard-coded?
Ehm - yes
Aha...
Yes, it is one dedicated pointer, all the rest is configured
If the remote host has to be changed, that can be done in the destination, and the code doesn’t need to be modified
Or if a (technical) user password is required, it doesn’t need to be stored in the code
What if the destination name changes?
It doesn't change
Aha...
Furthermore, the destination service has another cool feature
Which one?
Surprise....
Aha...
Write a simple node.js application which calls Backend service API like before
NEW: It should make use of destination service, to avoid hardcoded URLs. And use a cool feature
NEW: It should read the env variables in a more elegant way
Result:
At the end, we have the following artifacts in the cloud:
2 service instances
1 destination configuration
1 node.js application
1 API in Backend service
Sounds confusing
Check this diagram below
You need a working OData service (API) in Backend service
You should have followed the previous tutorials about creating node.js application
You should have already created the required instance of XSUAA, as explained in the same chapter of a previous blog
See explanations in the same chapter of the previous blog.
Furthermore:
You should make sure that you have quota for creating an instance of destination service in your (BETA-enabled) subaccount
To verify, proceed as follows:
Go to your global account and click on “Entitlements” in the left navigation pane
Then scroll down to “Destination”
Your (BETA-enabled) subaccount should have at least one assignment, as shown below:

If not, you might find this blog useful.
Explained in the same chapter of the previous blog
Go to your BETA-enabled subaccount and go into your Space
Go to „Service Marketplace“ and click on “Destination”

On the left navigation pane, click on “instances”, then click the button “New Instance”

In the “Create Instance” dialog, choose Service Plan as “lite”
Press Next
No need to enter configuration params
Press Next
No application yet to bind to.
Press Next
Enter a name for the new instance, e.g. "mydestination"
Press Finish
That’s it, now we have created an instance of destination service.
Take a note of the instance name, because we will have to write the correct name, when binding our application to this service instance.
Like we did before, we define the binding in the manifest, instead of clicking it in the cockpit
Note:
Alternatively, you can create and deploy an initial version of the app first, then define the binding during creation of the service instances
Note:
Due to quota restrictions, in a Trial account we can create only 2 instances of destination service
However, it doesn’t matter, because almost endless amount of destination configurations is allowed
I'm confused
To clarify:
One thing is the destination service:
This is the cloud (micro-) service, allowing apps to bind to
Totally different is the destination configuration:
Here you write e.g. the URL, user and pwd, etc
For each target, you create one "configuration"
Next logical step would be to create a destination configuration to point at our Backend service API.
So let’s do that. I’m eager to learn
But to do that, we need some data
Yes, let's go
But: we don’t have (yet): clientid, clientsecret.
*sigh* then I have to search a better tutorial...
We have an xsuaa instance, but no client credentials.
Reason: we don’t have a client yet
Our future node-application will be the client
I don’t understand: in previous blog, we created Service Key, and there we got the clientid
Yes, that’s true, but Service Keys are necessary for external applications only
What we want:
Deploy our app to the cloud and bind to the xsuaa service instance
Like that, our app is registered as client to xsuaa and the info like clientid can be viewed in the Environment of the app
We’ve learned that in this tutorial.
I didn't read...
You should
So, we need an early deploy of our app:
Just to get the info which we need for creating the destination
Why deploy a dummy app, not the final app?
Of course, I do have the final code which works.
But I want you to have the full learning experience
Oh so nice of you
We need to view the structure of Environment variables, only then we can know how to access them from code
We’ve done that in a previous tutorial
Yes, but not for "Destination" service
Deploy dummy app
Create folder structure as explained in the this chapter of the previous blog
Same package.json
This time - for the moment - leave the app.js file empty
In the manifest file, create one additional line to add the binding to the destination service instance:
Note:
As you know, be careful when adding a line, as you know, indent must be perfect
Note:
See appendix for full file content
Deploy the app like you did before (e.g. using command line client)
Note:
Don’t care if there are errors (due to empty app.js), we only need to view the environment variables
After deploy, check the Environment variables:

The screenshot shows the 2 service instances to which we bind our app (as specified in manifest.yml)
It also shows that both have credentials properties like clientid etc
Yes, we’ll need them later
Take a note of clientid and clientsecret and url, like we did before
BUT: make sure that you take the property values of the “xsuaa” subtree !
Now we can create a destination configuration.
Actually, this is the interesting step
Where we left: after creating a new service instance:

Info:
We have to learn that there are 2 levels of destination configurations:
Destination configurations can be created on subaccount level or on instance level.
We can see it in the above screenshot:
When clicking on the hyperlink “mydestination”, then we’re taken to the service instance.
There we can click on the “Destinations” menu entry to create destination configurations
Alternatively, there’s a shortcut: the icon “Open Dashboard” takes you directly to the “Destinations” screen of the selected service instance
That’s the instance level
The advantage: these destinations are only visible for this instance
The disadvantage: these destinations are only visible for this instance
Therefore, it is possible to create Destination Configurations on subaccount level
For us happy tutorial users, it doesn’t make a difference.
I've just chosen to describe the subaccount level, because it is easier to reach (less clicks)
Go to your (BETA-enabled) subaccount (as usual, the same subaccount like the Backend service)
On the left navigation pane, expand “Connectivity” and click on “Destinations”
That’s it, here we are:

Now let’s create a destination configuration.
Note:
Below we’re choosing "OAuth2ClientCredentials" authentication type.
As the name suggests, this is not the right type, because Backend service API don’t support “Client Credentials” (as of now)
But since there’s no “Password Credentials” or “Authorization Code” type available for Destination (as of now), we have to do a little trick:
We add the resource owner credentials as parameters to the token-URL (like we learned in a previous tutorial)
This is obviously not the recommended way, because the password is visible.
But I’ve decided to go ahead with this approach, because it allows us to learn the concepts and usage of destinations, already now, before features are available.
In productive scenarios, the way to go would be e.g. principal propagation
OK, so after clicking on “New Destination”, we enter the following details and press “Save”
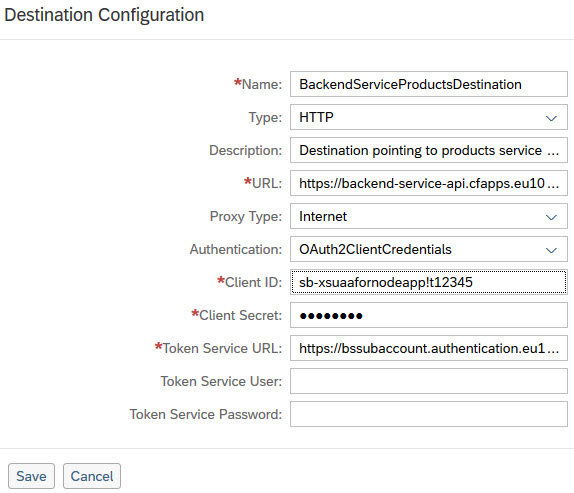
Explanation
Name:
A name of your choice for the destination configuration.
We need this name in the application code, when we programmatically fetch the data for this destination.
In our example, we enter the name as "BackendServiceProductsDestination"
Type:
Choose "HTTP", because we connect to a remote service
Description:
Optional, any text of your choice
URL:
The URL which we want to call in our application,
The URL which we want to move from the code into the destination
In our example, the full URL of the Backend service API
e.g.
https://backend-service-api.cfapps.eu10.hana.ondemand.com/odatav2/DEFAULT/PRODUCTSERVICE;v=1/Product...
Note about URL:
Have you seen it? In case of Backend Service:
You cannot just copy&paste the URL from browser. You have to modify the prefix. It is:
https://backend-service-api.cfapps...
Proxy Type:
Choose "Internet".
The second option, “On Premise” would be the right one when the service is hosted in e.g. an op premise SAP ERP system
Authentication:
This choice makes a big difference
E.g. some services can be free ("No Auth"), others require just user credentials ("Basic Auth"), etc
In our case, we choose “OAuth2ClientCredentials”
As a consequence, some more fields are made visible
Note:
This authentication type means that the service delegates the authentication/authorization to the “Authorization Server”
(see OAuth2 explanation)
That’s why e.g. the URL of the “Authorization Server” endpoint has to be specified below
Client ID:
This is the id of the client (app) which wants to connect to the "URL" above
It is the client id which was assigned to our node application after deployment, and binding to xsuaa
It is what we copied over from the Environment Variables or our app
e.g.
"sb-xsuaafornodeapp!t12345"
Client Secret:
Like above
Token Service URL:
Here we have to enter the URL of the “Authorization Server” which validates the client credentials and issues an access token.
That access token is required for accessing the Backend service URL, which is specified above in the destination configuration
The "Token Service URL" is composed like described in previous tutorials:
Take the url property of the Environment Variables and append /oauth/token
However: in our special case:
We're in a situation where the authentication type that we need is not yet available for destination (“Password Credentials”)
But the Backend service does not yet accept the “Client Credentials” which is supported by destination (as of June 2019)
If we try with “Client Credentials”, then the Backend service will complain, because the token doesn’t contain user information
But I tell you a little workaround, which allows us to go forward:
We add the URL parameters for "Password Credentials" grant type:
&grant_type=password etc
(as explained in previous tutorial)
Like that, we force the “Authorization Server” to generate a token which is suitable for Backend service
In the “Token Service URL” field, we enter
https://bssubaccount.authentication.eu10.hana.ondemand.com/oauth/token?grant_type=password&username=...
Note:
Make sure to adapt the user and password to your own Trial-user and pwd
Note:
I assume that it is absolutely clear for you that here you’re writing your password in plain text and it is visible for anybody who can access the subaccount
Token Service User and Password:
Leave these fields empty
That's it.
Just one moment, I have a question: how to do that in productive scenarios?
Answer 1: wait until the required features are available.
Answer 2: use a dummy destination (No Auth) to only store the service URL, then use “Authorization Code” grant type for the user login
Answer 3: use principal propagation or similar flow
OK, that's it
After creating the destination, you’ll find a button “Check Connection” at the end of the form
You can press it and expect that it does what it says: it checks the connection.
Try it:

The result is somehow funny:
The result is a success message, but it contains an error message as well
The reason:
I assume that the check is happy if the destination REST service is reached and data could be read
On top of that happiness, the check also tries to call the specified URL (Backend service API)
But this URL cannot be simply called, because the OAuth flow needs to be followed.
If the Backend service doesn’t receive a valid access token, then it responds with 401
OK, that's it about destination creation
Are we done with the destination?
Yes
Can we code?
Yes
In this section we will learn 2 new things:
- Read the environment variables in a more elegant way
- Use the destination service, which is really cool. A surprise is still waiting for us
manifest.yml
We’ve already added the manifest above. See appendix for full content
package.json
For reading the environment variables in Coud Foundry, there’s a little helper for node.js
cfenv
To use it, we add the dependency to our package.json file:
See the appendix for full file content
After adding the line and saving the file, change to the command line and execute
npm install
This will install the cfenv node-module
app.js
Here’s the full code:
Explanation 1
To read the environment variables, we’re now using a convenience node.js package: cfenv
It has convenience methods to access the environment variables of the current application:
cfenv.getAppEnv()
The following method returns the “credentials” as JSON object for the given service instance name:
const CREDENTIALS = appEnv.getServiceCreds('mydestination');
Doesn’t it look more elegant than the old approach?
const VCAP_SERVICES = JSON.parse(process.env.VCAP_SERVICES);
const DEST_CREDS = VCAP_SERVICES.destination[0].credentials;
Yes, I like it.
If you like it, you can find more info here
This was the first new learning
Explanation 2
Next learning: how to use the destination service
What we want:
Instead of hard-coding the URL, we want to get it from external config
This could be achieved e.g. through environment variables
However, there’s more:
Destination is about connectivity.
Calling a remote service (e.g. Backend service API) can be more complicated, depending on the required security mechanism.
In case of "Basic Authentication", we just need the value of user and password
In case of OAuth, we need to follow the OAuth flow.
And it would be fantastic, if we could just get a token from the destination, instead of fetching it ourselves
Yes, wonderful, just like a dream
Well: that’s what the destination service does for us.
Oh really? How cool is that?
Yes, wake up, it is super cool!
I’m fully focussed
Listen:
Whenever we ask the cloud platform for the destination configuration info, we get a valid token.
How can that be achieved?
We have to understand:
Destination information is not passed to us via environment variable. Also, there’s no convenience library which we could use (like in the NEOenvironment)
Instead, destination information is provided via a microservice
We call the destination REST service just like a normal REST service and the response contains the information we need in a structured way:
Among other, there's the URL of the remote service and the access token which we can directly use to call it
How to call the destination REST service?
We build the URL which contains the name of the destination, as configured in the cloud cockpit:
<destinationSrvURL>/<theDestinaionName>
Example URL:
https://destination-configuration.cfapps.eu10.hana.ondemand.com/destination-configuration/v1/destina...;
However, there’s a little tedious thing about calling this URL: it is protected with oauth.
Oh no...
Yes, before we get our desired token (no 2) from the destination, for free, we need to fetch a different token (no 1), required for the destination REST service
Summarizing the steps:
1. get destination info via REST service
a) Fetch token which is required by the destination REST service
b) call destination REST service to get the destination configuration
2. call Backend service API
In detail
1a)
Fetching the token for the destination REST service is encapsulated in a helper method
The call is a little bit easier than it used to be for the Backend service.
Reason: the required OAuth grant type is “Client Credentials”, which means that no user password is needed
The clientid and clientsecret which have to be sent, are retrieved programmatically from the environment variables of the “mydestination” service instance (not xsuaa)
The URL of the “Authorization Server” is also retrieved from the corresponding url-environment variable. It is the same as we already have used:
https://<acc>.authentication.eu10.hana.ondemand.com/oauth/token
Note:
Make sure that you don’t use the clientid/secret of the xsuaa service instance
Those are required for Backend service.
We specified them in the destination configuration in the cockpit (see above)
For the moment, we need a token for destination service.
1b)
Calling the destination REST service is a simple GET request.
We’ve encapsulated it in a helper method
The URL is retrieved from uri-environment variable of the destination service instance
We need to concatenate some segments and the destination name
<uri>/destination-configuration/v1/destinations/<destName>
e.g.
https://destination-configuration.cfapps.eu10.hana.ondemand.com/destination-configuration/v1/destina...;
We call our helper method and pass the name of our destination, as well as the concatenated value for the “Authorization” header:
As we know, the "Authorization" header is composed by ‘bearer’ and a blank and the token value
However, the string ‘bearer’ can be retrieved form the response (1a), so we don’t need a hard-coded string here.
So we can fire the GET request to the destination service and in the next step we can analyze the response
2)
Finally, after we’ve called the destination service and received all the information, we can use it to call our API of the Backend service.
The response of the destination service contains 2 important sections:
- The destination configuration:
This corresponds to the data which we entered in the cloud cockpit (URL, description, etc)
- The authToken:
This is the token required for accessing the URL
Note:
Whenever the destination REST service is called, it returns a valid token, it is refreshed if necessary
I love it so much: we don’t need to fetch it manually
That’s so fantastic…!
OK, so from the destination info object we can just access the URL of our OData service and the required token.
Here as well, the type of the token (in our case always ‘bearer’) can be found in a corresponding property
At the end, we can do a QUERY request to our OData service, we just need to compose the “Authorization” header value.
That’s it
Question: why aren’t we moving the whole destination-handling into one single helper method?
I thought, if we have 3 helper methods, it makes the overall process more visible
Better learning experience?
Sure
That's it?
No
Some more experience?
Yes, for better learning experience, let's add a diagram:

It is too small...what a bad experience!
Just click it to enlarge
Wow, nice experience
That's it?
That's it
What to do if you happily deploy everything and try testing and get..... Forbidden ???
See this blog for a Troubleshooting guide
In this tutorial, we’ve learned how to programmatically consume the Destination service
We've showed it for node.js application
Consuming the Destination service means calling a REST service
Required steps:
1a) Fetch oauth token for calling the destination API
1b) Call the destination REST service to get the destination configuration data, e.g. URL
Also, we get automatically a valid token for Backend service
2) Call that URL, using the that token
All the required data can be found in the environment variables of our app
In order to get these env variables, our app needs to be bound to instances of xsuaa and Destination services
Finally, we’ve created an app like it should be
And all the previous blogs were useless?
Yes, you can forget them all
No, no, it was so good learning experience…
Check this tutorial to learn how to use Destination with type "OAuth2UserTokenExchange"
Beforehand, you should have a look into App Router tutorials
Same like in last blog
SAP Help Portal:
Managing Destinations
Destination type OAuth Client Credentials
Node module cfenv: https://www.npmjs.com/package/cfenv
Syntax of REST API for fetching a destination
URL:
uri property from env var + path + name of configuration
<uri> + '/destination-configuration/v1/destinations/' + destinationName;
e.g.
https://destination-configuration.cfapps.eu10.hana.ondemand.com/destination-configuration/v1/destina...;
Authorization
OAuth client credentials.
clientid/secret to be taken from env of destinaion
token to be fetched manually
Response:
The service response is a string with the following (JSON) structure
Object
- - destinationConfiguration
- - - - URL
- - authTokens (this is an array)
- - - - [0]
- - - - - - type
- - - - - - value
manifest.yml
package.json
app.js
Quicklinks:
Destination Configuration
Diagram
Usage in code
Project files
Reference
Recap
In a previous tutorial, we’ve created a node.js application running in the cloud and calling a Backend service API.
We’ve bound our app to a service instance of XSUAA to avoid hard-coding the required params
But still we hard-coded the URL of the OData service (API)
Hard-coding is never a good idea.
What's the problem with a service URL?
For example, if the version of the API changes, then the URL is different.
Other example would be that the host changes, a different data center in the cloud.
You could decide to go for ODAta V4 instead of V2
OK, thanks, I got it
OK, in the present blog we want to improve that
Improve what?
Don't have URL strings in the application anymore
Externalize the string into a config file?
No, externalize the string into the cloud
Wow, sounds spacy...
It is cool
Furthermore, we improve the way of reading environment variables
That sounds boring...
It is nice
Overview
In this tutorial we’re going to learn how to use the destination service
We’re going to cover 3 aspects:
Create destination service in the cloud cockpit (Admin)
Create destination configuration in the cloud cockpit (Admin)
Use destination in the node.js code (Developer)
What is it all about: destinations?
A destination is used to encapsulate connection information.
So if an application needs to connect to a remote service, it is a good idea to extract some parts of the connection data out of the code and store it in the environment.
That’s why we have destinations.
How does it work?
Basically, in the cloud cockpit there's a screen, where you create a destination, to store the URL and other parameters
And my string in the code?
In the application code, you don’t write the URL, but instead, you point to the destination
Hard-coded?
Ehm - yes
Aha...
Yes, it is one dedicated pointer, all the rest is configured
If the remote host has to be changed, that can be done in the destination, and the code doesn’t need to be modified
Or if a (technical) user password is required, it doesn’t need to be stored in the code
What if the destination name changes?
It doesn't change
Aha...
Furthermore, the destination service has another cool feature
Which one?
Surprise....
Aha...
Goal
Write a simple node.js application which calls Backend service API like before
NEW: It should make use of destination service, to avoid hardcoded URLs. And use a cool feature
NEW: It should read the env variables in a more elegant way
Result:
At the end, we have the following artifacts in the cloud:
2 service instances
1 destination configuration
1 node.js application
1 API in Backend service
Sounds confusing
Check this diagram below
Prerequisites
You need a working OData service (API) in Backend service
You should have followed the previous tutorials about creating node.js application
You should have already created the required instance of XSUAA, as explained in the same chapter of a previous blog
Preparation
See explanations in the same chapter of the previous blog.
Furthermore:
You should make sure that you have quota for creating an instance of destination service in your (BETA-enabled) subaccount
To verify, proceed as follows:
Go to your global account and click on “Entitlements” in the left navigation pane
Then scroll down to “Destination”
Your (BETA-enabled) subaccount should have at least one assignment, as shown below:
If not, you might find this blog useful.
Create XSUAA service instance
Explained in the same chapter of the previous blog
Create Destination service instance
Go to your BETA-enabled subaccount and go into your Space
Go to „Service Marketplace“ and click on “Destination”
On the left navigation pane, click on “instances”, then click the button “New Instance”
In the “Create Instance” dialog, choose Service Plan as “lite”
Press Next
No need to enter configuration params
Press Next
No application yet to bind to.
Press Next
Enter a name for the new instance, e.g. "mydestination"
Press Finish
That’s it, now we have created an instance of destination service.
Take a note of the instance name, because we will have to write the correct name, when binding our application to this service instance.
Like we did before, we define the binding in the manifest, instead of clicking it in the cockpit
Note:
Alternatively, you can create and deploy an initial version of the app first, then define the binding during creation of the service instances
Note:
Due to quota restrictions, in a Trial account we can create only 2 instances of destination service
However, it doesn’t matter, because almost endless amount of destination configurations is allowed
I'm confused
To clarify:
One thing is the destination service:
This is the cloud (micro-) service, allowing apps to bind to
Totally different is the destination configuration:
Here you write e.g. the URL, user and pwd, etc
For each target, you create one "configuration"
Create dummy app
Next logical step would be to create a destination configuration to point at our Backend service API.
So let’s do that. I’m eager to learn
But to do that, we need some data
Yes, let's go
But: we don’t have (yet): clientid, clientsecret.
*sigh* then I have to search a better tutorial...
We have an xsuaa instance, but no client credentials.
Reason: we don’t have a client yet
Our future node-application will be the client
I don’t understand: in previous blog, we created Service Key, and there we got the clientid
Yes, that’s true, but Service Keys are necessary for external applications only
What we want:
Deploy our app to the cloud and bind to the xsuaa service instance
Like that, our app is registered as client to xsuaa and the info like clientid can be viewed in the Environment of the app
We’ve learned that in this tutorial.
I didn't read...
You should
So, we need an early deploy of our app:
Just to get the info which we need for creating the destination
Why deploy a dummy app, not the final app?
Of course, I do have the final code which works.
But I want you to have the full learning experience
Oh so nice of you
We need to view the structure of Environment variables, only then we can know how to access them from code
We’ve done that in a previous tutorial
Yes, but not for "Destination" service
Deploy dummy app
Create folder structure as explained in the this chapter of the previous blog
Same package.json
This time - for the moment - leave the app.js file empty
In the manifest file, create one additional line to add the binding to the destination service instance:
  services:

    - XsuaaForNodeApp

    - mydestination
Note:
As you know, be careful when adding a line, as you know, indent must be perfect
Note:
See appendix for full file content
Deploy the app like you did before (e.g. using command line client)
Note:
Don’t care if there are errors (due to empty app.js), we only need to view the environment variables
After deploy, check the Environment variables:
The screenshot shows the 2 service instances to which we bind our app (as specified in manifest.yml)
It also shows that both have credentials properties like clientid etc
Yes, we’ll need them later
Take a note of clientid and clientsecret and url, like we did before
BUT: make sure that you take the property values of the “xsuaa” subtree !
Create destination configuration
Now we can create a destination configuration.
Actually, this is the interesting step
Where we left: after creating a new service instance:
Info:
We have to learn that there are 2 levels of destination configurations:
Destination configurations can be created on subaccount level or on instance level.
We can see it in the above screenshot:
When clicking on the hyperlink “mydestination”, then we’re taken to the service instance.
There we can click on the “Destinations” menu entry to create destination configurations
Alternatively, there’s a shortcut: the icon “Open Dashboard” takes you directly to the “Destinations” screen of the selected service instance
That’s the instance level
The advantage: these destinations are only visible for this instance
The disadvantage: these destinations are only visible for this instance
Therefore, it is possible to create Destination Configurations on subaccount level
For us happy tutorial users, it doesn’t make a difference.
I've just chosen to describe the subaccount level, because it is easier to reach (less clicks)
Go to your (BETA-enabled) subaccount (as usual, the same subaccount like the Backend service)
On the left navigation pane, expand “Connectivity” and click on “Destinations”
That’s it, here we are:
Now let’s create a destination configuration.
Note:
Below we’re choosing "OAuth2ClientCredentials" authentication type.
As the name suggests, this is not the right type, because Backend service API don’t support “Client Credentials” (as of now)
But since there’s no “Password Credentials” or “Authorization Code” type available for Destination (as of now), we have to do a little trick:
We add the resource owner credentials as parameters to the token-URL (like we learned in a previous tutorial)
This is obviously not the recommended way, because the password is visible.
But I’ve decided to go ahead with this approach, because it allows us to learn the concepts and usage of destinations, already now, before features are available.
In productive scenarios, the way to go would be e.g. principal propagation
OK, so after clicking on “New Destination”, we enter the following details and press “Save”
Explanation
Name:
A name of your choice for the destination configuration.
We need this name in the application code, when we programmatically fetch the data for this destination.
In our example, we enter the name as "BackendServiceProductsDestination"
Type:
Choose "HTTP", because we connect to a remote service
Description:
Optional, any text of your choice
URL:
The URL which we want to call in our application,
The URL which we want to move from the code into the destination
In our example, the full URL of the Backend service API
e.g.
https://backend-service-api.cfapps.eu10.hana.ondemand.com/odatav2/DEFAULT/PRODUCTSERVICE;v=1/Product...
Note about URL:
Have you seen it? In case of Backend Service:
You cannot just copy&paste the URL from browser. You have to modify the prefix. It is:
https://backend-service-api.cfapps...
Proxy Type:
Choose "Internet".
The second option, “On Premise” would be the right one when the service is hosted in e.g. an op premise SAP ERP system
Authentication:
This choice makes a big difference
E.g. some services can be free ("No Auth"), others require just user credentials ("Basic Auth"), etc
In our case, we choose “OAuth2ClientCredentials”
As a consequence, some more fields are made visible
Note:
This authentication type means that the service delegates the authentication/authorization to the “Authorization Server”
(see OAuth2 explanation)
That’s why e.g. the URL of the “Authorization Server” endpoint has to be specified below
Client ID:
This is the id of the client (app) which wants to connect to the "URL" above
It is the client id which was assigned to our node application after deployment, and binding to xsuaa
It is what we copied over from the Environment Variables or our app
e.g.
"sb-xsuaafornodeapp!t12345"
Client Secret:
Like above
Token Service URL:
Here we have to enter the URL of the “Authorization Server” which validates the client credentials and issues an access token.
That access token is required for accessing the Backend service URL, which is specified above in the destination configuration
The "Token Service URL" is composed like described in previous tutorials:
Take the url property of the Environment Variables and append /oauth/token
However: in our special case:
We're in a situation where the authentication type that we need is not yet available for destination (“Password Credentials”)
But the Backend service does not yet accept the “Client Credentials” which is supported by destination (as of June 2019)
If we try with “Client Credentials”, then the Backend service will complain, because the token doesn’t contain user information
But I tell you a little workaround, which allows us to go forward:
We add the URL parameters for "Password Credentials" grant type:
&grant_type=password etc
(as explained in previous tutorial)
Like that, we force the “Authorization Server” to generate a token which is suitable for Backend service
In the “Token Service URL” field, we enter
https://bssubaccount.authentication.eu10.hana.ondemand.com/oauth/token?grant_type=password&username=...
Note:
Make sure to adapt the user and password to your own Trial-user and pwd
Note:
I assume that it is absolutely clear for you that here you’re writing your password in plain text and it is visible for anybody who can access the subaccount
Token Service User and Password:
Leave these fields empty
That's it.
Just one moment, I have a question: how to do that in productive scenarios?
Answer 1: wait until the required features are available.
Answer 2: use a dummy destination (No Auth) to only store the service URL, then use “Authorization Code” grant type for the user login
Answer 3: use principal propagation or similar flow
OK, that's it
After creating the destination, you’ll find a button “Check Connection” at the end of the form
You can press it and expect that it does what it says: it checks the connection.
Try it:
The result is somehow funny:
The result is a success message, but it contains an error message as well
The reason:
I assume that the check is happy if the destination REST service is reached and data could be read
On top of that happiness, the check also tries to call the specified URL (Backend service API)
But this URL cannot be simply called, because the OAuth flow needs to be followed.
If the Backend service doesn’t receive a valid access token, then it responds with 401
OK, that's it about destination creation
Are we done with the destination?
Yes
Can we code?
Yes
Create application
In this section we will learn 2 new things:
- Read the environment variables in a more elegant way
- Use the destination service, which is really cool. A surprise is still waiting for us
manifest.yml
We’ve already added the manifest above. See appendix for full content
package.json
For reading the environment variables in Coud Foundry, there’s a little helper for node.js
cfenv
To use it, we add the dependency to our package.json file:
{

  "dependencies": {

    "cfenv": "^1.1.0",

    . . .
See the appendix for full file content
After adding the line and saving the file, change to the command line and execute
npm install
This will install the cfenv node-module
app.js
Here’s the full code:
'use strict';


const oauthClient = require('client-oauth2');

const request = require('request-promise');


const express = require('express');

const app = express();


const cfenv = require("cfenv");

const appEnv = cfenv.getAppEnv();

const credentials = appEnv.getServiceCreds('mydestination');

const destClientId = credentials.clientid;

const destClientSecret = credentials.clientsecret;

const destUri = credentials.uri; //https://destination-configuration.cfapps.eu10.hana.ondemand.com

const destAuthUrl = credentials.url;//https://bssubaccount.authentication.eu10.hana.ondemand.com


// destination service is protected with OAuth

const _getTokenForDestinationService = function() {

    return new Promise((resolve, reject) => {

        let tokenEndpoint = destAuthUrl + '/oauth/token';

        const client = new oauthClient({

            accessTokenUri: tokenEndpoint,

            clientId: destClientId,

            clientSecret: destClientSecret,

            scopes: []

        });

        client.credentials.getToken()

        .catch((error) => {

            return reject({message: 'Error: failed to get access token for Destination service', error: error});

        })

        .then((result) => {

            resolve({message:'Successfully fetched token for Destination service.', tokenInfo: result});

        });

    });

}


// call the REST API of the Cloud Foundry Destination service to get the configuration info as configured in the cloud cockpit

const _getDestinationConfig = function (destinationName, authorizationHeaderValue){

    return new Promise (function(resolve, reject){

        let fullDestinationUri = destUri + '/destination-configuration/v1/destinations/' + destinationName;

        const options = {

            url: fullDestinationUri,

            resolveWithFullResponse: true ,

            headers: { Authorization: authorizationHeaderValue}

        };

        // do HTTP call

        request(options)

        .catch((error) => {

            return reject({ message: 'Error occurred while calling Destination service', error: error });

        })

        .then((response) => {

            if(response && response.statusCode == 200){

                let jsonDestInfo = JSON.parse(response.body);

                return resolve({ message: 'Successfully called Destination service.' , destinationInfo: jsonDestInfo });

            }else{

                reject('Error: failed to call destination service. ' + response.body);

            }

        });

    });

 };


 const _doQUERY = function (serviceUrl, authorizationHeaderValue){

    return new Promise (function(resolve, reject){

        const options = {

            url: serviceUrl,

            resolveWithFullResponse: true ,

            headers: {

                Authorization: authorizationHeaderValue,

                Accept : 'application/json'

            }

        };


        request(options)

        .then((response) => {

            if(response && response.statusCode == 200){

                resolve({responseBody: response.body});

            }

            return reject({ message: 'Error while calling OData service'});

        })

        .catch((error) => {

            reject({ message: 'Error occurred while calling OData service', error: error });

        });

    });

 };


// server response

app.get('/', function (req, res) {

    // 1a) get access token for destination service

    _getTokenForDestinationService()

    .then(result => {

        // 1b) call the destination service

        return _getDestinationConfig('BackendServiceProductsDestination', result.tokenInfo.tokenType + ' ' + result.tokenInfo.accessToken);

    })

    .then(result => {

        let bsApiUrl = result.destinationInfo.destinationConfiguration.URL;

        let tokenTypeForBsApi = result.destinationInfo.authTokens[0].type;  // type is 'bearer'

        let tokenForBsApi = result.destinationInfo.authTokens[0].value;

        // 2. call BS-API with Url + oauth token retrieved from destination

        return _doQUERY(bsApiUrl, tokenTypeForBsApi + ' ' + tokenForBsApi);

    })

    .then(result => {

        res.send('<h2>RESULT of request to Backend service:</h2>OData service response: <p>' + JSON.stringify(result.responseBody) + '</p>');

    })

    .catch(error => {

        res.send('ERROR: ' + error.message + ' - FULL ERROR: ' + error.error);

    });

});


// start the server

app.listen(process.env.PORT, function () { // env variable PORT is set by Cloud Foundry

})
Explanation 1
To read the environment variables, we’re now using a convenience node.js package: cfenv
It has convenience methods to access the environment variables of the current application:
cfenv.getAppEnv()
The following method returns the “credentials” as JSON object for the given service instance name:
const CREDENTIALS = appEnv.getServiceCreds('mydestination');
Doesn’t it look more elegant than the old approach?
const VCAP_SERVICES = JSON.parse(process.env.VCAP_SERVICES);
const DEST_CREDS = VCAP_SERVICES.destination[0].credentials;
Yes, I like it.
If you like it, you can find more info here
This was the first new learning
Explanation 2
Next learning: how to use the destination service
What we want:
Instead of hard-coding the URL, we want to get it from external config
This could be achieved e.g. through environment variables
However, there’s more:
Destination is about connectivity.
Calling a remote service (e.g. Backend service API) can be more complicated, depending on the required security mechanism.
In case of "Basic Authentication", we just need the value of user and password
In case of OAuth, we need to follow the OAuth flow.
And it would be fantastic, if we could just get a token from the destination, instead of fetching it ourselves
Yes, wonderful, just like a dream
Well: that’s what the destination service does for us.
Oh really? How cool is that?
Yes, wake up, it is super cool!
I’m fully focussed
Listen:
| Whenever we ask the cloud platform for the destination configuration info, we get a valid token |
Whenever we ask the cloud platform for the destination configuration info, we get a valid token.
How can that be achieved?
We have to understand:
Destination information is not passed to us via environment variable. Also, there’s no convenience library which we could use (like in the NEOenvironment)
Instead, destination information is provided via a microservice
We call the destination REST service just like a normal REST service and the response contains the information we need in a structured way:
Among other, there's the URL of the remote service and the access token which we can directly use to call it
How to call the destination REST service?
We build the URL which contains the name of the destination, as configured in the cloud cockpit:
<destinationSrvURL>/<theDestinaionName>
Example URL:
https://destination-configuration.cfapps.eu10.hana.ondemand.com/destination-configuration/v1/destina...;
However, there’s a little tedious thing about calling this URL: it is protected with oauth.
Oh no...
Yes, before we get our desired token (no 2) from the destination, for free, we need to fetch a different token (no 1), required for the destination REST service
Summarizing the steps:
1. get destination info via REST service
a) Fetch token which is required by the destination REST service
b) call destination REST service to get the destination configuration
2. call Backend service API
In detail
1a)
Fetching the token for the destination REST service is encapsulated in a helper method
The call is a little bit easier than it used to be for the Backend service.
Reason: the required OAuth grant type is “Client Credentials”, which means that no user password is needed
The clientid and clientsecret which have to be sent, are retrieved programmatically from the environment variables of the “mydestination” service instance (not xsuaa)
The URL of the “Authorization Server” is also retrieved from the corresponding url-environment variable. It is the same as we already have used:
https://<acc>.authentication.eu10.hana.ondemand.com/oauth/token
let tokenEndpoint = destAuthUrl + '/oauth/token';

const client = new oauthClient({

    accessTokenUri: tokenEndpoint,

    clientId: destClientId,

    clientSecret: destClientSecret,

    scopes: []

});

client.credentials.getToken()

. . .
Note:
Make sure that you don’t use the clientid/secret of the xsuaa service instance
Those are required for Backend service.
We specified them in the destination configuration in the cockpit (see above)
For the moment, we need a token for destination service.
1b)
Calling the destination REST service is a simple GET request.
We’ve encapsulated it in a helper method
let fullDestinationUri = destUri + '/destination-configuration/v1/destinations/' + destinationName;

const options = {

    url: fullDestinationUri,

    resolveWithFullResponse: true ,

    headers: { Authorization: authorizationHeaderValue}

};

request(options)
The URL is retrieved from uri-environment variable of the destination service instance
We need to concatenate some segments and the destination name
<uri>/destination-configuration/v1/destinations/<destName>
e.g.
https://destination-configuration.cfapps.eu10.hana.ondemand.com/destination-configuration/v1/destina...;
We call our helper method and pass the name of our destination, as well as the concatenated value for the “Authorization” header:
_getDestinationConfig('BackendServiceProductsDestination', result.tokenInfo.tokenType + ' ' + result.tokenInfo.accessToken);As we know, the "Authorization" header is composed by ‘bearer’ and a blank and the token value
However, the string ‘bearer’ can be retrieved form the response (1a), so we don’t need a hard-coded string here.
So we can fire the GET request to the destination service and in the next step we can analyze the response
2)
Finally, after we’ve called the destination service and received all the information, we can use it to call our API of the Backend service.
The response of the destination service contains 2 important sections:
- The destination configuration:
This corresponds to the data which we entered in the cloud cockpit (URL, description, etc)
- The authToken:
This is the token required for accessing the URL
Note:
Whenever the destination REST service is called, it returns a valid token, it is refreshed if necessary
I love it so much: we don’t need to fetch it manually
That’s so fantastic…!
OK, so from the destination info object we can just access the URL of our OData service and the required token.
Here as well, the type of the token (in our case always ‘bearer’) can be found in a corresponding property
let bsApiUrl = result.destinationInfo.destinationConfiguration.URL;

let tokenTypeForBsApi = result.destinationInfo.authTokens[0].type;

let tokenForBsApi = result.destinationInfo.authTokens[0].value;
At the end, we can do a QUERY request to our OData service, we just need to compose the “Authorization” header value.
That’s it
Question: why aren’t we moving the whole destination-handling into one single helper method?
I thought, if we have 3 helper methods, it makes the overall process more visible
Better learning experience?
Sure
That's it?
No
Some more experience?
Yes, for better learning experience, let's add a diagram:

It is too small...what a bad experience!
Just click it to enlarge
Wow, nice experience
That's it?
That's it
Troubleshooting
What to do if you happily deploy everything and try testing and get..... Forbidden ???
See this blog for a Troubleshooting guide
Summary
In this tutorial, we’ve learned how to programmatically consume the Destination service
We've showed it for node.js application
Consuming the Destination service means calling a REST service
Required steps:
1a) Fetch oauth token for calling the destination API
1b) Call the destination REST service to get the destination configuration data, e.g. URL
Also, we get automatically a valid token for Backend service
2) Call that URL, using the that token
All the required data can be found in the environment variables of our app
In order to get these env variables, our app needs to be bound to instances of xsuaa and Destination services
Finally, we’ve created an app like it should be
And all the previous blogs were useless?
Yes, you can forget them all
No, no, it was so good learning experience…
Next Steps
Check this tutorial to learn how to use Destination with type "OAuth2UserTokenExchange"
Beforehand, you should have a look into App Router tutorials
Advertisements
Same like in last blog
Links
SAP Help Portal:
Managing Destinations
Destination type OAuth Client Credentials
Node module cfenv: https://www.npmjs.com/package/cfenv
Appendix 1: Quick Reference
Syntax of REST API for fetching a destination
URL:
uri property from env var + path + name of configuration
<uri> + '/destination-configuration/v1/destinations/' + destinationName;
e.g.
https://destination-configuration.cfapps.eu10.hana.ondemand.com/destination-configuration/v1/destina...;
Authorization
OAuth client credentials.
clientid/secret to be taken from env of destinaion
token to be fetched manually
Response:
The service response is a string with the following (JSON) structure
Object
- - destinationConfiguration
- - - - URL
- - authTokens (this is an array)
- - - - [0]
- - - - - - type
- - - - - - value
Appendix 2: the files
manifest.yml
---

applications:

- name: myBsConsumerApp

  host: bsapp

  path: appfolder

  command: node app.js

  memory: 64M

  buildpack: nodejs_buildpack

  services:

    - XsuaaForNodeApp

    - mydestination
package.json
{

  "dependencies": {

    "cfenv": "^1.1.0",

    "client-oauth2": "^4.2.3",

    "express": "^4.16.3",

    "request": "^2.88.0",

    "request-promise": "^4.2.4"

  }

}
app.js
'use strict';


const oauthClient = require('client-oauth2');

const request = require('request-promise');


const express = require('express');

const app = express();


const cfenv = require("cfenv");


const appEnv = cfenv.getAppEnv();

const credentials = appEnv.getServiceCreds('mydestination');

const destClientId = credentials.clientid;

const destClientSecret = credentials.clientsecret;

const destUri = credentials.uri; //https://destination-configuration.cfapps.eu10.hana.ondemand.com

const destAuthUrl = credentials.url;//https://bssubaccount.authentication.eu10.hana.ondemand.com


// destination service is protected with OAuth

const _getTokenForDestinationService = function() {

    return new Promise((resolve, reject) => {

        let tokenEndpoint = destAuthUrl + '/oauth/token';

        const client = new oauthClient({

            accessTokenUri: tokenEndpoint,

            clientId: destClientId,

            clientSecret: destClientSecret,

            scopes: []

        });

        client.credentials.getToken()

        .catch((error) => {

            return reject({message: 'Error: failed to get access token for Destination service', error: error});

        })

        .then((result) => {

            resolve({message:'Successfully fetched token for Destination service.', tokenInfo: result});

        });

    });

}


// call the REST API of the Cloud Foundry Destination service to get the configuration info as configured in the cloud cockpit

const _getDestinationConfig = function (destinationName, authorizationHeaderValue){

    return new Promise (function(resolve, reject){

        let fullDestinationUri = destUri + '/destination-configuration/v1/destinations/' + destinationName;

        const options = {

            url: fullDestinationUri,

            resolveWithFullResponse: true ,

            headers: { Authorization: authorizationHeaderValue}

        };

        // do HTTP call

        request(options)

        .catch((error) => {

            return reject({ message: 'Error occurred while calling Destination service', error: error });

        })

        .then((response) => {

            if(response && response.statusCode == 200){

                let jsonDestInfo = JSON.parse(response.body);

                return resolve({ message: 'Successfully called Destination service.' , destinationInfo: jsonDestInfo });

            }else{

                reject('Error: failed to call destination service. ' + response.body);

            }

        });

    });

 };


 const _doQUERY = function (serviceUrl, authorizationHeaderValue){

    return new Promise (function(resolve, reject){

        const options = {

            url: serviceUrl,

            resolveWithFullResponse: true ,

            headers: {

                Authorization: authorizationHeaderValue,

                Accept : 'application/json'

            }

        };


        request(options)

        .then((response) => {

            if(response && response.statusCode == 200){

                resolve({responseBody: response.body});

            }

            return reject({ message: 'Error while calling OData service'});

        })

        .catch((error) => {

            reject({ message: 'Error occurred while calling OData service', error: error });

        });

    });

 };


// server response

app.get('/', function (req, res) {

    // 1a) get access token for destination service

    _getTokenForDestinationService()

    .then(result => {

        // 1b) call the destination service

        return _getDestinationConfig('BackendServiceProductsDestination', result.tokenInfo.tokenType + ' ' + result.tokenInfo.accessToken);

    })

    .then(result => {

        let bsApiUrl = result.destinationInfo.destinationConfiguration.URL;

        let tokenTypeForBsApi = result.destinationInfo.authTokens[0].type;  // type is 'bearer'

        let tokenForBsApi = result.destinationInfo.authTokens[0].value;

        // 2. call BS-API with Url + oauth token retrieved from destination

        return _doQUERY(bsApiUrl, tokenTypeForBsApi + ' ' + tokenForBsApi);

    })

    .then(result => {

        res.send('<h2>RESULT of request to Backend service:</h2>OData service response: <p>' + JSON.stringify(result.responseBody) + '</p>');

    })

    .catch(error => {

        res.send('ERROR: ' + error.message + ' - FULL ERROR: ' + error.error);

    });

});


// start the server

app.listen(process.env.PORT, function () { // env variable PORT is set by Cloud Foundry

})
Labels:
8 Comments
You must be a registered user to add a comment. If you've already registered, sign in. Otherwise, register and sign in.
Labels in this area
-
ABAP CDS Views - CDC (Change Data Capture)
2 -
AI
1 -
Analyze Workload Data
1 -
BTP
1 -
Business and IT Integration
2 -
Business application stu
1 -
Business Technology Platform
1 -
Business Trends
1,661 -
Business Trends
87 -
CAP
1 -
cf
1 -
Cloud Foundry
1 -
Confluent
1 -
Customer COE Basics and Fundamentals
1 -
Customer COE Latest and Greatest
3 -
Customer Data Browser app
1 -
Data Analysis Tool
1 -
data migration
1 -
data transfer
1 -
Datasphere
2 -
Event Information
1,400 -
Event Information
64 -
Expert
1 -
Expert Insights
178 -
Expert Insights
273 -
General
1 -
Google cloud
1 -
Google Next'24
1 -
Kafka
1 -
Life at SAP
784 -
Life at SAP
11 -
Migrate your Data App
1 -
MTA
1 -
Network Performance Analysis
1 -
NodeJS
1 -
PDF
1 -
POC
1 -
Product Updates
4,577 -
Product Updates
324 -
Replication Flow
1 -
RisewithSAP
1 -
SAP BTP
1 -
SAP BTP Cloud Foundry
1 -
SAP Cloud ALM
1 -
SAP Cloud Application Programming Model
1 -
SAP Datasphere
2 -
SAP S4HANA Cloud
1 -
SAP S4HANA Migration Cockpit
1 -
Technology Updates
6,886 -
Technology Updates
402 -
Workload Fluctuations
1
Related Content
- Usage of Custom Destination Service in BTP, ABAP Environment in Technology Blogs by Members
- Consuming SAP with SAP Build Apps - Connectivity options for low-code development - part 2 in Technology Blogs by SAP
- SAP Cloud Integration: Understanding the XML Digital Signature Standard in Technology Blogs by SAP
- Deployment of Fiori application to CF: Issue with metadata/Odata calls in Technology Q&A
- SAP Build Code - Speed up your development with Generative AI Assistant - Joule in Technology Blogs by SAP
Top kudoed authors
| User | Count |
|---|---|
| 12 | |
| 9 | |
| 8 | |
| 7 | |
| 7 | |
| 6 | |
| 6 | |
| 6 | |
| 6 | |
| 4 |