
- SAP Community
- Products and Technology
- Technology
- Technology Blogs by SAP
- How to adapt hybrid apps created with HAT to use M...
Technology Blogs by SAP
Learn how to extend and personalize SAP applications. Follow the SAP technology blog for insights into SAP BTP, ABAP, SAP Analytics Cloud, SAP HANA, and more.
Turn on suggestions
Auto-suggest helps you quickly narrow down your search results by suggesting possible matches as you type.
Showing results for
Product and Topic Expert
Options
- Subscribe to RSS Feed
- Mark as New
- Mark as Read
- Bookmark
- Subscribe
- Printer Friendly Page
- Report Inappropriate Content
05-10-2019
5:16 AM
Updated 18 February 2022: Added link to SAP Note regarding the status of these tools.
Updated 23 September 2020: Updated with information for exporting and importing the app.
Updated 20 June 2019: removed the requirement to download the project and modify/rebuild locally.
With SAP's multi-cloud strategy in full swing, more and more customers are keen on using Mobile Services available on Cloud Foundry. Some of our customers are looking into migrating their existing solution from Neo to Cloud Foundry. Others have started developing their apps in a Neo environment and now want to deploy into a productive landscape based on Cloud Foundry. In this blog I will show you what can be done to resolve some of the challenges around building hybrid mobile apps for the Cloud Foundry environment.
Please note that the use of the Hybrid Application Toolkit extension in SAP Web IDE Full-Stack is no longer recommended. For more details, please you check this SAP Note.
Our current solution will not automatically create the mobile app, related configuration settings and destination in the Cloud Foundry environment. You will have to perform those steps manually.
Before I jump into the details, I want to provide you one important recommendation:
When you develop an app in SAP Web IDE and use our Cloud Build Service to build the mobile app, we automatically generate the app in Mobile Services in the Neo landscape. Your mobile apps will interface with Mobile Services (on Neo) which acts as a proxy with other systems and services.
In this example, we'll start by creating a new project in SAP Web IDE, developing the app in the Neo environment and then moving to Mobile Services on Cloud Foundry.
Let's start in a freshly created workspace in SAP Web IDE Full-Stack.

We create a new project based on the CRUD Master-Detail Application template. Make sure you select the Neo environment in the Template Selection step.

In the next step you provide the basic information about your project.

For this example I will use the ES5 Gateway demo system. I've already created a Destination in SAP Cloud Platform (on Neo) to be able to use this service in SAP Web IDE (which is also residing in the Neo environment).
Unfortunately, the name of the destination I've used was not usable on Cloud Foundry. Please take note that you cannot use destination names that include a dash ("-"). So I had to recreate another one with the name "ES5Ludo", which works fine, but I did not capture a screenshot.

We select the GWSAMPLE_BASIC service, which was already used in various demos, and fill in the template customisation.

After finishing the wizard, you can run the application in SAP Web IDE to see how it looks like as a web application. Make sure the app is able to run before you move to the next step. Debugging and fixing issues in a web app is much easier now than doing this further down the road when the app is running on your mobile device.
Once we have confirmed the web app works fine, we enable the project for mobile.

Once the project is enabled as hybrid mobile project, we will build the mobile app in the cloud. We could obviously change code, add more Cordova plugins, etc. But that's not in the scope of this blog.

In this example, we will first create the app for the Neo environment. In the build wizard, please leave the options for "Save Xcode and or Android Studio project" and "Manually update configuration files" unselected. In the previous version of this blog we had to download the projects. This is no longer needed. We will automatically update configuration files (mobile/appConfig.js and config.xml) based on settings you've configured in the SAP Mobile Services cockpit on Neo. Later, we can use this as a reference for the configuration on Cloud Foundry.

Once the build is done, you will see the QR code and hyperlink to download the mobile app onto your device. The application will interface with SAP Mobile Services on Neo.
Let's take a look at the application that was created by the cloud build service in Mobile Services. For this, we go to the Mobile Services admin cockpit on Neo. From SAP Web IDE, you can navigate to Tools > SAP Cloud Platform Cockpit > Services > Mobile Services > Go to Service.

We can find the app in the list of Native/Hybrid applications. The Application ID here is generated by Hybrid App Toolkit.

Select the application to view the details.

An important item to check is the Connectivity feature. We will need to copy the Destination listed there.
To make it easier to migrate the application configuration, we can export it.
Since Hybrid Application Toolkit is actually targeting Neo landscapes, we have to create the mobile app manually in the Cloud Foundry environment. We need an exact duplicate.
Let's open the Mobile Services Cockpit on Cloud Foundry.
We now have to create exactly the same app as available in Neo. The easiest way to do this, is by importing the application configuration we've exported in the previous step.
NOTE: in case you are importing an offline app, please ensure the offline feature is added in the app's configuration, as this is likely not part of the exported configuration.
Below are the steps to create the app manually. You can skip these steps if you've imported the app, or just use it as a reference in case you want to troubleshoot and check the settings. It is recommended to check the connectivity settings and confirm you are able to access the data source. You might have to tweak the authentication settings here, depending on what your data source requires.
Let's start by hitting the button Create new app.
It is important to use exactly the same ID for the app.

Once the app is created, we need to add the Mobile Connectivity feature.

In the Cloud Foundry environment, you can add features as needed. In this case we only need to add the Mobile Connectivity. For offline apps, please ensure the offline feature is added.

Once added, configure the feature and create a new destination.
It is important to use exactly the same name as used in the Neo environment. And make sure the rewrite mode is the same.

Set the authentication to what your OData source requires. In this example I am using Basic Authentication to access the ES5 demo gateway system.
Once you are done, the destination is listed in the Mobile Connectivity overview.

First of all, please test whether you can reach the destination by using Ping.
Next, test the OData source using the same path as used by your application. You can find the path in the manifest.json file of the web app. You should be able to view Product data available in the sample OData source.
In this example the path is: sap/opu/odata/iwbep/GWSAMPLE_BASIC

By default, the newly created applications in Mobile Services on Cloud Foundry will use OAuth as authentication method. However, our (Neo) app is expecting to make use of SAML.
So we need to change the Security setting to use SAML.


In the tab Application Links in Mobile Services, please check the URL specified for Server API. We will need to modify the mobile app to point to this URL, instead of the URL pointing to the Neo environment.

Following the example, now it is time to modify the project in SAP Web IDE. Open the file mobile/appConfig.js.
Ensure the 'appID' matches the App ID specified in Mobile Services.
The fioriURL should match the Server API URL as mentioned above. And please make sure you don't miss the ":443" port number after the domain ! If your url contains a path, then make sure the port number comes before the path.
The auth settings should match the security configuration in Mobile Services.

Next, open the file config.xml and ensure the 'id' is the same as the App Id configured in Mobile Services.

Now, let's rebuild the mobile app to consume SAP Mobile Services on Cloud Foundry.
When configuring the Mobile Build Settings, please make sure to tick the option to manually update configuration files. By default, this is option is not selected and we then automatically update configuration files (mobile/appConfig.js and config.xml) with the settings you've configured on the SAP Mobile Services cockpit (on NEO !). In this particular case, you want to keep the configuration files untouched as we don't want to use the default Mobile Services.
Select Build. This will still make use of Cloud Build Services available in the Neo landscape.

Before you install the new version of the app on your device, please ensure to delete the previous version (on Android: including its data). If you skip this step, your app might have trouble starting up (blank screen).
Once the build is done, you can install the app on your device by using the QR code, or by downloading the binary via the url. Please be aware that we provide this as a convenience to developers. This should not be used for distributing the app within your company. You should be using some MDM offering for that purpose.
Once you run the application on your device, you will notice that you have to authenticate against the IDP configured on the Cloud Foundry landscape. The app should work the same way as before. You can check the logs in the Mobile Services cockpit on Cloud Foundry.
In short, the steps described are as follows:
You could actually skip step 1 and immediately create a new app in Mobile Services on CF and then fill in the required configuration settings in step 3. However, this is a bit error prone. I therefore recommend starting in the Neo environment.
If you want to move an existing app from Neo to CF, you can also skip step 1.
Changing from Mobile Services on Neo to Mobile Services on Cloud Foundry is pretty straightforward. Just export the app configuration in the Neo environment, and import it into the Cloud Foundry environment. After changing the fioriURL, you just need to rebuild the app.
Regards,
Ludo Noens
Updated 23 September 2020: Updated with information for exporting and importing the app.
Updated 20 June 2019: removed the requirement to download the project and modify/rebuild locally.
With SAP's multi-cloud strategy in full swing, more and more customers are keen on using Mobile Services available on Cloud Foundry. Some of our customers are looking into migrating their existing solution from Neo to Cloud Foundry. Others have started developing their apps in a Neo environment and now want to deploy into a productive landscape based on Cloud Foundry. In this blog I will show you what can be done to resolve some of the challenges around building hybrid mobile apps for the Cloud Foundry environment.
Please note that the use of the Hybrid Application Toolkit extension in SAP Web IDE Full-Stack is no longer recommended. For more details, please you check this SAP Note.
Our current solution will not automatically create the mobile app, related configuration settings and destination in the Cloud Foundry environment. You will have to perform those steps manually.
Before I jump into the details, I want to provide you one important recommendation:
When you start developing a new mobile app, we strongly recommend that you consider developing this with either MDK (Mobile Development Kit) for cross platform applications, or our native SDKs (SAP Cloud Platform SDK for iOS or SAP Cloud Platform SDK for Android).
Starting development on Neo
When you develop an app in SAP Web IDE and use our Cloud Build Service to build the mobile app, we automatically generate the app in Mobile Services in the Neo landscape. Your mobile apps will interface with Mobile Services (on Neo) which acts as a proxy with other systems and services.
In this example, we'll start by creating a new project in SAP Web IDE, developing the app in the Neo environment and then moving to Mobile Services on Cloud Foundry.
Creating an app based on the CRUD Master-Detail template
Let's start in a freshly created workspace in SAP Web IDE Full-Stack.
We create a new project based on the CRUD Master-Detail Application template. Make sure you select the Neo environment in the Template Selection step.
In the next step you provide the basic information about your project.
For this example I will use the ES5 Gateway demo system. I've already created a Destination in SAP Cloud Platform (on Neo) to be able to use this service in SAP Web IDE (which is also residing in the Neo environment).
Unfortunately, the name of the destination I've used was not usable on Cloud Foundry. Please take note that you cannot use destination names that include a dash ("-"). So I had to recreate another one with the name "ES5Ludo", which works fine, but I did not capture a screenshot.
We select the GWSAMPLE_BASIC service, which was already used in various demos, and fill in the template customisation.
After finishing the wizard, you can run the application in SAP Web IDE to see how it looks like as a web application. Make sure the app is able to run before you move to the next step. Debugging and fixing issues in a web app is much easier now than doing this further down the road when the app is running on your mobile device.
Enable as Hybrid Mobile Project
Once we have confirmed the web app works fine, we enable the project for mobile.
Once the project is enabled as hybrid mobile project, we will build the mobile app in the cloud. We could obviously change code, add more Cordova plugins, etc. But that's not in the scope of this blog.
In this example, we will first create the app for the Neo environment. In the build wizard, please leave the options for "Save Xcode and or Android Studio project" and "Manually update configuration files" unselected. In the previous version of this blog we had to download the projects. This is no longer needed. We will automatically update configuration files (mobile/appConfig.js and config.xml) based on settings you've configured in the SAP Mobile Services cockpit on Neo. Later, we can use this as a reference for the configuration on Cloud Foundry.
Once the build is done, you will see the QR code and hyperlink to download the mobile app onto your device. The application will interface with SAP Mobile Services on Neo.
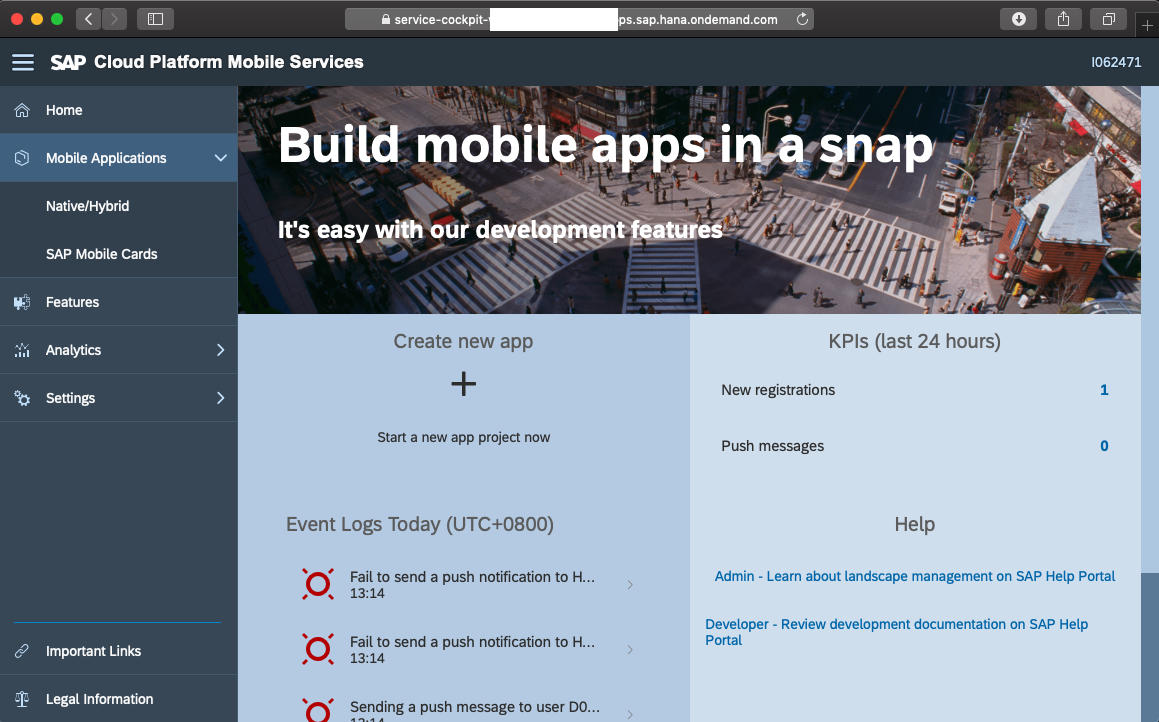
Mobile Services on Neo
Let's take a look at the application that was created by the cloud build service in Mobile Services. For this, we go to the Mobile Services admin cockpit on Neo. From SAP Web IDE, you can navigate to Tools > SAP Cloud Platform Cockpit > Services > Mobile Services > Go to Service.
We can find the app in the list of Native/Hybrid applications. The Application ID here is generated by Hybrid App Toolkit.
Select the application to view the details.
An important item to check is the Connectivity feature. We will need to copy the Destination listed there.
To make it easier to migrate the application configuration, we can export it.

Creating the app in Mobile Services on Cloud Foundry
Since Hybrid Application Toolkit is actually targeting Neo landscapes, we have to create the mobile app manually in the Cloud Foundry environment. We need an exact duplicate.
Let's open the Mobile Services Cockpit on Cloud Foundry.
We now have to create exactly the same app as available in Neo. The easiest way to do this, is by importing the application configuration we've exported in the previous step.

NOTE: in case you are importing an offline app, please ensure the offline feature is added in the app's configuration, as this is likely not part of the exported configuration.
Below are the steps to create the app manually. You can skip these steps if you've imported the app, or just use it as a reference in case you want to troubleshoot and check the settings. It is recommended to check the connectivity settings and confirm you are able to access the data source. You might have to tweak the authentication settings here, depending on what your data source requires.
Creating the app configuration manually
Let's start by hitting the button Create new app.
It is important to use exactly the same ID for the app.
Once the app is created, we need to add the Mobile Connectivity feature.
In the Cloud Foundry environment, you can add features as needed. In this case we only need to add the Mobile Connectivity. For offline apps, please ensure the offline feature is added.
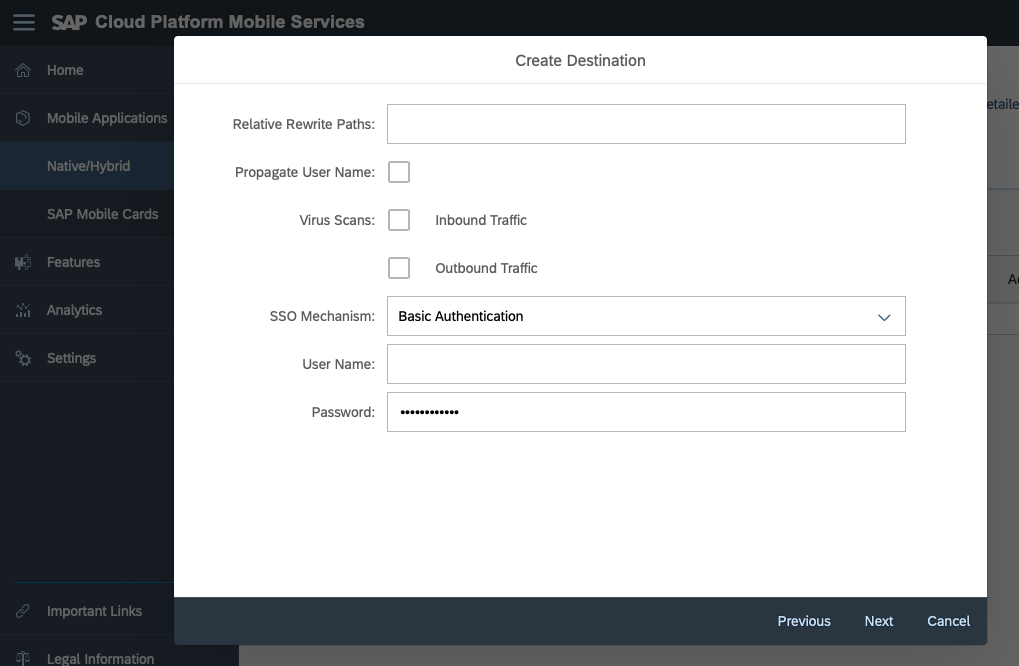
Once added, configure the feature and create a new destination.
It is important to use exactly the same name as used in the Neo environment. And make sure the rewrite mode is the same.
Set the authentication to what your OData source requires. In this example I am using Basic Authentication to access the ES5 demo gateway system.
Once you are done, the destination is listed in the Mobile Connectivity overview.
First of all, please test whether you can reach the destination by using Ping.
Next, test the OData source using the same path as used by your application. You can find the path in the manifest.json file of the web app. You should be able to view Product data available in the sample OData source.
In this example the path is: sap/opu/odata/iwbep/GWSAMPLE_BASIC
By default, the newly created applications in Mobile Services on Cloud Foundry will use OAuth as authentication method. However, our (Neo) app is expecting to make use of SAML.
So we need to change the Security setting to use SAML.
In the tab Application Links in Mobile Services, please check the URL specified for Server API. We will need to modify the mobile app to point to this URL, instead of the URL pointing to the Neo environment.
Rebuilding the app to use SAP Mobile Services on Cloud Foundry
Following the example, now it is time to modify the project in SAP Web IDE. Open the file mobile/appConfig.js.
Ensure the 'appID' matches the App ID specified in Mobile Services.
The fioriURL should match the Server API URL as mentioned above. And please make sure you don't miss the ":443" port number after the domain ! If your url contains a path, then make sure the port number comes before the path.
The auth settings should match the security configuration in Mobile Services.
Next, open the file config.xml and ensure the 'id' is the same as the App Id configured in Mobile Services.
Now, let's rebuild the mobile app to consume SAP Mobile Services on Cloud Foundry.
When configuring the Mobile Build Settings, please make sure to tick the option to manually update configuration files. By default, this is option is not selected and we then automatically update configuration files (mobile/appConfig.js and config.xml) with the settings you've configured on the SAP Mobile Services cockpit (on NEO !). In this particular case, you want to keep the configuration files untouched as we don't want to use the default Mobile Services.
Select Build. This will still make use of Cloud Build Services available in the Neo landscape.
Before you install the new version of the app on your device, please ensure to delete the previous version (on Android: including its data). If you skip this step, your app might have trouble starting up (blank screen).
Once the build is done, you can install the app on your device by using the QR code, or by downloading the binary via the url. Please be aware that we provide this as a convenience to developers. This should not be used for distributing the app within your company. You should be using some MDM offering for that purpose.
Once you run the application on your device, you will notice that you have to authenticate against the IDP configured on the Cloud Foundry landscape. The app should work the same way as before. You can check the logs in the Mobile Services cockpit on Cloud Foundry.
Summary
In short, the steps described are as follows:
- Create and build your application in the Neo environment
- Copy the Mobile Services app configuration to CF. You can use the export/import feature for this.
- Modify the SAP Web IDE project to use the Mobile Services App URL on CF
You could actually skip step 1 and immediately create a new app in Mobile Services on CF and then fill in the required configuration settings in step 3. However, this is a bit error prone. I therefore recommend starting in the Neo environment.
If you want to move an existing app from Neo to CF, you can also skip step 1.
Conclusion
Changing from Mobile Services on Neo to Mobile Services on Cloud Foundry is pretty straightforward. Just export the app configuration in the Neo environment, and import it into the Cloud Foundry environment. After changing the fioriURL, you just need to rebuild the app.
Regards,
Ludo Noens
Labels:
20 Comments
You must be a registered user to add a comment. If you've already registered, sign in. Otherwise, register and sign in.
Labels in this area
-
ABAP CDS Views - CDC (Change Data Capture)
2 -
AI
1 -
Analyze Workload Data
1 -
BTP
1 -
Business and IT Integration
2 -
Business application stu
1 -
Business Technology Platform
1 -
Business Trends
1,658 -
Business Trends
92 -
CAP
1 -
cf
1 -
Cloud Foundry
1 -
Confluent
1 -
Customer COE Basics and Fundamentals
1 -
Customer COE Latest and Greatest
3 -
Customer Data Browser app
1 -
Data Analysis Tool
1 -
data migration
1 -
data transfer
1 -
Datasphere
2 -
Event Information
1,400 -
Event Information
66 -
Expert
1 -
Expert Insights
177 -
Expert Insights
295 -
General
1 -
Google cloud
1 -
Google Next'24
1 -
Kafka
1 -
Life at SAP
780 -
Life at SAP
13 -
Migrate your Data App
1 -
MTA
1 -
Network Performance Analysis
1 -
NodeJS
1 -
PDF
1 -
POC
1 -
Product Updates
4,577 -
Product Updates
341 -
Replication Flow
1 -
RisewithSAP
1 -
SAP BTP
1 -
SAP BTP Cloud Foundry
1 -
SAP Cloud ALM
1 -
SAP Cloud Application Programming Model
1 -
SAP Datasphere
2 -
SAP S4HANA Cloud
1 -
SAP S4HANA Migration Cockpit
1 -
Technology Updates
6,873 -
Technology Updates
419 -
Workload Fluctuations
1
Related Content
- CAP Autentication error in Technology Q&A
- Consuming SAP with SAP Build Apps - Mobile Apps for iOS and Android in Technology Blogs by SAP
- Connect to ABAP environment using RFC in Technology Q&A
- FAQ for C4C Certificate Renewal in Technology Blogs by SAP
- SAP CAP: Controller - Service - Repository architecture in Technology Blogs by Members
Top kudoed authors
| User | Count |
|---|---|
| 36 | |
| 25 | |
| 17 | |
| 13 | |
| 8 | |
| 7 | |
| 6 | |
| 6 | |
| 6 | |
| 6 |