
- SAP Community
- Products and Technology
- Enterprise Resource Planning
- ERP Blogs by SAP
- New Installation of S/4HANA 1809 FPS2 – Part 2 – I...
Enterprise Resource Planning Blogs by SAP
Get insights and updates about cloud ERP and RISE with SAP, SAP S/4HANA and SAP S/4HANA Cloud, and more enterprise management capabilities with SAP blog posts.
Turn on suggestions
Auto-suggest helps you quickly narrow down your search results by suggesting possible matches as you type.
Showing results for
Product and Topic Expert
Options
- Subscribe to RSS Feed
- Mark as New
- Mark as Read
- Bookmark
- Subscribe
- Printer Friendly Page
- Report Inappropriate Content
05-09-2019
6:49 PM
This blog includes installation of S/4HANA 1809 FPS2 and will focus on creating Sandbox type instance with co-deployed (embedded) gateway.
Please find other blogs as follows at S/4HANA SQUARE ONE
STEP 1: OPERATING SYSTEM
It is recommended to install SuSE Linux version 12 Patch 1
TIP: Please refer Notes below:
Note 2399995 - Hardware requirement for SAP HANA 2.0
Note 2620910 - SAP S/4HANA 1511, 1610, 1709 and SAP BW/4HANA 1.0: Recommended Application Server Pla...
Note 2235581 - SAP HANA: Supported Operating Systems.
Note 2205917 - SAP HANA DB: Recommended OS settings for SLES 12
You can check your operating system version as below:
The minimum required is HANA 2.0 Support Package 03 Revision 36 but it is generally recommended to go to the highest revision available.
If you already have a database, please patch the database to HANA 2 and you can create container using command:
It takes about 2 minutes to create database with this command.
Please refer notes:
2380257 - SAP HANA Platform 2.0 SPS 00 Release Note
2423367 - Multitenant database containers will become the standard and only operation mode
To install database you can use hdblcmgui. I used hdblcm as below.
minimum is HANA 2 Rev 36 as per 2764769 - SAP S/4HANA 1809 Feature Package Stack 02: Additional Release Information
First unpack the archive to folder HANA2_36 and LCAPPS_36 together if you need integrated LiveCache so it can be installed as a combined install.
After installation, logon to HANA Database using HANA Studio and add system
Host Name : <your hostname or ip>
Instance Number: 02
Click Next and in the following screen enter User Name SYSTEM and Password
Click on Finish to exit.
Please refer Note 2600030 - Parameter Recommendations in SAP HANA Environments for parameter recommendations. This note contains check scripts which detect SAP HANA version, SAP product installed, etc. and give specific parameter recommendations.
Also refer Note 2469025 - How-To: Upgrading to SAP HANA 2.0
TIP: You don't need to extract the backup zip files S4CORE103_INST_EXPORT_*.zip. SWPM tool will extract them into /usr/sap/HDB/HDB02/backup/data/DB_HDB where the extract will use 60GB from this folder. Also this procedure is for SWPM+SUM combined installation and you don't need the SYSTEM/DDIC password from backup Database/ABAP instance.
Extract the SWPM SAR file as below
You should get message at the end of this that SAPCAR: ... files(s) extracted
Start x-Windows software such as Exceed or X-ming and set the DISPLAY variable needed to confirm x-Windows is working.
Execute SWPM to do system copy with backup restore as below:
I am showing only the important screens as most are self explanatory. Select Standard System from path below:

Click on Next
At the screen Software Integrity click on Next
At the screen Parameter Settings select Custom and click on Next At the screen General SAP System Parameters enter SAP System ID (SAPSID) S4H SAP Mount Directory /sapmnt
At the screenDNS Domain Name (strikethrough font means skipped for Typical) set FQDN for SAP system checked, DNS Domain Name for SAP System dummy.nodomain click on Next
At the screen Master Password specify Master password and confirm password Xxxxxxxn click on Next
At the screenOperating System Users accept master password or enter password Xxxxxxxn
At the screen Database for SAP System enter details
Database Host vhcalhdbdb
Instance Number 02
Database ID (DBSID)HDB
Password of DBA Xxxxxxxn click on Next
At the screen SAP HANA Multitenant Database Containers enter password for HANA Database superuser Xxxxxxxn click on Next
At the screen Software Package Browser enter path for the downloaded media from Maintenance Planner. Package Path: /sapmedia/download click Next
The status will change from "still missing" to "Available". Click on Next
At the screen Upgrade SAP Host Agent checkmark Upgrade SAP Host Agent with provided version and click on Next , after it is shown as "Available". Click on Next
At the screen SAP HANA Client Software Installation Path choose radio button Local Client Directory click on Next
At the screen Media Browser enter Package Path /sapmedia/1809_EXP click on Next.
Individual Package Location will change to /sapmedia/1809_EXP/S4CORE103_INST_EXPORT_1.zip click onNext
At the screen Software Package Browser accept Individual Package Locations /sapmedia/1809_EXP/S4CORE103_INST_EXPORT_[2..20].zip
At the screenSAP HANA Multitenant Database Containers accept HANA DB Database Host vhcalhdbdb Instance Number 02 and Password Xxxxxxxn click on Next
At the screen Database Schema accept schema DBACOCKPIT password and confirm Schema password Xxxxxxxn click on Next
At the screen Database Schema accept schema SAPHANADB password and confirm Schema password Xxxxxxxn click on Next
At the screenSAP HANA Import Parameters accept parameter values to keep on import and click on Next
At the screenInstallation Export accept number of parallel jobs and HANA<sid>adm user as hdbadm and enter password as Xxxxxxxn click on Next
At the screen Primary Application Server Instance and ABAP Central Services Instance accept values PAS Instance Number 00, PAS Instance Host vhcals4hci
ASCS Instance Number 01, ASCS Instance Host Name vhcals4hci click on Next
At the screenABAP Message Server Ports accept values for Ports 3601 and 3901 click on Next
At the screenICM User Management for the SAP Web Dispatcher accept password for webadm Xxxxxxxn and click on Next
At the screen SLD Destination for the SAP System OS Level leave default radio button at No SLD destination click on Next
At the screenMessage Server Access Control List leave default radio button at Do not create Message Server Access Control List click on Next
At the screenAdditional Components to be Included in the ASCS Instance enable checkmarks at Install integrated web dispatcher and Install Gateway integrated in ASCS instance and click on Next
At the screenSAP Web Dispatcher Parameters leave default dispatcher parameters HTTPS Port 44300, Encryption Always. click on Next
At the screen Configuring Transport Management for Single System select Run TMS config and enter password for TMSADM in Client 000 click on Next
At the screen Import SPAM/SAINT Update for Import SPAM/SAINT Update select radio button Yes
Specify the location of SPAM/SAINT Update Archive as /sapmedia/download/KD75372.SAR click on Next
TIP: This will save time later having to do it at the time of SUM installation. Click on Next
At the screenAdditional ABAP Transports leave radio button at default No for Import ABAP Transports click on Next
At the screen Preparing for the Software Update Manager checkmark Extract SUM, Start Sum Automatically, enter values of SUM as /sapmedia/download/SUM20SP04_1-80002456.SAR
Click on Next
At the screen Software Package Browser accept the Individual package location of SUM file or provide Package Path click on Next
At the screenAdditional SAP System Languages click on Next
At the screen Secure Storage Key Generation accept radio button – Individual Key (Recommended for Productive Systems) On the Next
At next screen Warning click OK
At next screen Cleanup of Operating System Users checkmark on Yes cleanup os users and click on Next
Here is the Parameter Summary Click on Next to confirm and begin the installation.


At next screen 96% Information click on OK and again OK. Fill in the Feedback to SAP.

As we executed combined SWPM+SUM you should have filesystem /usr/sap/S4H/SUM and you should directly jump to url https://vhcals4hci:1129/lmsl/sumabap/S4H/doc/slui
If not, don’t worry, please extract it as below 2 commands:
Open Google Chrome browser (latest version recommended) Enter URL:
https://vhcals4hci:1129/lmsl/sumabap/S4H/doc/slui
In case you get screen below please click on Advanced and then “Proceed to vhcals4hci(unsafe)"

Enter s4hadm/(password you used before) in the screen below

TIP: If you get message that Page is Unresponsive just click on Wait.
No prompts here ....
If you are asked whether to import SPAM version 71 select Import SPAM version 71.
Select Next at (6%) Current Phase PREP_CONFIGURATIN/INITSUBST
At (10%) Current Phase PREP_EXTENSION/BIND_PATCH Click on Next
(NOTE: in the screen below BI_CONT and BI_CONT_XT will appear only if you selected at Maintenance Planner)

Accept values for release level and Click on Next
At (10%) Current Phase PREP_EXTENSION/BIND_PATCH Click on Next

At (11%) Current Phase PREP_INTEGRATION/ADJUSTPRP Click on Next


Click on Next

The above note may not be required under certain conditions, possibly if you start SWPM+SUM combined.
At (17%) Current Phase MAIN_INIT/REPACHK_EHPI - Lock the development environment now click on Next

At (24%) Current Phase MAIN_DTTRANSSHD/DOWNCONF_DTTRANS_BCK accept selected radio button Backup completed click on Next
Click on Next

(above wait time is assuming process parameters changed as per above performance tip)
At (89%) Current Phase: MAIN_UPTRANS/STARTSAP_PUPG click on Next
At (89%) Current Phase: MAIN_UPTRANS/UPCONF click Next
At (89%) Current Phase: MAIN_POSTPROC/SETUPGPAR_UPG_POST click Next
At (91%) Current Phase: MAIN_POSTPROC/SUBMOD_SPAU_INFO/SPAUINFO click Next
At (91%) Current Phase: MAIN_POSTPROC/REQUPFINAL click Next SUM is completed. Please login to the system and check the Installed product version as:Please find Installed Software Component version:


TIP: Schedule complete SGEN if it is not completed so far. This will help reduce time needed for Best Practices Content Activation.
Please apply the 4 notes below to the installed instance as per SAP Note 2764769 - SAP S/4HANA 1809 Feature Package Stack 02: Additional Release Information these notes are only for 1809 FPS1
You can open OSS messages using component: for SWPM - BC-INS-SWPM
for SUM - BC-UPG-TLS-TLA
Your system installation is complete. Congratulations !!!
Mahesh Sardesai
Product Expert - S/4HANA

Please find other blogs as follows at S/4HANA SQUARE ONE
S/4HANA SQUARE ONE |
| NEW INSTALLATION | PART1 - MP | PART2 - Installation | PART3 - BP Activation | PART4 - Fiori Activation | PART5 - DATA MIGRATION |
| S/4HANA 1909 | fps1 fps0 | fps1 fps0 | fps1 fps0 | fps1 fps0 | fps0 |
| S/4HANA 1809 | fps2 fps1 fps0 | fps2 fps1 fps0 | fps2 fps1 fps0 | fps2 fps1 fps0 | |
| S/4HANA 1709 | fps2 fps1 fps0 | fps2 fps1 fps0 | fps2 fps1 fps0 | ||
| S/4HANA 1610 | fps2 fps0 | fps2 fps0 | fps2 fps1 fps0 | ||
| S/4HANA 1511 | fps2 fps1 |
| SYSTEM CONVERSION | t2 - RC | t3 - MP | t4 - SIC | t5 - CCM | t6 - SUM |
| S/4HANA 1909 | rc2 | link | link | ||
| S/4HANA 1809 | rc2 | link | link | link | prepare EHP7/hdb EHP6/db6 EHP5/ora EHP6/mss |
| S/4HANA 1610 FPS0 | link | link | link |
| S/4HANA CLOUD | CPM | MASTER | CONTENT | EXTEND | |
| OUTPUT MANAGEMENT | link | link | link | link | link |
| S/4HANA CERTIFICATION | |
| S/4HANA Certification Exams through SAP Certification Hub | link |
STEP 1: OPERATING SYSTEM
It is recommended to install SuSE Linux version 12 Patch 1
TIP: Please refer Notes below:
Note 2399995 - Hardware requirement for SAP HANA 2.0
Note 2620910 - SAP S/4HANA 1511, 1610, 1709 and SAP BW/4HANA 1.0: Recommended Application Server Pla...
Note 2235581 - SAP HANA: Supported Operating Systems.
Note 2205917 - SAP HANA DB: Recommended OS settings for SLES 12
You can check your operating system version as below:
sid-hdb-s4h:~ # cat /etc/SuSE-release

  SuSE-release SUSE Linux Enterprise Server 12 (x86_64)

  VERSION = 12

  PATCHLEVEL = 2
STEP 2: USE EXISTING HANA DATABASE (OPTION1)
The minimum required is HANA 2.0 Support Package 03 Revision 36 but it is generally recommended to go to the highest revision available.
If you already have a database, please patch the database to HANA 2 and you can create container using command:
CREATE DATABASE HDB SYSTEM USER PASSWORD XxxxxxxnIt takes about 2 minutes to create database with this command.
STEP 2: NEW HANA DATABASE (OPTION 2)
Please refer notes:
2380257 - SAP HANA Platform 2.0 SPS 00 Release Note
2423367 - Multitenant database containers will become the standard and only operation mode
To install database you can use hdblcmgui. I used hdblcm as below.
minimum is HANA 2 Rev 36 as per 2764769 - SAP S/4HANA 1809 Feature Package Stack 02: Additional Release Information
First unpack the archive to folder HANA2_36 and LCAPPS_36 together if you need integrated LiveCache so it can be installed as a combined install.
sid-hdb:/sapmedia/ #SAPCAR -xvf IMDB_SERVER20_036_0-80002031.SAR

sid-hdb:/sapmedia/ #mv SAP_HANA_DATABASE HANA2_36

sid-hdb:/sapmedia/ #SAPCAR –xvf IMDB_LCAPPS_2036_0-20010426.SAR

sid-hdb:/sapmedia/ #mv SAP_HANA_LCAPPS HANA2_36_LCAPPS

sid-hdb:/sapmedia/HANA2_36 # ./hdblcm


...............

Updating SAP HANA Database Instance Integration on Local Host...

Deploying SAP Host Agent configurations...

Creating Component List...

SAP HANA Database System installed


Deployment of SAP Host Agent configurations finished


You can send feedback to SAP with this form:

https://vhcalhdbdb:1129/lmsl/HDBLCM/HDB/feedback/feedback.html

Log file written to '/var/tmp/hdb_HDB_hdblcm_install_2018-09-28_19.21.35/hdblcm.log' on host 'vhcals4hci'.
After installation, logon to HANA Database using HANA Studio and add system
Host Name : <your hostname or ip>
Instance Number: 02
Click Next and in the following screen enter User Name SYSTEM and Password
Click on Finish to exit.
Please refer Note 2600030 - Parameter Recommendations in SAP HANA Environments for parameter recommendations. This note contains check scripts which detect SAP HANA version, SAP product installed, etc. and give specific parameter recommendations.
Also refer Note 2469025 - How-To: Upgrading to SAP HANA 2.0
TIP: Please change the log mode if you don’t want to be spend time on log maintenance:

In HANA studio –> Configuration –> global.ini –> persistence and set the parameter log_mode to overwrite.

When you change the log mode, you must restart the database system to activate the changes.

It is also recommended that you perform a full data backup. You can also set the log_mode to ‘overwrite’

using the following SQL-Statement:
ALTER SYSTEM ALTER CONFIGURATION ('global.ini', 'SYSTEM') SET ('persistence', 'log_mode') = 'overwrite' WITH RECONFIGURE;STEP 3: S/4HANA INSTALLATION USING SWPM
TIP: You don't need to extract the backup zip files S4CORE103_INST_EXPORT_*.zip. SWPM tool will extract them into /usr/sap/HDB/HDB02/backup/data/DB_HDB where the extract will use 60GB from this folder. Also this procedure is for SWPM+SUM combined installation and you don't need the SYSTEM/DDIC password from backup Database/ABAP instance.
Extract the SWPM SAR file as below
sid-hdb:/ # cd /install

sid-hdb:/install # /sapmedia/SAPCAR -xvf /sapmedia/download/SWPM20SP04_1-80003424.SAR
You should get message at the end of this that SAPCAR: ... files(s) extracted
Start x-Windows software such as Exceed or X-ming and set the DISPLAY variable needed to confirm x-Windows is working.
Execute SWPM to do system copy with backup restore as below:
sid-hdb:/install#./sapinst SAPINST_USE_HOSTNAME=vhcals4hci SAPINST_ACCEPT_INTERNAL_SIGNATURE=true SAPINST_SLP_MODE=false SAPINST_STACK_XML=/sapmedia/download/MP_Stack_1000543815_20180921_.xml
TIP: At this point if you get the screen below:
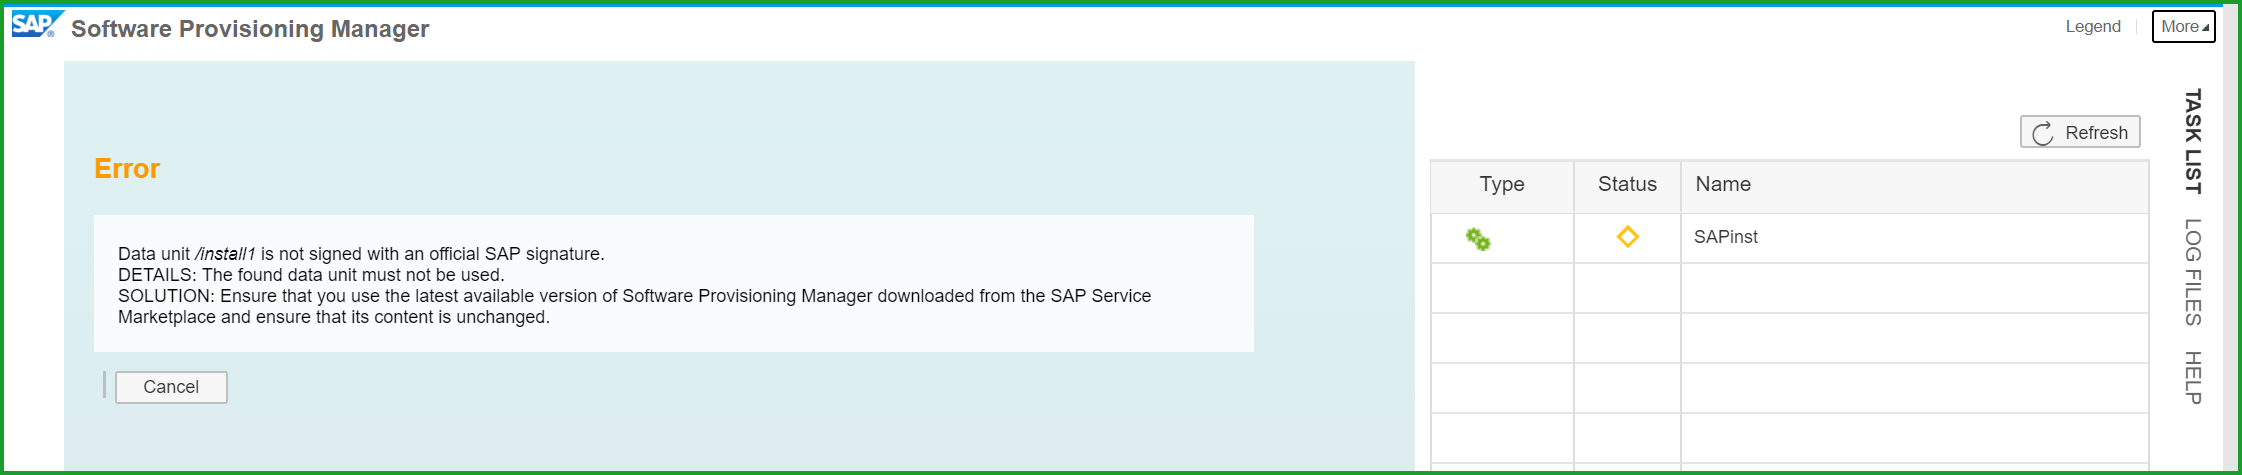
Please refer Note 2510478 Data unit /xx/xx/xx/SWPM is not signed with an official SAP signature.
I started with command:
./sapinst SAPINST_USE_HOSTNAME=vhcals4hci SAPINST_ACCEPT_INTERNAL_SIGNATURE=true SAPINST_SLP_MODE=false SAPINST_STACK_XML=/sapmedia/download/MP_Stack_1000543815_20180921_.xml This is ok for sandbox.I am showing only the important screens as most are self explanatory. Select Standard System from path below:
Click on Next
At the screen Software Integrity click on Next
TIP: If you select Typical at next parameter, those skipped are shown in Strikethrough.

Skipping these parameters will save some time and you may be able to change them in the final Parameter Summary.

If you need integrated web dispatcher please select Custom.
At the screen Parameter Settings select Custom and click on Next At the screen General SAP System Parameters enter SAP System ID (SAPSID) S4H SAP Mount Directory /sapmnt
At the screen
At the screen Master Password specify Master password and confirm password Xxxxxxxn click on Next
At the screen
At the screen Database for SAP System enter details
Database Host vhcalhdbdb
Instance Number 02
Database ID (DBSID)HDB
Password of DBA Xxxxxxxn click on Next
At the screen SAP HANA Multitenant Database Containers enter password for HANA Database superuser Xxxxxxxn click on Next
At the screen Software Package Browser enter path for the downloaded media from Maintenance Planner. Package Path: /sapmedia/download click Next
The status will change from "still missing" to "Available". Click on Next
At the screen Upgrade SAP Host Agent checkmark Upgrade SAP Host Agent with provided version and click on Next , after it is shown as "Available". Click on Next
At the screen SAP HANA Client Software Installation Path choose radio button Local Client Directory click on Next
At the screen Media Browser enter Package Path /sapmedia/1809_EXP click on Next.
TIP: SWPM takes half hour to verify and check the zip filesIndividual Package Location will change to /sapmedia/1809_EXP/S4CORE103_INST_EXPORT_1.zip click onNext
At the screen Software Package Browser accept Individual Package Locations /sapmedia/1809_EXP/S4CORE103_INST_EXPORT_[2..20].zip
At the screen
At the screen Database Schema accept schema DBACOCKPIT password and confirm Schema password Xxxxxxxn click on Next
At the screen Database Schema accept schema SAPHANADB password and confirm Schema password Xxxxxxxn click on Next
At the screen
At the screen
At the screen Primary Application Server Instance and ABAP Central Services Instance accept values PAS Instance Number 00, PAS Instance Host vhcals4hci
ASCS Instance Number 01, ASCS Instance Host Name vhcals4hci click on Next
At the screen
At the screen
At the screen SLD Destination for the SAP System OS Level leave default radio button at No SLD destination click on Next
At the screen
At the screen
At the screen
At the screen Configuring Transport Management for Single System select Run TMS config and enter password for TMSADM in Client 000 click on Next
At the screen Import SPAM/SAINT Update for Import SPAM/SAINT Update select radio button Yes
Specify the location of SPAM/SAINT Update Archive as /sapmedia/download/KD75372.SAR click on Next
TIP: This will save time later having to do it at the time of SUM installation. Click on Next
At the screen
At the screen Preparing for the Software Update Manager checkmark Extract SUM, Start Sum Automatically, enter values of SUM as /sapmedia/download/SUM20SP04_1-80002456.SAR
Click on Next
At the screen Software Package Browser accept the Individual package location of SUM file or provide Package Path click on Next
At the screen
At the screen Secure Storage Key Generation accept radio button – Individual Key (Recommended for Productive Systems) On the Next
At next screen Warning click OK
At next screen Cleanup of Operating System Users checkmark on Yes cleanup os users and click on Next
Here is the Parameter Summary Click on Next to confirm and begin the installation.
At next screen 96% Information click on OK and again OK. Fill in the Feedback to SAP.
STEP 4: ADDON INSTALLATION USING SUM
As we executed combined SWPM+SUM you should have filesystem /usr/sap/S4H/SUM and you should directly jump to url https://vhcals4hci:1129/lmsl/sumabap/S4H/doc/slui
If not, don’t worry, please extract it as below 2 commands:
as s4hadm

cd /usr/sap/S4H

SAPCAR -xvf /sapmedia/download/SUM20SP04_1-80002456.SAR

as root

ps –ef | grep –i sapup

/usr/sap/S4H/SUM/abap/SUMSTART confighostagent
TIP: Please check that your /windows/drivers/etc/host file contains entry with IP address mapped to hostname vhcals4hci.
c:\users\mahesh>type c:\windows\system32\drivers\etc\hosts
10.20.130.140 vhcals4hci vhcals4hci.dummy.nodomain vhcals4hcs vhcals4hcs.dummy.nodomain vhcalhdbdb vhcalhdbdb.dummy.nodomainOpen Google Chrome browser (latest version recommended) Enter URL:
https://vhcals4hci:1129/lmsl/sumabap/S4H/doc/slui
In case you get screen below please click on Advanced and then “Proceed to vhcals4hci(unsafe)"
Enter s4hadm/(password you used before) in the screen below
TIP: If you get message that Page is Unresponsive just click on Wait.
PERFORMANCE TIP: When you use the Combined SWPM+SUM procedure, SUM is started bypassing many phases and prompts.

The Number of processes for Batch, R3trans are set to 1-uptime/3-downtime  and R3load are set to 4/4.

In order to have the installation take advantage of CPU power and save time, as soon as you get the first screen

of SUM please do as below


On the right side, select menu option (1) More, (2) Utilities, (3) SUM Parameters, (4) enter values and (5) Save.
EXTRACTION PHASE
No prompts here ....
If you are asked whether to import SPAM version 71 select Import SPAM version 71.
TIP: If you get error manifest signature revoked download new crlbag.p7s as per

SAP Note 2491577 - SUM fails at phase PREP_EXTRACT/SCAN_DOWNLOADDIR with error message "SIGNATURE: m...
CONFIGURATION PHASE
Select Next at (6%) Current Phase PREP_CONFIGURATIN/INITSUBST
At (10%) Current Phase PREP_EXTENSION/BIND_PATCH Click on Next
(NOTE: in the screen below BI_CONT and BI_CONT_XT will appear only if you selected at Maintenance Planner)
Accept values for release level and Click on Next
At (10%) Current Phase PREP_EXTENSION/BIND_PATCH Click on Next
At (11%) Current Phase PREP_INTEGRATION/ADJUSTPRP Click on Next
CHECKS PHASE
Click on Next
The above note may not be required under certain conditions, possibly if you start SWPM+SUM combined.
PREPROCESSING PHASE
At (17%) Current Phase MAIN_INIT/REPACHK_EHPI - Lock the development environment now click on Next
At (24%) Current Phase MAIN_DTTRANSSHD/DOWNCONF_DTTRANS_BCK accept selected radio button Backup completed click on Next
Click on Next
EXECUTION PHASE
(above wait time is assuming process parameters changed as per above performance tip)
At (89%) Current Phase: MAIN_UPTRANS/STARTSAP_PUPG click on Next
At (89%) Current Phase: MAIN_UPTRANS/UPCONF click Next
At (89%) Current Phase: MAIN_POSTPROC/SETUPGPAR_UPG_POST click Next
At (91%) Current Phase: MAIN_POSTPROC/SUBMOD_SPAU_INFO/SPAUINFO click Next
At (91%) Current Phase: MAIN_POSTPROC/REQUPFINAL click Next
SUM is completed. Please login to the system and check the Installed product version as:Please find Installed Software Component version:TIP: Schedule complete SGEN if it is not completed so far. This will help reduce time needed for Best Practices Content Activation.
STEP 5: S/4HANA RELEASE INFORMATION NOTE
Please apply the 4 notes below to the installed instance as per SAP Note 2764769 - SAP S/4HANA 1809 Feature Package Stack 02: Additional Release Information these notes are only for 1809 FPS1
COMPONENT FOR INCIDENTS:
You can open OSS messages using component: for SWPM - BC-INS-SWPM
for SUM - BC-UPG-TLS-TLA
OTHER REFERENCES:
Installation Guide
Administration Guide for Implementation
Your system installation is complete. Congratulations !!!
Mahesh Sardesai
Product Expert - S/4HANA
- SAP Managed Tags:
- SAP S/4HANA
Labels:
10 Comments
You must be a registered user to add a comment. If you've already registered, sign in. Otherwise, register and sign in.
Labels in this area
-
Artificial Intelligence (AI)
1 -
Business Trends
363 -
Business Trends
22 -
Customer COE Basics and Fundamentals
1 -
Digital Transformation with Cloud ERP (DT)
1 -
Event Information
461 -
Event Information
24 -
Expert Insights
114 -
Expert Insights
157 -
General
1 -
Governance and Organization
1 -
Introduction
1 -
Life at SAP
415 -
Life at SAP
2 -
Product Updates
4,685 -
Product Updates
217 -
Roadmap and Strategy
1 -
Technology Updates
1,502 -
Technology Updates
89
Related Content
- Proration of flat rate in Enterprise Resource Planning Q&A
- service object in es31 are popup to open Zdrive in Enterprise Resource Planning Q&A
- FP2402 New Installation in Enterprise Resource Planning Q&A
- Quick Start guide for PLM system integration 3.0 Implementation/Installation in Enterprise Resource Planning Blogs by SAP
- Leased assets in Enterprise Resource Planning Q&A
Top kudoed authors
| User | Count |
|---|---|
| 13 | |
| 11 | |
| 10 | |
| 8 | |
| 7 | |
| 6 | |
| 4 | |
| 4 | |
| 4 | |
| 3 |