
- SAP Community
- Products and Technology
- Technology
- Technology Blogs by SAP
- Build an installation host (jumpbox) to install SA...
Technology Blogs by SAP
Learn how to extend and personalize SAP applications. Follow the SAP technology blog for insights into SAP BTP, ABAP, SAP Analytics Cloud, SAP HANA, and more.
Turn on suggestions
Auto-suggest helps you quickly narrow down your search results by suggesting possible matches as you type.
Showing results for
Product and Topic Expert
Options
- Subscribe to RSS Feed
- Mark as New
- Mark as Read
- Bookmark
- Subscribe
- Printer Friendly Page
- Report Inappropriate Content
04-29-2019
5:04 PM
One way to speed up the installation of SAP Data Hub is to have a reusable installation host on AWS to use for the installation and for maintenance tasks. I have assembled the various installation steps into this blog post as a guide for building the installation host. Using the steps below, you should have an environment that passes all the preflight checks done by the SAP Data Hub installer.
The installation guide contains the Installation Host Prerequisites listed at help.sap.com but the guide has all the steps in various links in the hierarchy, so I put them all together in one place. Note that this is confirmed for 2.3.x and 2.4.x and should work for future releases of Data Hub - but always confirm with the current product documentation.
Source: help.sap.com
For AWS-specific installation, you'll also need
Optional components (my personal recommendation and best practice)
I'll explain the steps and provide commands for each of these items. This will save you from going to each of the various websites and deciphering each installation individually.
For this I will assume you have an AWS account and have appropriate permissions to create instances.
Login to the Amazon Console and navigate to EC2. Make sure to install the EC2 instance in the same AWS region as you will install SAP Data Hub (to limit the cross-region networking costs).
Click the "Launch Instance" Button to start a new EC2 instance. See highlighted areas to check Region and Launch Instance below:

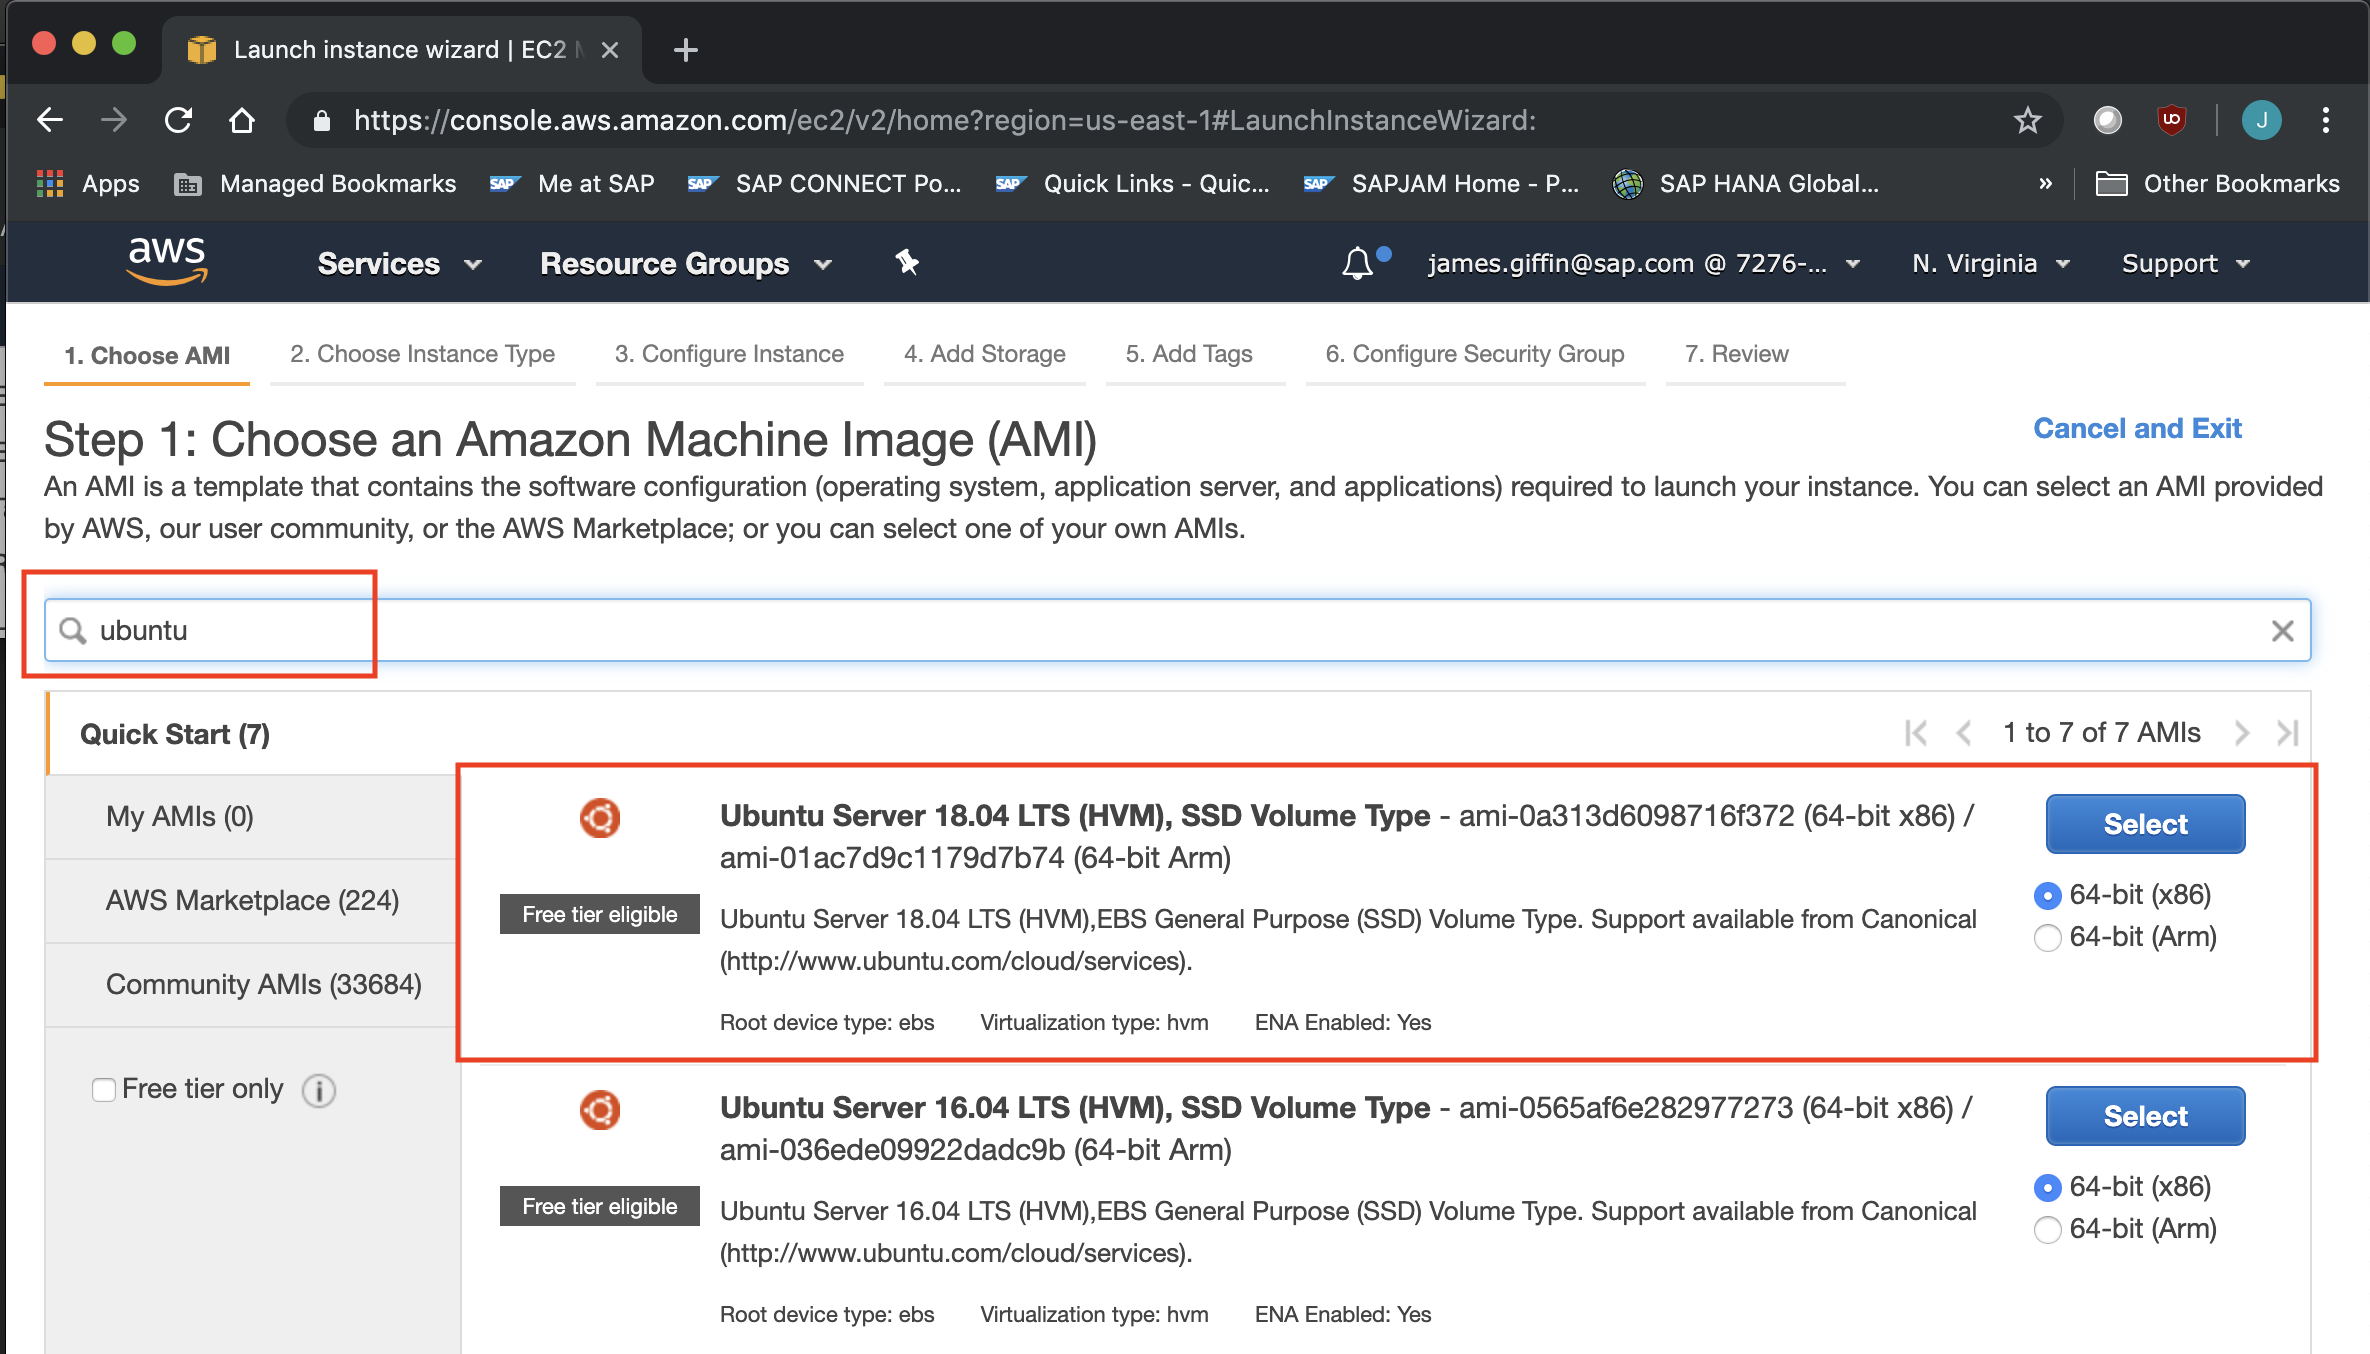
The next step is to select the Amazon Machine Image (AMI) to Launch. I chose Ubuntu server 18.04 64-bit because the software and package installers are easy to use.
Next, select the EC2 instance type for your jumpbox. I chose t3.xlarge because it has 4cpu and 16GB of ram and 5 Gigabit networking which helps in the docker mirroring phase of the Data Hub installation. You can choose another instance type if you like or want to reduce costs.

Next configure your instance details. The key change to make is on the storage of the jumpbox volume. The default storage on my instance was 8 GB which is not enough space to download the Installation files and docker images to the local machine.
The installation guide recommends "It has at least 10GB free disk space for SAP Data Hub installation folders and files, and has at least 20GB free disk space for used container images."
My suggestion is provision 100-200 GB to give yourself plenty of room for multiple installations and future upgrades.

Optional - It is a good idea to add tags to the instance for reference later.

Configure the security groups and make sure you have your keypair associated with the instance available on your local machine so you can login to the machine.
Once the instance is available, note the IP Address and login using SSH from your terminal program using your keypair file. The IP address is located in the lower panel of the instances view of the AWS console.

The machine images on AWS typically have ec2-user as the system user, except for Ubuntu, they use "ubuntu". Login to the terminal with the following:
ssh -i <keyname.pem> ubuntu@<ip address>
Note: I am on a MacBook, so I can use the pem key format. If you're on windows you'll use PuTTY and have to convert the .pem keyfile to a .ppk. There are lots of tutorials on AWS and StackOverflow that cover this topic.

The first thing to do is assume root by typing:

Source: https://phoenixnap.com/kb/how-to-install-docker-on-ubuntu-18-04
Run the following command to install docker

To confirm docker has installed, run:

Run the following command to install Python 2.7
To confirm Python 2.7 has installed check the version:

Run the following command to install PyYAML (Python has to be installed first)

Source: https://kubernetes.io/docs/tasks/tools/install-kubectl/#install-using-native-package-management
The documentation shows the following commands to install kubectl:
Confirm the installed version with

Unfortunately this installs the latest kubectl (1.14.1) which is not supported. We have to roll it back to a supported version. After some research I found that 1.11.5 works, here's how to downgrade it.
Verify the downgraded version

For installation on AWS EKS, only 2.9.x is supported . https://help.sap.com/viewer/e66c399612e84a83a8abe97c0eeb443a/2.4.latest/en-US/40cc1c6cd72546378182f0...
Helm Source: https://github.com/helm/helm
I create a downloads folder on my machine and dump all my software downloads in it. Just change directories into that folder and run the following commands:
Unpack the tar.gz

Find the helm binary in the unpacked directory, and move it to its desired destination
Verify the helm version

Source: https://docs.aws.amazon.com/eks/latest/userguide/install-aws-iam-authenticator.html
The aws-iam-authenticator allows your installation host to talk to the EKS cluster through kubectl (which we installed earlier)
I'm still in the /download folder, run the following commands to download and make the file executable.
Copy the aws-iam-authenticator executable to your root user's path:
Export the path to your profile so it loads every time you login
If the root user doesn't have a /bin folder under the $HOME directory, just create it and run the commands again.
You'll need the AWS CLI to connect to your AWS instances and the kubernetes cluster. The installation is a simple command:

Check the version:

Unfortunately, the version installed is way too old for us. 1.14.x. The minimum required version is 1.16.73.
To upgrade the awscli, we need to install pip3 which works with Python 3. The ubuntu image we chose already has Python 3 installed. To confirm type:

To install pip3, just run:

Now we can update the awscli

Confirm the version again:

We now have version 1.16.147 which is higher than the minimum version 1.16.73.
Now that we have the basics, you'll need to install unzip to unzip the Data Hub installation files.
Installing unzip is easy, just run:
I also install screen for linux for the Data Hub installation because it allows you to disconnect from a terminal "screen" and let the docker image mirroring stage of the Data Hub Installation happen without worry of losing my connection. For more information reference this handy guide: https://linuxize.com/post/how-to-use-linux-screen/
To install it run:
Now you are prepared to run your Data Hub installation from your installation host. With the tooling we've installed you should be ready to pass all your pre-flight checks with ease. I've used these steps on multiple implementations and I hope that this blog will save you time as you prepare for your own Data Hub Installation.
The installation guide contains the Installation Host Prerequisites listed at help.sap.com but the guide has all the steps in various links in the hierarchy, so I put them all together in one place. Note that this is confirmed for 2.3.x and 2.4.x and should work for future releases of Data Hub - but always confirm with the current product documentation.
Checklist of software to install
Source: help.sap.com
- Docker (minimum version 1.12.6) is installed and able to push to the internal registry.
- Python 2.7 is installed
- The Python YAML package (PyYAML) is installed.
The Kubernetes command-line tool, kubectl, is required, using one of the following versions:
- 1.9.x
- 1.10.x (greater or equal to 1.10.1)
- 1.11.x
kubectl must have access to the Kubernetes cluster
- The Kubernetes package manager, Helm, is installed and properly configured, using one of the following versions:
- 2.9.x - is the required version for AWS EKS
For AWS-specific installation, you'll also need
- aws-iam-authenticator
- aws-cli
Optional components (my personal recommendation and best practice)
- unzip
- screen for Linux
I'll explain the steps and provide commands for each of these items. This will save you from going to each of the various websites and deciphering each installation individually.
First, provision an EC2 instance as your installation host/jumpbox
For this I will assume you have an AWS account and have appropriate permissions to create instances.
Login to the Amazon Console and navigate to EC2. Make sure to install the EC2 instance in the same AWS region as you will install SAP Data Hub (to limit the cross-region networking costs).
Click the "Launch Instance" Button to start a new EC2 instance. See highlighted areas to check Region and Launch Instance below:
The next step is to select the Amazon Machine Image (AMI) to Launch. I chose Ubuntu server 18.04 64-bit because the software and package installers are easy to use.
Next, select the EC2 instance type for your jumpbox. I chose t3.xlarge because it has 4cpu and 16GB of ram and 5 Gigabit networking which helps in the docker mirroring phase of the Data Hub installation. You can choose another instance type if you like or want to reduce costs.
Next configure your instance details. The key change to make is on the storage of the jumpbox volume. The default storage on my instance was 8 GB which is not enough space to download the Installation files and docker images to the local machine.
The installation guide recommends "It has at least 10GB free disk space for SAP Data Hub installation folders and files, and has at least 20GB free disk space for used container images."
My suggestion is provision 100-200 GB to give yourself plenty of room for multiple installations and future upgrades.
Optional - It is a good idea to add tags to the instance for reference later.
Configure the security groups and make sure you have your keypair associated with the instance available on your local machine so you can login to the machine.
Once the instance is available, note the IP Address and login using SSH from your terminal program using your keypair file. The IP address is located in the lower panel of the instances view of the AWS console.
The machine images on AWS typically have ec2-user as the system user, except for Ubuntu, they use "ubuntu". Login to the terminal with the following:
ssh -i <keyname.pem> ubuntu@<ip address>
Note: I am on a MacBook, so I can use the pem key format. If you're on windows you'll use PuTTY and have to convert the .pem keyfile to a .ppk. There are lots of tutorials on AWS and StackOverflow that cover this topic.
Now we can install the software on the installation host
The first thing to do is assume root by typing:
sudo suInstall Docker
Source: https://phoenixnap.com/kb/how-to-install-docker-on-ubuntu-18-04
Run the following command to install docker
sudo apt-get update
sudo apt install docker.ioTo confirm docker has installed, run:
docker --versionInstall Python 2.7
Run the following command to install Python 2.7
sudo apt install python2.7 python-pipTo confirm Python 2.7 has installed check the version:
python --versionInstall PyYAML
Run the following command to install PyYAML (Python has to be installed first)
sudo pip2 install pyyamlInstall kubectl
Source: https://kubernetes.io/docs/tasks/tools/install-kubectl/#install-using-native-package-management
The documentation shows the following commands to install kubectl:
sudo apt-get update && sudo apt-get install -y apt-transport-https

curl -s https://packages.cloud.google.com/apt/doc/apt-key.gpg | sudo apt-key add -

echo "deb https://apt.kubernetes.io/ kubernetes-xenial main" | sudo tee -a /etc/apt/sources.list.d/kubernetes.list

sudo apt-get update

sudo apt-get install -y kubectl
Confirm the installed version with
kubectl versionUnfortunately this installs the latest kubectl (1.14.1) which is not supported. We have to roll it back to a supported version. After some research I found that 1.11.5 works, here's how to downgrade it.
sudo apt-get install -qy kubelet=1.11.5-00 kubectl=1.11.5-00 kubernetes-cni-0.6.0-00 --allow-downgradesVerify the downgraded version
kubectl verisonInstall helm
For installation on AWS EKS, only 2.9.x is supported . https://help.sap.com/viewer/e66c399612e84a83a8abe97c0eeb443a/2.4.latest/en-US/40cc1c6cd72546378182f0...
Helm Source: https://github.com/helm/helm
I create a downloads folder on my machine and dump all my software downloads in it. Just change directories into that folder and run the following commands:
wget https://storage.googleapis.com/kubernetes-helm/helm-v2.9.1-linux-amd64.tar.gzUnpack the tar.gz
tar -zxvf helm-v2.9.1-linux-amd64.tar.gzFind the helm binary in the unpacked directory, and move it to its desired destination
cd linux-amd64

cp helm /usr/local/bin/helm
Verify the helm version
helm versionAWS specific installations:
Install aws-iam-authenticator
Source: https://docs.aws.amazon.com/eks/latest/userguide/install-aws-iam-authenticator.html
The aws-iam-authenticator allows your installation host to talk to the EKS cluster through kubectl (which we installed earlier)
I'm still in the /download folder, run the following commands to download and make the file executable.
curl -o aws-iam-authenticator https://amazon-eks.s3-us-west-2.amazonaws.com/1.11.5/2018-12-06/bin/linux/amd64/aws-iam-authenticato...

chmod +x ./aws-iam-authenticator
Copy the aws-iam-authenticator executable to your root user's path:
cp ./aws-iam-authenticator $HOME/bin/aws-iam-authenticator && export PATH=$HOME/bin:$PATHExport the path to your profile so it loads every time you login
echo 'export PATH=$HOME/bin:$PATH' >> ~/.bashrcIf the root user doesn't have a /bin folder under the $HOME directory, just create it and run the commands again.
Install AWS Command Line Interface (awscli)
You'll need the AWS CLI to connect to your AWS instances and the kubernetes cluster. The installation is a simple command:
sudo apt install awscliCheck the version:
aws --versionUnfortunately, the version installed is way too old for us. 1.14.x. The minimum required version is 1.16.73.
To upgrade the awscli, we need to install pip3 which works with Python 3. The ubuntu image we chose already has Python 3 installed. To confirm type:
python3 --versionTo install pip3, just run:
sudo apt install python3-pipNow we can update the awscli
pip3 install awscli --upgrade --userConfirm the version again:
aws --versionWe now have version 1.16.147 which is higher than the minimum version 1.16.73.
Optional Additional tools needed to install Data Hub 2.x
Now that we have the basics, you'll need to install unzip to unzip the Data Hub installation files.
Install unzip
Installing unzip is easy, just run:
sudo apt install unzip
Install screen
I also install screen for linux for the Data Hub installation because it allows you to disconnect from a terminal "screen" and let the docker image mirroring stage of the Data Hub Installation happen without worry of losing my connection. For more information reference this handy guide: https://linuxize.com/post/how-to-use-linux-screen/
To install it run:
sudo apt install screenSummary
Now you are prepared to run your Data Hub installation from your installation host. With the tooling we've installed you should be ready to pass all your pre-flight checks with ease. I've used these steps on multiple implementations and I hope that this blog will save you time as you prepare for your own Data Hub Installation.
- SAP Managed Tags:
- SAP Data Intelligence
Labels:
3 Comments
You must be a registered user to add a comment. If you've already registered, sign in. Otherwise, register and sign in.
Labels in this area
-
ABAP CDS Views - CDC (Change Data Capture)
2 -
AI
1 -
Analyze Workload Data
1 -
BTP
1 -
Business and IT Integration
2 -
Business application stu
1 -
Business Technology Platform
1 -
Business Trends
1,658 -
Business Trends
104 -
CAP
1 -
cf
1 -
Cloud Foundry
1 -
Confluent
1 -
Customer COE Basics and Fundamentals
1 -
Customer COE Latest and Greatest
3 -
Customer Data Browser app
1 -
Data Analysis Tool
1 -
data migration
1 -
data transfer
1 -
Datasphere
2 -
Event Information
1,400 -
Event Information
69 -
Expert
1 -
Expert Insights
177 -
Expert Insights
328 -
General
1 -
Google cloud
1 -
Google Next'24
1 -
GraphQL
1 -
Kafka
1 -
Life at SAP
780 -
Life at SAP
13 -
Migrate your Data App
1 -
MTA
1 -
Network Performance Analysis
1 -
NodeJS
1 -
PDF
1 -
POC
1 -
Product Updates
4,575 -
Product Updates
374 -
Replication Flow
1 -
REST API
1 -
RisewithSAP
1 -
SAP BTP
1 -
SAP BTP Cloud Foundry
1 -
SAP Cloud ALM
1 -
SAP Cloud Application Programming Model
1 -
SAP Datasphere
2 -
SAP S4HANA Cloud
1 -
SAP S4HANA Migration Cockpit
1 -
Technology Updates
6,872 -
Technology Updates
460 -
Workload Fluctuations
1
Related Content
- SAP BTP FAQs - Part 1 (General Topics in SAP BTP) in Technology Blogs by SAP
- Is there a specific program or a report that can generate only Addons installed? in Technology Q&A
- SAPRouter Installation on Linux step by step in Technology Blogs by Members
- Error installing ABAP 7.5.2. Assertion failed: Unable to generate a new password for database login in Technology Q&A
- Two DAA agents are installed in the single host in Technology Q&A
Top kudoed authors
| User | Count |
|---|---|
| 14 | |
| 10 | |
| 8 | |
| 6 | |
| 6 | |
| 6 | |
| 6 | |
| 6 | |
| 5 | |
| 4 |