
- SAP Community
- Products and Technology
- Technology
- Technology Blogs by SAP
- Connecting the SAP HANA Service on Cloud Foundry t...
Technology Blogs by SAP
Learn how to extend and personalize SAP applications. Follow the SAP technology blog for insights into SAP BTP, ABAP, SAP Analytics Cloud, SAP HANA, and more.
Turn on suggestions
Auto-suggest helps you quickly narrow down your search results by suggesting possible matches as you type.
Showing results for
lsubatin
Active Contributor
Options
- Subscribe to RSS Feed
- Mark as New
- Mark as Read
- Bookmark
- Subscribe
- Printer Friendly Page
- Report Inappropriate Content
04-24-2019
9:19 PM
This blog post follows this first part. The aim is to integrate the SAP Cloud Platform, SAP HANA Service in Cloud Foundry with SAP Analytics Cloud to expose calculation views in an HDI container.
I will cover propagating identity from the User Account and Authentication service in your Cloud Foundry subaccount (a.k.a, xsuaa) to your HANA instance by creating a trust relation.
Get the Certificate for your account
Log in to a SQL console
Check an existing JWT provider
Configure trust between HANA and XSUAA
Create a role collection
Configure the User in SAP Cloud Platform
This is a simplification from this note: https://launchpad.support.sap.com/#/notes/2470084
If you already have a JWT identity provider, I would recommend you use the script in that note.
While you are looking at your deployed application, check the URL for UAA:

It will be right after “url”

In a new browser tab, append /sap/trust/jwt to that URL. Leave that open, you’ll need it in a sec:
You can do this from Web IDE or the Dashboard:

Go to SAP HANA Cockpit -> Open SQL Console. Open a SQL console for your database

If you created your database recently, you will find a JWT provider there. Run the following statements to see if you got lucky:
The first statement returns an entry for JWT

The second statement returns the certificate for that PSE:

The third one returns the JWT provider.
Two options here:
Make sure the certificate matches the one from your UAA service in your account. Compare the values from the UAA to the results in the select statements. You’re basically making sure you have the same certificate:

The issuer and the certificate need to match (you can download the value for the certificate to see if it matches), I personally asked HANA to compare them:

And you will find the issuer in the JWT provider:

If all of this matches, you can continue to Create a user for the connection.
If it does not match, I would recommend you run the script in the note.
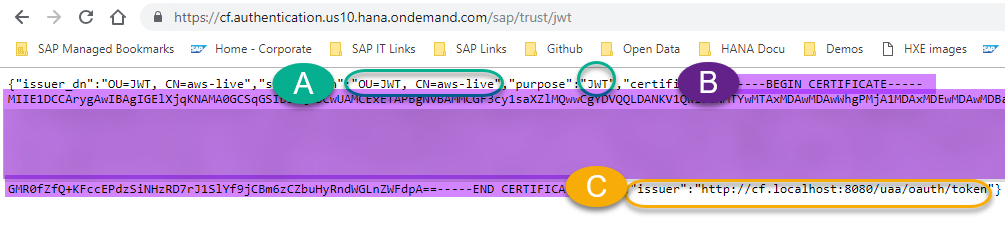
Copy the full certificate ( B - Including the “---Begin Certificate” and “End certificate---")

And use it to replace the placeholder below, mind the quotes, they are not double:

Press F8 or Run.
Get the Certificate ID:

Use the ID to replace the placeholder below:

Get the Issuer (C) from the UAA:

Replace it from below (again, mind the quotation marks… or whatever those are called):

Ta-da! Now these statements should return results:
Get the name of the JWT provider from the last statement:

Here is the sample code to create a user. Use the JWT provider in the placeholder below (and a proper user name and password, for the love of databases… )

From your Cloud Foundry subaccount -> Role Collections -> New Role Collection.
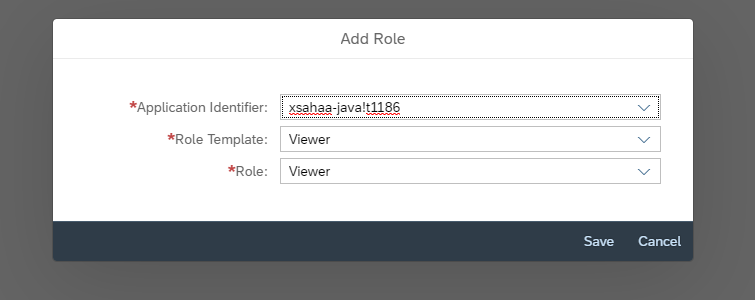
Give it a name and click on it to add a role:

Add role -> Pick the application identifier that starts with the xsappname in xs-security.json:
Go back to the subaccount and click on your default identity provider

Find your user and click Assign Role Collection

Use the role collection you have just created

You can now test this user. Click on the endpoint of the application xsahaa-entry:

And log in with the email and password you use to log in to SAP Cloud Platform:

And this is the first joyful moment!

And now some real testing: Append the following to the URL: /sap/bc/ina/service/v2/HeartBeat

Can't you hear that heart beat for the very first time?
Add /sap/bc/ina/service/v2/GetServerInfo

The database user you created still needs permissions to access the HDI container. Move on to the next blog post to grant access and connect from SAP Analytics Cloud: https://blogs.sap.com/2019/04/24/connecting-the-sap-hana-service-on-cloud-foundry-to-sap-analytics-c... .
I will cover propagating identity from the User Account and Authentication service in your Cloud Foundry subaccount (a.k.a, xsuaa) to your HANA instance by creating a trust relation.
Contents
Configure or check the JWT identity provider in SAP HANA
Get the Certificate for your account
Log in to a SQL console
Check an existing JWT provider
Configure trust between HANA and XSUAA
Configure a user for the connection with SAC
Create a role collection
Configure the User in SAP Cloud Platform
Configure or check the JWT identity provider in SAP HANA
This is a simplification from this note: https://launchpad.support.sap.com/#/notes/2470084
If you already have a JWT identity provider, I would recommend you use the script in that note.
Get the Certificate for your account
While you are looking at your deployed application, check the URL for UAA:
It will be right after “url”
In a new browser tab, append /sap/trust/jwt to that URL. Leave that open, you’ll need it in a sec:
Log in to a SQL console
You can do this from Web IDE or the Dashboard:
Go to SAP HANA Cockpit -> Open SQL Console. Open a SQL console for your database
If you created your database recently, you will find a JWT provider there. Run the following statements to see if you got lucky:
SELECT * FROM SYS.PSES where purpose = 'JWT';

SELECT * FROM SYS.CERTIFICATES;

SELECT * FROM SYS.JWT_PROVIDERS;
The first statement returns an entry for JWT
The second statement returns the certificate for that PSE:
The third one returns the JWT provider.
Two options here:
1- You got results: You already have a JWT provider in HANA
Make sure the certificate matches the one from your UAA service in your account. Compare the values from the UAA to the results in the select statements. You’re basically making sure you have the same certificate:
The issuer and the certificate need to match (you can download the value for the certificate to see if it matches), I personally asked HANA to compare them:
And you will find the issuer in the JWT provider:
If all of this matches, you can continue to Create a user for the connection.
If it does not match, I would recommend you run the script in the note.
2- If you didn’t get any results, you need to create a provider
Copy the full certificate ( B - Including the “---Begin Certificate” and “End certificate---")
And use it to replace the placeholder below, mind the quotes, they are not double:
Create certificate from 'Replace with C here ' ;Press F8 or Run.
Get the Certificate ID:
select CERTIFICATE_ID from SYS.CERTIFICATES;Use the ID to replace the placeholder below:
create pse SAPXSUAAJWT ;

set pse SAPXSUAAJWT purpose JWT;

ALTER PSE SAPXSUAAJWT ADD Certificate <<Certificate id>>;
Get the Issuer (C) from the UAA:
Replace it from below (again, mind the quotation marks… or whatever those are called):
CREATE JWT PROVIDER JWTPROVIDER_HAAS_PROV WITH ISSUER 'YOUR ISSUER HERE' CLAIM 'user_name' AS EXTERNAL IDENTITY;Ta-da! Now these statements should return results:
SELECT * FROM SYS.PSES;

SELECT * FROM SYS.CERTIFICATES;

SELECT * FROM SYS.PSE_CERTIFICATES;

SELECT * FROM SYS.JWT_PROVIDERS;
Create a user for the connection
Get the name of the JWT provider from the last statement:
Here is the sample code to create a user. Use the JWT provider in the placeholder below (and a proper user name and password, for the love of databases… )
CREATE USER YOUR_USER PASSWORD Th3_Pa55w0rd# NO FORCE_FIRST_PASSWORD_CHANGE;

GRANT EXECUTE ON SYS.EXECUTE_MDS_DEV to YOUR_USER;

ALTER USER YOUR_USER ENABLE JWT;

ALTER USER YOUR_USER ADD IDENTITY 'your.user@email.com' FOR JWT PROVIDER <<The JWT Provider>>;
Create a role collection
From your Cloud Foundry subaccount -> Role Collections -> New Role Collection.
Give it a name and click on it to add a role:
Add role -> Pick the application identifier that starts with the xsappname in xs-security.json:
Configure the User in SAP Cloud Platform
Go back to the subaccount and click on your default identity provider
Find your user and click Assign Role Collection
Use the role collection you have just created
You can now test this user. Click on the endpoint of the application xsahaa-entry:
And log in with the email and password you use to log in to SAP Cloud Platform:
And this is the first joyful moment!
And now some real testing: Append the following to the URL: /sap/bc/ina/service/v2/HeartBeat
Can't you hear that heart beat for the very first time?
Add /sap/bc/ina/service/v2/GetServerInfo
The database user you created still needs permissions to access the HDI container. Move on to the next blog post to grant access and connect from SAP Analytics Cloud: https://blogs.sap.com/2019/04/24/connecting-the-sap-hana-service-on-cloud-foundry-to-sap-analytics-c... .
- SAP Managed Tags:
- SAP Analytics Cloud,
- SAP HANA service for SAP BTP,
- SAP Business Technology Platform
Labels:
11 Comments
You must be a registered user to add a comment. If you've already registered, sign in. Otherwise, register and sign in.
Labels in this area
-
ABAP CDS Views - CDC (Change Data Capture)
2 -
AI
1 -
Analyze Workload Data
1 -
BTP
1 -
Business and IT Integration
2 -
Business application stu
1 -
Business Technology Platform
1 -
Business Trends
1,661 -
Business Trends
87 -
CAP
1 -
cf
1 -
Cloud Foundry
1 -
Confluent
1 -
Customer COE Basics and Fundamentals
1 -
Customer COE Latest and Greatest
3 -
Customer Data Browser app
1 -
Data Analysis Tool
1 -
data migration
1 -
data transfer
1 -
Datasphere
2 -
Event Information
1,400 -
Event Information
64 -
Expert
1 -
Expert Insights
178 -
Expert Insights
273 -
General
1 -
Google cloud
1 -
Google Next'24
1 -
Kafka
1 -
Life at SAP
784 -
Life at SAP
11 -
Migrate your Data App
1 -
MTA
1 -
Network Performance Analysis
1 -
NodeJS
1 -
PDF
1 -
POC
1 -
Product Updates
4,577 -
Product Updates
326 -
Replication Flow
1 -
RisewithSAP
1 -
SAP BTP
1 -
SAP BTP Cloud Foundry
1 -
SAP Cloud ALM
1 -
SAP Cloud Application Programming Model
1 -
SAP Datasphere
2 -
SAP S4HANA Cloud
1 -
SAP S4HANA Migration Cockpit
1 -
Technology Updates
6,886 -
Technology Updates
403 -
Workload Fluctuations
1
Related Content
- 10+ ways to reshape your SAP landscape with SAP BTP - Blog 4 Interview in Technology Blogs by SAP
- 10+ ways to reshape your SAP landscape with SAP Business Technology Platform – Blog 4 in Technology Blogs by SAP
- Top Picks: Innovations Highlights from SAP Business Technology Platform (Q1/2024) in Technology Blogs by SAP
- CAP LLM Plugin – Empowering Developers for rapid Gen AI-CAP App Development in Technology Blogs by SAP
- SAP Analytics Cloud Planning - Converting data in Technology Blogs by SAP
Top kudoed authors
| User | Count |
|---|---|
| 12 | |
| 10 | |
| 9 | |
| 7 | |
| 7 | |
| 7 | |
| 6 | |
| 6 | |
| 5 | |
| 4 |