
- SAP Community
- Products and Technology
- Enterprise Resource Planning
- ERP Blogs by Members
- SCL Consulting - SAP SMB Summit 2019 Nice - Hackat...
Enterprise Resource Planning Blogs by Members
Gain new perspectives and knowledge about enterprise resource planning in blog posts from community members. Share your own comments and ERP insights today!
Turn on suggestions
Auto-suggest helps you quickly narrow down your search results by suggesting possible matches as you type.
Showing results for
jonarranz
Discoverer
Options
- Subscribe to RSS Feed
- Mark as New
- Mark as Read
- Bookmark
- Subscribe
- Printer Friendly Page
- Report Inappropriate Content
04-17-2019
10:35 AM
SCL_SMBSummit19_HACKATON
[SCL Consulting]- SAP SMB Summit 2019 - Hackaton Winner!
Github repo here: https://github.com/jonarranzATscl/SCL_SMBSummit19_HACKATON
UPDATE (2019/10/25): Darius Heydarian @ SAP made an awesome step by step video implementing this solution. Thank you for your hard work!!
Solution Brief
The present solution was developed for the SAP SMB Summit 2019 Hackaton - Nice Hackaton Homepage. It was totally developed in the alloted time, on site, and it won the competition!
We tried to provide a trusted "Cold chain" monitor for our goods; using a CC2650STK sensor to send temperature readings to Leonardo (not really, we'll dive into it later) and store those readings in a blockchain. Also, we provided an alarm system: when temperature went up to a certain threshold, it sent a message to a B1 backend and a particular user at Telegram. Using telegram, one could ask for the last sensor readout in realtime, thus, providing chatbox integration.
Technologies used
Hackaton "Building Blocks"
- B1Backend (B1Backend)
- Blockchain (Blockchain)
- CloudFoundry (CloudFoundry)
- IoTLeonardo (IoTLeonardo)
Other Tools
- Node-RED (Node-RED) - Flow based programming for the Internet of Things
- Mosquitto (Mosquitto) - Open source MQTT broker
- Amazon Web Services (AWS) - For running the mosquitto broker
- Amazon Elastic Beanstalk (EBS) - For hosting node-red
Solution Architecture
**Solution architecture graphic is in the works**
IoT - Reading from the sensor and acting on received values
For this part, we wanted to use the IoT Leonardo building block which was provided to us in the form of a CC2650STK sensor, an iPad mini with the SAP Gateway to Leonardo and, of course, a SAP Leonardo account. We really couldn't use any of this technologies, because the WiFi connection at the convention hall was working really badly (for the first hour only, it worked fine afterwards) and the iPad couldn't keep a stable connection. So... we invented our own "Leonardo" which we named "Michelangelo".
Mosquitto - MQTT Server
The first thing we needed for registering sensor readouts was an MQTT Server. Mosquitto is a great open source MQTT server, so we launched an EC2 instance on AWS and ran a mosquitto server there (we used the standard Ubuntu AMI and installed mosquitto via apt: sudo apt-get install mosquitto). It publishes a pure TCP service on port 1883, we used no authentication and our security group was "open for everyone".... do not use this in any production system!.
We had to send sensor data to the mqtt server, so we configured the standard TI SensorLink application to push sensor data to our cloud broker:

Then, we were getting fresh sensor data on our cloud server every other second; but had no way to interact with it.
Node-RED
For acting on sensor data, we chose Node-RED. It's an open source flow based programming tool, specially designed for interacting with IoT devices. It can be deployed as a web app, so we chose to deploy it on AWS Elastic Beanstalk. EB is quite similar to CloudFoundry, you can upload an application and it runs in the cloud, totally managed. Installing Node-RED on EBS
We designed a simple flow to act on sensor data:

We received the mqtt messages on the CC2650STK topic, and converted them to JSON (the sensor sends data as a stringified JSON, so we converted it back to a JSON object). We kept the last temperature readout locally, as a global variable, which was updated after receiving every message.
You can "connect" different flows on Node-RED, so after storing the last temperature readout, we diverted paths for each different functionallity:
- Always store readouts on Blockchain
- If the alert condition is met, send a message to both the B1 backend and the predefined Telegram user.
Blockchain - Storing sensor readouts on a blockchain
For this functionality, we used the Blockchain building block directly. Following the step by step tutorial, we managed to have our blockchain up and running in less than 10 minutes. This tutorial creates a really simple chain, a key-value store, but that was all we needed! Fortunately, it has a swagger interface for testing the recently created rest services for interacting with the bloickchain, so we focused our attention on the POST method, for writing new values to the blockchain.

Consequently, we got a REST service for writing values on our blockchain, so we had to send the message from Node-RED. That's an easy task! We made a little sub-flow for this particular endeavour:

We just compose an HTTP request object and send it to the HyperLedger api gateway URL:

The "payload", in this case, refers to the last saved temperature readout; so, every time we received a temperature readout from our sensor via the mqtt server, we stored it in the blockchain directly: no way to miss any transaction, every readout is stored in the blockchain sequentially and the chain can't be broken!

Acting on threshold values - IoT decision making
In our design, we wanted to send a message when temperature went up a certain threshold... but that is really hard to simulate! The sensors temperature variance is really slow: even if you put it in a hot place, it takes its time to update the sensor value. So, we "cheated" using the sensor button: if the button present in the sensor was pressed, it triggered the message sending flow. Really easy to do on Node-RED:

Once the alert condition was fulfilled, we continued the flow to two different subflows: sending the message to the B1 backend and sending the message via Telegram.
B1 Backend - .NET Core App hosted on SAP Cloud Platform on Cloud Foundry
We could have sent the message, via B1 Service Layer, directly from Node-RED; but we wanted to use the CloudFoundry building block... so we followed @Ralphive 's tutorial on CloudFoundry and used his .NET Core demo app.
We made two simple changes to the example project:

First, we created a new service for posting B1 Activities. The example app already connects to ServiceLayer, so we used the already estabilished connection to create an activity with the current time-stamp (adjusting the time zome variance between Nice and the server location) and a custom message containing the sensor readout.
After that, we created a new APIContoller, that is, a REST service for receiving a temperature value. We could have saved temperature values on the already provided Postgres database, but for the sake of simplicity, we just used the POST method to send the alert message to the B1 backend using the method shown in the last screenshot.

After compiling the project and uploading it to SAP Cloud Platform via CloudFoundry using the .NET Core buildpack, we had our own webservice bridge for sending messages to the B1 backend from our Node-RED flow!

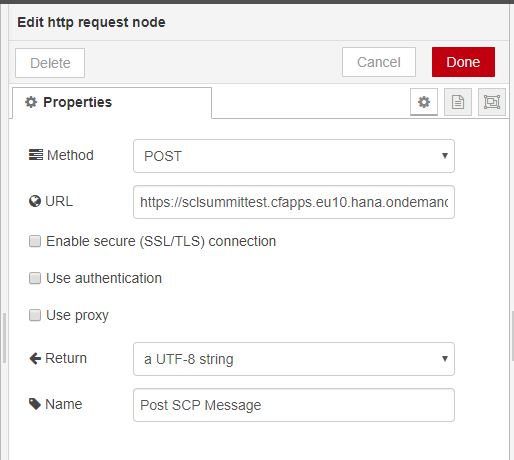
Back to Node-RED, we had to compose a new http request for calling our just deployed REST service:

Easy as pie! Just set the request payload to the last sensor readout, select a destination URL and we're done.

Chatbox Integration - Send alert messages via Telegram and interact with a Telegram Bot
Same as the B1 Backend, we wanted to send a Telegram message to a certain user after the alert condition was fulfilled. Also, we made the world's simplest AI for answering users interacting with the bot when they asked for sensor temperature.
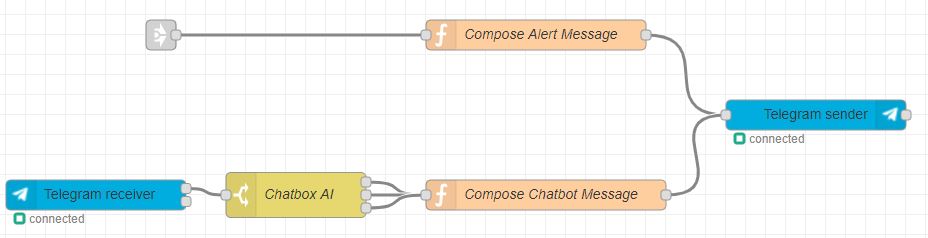
All of this is implemented in the last Node-RED subflow: Telegram
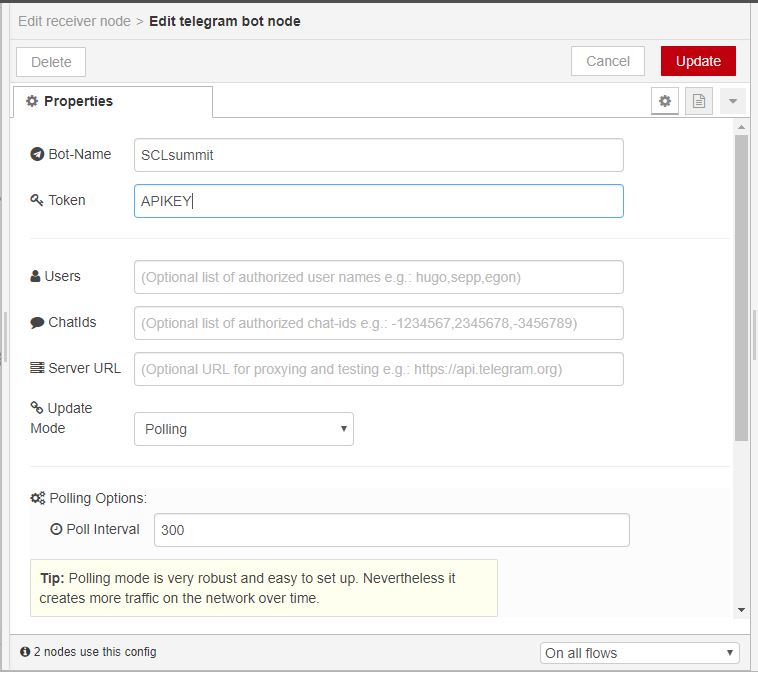
Telegram interaction from Node-RED is really easy, as it provides some specific nodes for interacting with Telegram Bots. Creating a Telegram bot is really easy, you just have to talk to the @BotFather user, follow his instructions, and you'll have your bot created in less than a minute and will be provided with your API Key.
Composing a Telegram message is no different from composing an HTTP request: select the destination user, compose a text message and hit the "Telegram sender" node.
For user interaction, we designed a really powerful and ahead of its time AI:

Simply put: if the user sends any text to the bot containing the "temp" substring, it will automatically initiate the response flow and send the last stored temperature readout from the sensor.

Wrap up
So, this is the solution we designed for the Hackaton: a multi-cloud solution (both AWS & SCP!), using IoT sensors to gather real world's data, storing sensor values on a secure blockchain, sending alerts when alert conditions were met and answering user inquiries from our Telegram Bot.
We had a really great time in the Hackaton and are looking forward to upcoming years competition, it's the best session to attend in the SMB Summit, doubt no more and join us next year!!
Our most sincere gratitude to the Solution Architect team for making all this possible, organizing and mantaining the event in such a great venue, creating the building blocks and helping everyone out on-site!
1 Comment
You must be a registered user to add a comment. If you've already registered, sign in. Otherwise, register and sign in.
Labels in this area
-
"mm02"
1 -
A_PurchaseOrderItem additional fields
1 -
ABAP
1 -
ABAP Extensibility
1 -
ACCOSTRATE
1 -
ACDOCP
1 -
Adding your country in SPRO - Project Administration
1 -
Advance Return Management
1 -
AI and RPA in SAP Upgrades
1 -
Approval Workflows
1 -
ARM
1 -
ASN
1 -
Asset Management
1 -
Associations in CDS Views
1 -
auditlog
1 -
Authorization
1 -
Availability date
1 -
Azure Center for SAP Solutions
1 -
AzureSentinel
2 -
Bank
1 -
BAPI_SALESORDER_CREATEFROMDAT2
1 -
BRF+
1 -
BRFPLUS
1 -
Bundled Cloud Services
1 -
business participation
1 -
Business Processes
1 -
CAPM
1 -
Carbon
1 -
Cental Finance
1 -
CFIN
1 -
CFIN Document Splitting
1 -
Cloud ALM
1 -
Cloud Integration
1 -
condition contract management
1 -
Connection - The default connection string cannot be used.
1 -
Custom Table Creation
1 -
Customer Screen in Production Order
1 -
Data Quality Management
1 -
Date required
1 -
Decisions
1 -
desafios4hana
1 -
Developing with SAP Integration Suite
1 -
Direct Outbound Delivery
1 -
DMOVE2S4
1 -
EAM
1 -
EDI
2 -
EDI 850
1 -
EDI 856
1 -
edocument
1 -
EHS Product Structure
1 -
Emergency Access Management
1 -
Energy
1 -
EPC
1 -
Financial Operations
1 -
Find
1 -
FINSSKF
1 -
Fiori
1 -
Flexible Workflow
1 -
Gas
1 -
Gen AI enabled SAP Upgrades
1 -
General
1 -
generate_xlsx_file
1 -
Getting Started
1 -
HomogeneousDMO
1 -
IDOC
2 -
Integration
1 -
Learning Content
2 -
LogicApps
2 -
low touchproject
1 -
Maintenance
1 -
management
1 -
Material creation
1 -
Material Management
1 -
MD04
1 -
MD61
1 -
methodology
1 -
Microsoft
2 -
MicrosoftSentinel
2 -
Migration
1 -
MRP
1 -
MS Teams
2 -
MT940
1 -
Newcomer
1 -
Notifications
1 -
Oil
1 -
open connectors
1 -
Order Change Log
1 -
ORDERS
2 -
OSS Note 390635
1 -
outbound delivery
1 -
outsourcing
1 -
PCE
1 -
Permit to Work
1 -
PIR Consumption Mode
1 -
PIR's
1 -
PIRs
1 -
PIRs Consumption
1 -
PIRs Reduction
1 -
Plan Independent Requirement
1 -
Premium Plus
1 -
pricing
1 -
Primavera P6
1 -
Process Excellence
1 -
Process Management
1 -
Process Order Change Log
1 -
Process purchase requisitions
1 -
Product Information
1 -
Production Order Change Log
1 -
Purchase requisition
1 -
Purchasing Lead Time
1 -
Redwood for SAP Job execution Setup
1 -
RISE with SAP
1 -
RisewithSAP
1 -
Rizing
1 -
S4 Cost Center Planning
1 -
S4 HANA
1 -
S4HANA
3 -
Sales and Distribution
1 -
Sales Commission
1 -
sales order
1 -
SAP
2 -
SAP Best Practices
1 -
SAP Build
1 -
SAP Build apps
1 -
SAP Cloud ALM
1 -
SAP Data Quality Management
1 -
SAP Maintenance resource scheduling
2 -
SAP Note 390635
1 -
SAP S4HANA
2 -
SAP S4HANA Cloud private edition
1 -
SAP Upgrade Automation
1 -
SAP WCM
1 -
SAP Work Clearance Management
1 -
Schedule Agreement
1 -
SDM
1 -
security
2 -
Settlement Management
1 -
soar
2 -
SSIS
1 -
SU01
1 -
SUM2.0SP17
1 -
SUMDMO
1 -
Teams
2 -
User Administration
1 -
User Participation
1 -
Utilities
1 -
va01
1 -
vendor
1 -
vl01n
1 -
vl02n
1 -
WCM
1 -
X12 850
1 -
xlsx_file_abap
1 -
YTD|MTD|QTD in CDs views using Date Function
1
- « Previous
- Next »
Related Content
- Partners ring in Innovations at the inaugural #Hack2Build APJ event in Enterprise Resource Planning Blogs by SAP
- #Hack2Build EMEA South & MEE: SAP S/4 HANA Cloud Side-by-Side Extension - Accelerating Innovation Together in Enterprise Resource Planning Blogs by SAP
- #Hack2Build MEE/EMEA: SAP S/4HANA Cloud Side-by-Side Extension - virtual but with results for reality in Enterprise Resource Planning Blogs by SAP
- SAP SME Tech Hangout - Wall of Fame 2020 in Enterprise Resource Planning Blogs by SAP
- SME SEEDx Code Camp Sprint 1 – Building a Chatbot in Enterprise Resource Planning Blogs by SAP
Top kudoed authors
| User | Count |
|---|---|
| 2 | |
| 2 | |
| 2 | |
| 2 | |
| 2 | |
| 2 | |
| 1 | |
| 1 | |
| 1 | |
| 1 |