
- SAP Community
- Products and Technology
- Technology
- Technology Blogs by SAP
- Cloud Integration – Sending Signed and/or Encrypte...
Technology Blogs by SAP
Learn how to extend and personalize SAP applications. Follow the SAP technology blog for insights into SAP BTP, ABAP, SAP Analytics Cloud, SAP HANA, and more.
Turn on suggestions
Auto-suggest helps you quickly narrow down your search results by suggesting possible matches as you type.
Showing results for
Advisor
Options
- Subscribe to RSS Feed
- Mark as New
- Mark as Read
- Bookmark
- Subscribe
- Printer Friendly Page
- Report Inappropriate Content
04-09-2019
7:49 AM
This blog describes how to use the Mail receiver adapter to send signed and/or encrypted mails to an email recipient. This feature will be available for customers starting with the 14-April-2019 release. This blog describes the feature in a small sample scenario.
In many Cloud Integration scenarios messages are sent out to one or multiple mail receivers. Starting with the 14-April-2019 release, the mails sent out cannot only be encrypted but also signed. This blog describes a small sample scenario.
To sign the mail, a private key is required in the keystore. Add or create the private key to be used for the signature in the keystore, note down the Alias as it is required in the Mail receiver channel. To create or import the key in the keystore open the Keystore Monitor available in the Operations View in the section Manage Security.
Create New Key
If you want to create a new key, in the Keystore Monitor select the Create -> Key Pair action at the top of the monitor. A create dialog appears asking for the Alias to be used for the key and the key specific attributes. Note down the Alias as it is required later in the mail receiver channel.

Choose Deploy to add the new key to the keystore.
Upload Existing Key
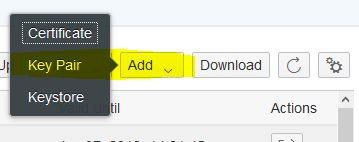
If you want to upload an existing key, in the Keystore Monitor select the Add -> Key Pair action at the top of the monitor. An upload dialog appears asking for the private key file to upload and the Alias to be used for the private key. Note down the Alias as it is required later in the mail receiver channel.

Choose Deploy to add the certificate to the keystore.
To encrypt the mail, the certificate of the mail receiver is required in the keystore. Add the certificate to be used for the encryption to the keystore, note down the Alias as it is required later in the configuration of the Mail receiver channel. To import the certificate to the keystore open the Keystore Monitor available in the Operations View in the section Manage Security.
To upload the certificate, in the Keystore Monitor select Add -> Certificate action at the top of the monitor. An upload dialog appears asking for the private key file to upload and the Alias to be used for the private key. Note down the Alias as it is required later in the mail receiver channel.


Choose Deploy to add the certificate to the keystore.
To be able to receive signed and encrypted mails in the mail receiver the respective key and certificate needs to be defined there as well.
For decryption the private key is required for the certificate the mail was encrypted with in the Cloud Integration tenant.
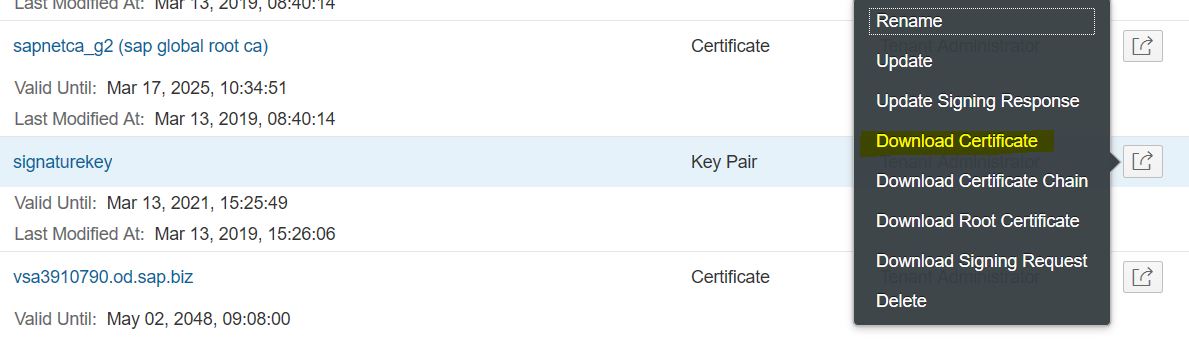
For signature verification the public key is required for the key pair the mail was signed with in the Cloud Integration tenant. This certificate can be downloaded in the Keystore Monitor using the Download action for the Signature Key:
Now we configure the integration flow in the Web UI, Design section. Create an integration flow, connect the sender participant with the start message event and select the adapter you want to use as sender adapter. Alternatively, to keep things simple, you can use a Timer start event to trigger the processing of the integration flow.
The integration flow we configure in this blog is using the Timer start event and sets the payload in a Content Modifier -> Message Body:

For the Timer start event, specify the Run Once option so that the integration flow is processed once after deployment.
To configure the mail receiver channel, connect the End Message event with the Receiver participant and select the Mail adapter.
Make sure that the created mail channel has at least version 1.5, as only with this version sending signed mails is possible.
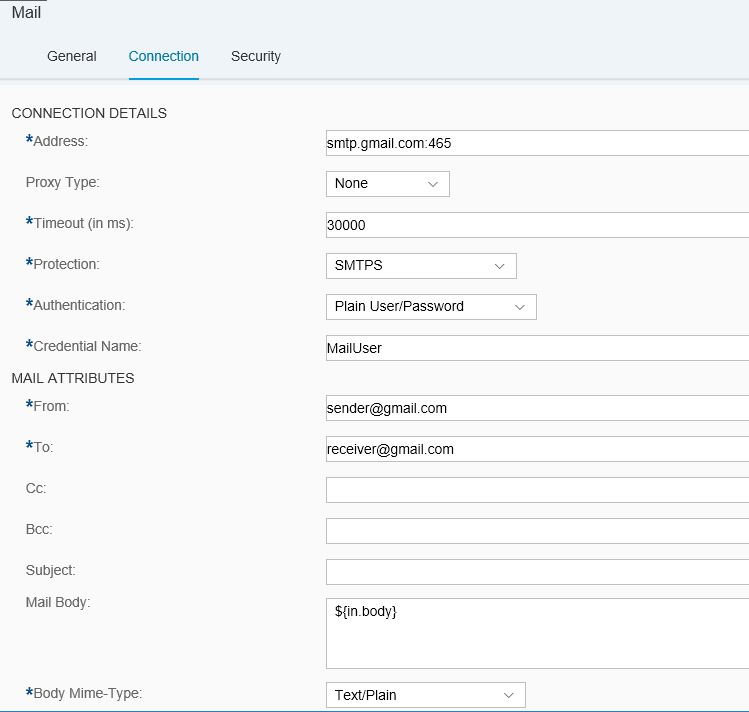
First, you choose the Connection tab in the Mail receiver channel. Configure the mail server in the Address field and configure the Proxy Type, Protection and Authentication as required by your mail server.
Also configure the sender and receiver mail addresses in the Mail Attributes:
In the Security tab, specify that the mail shall be signed and encrypted using the Signature and Encryption Type drop down. After selecting S/MIME Signature and Encryption the configuration fields for Signature and Encryption are shown.
Under Signature specify the Alias of the private key to be used for signing the mail and select the Signature Algorithm. The Alias can either be a fixed alias name or can be read dynamically from a header or property using ${header.alias}. Make sure the alias fits to the one configured in the keystore.
Under Encryption specify the Encryption Algorithm and the Alias of the public key to be used for encrypting the mail. With the 12-May-2019 update the Alias can also be read dynamically from a header or property using ${header.alias} or from partner directory using pd:<PartnerID>:<ParameterID>:Binary. Note that you need to use the new mail receiver version 1.6 to be able to set the alias dynamically. Make sure the alias fits to the one configured in the keystore.

Note that the message is first signed and afterwards encrypted.
Now you can deploy the integration flow. You can check if the integration flow was started successfully in the Manage Integration Content monitor.

Now you can send signed and encrypted mails to mail receivers.
Sending Signed and/or Encrypted Mails in Mail Receiver Adapter
In many Cloud Integration scenarios messages are sent out to one or multiple mail receivers. Starting with the 14-April-2019 release, the mails sent out cannot only be encrypted but also signed. This blog describes a small sample scenario.
Configure Key and Certificate in the Keystore
Add or Create Signature Key
To sign the mail, a private key is required in the keystore. Add or create the private key to be used for the signature in the keystore, note down the Alias as it is required in the Mail receiver channel. To create or import the key in the keystore open the Keystore Monitor available in the Operations View in the section Manage Security.
Create New Key
If you want to create a new key, in the Keystore Monitor select the Create -> Key Pair action at the top of the monitor. A create dialog appears asking for the Alias to be used for the key and the key specific attributes. Note down the Alias as it is required later in the mail receiver channel.
Choose Deploy to add the new key to the keystore.
Upload Existing Key
If you want to upload an existing key, in the Keystore Monitor select the Add -> Key Pair action at the top of the monitor. An upload dialog appears asking for the private key file to upload and the Alias to be used for the private key. Note down the Alias as it is required later in the mail receiver channel.
Choose Deploy to add the certificate to the keystore.
Add Encryption Certificate
To encrypt the mail, the certificate of the mail receiver is required in the keystore. Add the certificate to be used for the encryption to the keystore, note down the Alias as it is required later in the configuration of the Mail receiver channel. To import the certificate to the keystore open the Keystore Monitor available in the Operations View in the section Manage Security.
To upload the certificate, in the Keystore Monitor select Add -> Certificate action at the top of the monitor. An upload dialog appears asking for the private key file to upload and the Alias to be used for the private key. Note down the Alias as it is required later in the mail receiver channel.
Choose Deploy to add the certificate to the keystore.
Configure the Key and Certificate in the Mail Receiver
To be able to receive signed and encrypted mails in the mail receiver the respective key and certificate needs to be defined there as well.
For decryption the private key is required for the certificate the mail was encrypted with in the Cloud Integration tenant.
For signature verification the public key is required for the key pair the mail was signed with in the Cloud Integration tenant. This certificate can be downloaded in the Keystore Monitor using the Download action for the Signature Key:
Configure the Integration Flow Sending the Mails
Now we configure the integration flow in the Web UI, Design section. Create an integration flow, connect the sender participant with the start message event and select the adapter you want to use as sender adapter. Alternatively, to keep things simple, you can use a Timer start event to trigger the processing of the integration flow.
The integration flow we configure in this blog is using the Timer start event and sets the payload in a Content Modifier -> Message Body:
For the Timer start event, specify the Run Once option so that the integration flow is processed once after deployment.
Configure the Mail Receiver Channel
To configure the mail receiver channel, connect the End Message event with the Receiver participant and select the Mail adapter.
Make sure that the created mail channel has at least version 1.5, as only with this version sending signed mails is possible.
First, you choose the Connection tab in the Mail receiver channel. Configure the mail server in the Address field and configure the Proxy Type, Protection and Authentication as required by your mail server.
Also configure the sender and receiver mail addresses in the Mail Attributes:
In the Security tab, specify that the mail shall be signed and encrypted using the Signature and Encryption Type drop down. After selecting S/MIME Signature and Encryption the configuration fields for Signature and Encryption are shown.
Under Signature specify the Alias of the private key to be used for signing the mail and select the Signature Algorithm. The Alias can either be a fixed alias name or can be read dynamically from a header or property using ${header.alias}. Make sure the alias fits to the one configured in the keystore.
Under Encryption specify the Encryption Algorithm and the Alias of the public key to be used for encrypting the mail. With the 12-May-2019 update the Alias can also be read dynamically from a header or property using ${header.alias} or from partner directory using pd:<PartnerID>:<ParameterID>:Binary. Note that you need to use the new mail receiver version 1.6 to be able to set the alias dynamically. Make sure the alias fits to the one configured in the keystore.
Note that the message is first signed and afterwards encrypted.
Deploy the Integration Flow
Now you can deploy the integration flow. You can check if the integration flow was started successfully in the Manage Integration Content monitor.
Execute the Scenario
Now you can send signed and encrypted mails to mail receivers.
- SAP Managed Tags:
- SAP Integration Suite,
- Cloud Integration
Labels:
11 Comments
You must be a registered user to add a comment. If you've already registered, sign in. Otherwise, register and sign in.
Labels in this area
-
ABAP CDS Views - CDC (Change Data Capture)
2 -
AI
1 -
Analyze Workload Data
1 -
BTP
1 -
Business and IT Integration
2 -
Business application stu
1 -
Business Technology Platform
1 -
Business Trends
1,658 -
Business Trends
93 -
CAP
1 -
cf
1 -
Cloud Foundry
1 -
Confluent
1 -
Customer COE Basics and Fundamentals
1 -
Customer COE Latest and Greatest
3 -
Customer Data Browser app
1 -
Data Analysis Tool
1 -
data migration
1 -
data transfer
1 -
Datasphere
2 -
Event Information
1,400 -
Event Information
66 -
Expert
1 -
Expert Insights
177 -
Expert Insights
299 -
General
1 -
Google cloud
1 -
Google Next'24
1 -
Kafka
1 -
Life at SAP
780 -
Life at SAP
13 -
Migrate your Data App
1 -
MTA
1 -
Network Performance Analysis
1 -
NodeJS
1 -
PDF
1 -
POC
1 -
Product Updates
4,577 -
Product Updates
344 -
Replication Flow
1 -
RisewithSAP
1 -
SAP BTP
1 -
SAP BTP Cloud Foundry
1 -
SAP Cloud ALM
1 -
SAP Cloud Application Programming Model
1 -
SAP Datasphere
2 -
SAP S4HANA Cloud
1 -
SAP S4HANA Migration Cockpit
1 -
Technology Updates
6,873 -
Technology Updates
422 -
Workload Fluctuations
1
Related Content
- Top Picks: Innovations Highlights from SAP Business Technology Platform (Q1/2024) in Technology Blogs by SAP
- Cloud Integration: Manually Sign / Verify XML payload based on XML Signature Standard in Technology Blogs by SAP
- HTTP receiver adapter - inbuilt retry option in Technology Q&A
- SAP Cloud Integration: Understanding the XML Digital Signature Standard in Technology Blogs by SAP
- Single Sign On to SAP Cloud Integration (CPI runtime) from an external Identity Provider in Technology Blogs by SAP
Top kudoed authors
| User | Count |
|---|---|
| 39 | |
| 25 | |
| 17 | |
| 13 | |
| 7 | |
| 7 | |
| 7 | |
| 7 | |
| 6 | |
| 6 |