
- SAP Community
- Products and Technology
- Technology
- Technology Blogs by SAP
- Step-by-Step: Consume REST Service API with SAP C...
Technology Blogs by SAP
Learn how to extend and personalize SAP applications. Follow the SAP technology blog for insights into SAP BTP, ABAP, SAP Analytics Cloud, SAP HANA, and more.
Turn on suggestions
Auto-suggest helps you quickly narrow down your search results by suggesting possible matches as you type.
Showing results for
Advisor
Options
- Subscribe to RSS Feed
- Mark as New
- Mark as Read
- Bookmark
- Subscribe
- Printer Friendly Page
- Report Inappropriate Content
03-25-2019
9:19 AM
Disclaimer: This blog post is only applicable for the SAP Cloud SDK version of at most 2.19.2. We plan to continuously migrate these blog posts into our List of Tutorials. Feel free to check out our updated Tutorials on the SAP Cloud SDK.
Note: This post is part of a series. For a complete overview visit the SAP Cloud SDK Overview.

Introduction
We have already seen the SAP Cloud SDK providing capabilities for conveniently consuming OData and SOAP based API services. But some application may target a web service, which serves resources from an REST based endpoint, instead of OData or SOAP. If the REST based endpoint is well-defined, its specification can be declared as OpenAPI.
In this step-by-step guide we will choose a RESTful API from the SAP API Business Hub, take the attached OpenAPI interface file and generate Java code from it. By using the latest Maven project archetype of SAP Cloud SDK, we will have a well prepared start to implement and deploy a new application to the SCP, capable of consuming an OpenAPI service. We will setup a destination to the API service to test and proof the new application.
In the upcoming steps, we will use the Monitoring v2 service on SCP Neo. It provides up-to-date runtime metrics to connected applications and processes. Its API will be consumed by a newly created application running on SCP Cloud Foundry. However, the general strategy of this guide can be used for either platform deployment.
Prerequisites:
We assume you have completed the tutorial "HelloWorld on SCP CloudFoundry", such that the following requirements are already met:
- You have an SCP account, which is able to deploy simple Java web applications.
- Java, Maven and an IDE of your choice are installed and up-to-date.
- Cloud Foundry command line interface is installed, such that you can run
cf versionwithout an error.
Recommendations:
If you are new to the SAP Cloud SDK, you may want to start on the Cloud SDK Overview page. For an introduction on OpenAPI and SAP Cloud SDK, we recommend the post Access any REST service with Cloud SDK. Find more courses and guides in the official tutorials section.
Note: This tutorial does not require access to an SAP S/4HANA system.
Build an application powered by OpenAPI and Cloud SDK
Steps:
- Choose a REST service
- Build a new Spring application
- Enable OpenAPI code generation
- Run the code generation
- Setup the application
- Setup and run a mock server test
- Obtain credentials from SCP Neo
- Prepare configuration on SCP Cloud Foundry
- Deploy application
- Test
Step 1: Choose a service and download the OpenAPI interface file
In the beginning it is important to make sure the web service, which will be consumed, is actually offering an OpenAPI interface file. We need a JSON or YAML file, as a formal specification of the API. For this step-by-step guide we assume the "Monitoring v2" as target API.
Excursus: Explore a REST Service on SAP API Business Hub
We will now browse and download an OpenAPI file for "Monitoring v2".
- Visit the SAP API Business Hub.
 Its services are declared as either ODATA, SOAP or REST. If you are interested in OData and SOAP, please take a look at what the SAP Cloud SDK can provide as additional functionality.
 - Search for "Monitoring v2" and click on the respective row.
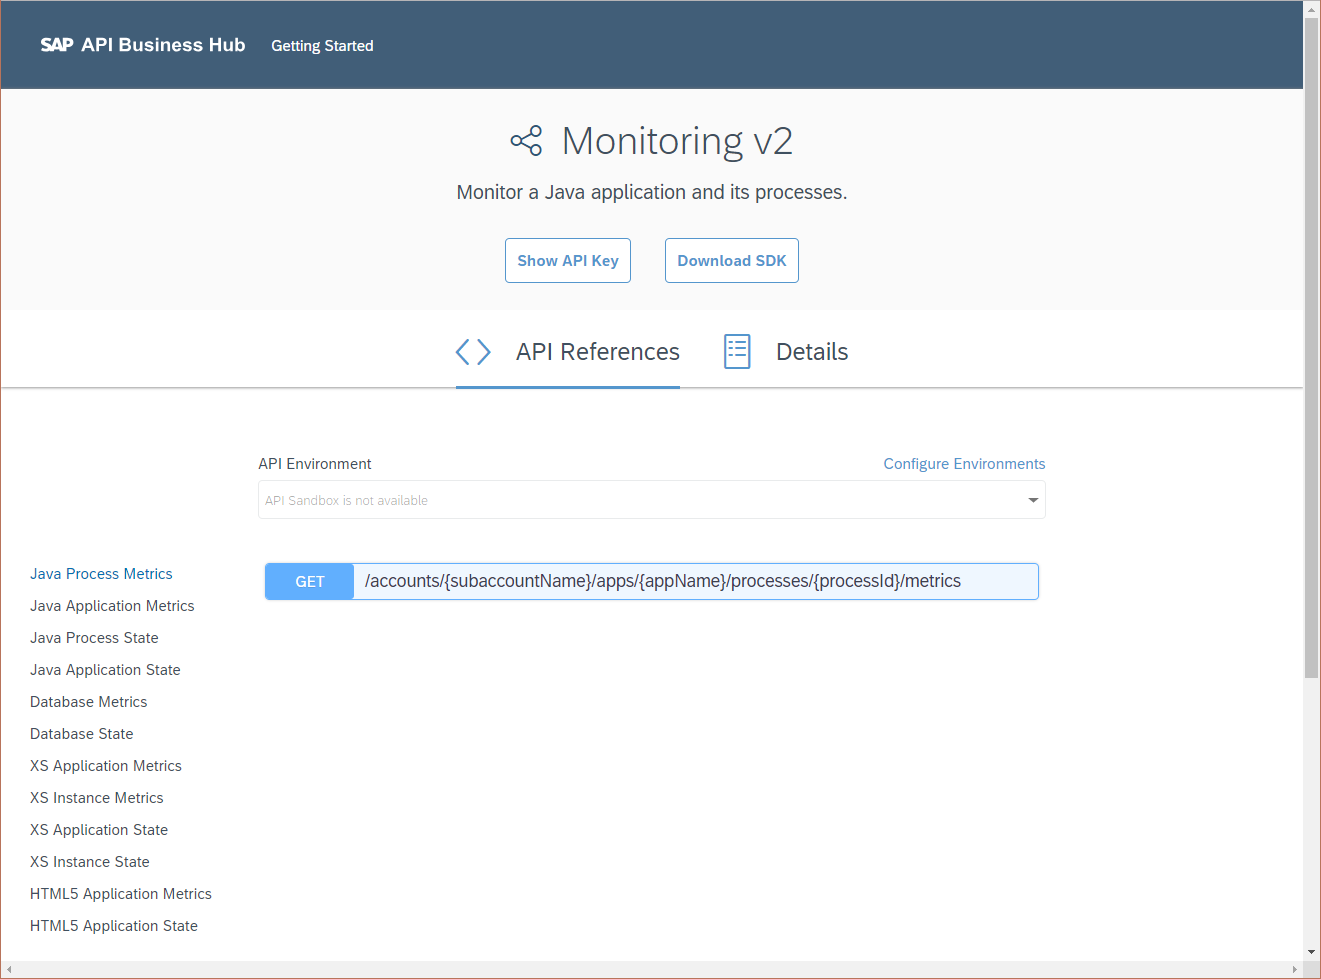 On this API reference, you can find a documentation of multiple interactive endpoints. By exploring the colored fields, you can test the API and investigate request parameters and expected response bodies. With this Swagger UI -like interface you can test API calls against a sandbox system.
 - Change to the "Details" page.
 Here you can find meta information about an API, as well as available URLs of the API. They heavily depend on your target landscape. Also details about authentication and links to in-depth documentation are referenced on this page.
 - Click the "Download Specification" button
This will trigger the download of the OpenAPI file to this API. The specification can be saved as JSON or YAML. Both of them can be parsed later by the code generator. Let's choose YAML.
Step 2: Create a new Spring application
In order to quickly get started with a new web application project, let's use the Spring Boot archetype prepared by SAP Cloud SDK. Open the command line and run the following Maven command to create a convenient multi-module project at the current directory:
mvn archetype:generate -DarchetypeGroupId=com.sap.cloud.s4hana.archetypes -DarchetypeArtifactId=scp-cf-spring -DarchetypeVersion=RELEASE
Note: Please change the
RELEASE reference at the end of the command to your preferred version. This tutorial uses org.example.rest as base package.A project based on the Spring Boot archetype is generated, containing the following elements:
- ./
- application/
- cx-server/
- integration-tests/
- uni-tests/
- pom.xml
If you are further interested in the details of the project structure, please find the related tutorial with in-depth information on the similar TomEE archetype.
Step 3: Enable OpenAPI code generation
- To enable the automatic code generation with OpenAPI, please rename and move the previously downloaded YAML file into the folder:
./application/src/main/resources/api.yaml
- Open the
./application/pom.xmlfile and add the following<plugin>next to the other declared plugins.
<plugins>
...
<plugin>
<groupId>org.openapitools</groupId>
<artifactId>openapi-generator-maven-plugin</artifactId>
<version>3.3.4</version>
<executions>
<execution>
<goals>
<goal>generate</goal>
</goals>
<configuration>
<inputSpec>${project.basedir}/src/main/resources/api.yaml</inputSpec>
<generatorName>java</generatorName>
<configurationFile>${project.basedir}/src/main/resources/api-options.json</configurationFile>
<generateApiTests>false</generateApiTests>
<generateModelTests>false</generateModelTests>
<generateApiDocumentation>false</generateApiDocumentation>
<generateModelDocumentation>false</generateModelDocumentation>
</configuration>
</execution>
</executions>
</plugin>
</plugins>
Note: You can easily change and update the plugin version to a recent state. Since this tool is still in ongoing development and gets improved on a regularly basis, we recommend using the latest version. You can find it in the Maven central repository. - For later compilation of the generated code, an additional dependency needs to be declared in the same
pom.xmlfile. Again, please feel encouraged to replace the version with the latest version from the Maven central repository.
<dependencies>

    ...


    <!-- due to annotations in the generated code -->

    <dependency>

        <groupId>io.swagger</groupId>

        <artifactId>swagger-annotations</artifactId>

        <version>1.5.22</version>

    </dependency>

</dependencies>
- You may have already noticed the reference of
/src/main/resources/api-options.json. In order to improve the readability of the code generator setup, we delegate some settings to a separate JSON file. Create theapi-options.jsonwith the following content, and put it next toapi.yaml:
{

  "java8" : true,

  "dateLibrary" : "java8",


  "modelPackage" : "org.example.rest.monitoring.model",

  "apiPackage" : "org.example.rest.monitoring.api",

  "invokerPackage" : "org.example.rest.monitoring.invoker",


  "serializableModel" : true,

  "withXml" : false,

  "booleanGetterPrefix" : "is",

  "useRuntimeException" : false,

  "hideGenerationTimestamp" : true,


  "library" : "resttemplate",

  "sourceFolder" : "/src/main/java"

}
You can modify it to your needs. But we recommend leaving the value"library" : "resttemplate"intact, to ensure support with SAP Cloud SDK.
Your application module will now look like this - with the new files highlighted:

Once the modifications are done, we are ready to start the code generation.
Step 4: Run the code generation
- Use the command line again, to execute the following Maven command:
mvn generate-sources
This phase will traverse the project module hierarchy and eventually starts the code generator in application. - Once the Maven process finishes, you can find the generated code in the
targetdirectory of theapplicationmodule:
./application/target/generated-sources/openapi/src/main/java/
Depending on the library template chosen in the generator settings, the generated code will differ both, for API and invoker classes.
Note: Make sure that your IDE identifies the files as generated sources, such that the classes can be resolved from your editors classpath. - If you find your generated API methods having incorrect letter casing, it is likely due to an improper API naming convention from the API file. You could either fix the naming manually in the original API file or use an automatic routine to fix the specification during Maven build. Although we do not recommend manually changing generated code, you could still fix the issue by adjusting the values for
operationIdelements in theapi.yaml. We advise using an automatic approach to handle the issue, please see the Appendix in the adjacent post Access any REST service with SAP Cloud SDK.
Your application module will now have generated sources:

Take a look into the Java files of the generated packages:
apicontains a dynamic set of classes, depending on the OpenAPI interface. Each OpenAPI endpoint is mapped to a class, which can be instantiated. Given the interface, each API class features the respective operations as methods. The return type of these methods are defined in themodelpackage.invokerholds static classes for API querying, e.g.ApiClientand helper classes.modelincorporates classes, which are mapped to entities defined by the API. They enable the type-safe usage of API responses.
Step 5: Setup the application
- Prepare a dedicated Destination type
Create a new java classMonitoringDestination.javato serve as placeholder for the destination identifier.
package org.example.rest;


import com.sap.cloud.sdk.cloudplatform.connectivity.DestinationDeclarator;


public class MonitoringDestination extends DestinationDeclarator {

    public final static String DESTINATION_NAME = "MonitoringEndpoint";


    public MonitoringDestination() {

        super(DESTINATION_NAME);

    }

}
- Implement the OpenAPI related application beans
Create a new classConfigurationMonitoring.javato serve beans with request scope, to ensure tenant and user separation. With theMonitoringDestinationreference we can resolve service paths and theHttpClient, which automatically resolves authorization headers for us.
package org.example.rest;


import com.sap.cloud.sdk.cloudplatform.connectivity.Destination;

import com.sap.cloud.sdk.cloudplatform.connectivity.DestinationAccessor;

import com.sap.cloud.sdk.cloudplatform.connectivity.HttpClientAccessor;

import org.apache.http.client.HttpClient;

import org.example.rest.monitoring.invoker.ApiClient;

import org.springframework.context.annotation.*;

import org.springframework.http.client.BufferingClientHttpRequestFactory;

import org.springframework.http.client.HttpComponentsClientHttpRequestFactory;

import org.springframework.web.client.RestTemplate;

import org.springframework.web.context.WebApplicationContext;


import java.net.URI;

import java.net.URISyntaxException;


@Configuration

public class ConfigurationMonitoring {

    @Bean

    @Primary

    @Scope(value = WebApplicationContext.SCOPE_REQUEST, proxyMode = ScopedProxyMode.TARGET_CLASS)

    public ApiClient createApiClient() throws URISyntaxException

    {

        // resolve destination

        final Destination destination = DestinationAccessor.getDestination(MonitoringDestination.DESTINATION_NAME);


        // instantiate RestTemplate and ApiClient

        final RestTemplate restTemplate = createRestTemplate();

        final ApiClient apiClient = new ApiClient(restTemplate);


        // set root of API Client base path

        final URI uri = destination.getUri();

        final URI path = new URI(uri.getScheme(), null, uri.getHost(), uri.getPort(), uri.getPath(), null, null);

        apiClient.setBasePath(path.toString());

        return apiClient;

    }


    @Bean

    @Primary

    @Scope(value = WebApplicationContext.SCOPE_REQUEST, proxyMode = ScopedProxyMode.TARGET_CLASS)

    public RestTemplate createRestTemplate()

    {

        // create new HttpClient for destination

        final HttpClient httpClient = HttpClientAccessor.getHttpClient(MonitoringDestination.DESTINATION_NAME);


        // instantiate template with prepared HttpClient, featuring repeated response reading

        final RestTemplate restTemplate = new RestTemplate();

        final HttpComponentsClientHttpRequestFactory httpRequestFactory = new HttpComponentsClientHttpRequestFactory();

        httpRequestFactory.setHttpClient(httpClient);

        restTemplate.setRequestFactory(new BufferingClientHttpRequestFactory(httpRequestFactory));

        return restTemplate;

    }

}
With@Primarywe signal Spring to select this instantiation method with priority over the methods provided by default from the generated OpenAPI code.
Note: If you plan to not use the bean or need access in a threaded environment (e.g. Hysterics commands), then you can just call the methods directly. - Implement a response model
Create a new classmodels/MonitorResponse.javato hold the values prepared by the controller.
package org.example.rest.models;


import com.fasterxml.jackson.annotation.JsonProperty;

import javax.annotation.Nonnull;

import org.example.rest.monitoring.model.AccountsAppsMetricsresponse;


import java.util.List;


public class MonitorResponse {

    @JsonProperty("monitor")

    private final List<AccountsAppsMetricsresponse> monitor;


    public MonitorResponse( @Nonnull final List<AccountsAppsMetricsresponse> monitor ) {

        this.monitor = monitor;

    }

}
- Implement a service controller
Create a new classcontrollers/MonitorController.javato listen on requests to our application. To keep the example simple, we are going to simply wrap the API response into our own model classMonitorResponse. You can later manipulate theresultlist and or use a different response model for further data processing.
package org.example.rest.controllers;


import javax.annotation.Nonnull;


import org.example.rest.models.MonitorResponse;

import org.example.rest.monitoring.api.JavaApplicationMetricsApi;

import org.example.rest.monitoring.invoker.ApiClient;

import org.example.rest.monitoring.model.AccountsAppsMetricsresponse;

import org.springframework.http.ResponseEntity;

import org.springframework.web.bind.annotation.RequestMapping;

import org.springframework.web.bind.annotation.RequestMethod;

import org.springframework.web.bind.annotation.RequestParam;

import org.springframework.web.bind.annotation.RestController;


import java.net.URISyntaxException;

import java.util.List;


@RestController

@RequestMapping("/monitor")

public class MonitorController {

    private final ApiClient apiClient;


    public MonitorController( @Nonnull final ApiClient apiClient ) {

        this.apiClient = apiClient;

    }


    @RequestMapping(method = RequestMethod.GET)

    public ResponseEntity<MonitorResponse> getMonitor(@RequestParam final String account, @RequestParam final String app) throws URISyntaxException {

        final List<AccountsAppsMetricsresponse> result = new JavaApplicationMetricsApi(apiClient).getAccountsSubaccountNameAppsAppNameMetrics(account, app);

        return ResponseEntity.ok(new MonitorResponse(result));

    }

}
As you see, our controller is listening for aGET /monitorrequest. Upon execution an instance ofApiClientis injected as part of the class constructor. Spring will resolve the bean from our previously introducedConfigurationMonitoringconfiguration.
Your application module now contains classes for controller and model:

Step 6: Setup and run a mock server test
It's time to verify the newly created code with an elaborate mock server test. We are now working in the
integration-tests module.- Create a new resource file
./integration-tests/src/test/resources/mocked_monitoring_response.json
The following JSON payload is going to be used as mocked server response. Please note, while this example only features three metrics, in reality there are many more records for a given process.
[

  {

    "account": "d012345trial",

    "application": "sampleapp",

    "state": "Ok",

    "processes": [

      {

        "process": "0123456789abcdef",

        "state": "Ok",

        "metrics": [

          {

            "name": "Used Disc Space",

            "state": "Ok",

            "value": 57,

            "unit": "%",

            "warningThreshold": 90,

            "errorThreshold": 95,

            "timestamp": 1551950283000,

            "output": "DISK OK - free space: / 3041 MB (39% inode=79%); /var 1459 MB (76% inode=98%); /tmp 1844 MB (96% inode=99%);",

            "metricType": "rate",

            "min": 0,

            "max": 8063

          },

          {

            "name": "Requests per Minute",

            "state": "Ok",

            "value": 0,

            "unit": "requests",

            "warningThreshold": 0,

            "errorThreshold": 0,

            "timestamp": 1551950284000,

            "output": "JMX OK - RequestsCountMin = 0 ",

            "metricType": "performance",

            "min": 0,

            "max": 0

          },

          {

            "name": "CPU Load",

            "state": "Ok",

            "value": 10,

            "unit": "%",

            "warningThreshold": 80,

            "errorThreshold": 90,

            "timestamp": 1551950283000,

            "output": "OK CPUValue: 10 (W> 80, C> 90) ",

            "metricType": "performance",

            "min": 0,

            "max": 0

          }

        ]

      }

    ]

  }

]
- Create a new test file
./integration-tests/src/test/java/[...]/MonitoringControllerLocalTest.java
The following test class currently contains a test, whether the contents of the OpenAPI endpoint is correctly wrapped and forwarded by our controller.
package org.example.rest;


import com.github.tomakehurst.wiremock.junit.WireMockRule;

import com.sap.cloud.sdk.cloudplatform.servlet.RequestContextExecutor;

import com.sap.cloud.sdk.testutil.MockUtil;

import org.apache.commons.io.Charsets;

import org.apache.commons.io.IOUtils;

import org.junit.Before;

import org.junit.BeforeClass;

import org.junit.Rule;

import org.junit.Test;

import org.junit.runner.RunWith;

import org.springframework.beans.factory.annotation.Autowired;

import org.springframework.boot.test.autoconfigure.web.servlet.WebMvcTest;

import org.springframework.test.context.junit4.SpringRunner;

import org.springframework.test.web.servlet.MockMvc;

import org.springframework.test.web.servlet.request.MockMvcRequestBuilders;


import java.io.IOException;

import java.net.URI;


import static com.github.tomakehurst.wiremock.client.WireMock.*;

import static com.github.tomakehurst.wiremock.core.WireMockConfiguration.wireMockConfig;

import static java.lang.Thread.currentThread;

import static org.springframework.test.web.servlet.result.MockMvcResultMatchers.content;

import static org.springframework.test.web.servlet.result.MockMvcResultMatchers.status;


@RunWith( SpringRunner.class )

@WebMvcTest

public class MonitoringControllerLocalTest

{

    private static final String TEST_API_BASE_PATH = "/monitoring/v2";

    private static final String TEST_SCP_ACCOUNT_ID = "d012345trial";

    private static final String TEST_SCP_APPLICATION = "sampleapp";


    private static final MockUtil mockUtil = new MockUtil();


    @Rule

    public final WireMockRule wireMockServer = new WireMockRule(wireMockConfig().dynamicPort());


    @Autowired

    private MockMvc mvc;


    private static String TEST_API_RESPONSE;


    @BeforeClass

    public static void beforeClass() throws IOException {

        mockUtil.mockDefaults();


        // load expected response from mocked API service

        TEST_API_RESPONSE = IOUtils.toString(currentThread().getContextClassLoader().getResourceAsStream("mocked_monitoring_response.json"), Charsets.UTF_8);

    }


    @Before

    public void mockServerResponses() {

        stubFor(

            get(urlPathMatching(TEST_API_BASE_PATH + "/accounts/(\\w+)/apps/(\\w+)/metrics"))

                .willReturn(okJson(TEST_API_RESPONSE)));

    }


    @Test

    public void testMonitor() throws Exception

    {

        final URI apiUrl = new URI(wireMockServer.baseUrl() + "/" + TEST_API_BASE_PATH);

        mockUtil.mockDestination(MonitoringDestination.DESTINATION_NAME, apiUrl, null);


        new RequestContextExecutor().execute(() -> {

            mvc.perform(MockMvcRequestBuilders.get("/monitor").param("account", TEST_SCP_ACCOUNT_ID).param("app", TEST_SCP_APPLICATION))

                .andExpect(status().isOk())

                .andExpect(content().json("{\"monitor\":"+TEST_API_RESPONSE+"}"));

        });

    }

}
Note: You can easily modify the chain of.andExpect(...)statements to improve test assertions.
During the test the following things happen:
- Since the test is run with
SpringRunnerand annotated with@WebMvcTestwe can use the autowiredMockMvcinstance to directly call our controller. - Our controller makes an HTTP request to the mock server with
GET /monitoring/v2/accounts/d012345trial/apps/sample-application/metrics
- The controller response is checked for an HTTP status 200 and the correct JSON content.
- For the sake of simplicity we omit authorization checks at the current stage.
Run the test. - Since the test is run with
Your integration-test module now contains a mock server test:

Step 7: Obtain credentials from SCP Neo
In case you don't already have credentials to access a monitoring API with, you can simply create them yourself on SCP Neo.
- Use the SAP Cloud Platform Cockpit, to go to your account. In the left navigation, click on
Services. In category DevOps make sure Monitoring is active.
- In the navigation, open
Security > OAuth. In the content frame, find the Token Endpoint, note it down - you will need this in the next step.
- Next, change to the tab labeled
Platform API.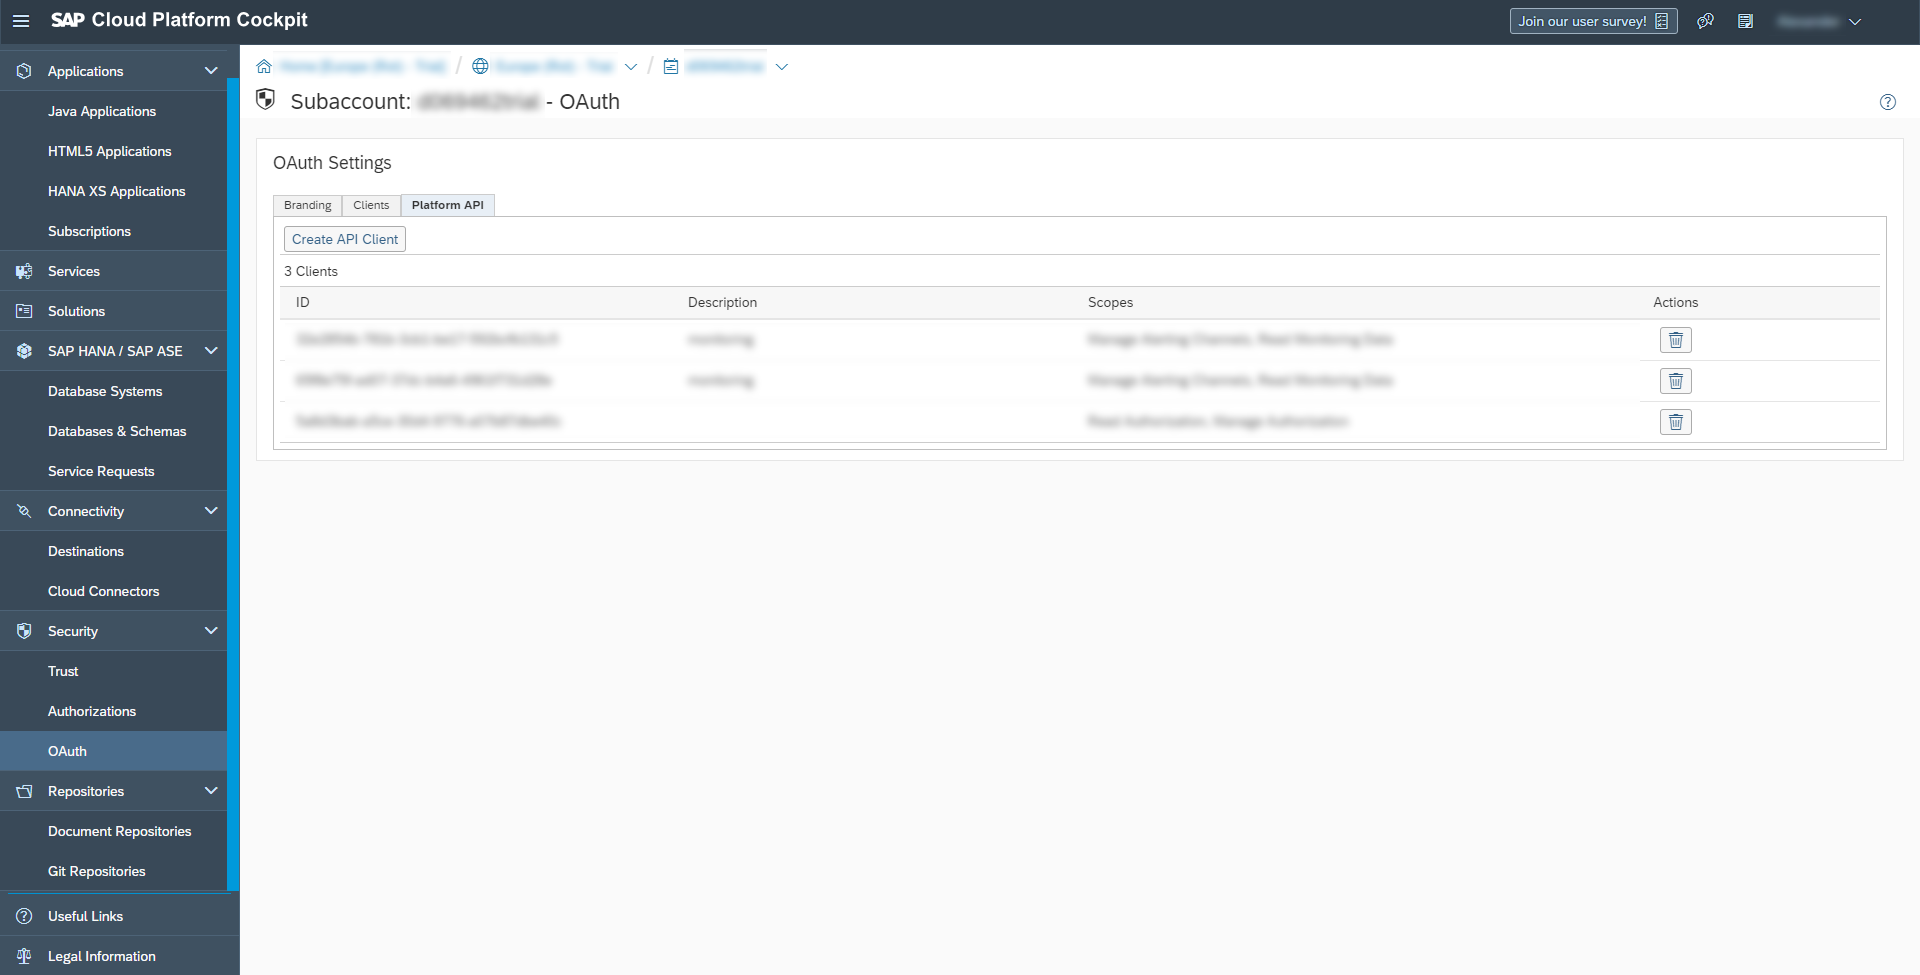
- Click the Button Create API Client. Enter a description and select the Monitoring Service checkbox.

- Note down the Client ID and Client Secret. You will need them during the destination configuration.

Step 8: Prepare configuration on SCP Cloud Foundry
Open the SCP Cockpit and navigate to your Cloud Foundry account.
- Ensure service bindings
Open the current account space, which your application is going to be uploaded to. Here, in the navigation on the left, under Services, click on Service Instances. Make sure you have an instance running for both services,xsuaaanddestination. For the sake of this guide, let's assume thexsuaaservice instance is called"myxsuaa"and thedestinationservice instance is called"mydestination".In case you are missing a service instance, go to Service Marketplace and setup it up. Forxsuaa, the recommended service plan is application. Fordestinationit is lite. - Add the destination
Leave the space, back to your Cloud Foundry account. In the navigation, under Connectivity click Destination, Click the button New Destination. Enter the Monitoring service destination values:
- Name:
MonitoringEndpointJust like described in your Java application, as fieldMonitoringDestination.DESTINATION_NAME - Type:
HTTP - URL:
https://api.[domain].ondemand.com/monitoring/v2/Enter the correct sub domain, depending on your landscape. You can find a list of supported URLs on the Service API page. - Proxy Type:
Internet - Authentication:
OAuth2ClientCredentials - Client ID + Token Service User: (Client ID from the previous step)
- Client Secret + Token Service Password: (Client Secret from previous step)
- Token Service URL: (Token Endpoint from previous step)

Note: While Monitoring v2 has only one pair of credentials, other services may distinguish between Token Service User and Client ID. - Name:
You are done with the setup on SCP Cloud Foundry.
Step 9: Deploy application
- Run a complete Maven build with your project:
mvn clean install
All tests will be executed to make sure your application is working as expected. - Open the
manifest.yml
Change the YAML such that XSUAA and destination services instance are bound upon application initialization. Add the following entries to the list of services:
services:

  - myxsuaa

  - mydestination
Note: This may differ from your file, in case the service instances were named differently. - In the command prompt run the following statement with the Cloud Foundry commandline interface: For information on how to use the
cftool, please find the starter tutorial for applications on Cloud Foundry with the SAP Cloud SDK.
cf push

Note down the logged entry inurlsabove.
Step 10: Test
- Open the application URL. You will be greeted with the default landing page.
 Enter the following path.
/monitor?account=D123456&app=sampleapp
Replace the wildcards for the request parameters. Foraccountenter the (sub) account Id for which the monitored application is running. Enter the application name forapp.
You should see the successful response from your application.

Congratulation!
You successfully consumed a service API from SCP Neo with an application on SCP Cloud Foundry, with the help of code generation and SAP Cloud SDK.
- SAP Managed Tags:
- SAP Cloud SDK,
- SAP Business Accelerator Hub
Labels:
21 Comments
You must be a registered user to add a comment. If you've already registered, sign in. Otherwise, register and sign in.
Labels in this area
-
ABAP CDS Views - CDC (Change Data Capture)
2 -
AI
1 -
Analyze Workload Data
1 -
BTP
1 -
Business and IT Integration
2 -
Business application stu
1 -
Business Technology Platform
1 -
Business Trends
1,661 -
Business Trends
87 -
CAP
1 -
cf
1 -
Cloud Foundry
1 -
Confluent
1 -
Customer COE Basics and Fundamentals
1 -
Customer COE Latest and Greatest
3 -
Customer Data Browser app
1 -
Data Analysis Tool
1 -
data migration
1 -
data transfer
1 -
Datasphere
2 -
Event Information
1,400 -
Event Information
64 -
Expert
1 -
Expert Insights
178 -
Expert Insights
273 -
General
1 -
Google cloud
1 -
Google Next'24
1 -
Kafka
1 -
Life at SAP
784 -
Life at SAP
11 -
Migrate your Data App
1 -
MTA
1 -
Network Performance Analysis
1 -
NodeJS
1 -
PDF
1 -
POC
1 -
Product Updates
4,577 -
Product Updates
324 -
Replication Flow
1 -
RisewithSAP
1 -
SAP BTP
1 -
SAP BTP Cloud Foundry
1 -
SAP Cloud ALM
1 -
SAP Cloud Application Programming Model
1 -
SAP Datasphere
2 -
SAP S4HANA Cloud
1 -
SAP S4HANA Migration Cockpit
1 -
Technology Updates
6,886 -
Technology Updates
402 -
Workload Fluctuations
1
Related Content
- Annotation in SEGW in Technology Q&A
- Developer extendibility for custom table and publish oDATA in Technology Q&A
- Consuming SAP with SAP Build Apps - Connectivity options for low-code development - part 2 in Technology Blogs by SAP
- Unlocking Full-Stack Potential using SAP build code - Part 1 in Technology Blogs by Members
- Consuming CAPM Application's OData service into SAP Fiori Application in Business Application Studio in Technology Blogs by Members
Top kudoed authors
| User | Count |
|---|---|
| 12 | |
| 9 | |
| 8 | |
| 7 | |
| 7 | |
| 6 | |
| 6 | |
| 6 | |
| 6 | |
| 4 |