
- SAP Community
- Products and Technology
- CRM and Customer Experience
- CRM and CX Blogs by SAP
- SAP Marketing Cloud: How to create a Facebook App ...
CRM and CX Blogs by SAP
Stay up-to-date on the latest developments and product news about intelligent customer experience and CRM technologies through blog posts from SAP experts.
Turn on suggestions
Auto-suggest helps you quickly narrow down your search results by suggesting possible matches as you type.
Showing results for
Employee
Options
- Subscribe to RSS Feed
- Mark as New
- Mark as Read
- Bookmark
- Subscribe
- Printer Friendly Page
- Report Inappropriate Content
03-15-2019
8:46 AM
Introduction
SAP Marketing Cloud offers two integration scenarios with Facebook.
- Facebook Page Integration
- Facebook Campaign and Custom Audience Integration
Disclaimer: “The Facebook user interface has changed, and the instructions below are no longer accurate. For more information on how to create a Facebook app, refer to the Facebook documentation Create an App - Meta App Development (facebook.com).”
This blog post focuses on the Facebook App creation to enable the second scenario, Facebook Campaign and Custom Audience Integration.
With the integration you have the possibility to use your SAP Marketing Cloud Target Groups (custom audience) on Facebook including Instagram and the Facebook Audience Network. With SAP Marketing Cloud you can plan, execute and analyze the performance of your Facebook campaigns.
Upfront I kindly refer to the application help and the SAP Marketing Cloud Integration Guide, which contains all important information and is updated regularly.
Disclaimer: SAP has no impact on the Facebook App review or the app review process itself. Facebook has always the right to reject Facebook Apps without any reason.
The goal of this blog is to create a Facebook App which can be used for the SAP Marketing Cloud - Facebook Campaign and Custom Audience Integration.
For productive usage of the Facebook App, your app must be live, and the following permissions must be approved:
Facebook Login
Ads_management (Standard Access)
For further details see the SAP Marketing Cloud Integration Guide
To get started, get a rough understanding of the Facebook App, Facebook App review, Facebook App Access Levels and the Marketing API sample submission.
Facebook App Creation for SAP Marketing Cloud - Facebook Campaign
Remark:
- Be aware that the App creation process is a snapshot taken in March 2019. Facebook can always change the process.
- The SAP Marketing Cloud integration is a Server-to-Server App: https://developers.facebook.com/docs/apps/review/server-to-server-apps/
- A Business Verification is necessary to get the ads management standard access
- The best source on a how to configure SAP Marketing Cloud is the SAP Marketing Cloud Integration Guide
In the example the SAP Marketing Cloud URL is used. Replace it with your personal SAP Marketing Cloud URL.
Example SAP Marketing Cloud URL: http://my300011.s4hana.ondemand.com/
The following artifacts are needed for the Facebook App:
- Company logo
- Data Privacy URL
- SAP Marketing Cloud URL
- Redirect URI of SAP Marketing Cloud URL (see Integration Guide)
Step 1 - Create a new Facebook App:
Go to https://developers.facebook.com/apps/ and create a new Facebook App by pressing"Add a New App”.

Image 1: Add a new Facebook App
Select "Implement Marketing API”, this will add the "Marketing API" and automatically the "Facebook Login" products to your app.

Image 2: Implement Marketing API
The Facebook Login and Marketing API products are added to your app.
Remark: Grey check marks means these Facebook APIs are not yet approved. A green check mark means approved.

Image 3: Facebook App Settings (Basic and Advanced)
Step 2 - Do Basic and Advanced App Settings:
A) Basic Settings
- Add app icon
- Add privacy URL
- Add app domains: use the hostname of your SAP Marketing Cloud Tenant (without https://)
- Select business use: Choose "support my own business"
- Select category: Choose "Business and Pages"
- Add contact email address
Remark: The App ID and App secret is needed to configure the Facebook Integration in SAP Marketing Cloud
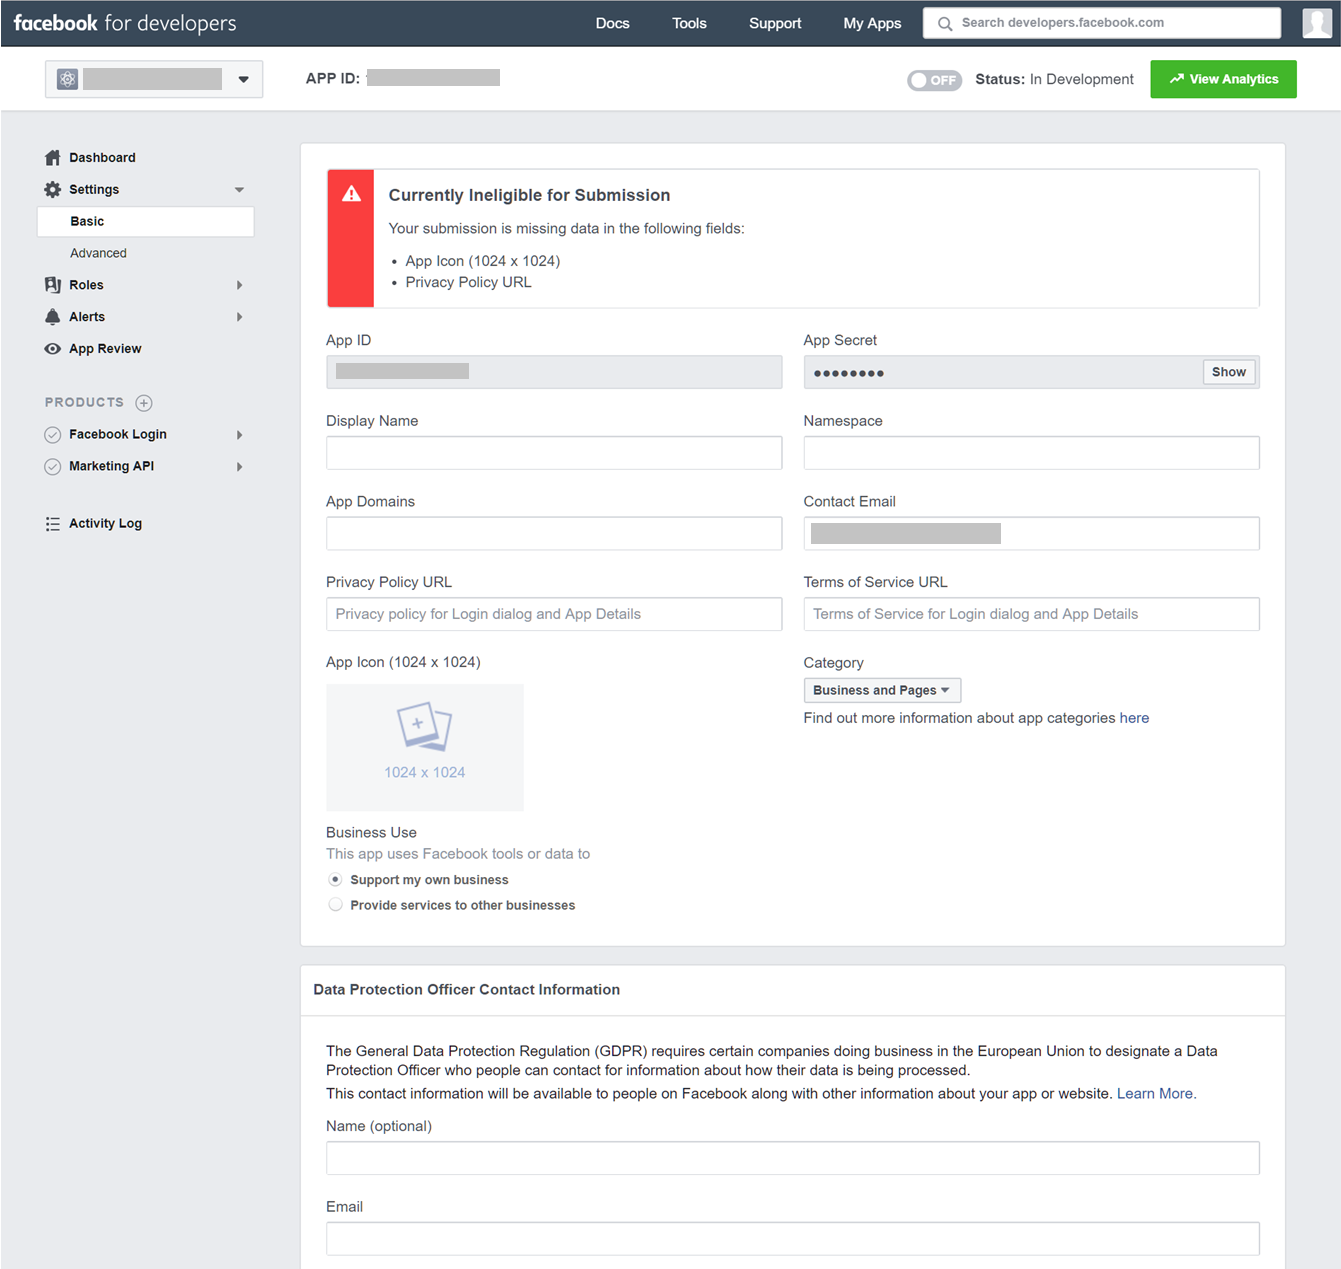
Image 4: Basic Settings including App ID and App secret
B) Advanced Settings:
- Go to Settings section “Advanced Settings”
- Turn off "Social Discovery" (not needed)
- Add your Business Manager
- Add Marketing Cloud URL to the Domain Manager section
- Go to the Domain Manager section
- Add the URL your Marketing Cloud
- Click Add Domain: URL: http://my300011.s4hana.ondemand.com/
- Choose Exact Match
- Prefetch Setting: use the defaults: HTML, JavaScript and CSS
- Click Apply

Image 5: Advanced Settings, turn off "Social Discovery"

Image 6: Domain Manager, add your SAP Marketing Cloud as a Domain

Image 7: SAP Marketing Cloud Domain Settings
Step 3 - Set up Facebook Login
- Go to Facebook Login section “Settings” and choose:
- Client OAuth Login: Yes
- Web OAuth Login: Yes
- Enforce HTTPS: Yes (default)
- Force Web OAuth Reauthentication: No
- Embedded Browser OAuth Login: No
- Use strict Mode for Redirect URIs: Yes
- In the section “Valid OAuth Redirect URIs” enter the redirect URI of your SAP Marketing Cloud as described in the SAP Marketing Cloud Integration Guide
- Go to Facebook Login section “Quickstart”
- Choose “Web” as platform
- Enter your companies site URL
- Save your changes
- Check the settings in the screenshot below – your settings should match

Image 8: Facebook Login Settings

Image 9: Facebook Login Quickstart, choose Web as Platform and add Site URL
Step 4 - Set Up Marketing API:
- Go to Marketing API section “Settings”
- Choose your Business Manager
- Add "Ads Management Standard Access" to your app review submission
Remark: You can already set up the Communication Arrangement in SAP Marketing Cloud and test with the Facebook user and ad account associated with the app.

Image 10: Marketing API Settings
Step 5 - Set Up Communication Arrangement in SAP Marketing Cloud:
For the next steps you need a working integration, for example, to create a video.
For details see the SAP Marketing Cloud Integration Guide
Step 6 - Produce a video:
You must provide a video for the Facebook Login permission and a video for the Ads_management (Standard Access) permission.
Facebook provides an example video on the Marketing API sample submission page.
For the Facebook Login permission video, you can show the creation of a Facebook campaign and then trigger the user authentication flow to Facebook by pressing the "authenticate button" in the campaign designer UI.
For the login video it is important to show that the login uses your Facebook App.
For the Ads_management permission video, you can show the campaign creation, performance tab with analytics, including charts and various drilldowns. You can use the CSV upload to add data to your Facebook campaign in case you do not have a real example of a Facebook campaign yet.
Remark: Be aware that SAP can't produce such videos for you because the video must show your new app.
Step 7 - Test the App
Test your app to increase the successful calls of the app to the Facebook API – for example, create campaigns
Step 8 - App Live Mode
Turn on live mode. For further details see the Facebook documentation on switching on live mode.
Remark: Once the app is set to live, the unapproved permissions for Ads_management and login will disappear. This means the app can't be used to create a campaign (ad account retrieval will fail). Also, in the graph API console this access is missing.
Once APIs are approved, everything will work again.
Step 9 - Submit your app for review
Sumbmit the App for review.
Remark: To use your App productively you need the following permissions approved:
- Facebook Login
- Ads_management (Standard Access)
You can use the following text for your app submission:
Hello Facebook,


we are using SAP Marketing Cloud and would like to create Facebook campaigns and transfer custom audiences with SAP Marketing Cloud to Facebook. Campaigns and custom audiences are used for advertising.


Details: https://help.sap.com/viewer/b88f770e4b7c4ecead5477e7a6c7b8f7/LATEST/en-US/7d6b9556027ed75fe10000000a...


SAP Marketing Cloud is a marketing suite offered by SAP and is a server-to-server app:


https://developers.facebook.com/docs/apps/review/server-to-server-apps/


The Facebook login is necessary to fetch a user access token to access the Marketing API (Ads_management permission).


Thank you for your approval.


With best regards


--- Your Name Here ---


1) Logon to SAP Marketing Cloud


2) Open SAP Marketing Cloud Campaigns app


3) Create a new campaign


4) Click Authenticate


5) OAuth 2.0 login flow starts with Facebook


For details see uploaded screencast.
Image 11: Facebook review submission

Image 12: Submit Facebook App for review
Remark: The Business Verification is a prerequisite of the Ads Management Standard Access.

Image 13: Business Verification
Remark: It might be that Facebook Login or Marketing API permissions get approved independently. See intermediate result below: Facebook Login permission is approved (green check mark), ads management permission is still pending (grey check mark)

Image 14: Intermediate result, Facebook Login approved, Marketing API pending
Submit approval for Marketing API: Ads Management Standard Access

Image 15: Ads Management Standard Access submission

Image 15: Ads Management Standard Access submission approval form
Final Result - Approved Facebook App
Once both APIs are approved your app should look like this:

Image 16: Facebook Login and Marketing API approved
Step 10 - Test the integration
Test your app with business users.
Summary
This blog showed how to create a Facebook App including approval for SAP Marketing Cloud.
Did you have any issues with the integration?
Have a look at the Facebook troubleshooting consulting note.
Further readings
- SAP Marketing Cloud Integration Guide
- Facebook Marketing API sample submission
- Facebook App, Facebook App review
- Facebook App Access Levels
- Facebook troubleshooting consulting note
Best regards
Michael
- SAP Managed Tags:
- SAP Marketing Cloud
Labels:
24 Comments
You must be a registered user to add a comment. If you've already registered, sign in. Otherwise, register and sign in.
Labels in this area
-
Business Trends
270 -
Business Trends
10 -
chitchat
1 -
customerexperience
1 -
Event Information
256 -
Event Information
17 -
Expert Insights
30 -
Expert Insights
48 -
Life at SAP
133 -
Life at SAP
1 -
Product Updates
666 -
Product Updates
24 -
SAP HANA Service
1 -
SAPHANACloud
1 -
SAPHANAService
1 -
Technology Updates
453 -
Technology Updates
15
Related Content
- SAP Commerce Cloud Q1 ‘24 Release Highlights in CRM and CX Blogs by SAP
- SAP Inside Track 2024 – Bangalore – February 17 !!My experience as a Speaker in CRM and CX Blogs by Members
- New Learning Journey - Implement an Integration of SAP S/4HANA Cloud with SAP Commerce Cloud in CRM and CX Blogs by SAP
- Campaign Build - Segmentation Best Practice in CRM and CX Blogs by SAP
- Introduction to Permission Marketing in CRM and CX Blogs by SAP
Top kudoed authors
| User | Count |
|---|---|
| 4 | |
| 2 | |
| 2 | |
| 2 | |
| 1 | |
| 1 | |
| 1 | |
| 1 | |
| 1 | |
| 1 |