
- SAP Community
- Products and Technology
- Technology
- Technology Blogs by SAP
- SAP Process Integration Test Tool (PIT) - Create a...
Technology Blogs by SAP
Learn how to extend and personalize SAP applications. Follow the SAP technology blog for insights into SAP BTP, ABAP, SAP Analytics Cloud, SAP HANA, and more.
Turn on suggestions
Auto-suggest helps you quickly narrow down your search results by suggesting possible matches as you type.
Showing results for
Advisor
Options
- Subscribe to RSS Feed
- Mark as New
- Mark as Read
- Bookmark
- Subscribe
- Printer Friendly Page
- Report Inappropriate Content
03-12-2019
12:27 PM
In this blog I will show you how to create and execute a test case from end-to-end using the new SAP Process Integration Test Tool (PIT) that we have shipped with SAP Process Orchestration 7.5 SP14. See also the announcement about the PIT Tool in the Process Integration Test Tool shipped with sap process orchestration blog.
I take it that you have gone through the SAP Process Integration Test Tool (PIT) - First Steps blog where I explained the basis configuration, i.e., all configuration steps to setup the PIT tool itself and the connected systems.
After the basic configuration has been done – all systems are ready and maintained on the PIT Tool – you can start with creating a test case.
The Test Cases will be created in the Test Case browser of the NWDS. The test cases are visible and usable for all developers because the data is stored on the server. Test cases can be created by users with role SAP_PIT_TEST_DEVELOPER.
In the Create New test Case wizard you have to choose the configuration objects that describe your scenario you want to test. This object has to be the same on all tested systems.
Our test case has as source a classic Configuration from a PI Dual Stack System and as target an Integrated Configuration Object (ICO) on a PO system.
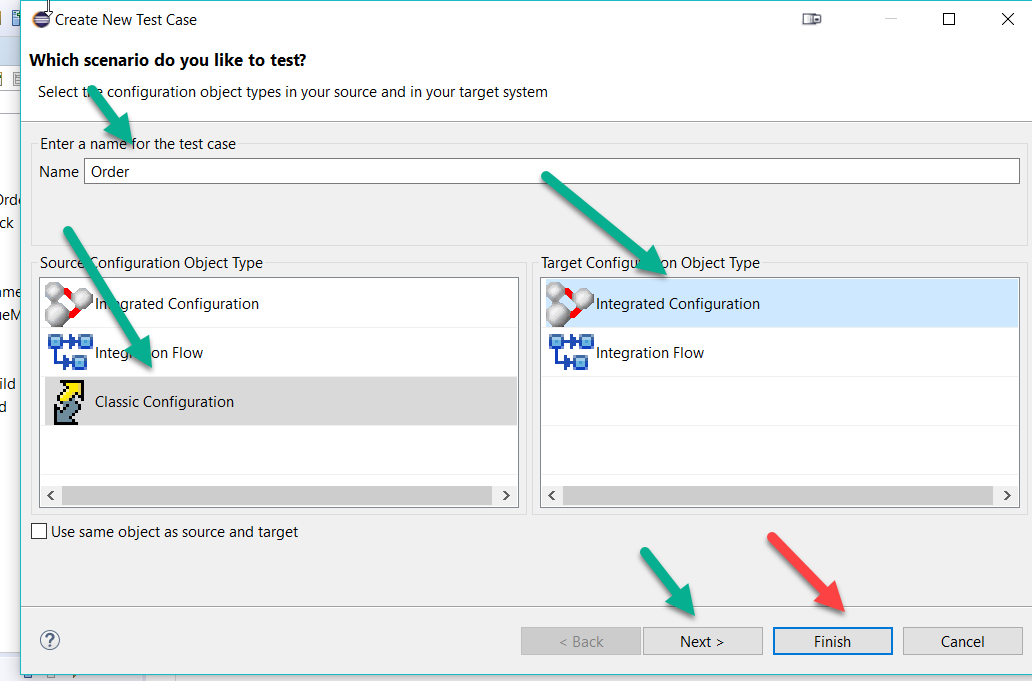
You have the possibility to select the check box – Use same object as source and target – if source and target objects are the same. This is the case for instance when you run regression tests. This feature is only supported if the scenario belongs to a PO or PI-AEX system, i.e., in case of ICOs or Integration Flows. You can select only the Sources configuration or only the test case name and jump to the editor by clicking the finish button.
If you stay in the wizard – you can now Select the configuration objects for both the source and the target. In case of identical objects, you only need to select the object once.


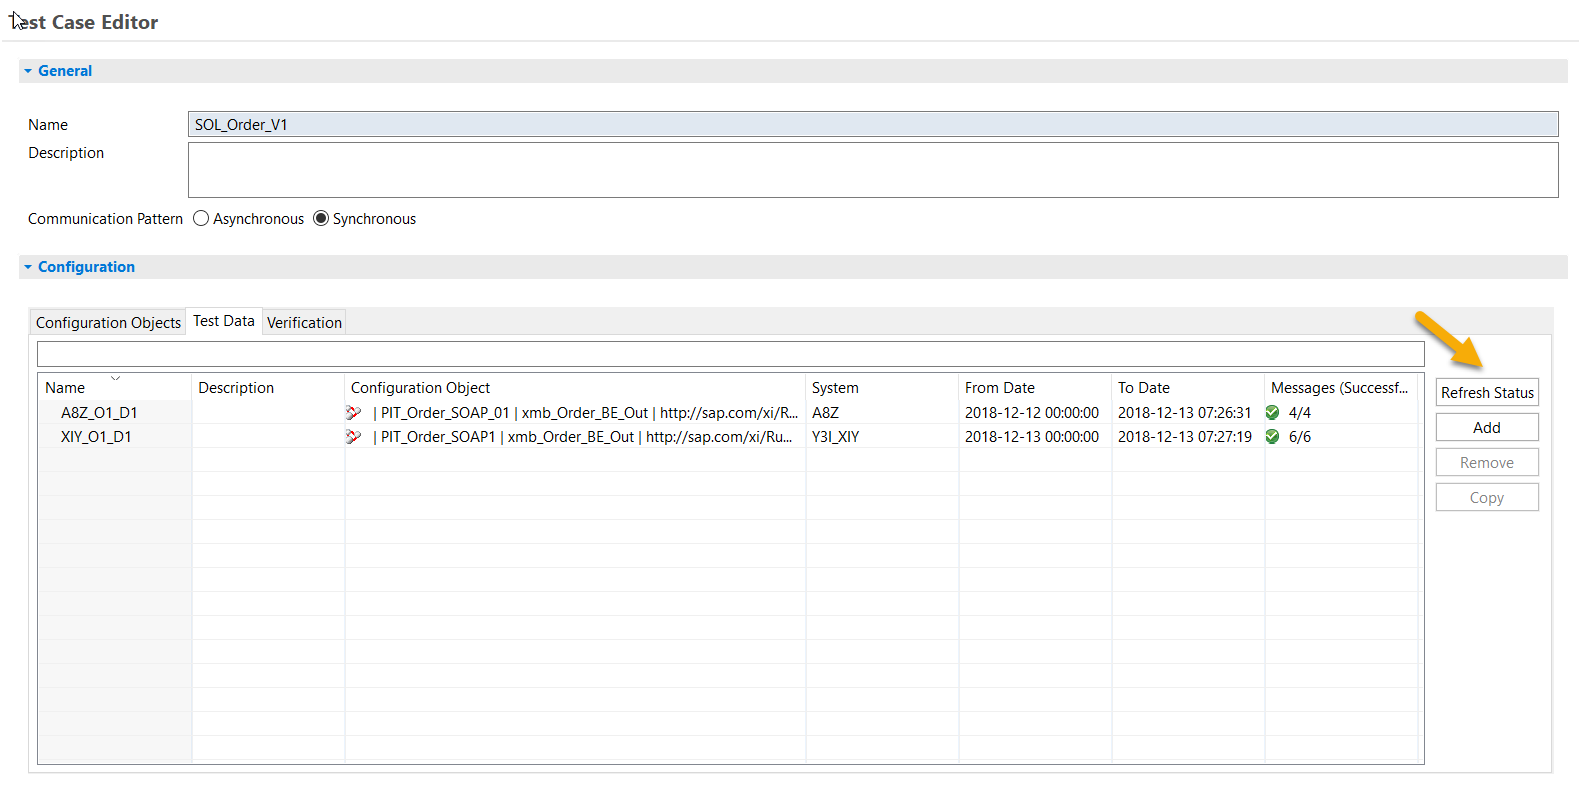
Additional configuration objects can be added directly in the editor. There are also the possibility to mark the configuration as source and/or target. Please check if the Communication Pattern - asynchronous or synchronous is set the right way. The Is Sensitive check box is by now for information only. With the first version we have not secured personal sensitive data within the tool yet. This is planned for future shipments. Currently, you have to take care about this data by yourself.

To get the Test data from source systems stored into the PIT database, you have to add a new test data set definition. Please have in your mind that only successfully processed messages with all 3 log levels (BI, MS, AM) in Java or the logging enabled for both synchronous and asynchronous messages in Abap System can be used for the tests.
First you have to define a time frame for the message extraction.

Now you have the possibility to directly finish the wizard …
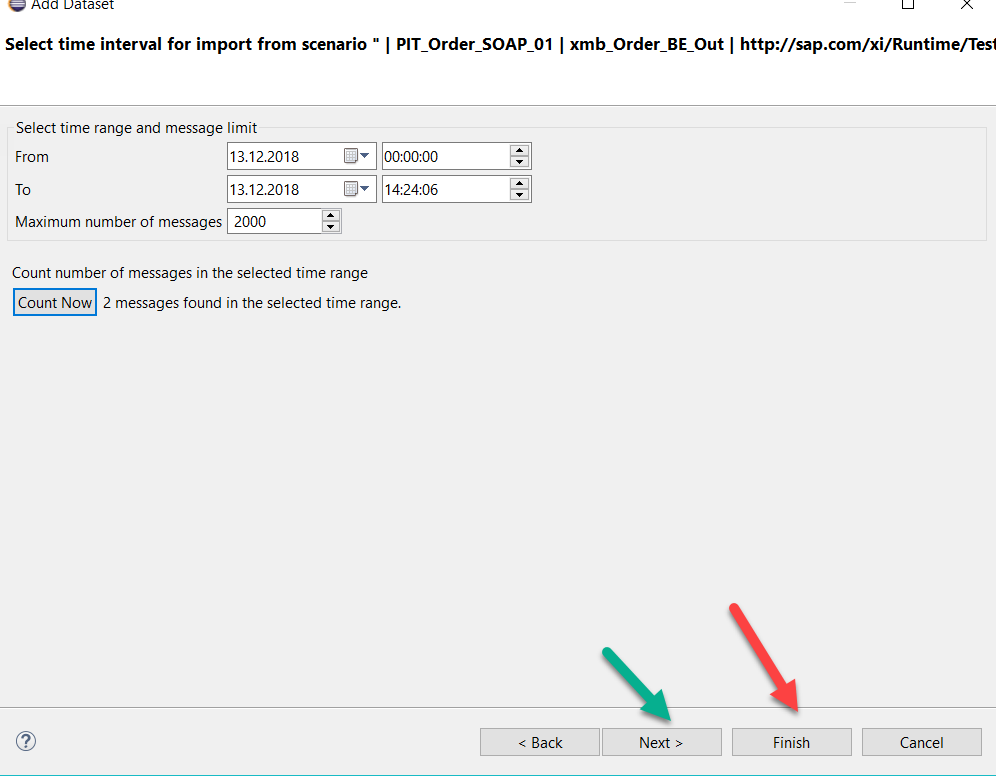
… or re-fine the selection by further restricting to selected message IDs.

Choose which parts shall be executed during verification. The default is that all steps are executed. But it is possible to deselect steps. For each step you can define exemption from comparison. That means, if you know upfront that a particular value will be always different, you can exclude it from validation.

To be able to execute a test run, you first have to create a run configuration. Run configurations are stored per user locally on his/her client instance. That means they are visible and usable only for this user. In the run configuration, select the test case and a test data set, then click on Apply, and finally run the job. By default, the Stop message before delivering to receiver flag is set. This way, we ensure that test data won’t be sent to the receiver.


All long running activities like extraction of test data, execution of a test run and verification of the result are executed as background jobs on the server.
The jobs will be executed by periodical run of the JobHandlerJob on the PIT server (JobHandlerJob can be scheduled via CTC)
The job browser shows an overview over all executed jobs. You can show a job log for a particular job or change the filter, which jobs you would like to see.

Verification can be triggered by right mouse click on the execution job and selecting "Launch verification" This run can be launched more than one time - e.g. if you need to define a new exemption after the first run.

To display the verification results select verification job in the job browser and trigger "Show verification results"

This will show you the verification results in the upper screen. On the overview tab, the overall number of processed messages and the number of verification errors are displayed. On the next tab, a list of all messages are displayed with the number of errors for each message. On the Error Overview tab, you see an overview of the type of errors and where they actually occurred. We distinguish here between structural errors, differences in the payload, in the header or message attachments. If you double click on either of the messages you get the difference detail of the very message displayed.
The verification will be done for the pipeline step only - even if you have decided to run the message thru the Receiver Adapters.


For more information - please take also a look at the SAP Help.
With this you should be able to create your own test cases in order to automate your integration scenario tests.
I take it that you have gone through the SAP Process Integration Test Tool (PIT) - First Steps blog where I explained the basis configuration, i.e., all configuration steps to setup the PIT tool itself and the connected systems.
After the basic configuration has been done – all systems are ready and maintained on the PIT Tool – you can start with creating a test case.
Create a Test Case
The Test Cases will be created in the Test Case browser of the NWDS. The test cases are visible and usable for all developers because the data is stored on the server. Test cases can be created by users with role SAP_PIT_TEST_DEVELOPER.
In the Create New test Case wizard you have to choose the configuration objects that describe your scenario you want to test. This object has to be the same on all tested systems.
Our test case has as source a classic Configuration from a PI Dual Stack System and as target an Integrated Configuration Object (ICO) on a PO system.
You have the possibility to select the check box – Use same object as source and target – if source and target objects are the same. This is the case for instance when you run regression tests. This feature is only supported if the scenario belongs to a PO or PI-AEX system, i.e., in case of ICOs or Integration Flows. You can select only the Sources configuration or only the test case name and jump to the editor by clicking the finish button.
If you stay in the wizard – you can now Select the configuration objects for both the source and the target. In case of identical objects, you only need to select the object once.
Additional configuration objects can be added directly in the editor. There are also the possibility to mark the configuration as source and/or target. Please check if the Communication Pattern - asynchronous or synchronous is set the right way. The Is Sensitive check box is by now for information only. With the first version we have not secured personal sensitive data within the tool yet. This is planned for future shipments. Currently, you have to take care about this data by yourself.
Fetch a Test Data Set
To get the Test data from source systems stored into the PIT database, you have to add a new test data set definition. Please have in your mind that only successfully processed messages with all 3 log levels (BI, MS, AM) in Java or the logging enabled for both synchronous and asynchronous messages in Abap System can be used for the tests.
First you have to define a time frame for the message extraction.
Now you have the possibility to directly finish the wizard …
… or re-fine the selection by further restricting to selected message IDs.
Define verification steps and exemptions
Choose which parts shall be executed during verification. The default is that all steps are executed. But it is possible to deselect steps. For each step you can define exemption from comparison. That means, if you know upfront that a particular value will be always different, you can exclude it from validation.
Execute test run
To be able to execute a test run, you first have to create a run configuration. Run configurations are stored per user locally on his/her client instance. That means they are visible and usable only for this user. In the run configuration, select the test case and a test data set, then click on Apply, and finally run the job. By default, the Stop message before delivering to receiver flag is set. This way, we ensure that test data won’t be sent to the receiver.
Job Browser
All long running activities like extraction of test data, execution of a test run and verification of the result are executed as background jobs on the server.
The jobs will be executed by periodical run of the JobHandlerJob on the PIT server (JobHandlerJob can be scheduled via CTC)
The job browser shows an overview over all executed jobs. You can show a job log for a particular job or change the filter, which jobs you would like to see.
Trigger verification run
Verification can be triggered by right mouse click on the execution job and selecting "Launch verification" This run can be launched more than one time - e.g. if you need to define a new exemption after the first run.
Show verification results
To display the verification results select verification job in the job browser and trigger "Show verification results"
This will show you the verification results in the upper screen. On the overview tab, the overall number of processed messages and the number of verification errors are displayed. On the next tab, a list of all messages are displayed with the number of errors for each message. On the Error Overview tab, you see an overview of the type of errors and where they actually occurred. We distinguish here between structural errors, differences in the payload, in the header or message attachments. If you double click on either of the messages you get the difference detail of the very message displayed.
The verification will be done for the pipeline step only - even if you have decided to run the message thru the Receiver Adapters.
For more information - please take also a look at the SAP Help.
With this you should be able to create your own test cases in order to automate your integration scenario tests.
- SAP Managed Tags:
- SAP Process Orchestration
Labels:
18 Comments
You must be a registered user to add a comment. If you've already registered, sign in. Otherwise, register and sign in.
Labels in this area
-
ABAP CDS Views - CDC (Change Data Capture)
2 -
AI
1 -
Analyze Workload Data
1 -
BTP
1 -
Business and IT Integration
2 -
Business application stu
1 -
Business Technology Platform
1 -
Business Trends
1,661 -
Business Trends
86 -
CAP
1 -
cf
1 -
Cloud Foundry
1 -
Confluent
1 -
Customer COE Basics and Fundamentals
1 -
Customer COE Latest and Greatest
3 -
Customer Data Browser app
1 -
Data Analysis Tool
1 -
data migration
1 -
data transfer
1 -
Datasphere
2 -
Event Information
1,400 -
Event Information
64 -
Expert
1 -
Expert Insights
178 -
Expert Insights
270 -
General
1 -
Google cloud
1 -
Google Next'24
1 -
Kafka
1 -
Life at SAP
784 -
Life at SAP
11 -
Migrate your Data App
1 -
MTA
1 -
Network Performance Analysis
1 -
NodeJS
1 -
PDF
1 -
POC
1 -
Product Updates
4,578 -
Product Updates
323 -
Replication Flow
1 -
RisewithSAP
1 -
SAP BTP
1 -
SAP BTP Cloud Foundry
1 -
SAP Cloud ALM
1 -
SAP Cloud Application Programming Model
1 -
SAP Datasphere
2 -
SAP S4HANA Cloud
1 -
SAP S4HANA Migration Cockpit
1 -
Technology Updates
6,886 -
Technology Updates
395 -
Workload Fluctuations
1
Related Content
- Top Picks: Innovations Highlights from SAP Business Technology Platform (Q1/2024) in Technology Blogs by SAP
- Transferring of Data between Enhancements using Singleton Class in Technology Q&A
- It has never been easier to print from SAP with Microsoft Universal Print in Technology Blogs by Members
- Unlocking Full-Stack Potential using SAP build code - Part 1 in Technology Blogs by Members
- Upload Excel using SAP RAP Only in Technology Blogs by Members
Top kudoed authors
| User | Count |
|---|---|
| 11 | |
| 10 | |
| 10 | |
| 10 | |
| 8 | |
| 7 | |
| 7 | |
| 7 | |
| 7 | |
| 6 |