
- SAP Community
- Products and Technology
- Technology
- Technology Blogs by SAP
- Creating Custom Buildpacks
Technology Blogs by SAP
Learn how to extend and personalize SAP applications. Follow the SAP technology blog for insights into SAP BTP, ABAP, SAP Analytics Cloud, SAP HANA, and more.
Turn on suggestions
Auto-suggest helps you quickly narrow down your search results by suggesting possible matches as you type.
Showing results for
Product and Topic Expert
Options
- Subscribe to RSS Feed
- Mark as New
- Mark as Read
- Bookmark
- Subscribe
- Printer Friendly Page
- Report Inappropriate Content
02-27-2019
4:57 PM

I'll be going though the procedure for a Pyhton Buildpack (in reference to my blog on Python depending on NumPy ). That's why you will be seen python as a prerequisite.
I have not tested this procedure for other buildpacks (such as Java) but I assume you can trace the same steps adapting the same files like I did.
Also, it is good to note that this is a completely different approach than the one described on buildpack.io - which is based on pack and build utilities on top of a docker image.
Talking about docker, I'd not recommend either docker nor WSL (Windows Subsystem for Linux) in case you intend on debugging go scripts. It sounds like a good idea but it will bring too much complexity to the table (in case you wanted to use docker). To add to this it is not even compatible with WSL (at least with the Windows build version I have). It might work on later Windows 10 build versions, but I couldn't test it yet.
So, without further delay, let's see what I've done to build this custom buildpack.
In order to proceed, here is my current setup:
Host Machine:
- Windows 10 build 1709
Buildpack Machine:
- Linux Ubuntu 18.10
Prerequisites
- go-language => 1.11.5
- python3
- git
- cf CLI
- Lib Buildpack
Installation
Installing the pre-requisites
Download and install cf CLI for Linux here.
Download and install go-language for Linux here.
Download and install python 3.6 using:
$ sudo apt install python3After you've installed these tools you should have the following versions installed:
$ python3 --version

Python 3.6.7

$ git version

git version 2.19.1

$ cf version

cf version 6.43.0+815ea2f3d.2019-02-20

$ go version

go version go1.11.5 linux/amd64

$ gcc --version

gcc (Ubuntu 8.2.0-7ubuntu1) 8.2.0
Add the following environment variables to your .bashrc or .profile in your home directory:
export GOPATH=$HOME/go

export GOROOT=/usr/local/go

export PATH=$PATH:$GOPATH/bin:$GOROOT/bin
Libbuildpack
Install this library by issuing the following go commands via CMD:
$ cd $HOME

$ go get -u -v github.com/cloudfoundry/libbuildpack

$ go get -u -v github.com/google/subcommands

$ go get -u -v github.com/go-delve/delve/cmd/dlv

$ cd $GOPATH/src/github.com/cloudfoundry/libbuildpack/packager/buildpack-packager

$ go install -i
NOTE: go is usually quiet (it doesn't provide a lot of output during get or install).
Testing the library
To make sure the library is installed, runt the following [being at any path]:
$ buildpack-packager help

Usage: buildpack-packager <flags> <subcommand> <subcommand args>
Forking the buildpack
Open the buildpack on github and press the fork button. Here I'll be using the following URL:
https://github.com/cloudfoundry/python-buildpackAfter this you should have a new repository at your github account under the following location:
https://github.com/<git_user_id>/python-buildpackTo clone the repository locally, adapt the following command to your forked git path:
$ cd $HOME

$ git clone --recurse-submodules -j8 https://github.com/<your_git_user_name>/python-buildpack.git
This will create a directory named "python-buildpack" so you can create your own branch and start performing the changes from there.
Checking the buildpack runs all tests
But before we go any further, let's check that the standard tests work with our current setup so far.
To run the unit tests we run the following command:
$ cd ~/python-buildpack/

$ ./scripts/unit.sh
This script will download and install several go modules and then will perform the required steps to test the buildpack
[1550511332] Conda Suite - 15/15 specs ••••••••••••••• SUCCESS! 600.092ms PASS

[1550511332] Finalize Suite - 7/7 specs ••••••• SUCCESS! 492.213ms PASS

[1550511332] Finalize Cli Suite - 0/0 specs  SUCCESS! 1.117ms PASS

[1550511332] Hooks Suite - 22/22 specs •••••••••••••••••••••• SUCCESS! 1.101857s PASS

[1550511332] ManagePyFinder Suite - 6/6 specs •••••• SUCCESS! 214.806ms PASS

[1550511332] Supply Suite - 36/36 specs •••••••••••••••••••••••••••••••••••• SUCCESS! 960.564ms PASS

[1550511332] Supply Cli Suite - 0/0 specs  SUCCESS! 798µs PASS
Script modifications
I am not a 'go' developer so I really feel there are better ways of achieving this. However, my goal here was to be able to provide a buildpack that was capable of running Python applications that depend on modules such as NumPy. Apparently, 'pip install' that runs by default will not do the trick. I believe this has something to do with the way the file "requirements.txt" is processed by the buildpack (I think it does this one-by-one so it prevents pip from installing them in the correct order).
Therefore, it will probably try to install a dependency from the requirements.txt before NumPy is already installed. Thus, it will throw an error and the deployment will fail.
Therefore, my modification is as simple as running pip to install NumPy, SciPY and MatplotLib before the buildpack tries to process the requirements.txt.
The Cloud Foundry Buildpack phase named "COMPILE" will call a go script named "supply". This is where things Python runtime and its modules get installed.
I've created a method named InstallNumpy() inside the supply script, to do the trick:
func (s *Supplier) InstallNumPy() error {


	s.Log.Info("------> Installing ML libs")


    cmd := exec.Command("python", "-m", "pip", "install", "numpy", "scipy", "matplotlib")

	output, err := cmd.CombinedOutput()


	if err != nil {

		msg := fmt.Sprintf("ML libs installation failed due to: \n %s", output)

		s.Log.Debug("[ML Installation Error]: %s", err)

		s.Log.Debug(msg)

		return err

	} else {

		msg := fmt.Sprintf("\n %s", output)

		s.Log.Info(msg)

		s.Log.Info("------> ML libs installed ")

	}

        return nil

}
And this method gets called right after InstallPipEnv method is called on the supply.go.
	if err := s.InstallNumPy(); err != nil {

			s.Log.Error("Could not install numpy: %v", err)

			return err

	}
NOTE: Is this the best approach? Of course not!
A better way would be to let pip install command decide the order in which it should install all dependencies listed in the requirements.txt file - who knows. Instead I went for the quick and dirty method. If you are a better Python developer (and you are sure enough better then I am), I suggest you get in touch with the project maintainers and try to give them your contribution. I'd be glad to test your approach as well - so please let me know your thoughts and comments on this topic.
Synch git with these modifications
You may want to skip the above manual modifications by issuing the following git commands:
$ cd ~/python-buildpack/

$ git checkout numpy
Debugging your modifications
Basic python project
To debug the buildpack, we need a basic project to run against it.
I've prepared an example for my blog post on the subject, but this time I had to modify it to support the standard buildpack. I did this on another branch to avoid confusion.
$ cd $HOME

$ git clone https://github.com/ivanmir/fuzzy

$ cd fuzzy

$ git checkout buildpack_std
The debugger installation
You may have noticed that we have already installed the go-delve package when we installed the libbuildpack with "go" commands.
Delve is a go debug daemon that will allow you to connect remotely from an IDE such as Visual-Code.
Let's understand the scripts needed to start a debug session
We need to understand what happens during the COMPILE phase.
The compile file is a bash script that takes two parameters as input and then runs the supply function we've previously modified. The supply function is coordinated by the main.go program that is located under supply/cli directory. Whereas the two parameters are respectively the python project path and a temporary cache to store files it will download.
All of this is done by the compile script stored at the bin directory.
Let's create a new script named "prepare.sh" based on the original [compile script] and replace the start command with a delve command that will start the debugger:
#!/bin/bash

set -euo pipefail


export BUILD_DIR=$1

export CACHE_DIR=$2

export DEPS_DIR="$BUILD_DIR/.cloudfoundry"

export CF_STACK="cflinuxfs3"

export BUILDPACK_PATH=$HOME"/python-buildpack"


rm -fR $DEPS_DIR

rm -fR $BUILD_DIR"/.profile"

rm -fR $CACHE_DIR


mkdir -p $CACHE_DIR

mkdir -p "$DEPS_DIR/0"

mkdir -p "$BUILD_DIR/.profile.d"


echo "export DEPS_DIR="$BUILD_DIR"/.cloudfoundry" > "$BUILD_DIR/.profile.d/0000_set-deps-dir.sh"


dlv debug $BUILDPACK_PATH/src/python/supply/cli/main.go --listen=<LINUX_IP_ADDRESS>:2345 --api-version 2 --log --headless --accept-multiclient -- "$BUILD_DIR" "$CACHE_DIR" "$DEPS_DIR" 0
NOTE: Replace the Linux IP address in the script with your own IP address. Note also that I've included sanitation routines in the script to remove the directories created and included the switch [--accept-multiclient] to support debugging multiple times. This will allow you to both stop the debug session at any time and start from the beginning. If, you eventually finish the script execution and want to star all over, you should kill the dlv process and start the prepare.sh again to perform directory cleaning again.
Running the debugger
Once you run the script, you should see a message like this:
$ cd ~/python-buildpack

$ ./bin/prepare.sh /home/<linux_user>/fuzzy /tmp/fuzzy

INFO[0000] launching process with args: [/home/<linux_user>/python-buildpack/debug /home/<linux_user>/fuzzy /tmp/fuzzy /home/linux_user/fuzzy/.cloudfoundry 0]  layer=debugger
NOTE: don't try to use variables or '~' to represent your home directory. Instead, always use the full path to the project directory as I've had issues running it correctly with the '~' character.
Install Visual Studio Code
For this blog I am using Windows and Visual Studio Code. Once you've installed vscode, make sure you have the go-extension installed:

I've installed git for Windows and cloned the forked buildpack project again locally.
Open the folder where the buildpack has been installed:

NOTE: After you've opened this folder for the first time on vscode, it will prompt you to install go dependencies locally - it would be a message at the bottom of the IDE (status bar). Let the IDE install all dependencies - it should take a while to complete.
Debugging remotely [recommended]
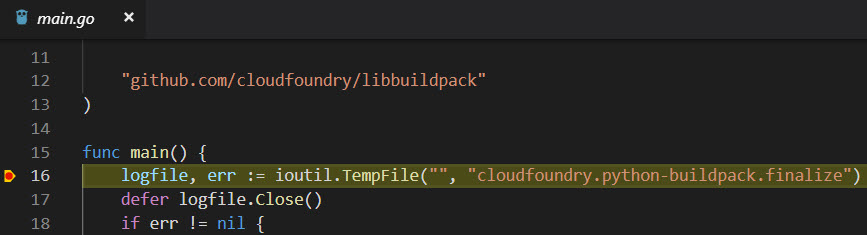
Open the main.go script located on the following path:
<local project's folder>/src/python/supply/cli/main.goClick on the debug icon (on the side-bar [left]) and select "Add Configuration..." from the drop-down menu.

This will add a file ".launch.json" at a new directory named ".vscode" at the root of the project.
Add the following launch configuration to debug remotely:
{

    "name": "Remote",

    "type": "go",

    "request": "launch",

    "mode": "remote",

    "remotePath": "/home/<linux_user>/python-buildpack",

    "port": 2345,

    "host": "<linux_ip_address>",

    "program": "${workspaceRoot}",

    "env": {},

    "trace": "log",

    "logOutput": "debugger",

    "apiVersion": 2,

    "showLog": true

}
Set a break-point on the file "/src/python/supply/cli/main.go", click on the debug function in vscode to start the "Launch" configuration.

Observe the "Debug Console" view will show the same entries you will see the when the buildpack is running the go scripts while CF is deploying your application.

And your code will stop at the line with a line-break:
You will also be able to inspect local and global variables:

Notice the dlv command line issued earlier will start displaying logs as well while the debug session is going on. Whenever you hit the stop button on the debug session in vscode you will see a "halting" message:

Debugging locally on Windows
This buildpack was created under a *nix environment and it uses lots of stuff integrated with it. So if you want to run a debug session 100% local you need to adapt some things so it will allow you to run on Windows.
You will need to install go, git and delve locally. Follow the documentation mentioned on this blog. The sites will also feature installation procedures related to Windows environment.
Once you have everything installed locally, you should have:
> git --version

git version 2.20.1.windows.1


> go version

go version go1.11.5 windows/amd64


> dlv version

Delve Debugger

Version: 1.2.0

Build: $Id: 068e2451004e95d0b042e5257e34f0f08ce01466
Add the following configuration in your launch.json:
{

    "name": "Launch",

    "type": "go",

    "request": "launch",

    "mode": "auto",

    "program": "${workspaceRoot}/src/python/supply/cli/main.go",

    "env": {

        "BUILDPACK_DIR": "${workspaceRoot}",

        "CF_STACK": "cflinuxfs3",

        "DEPS_DIR": "${workspaceRoot}/../fuzzy/.cloudfoundry",

        "PIP_CERT": "${workspaceRoot}/../ca-certificates.crt"

    },

    "preLaunchTask": "createDirs",

    "args": ["${workspaceRoot}/../fuzzy", "${workspaceRoot}/fuzzy-temp", "${workspaceRoot}/../fuzzy/.cloudfoundry", "0"]

}
Add a task in vscode by going to the menu "Terminal" and sub-menu "Configure Tasks...". Add a default task and change it according to the following:
{

    "version": "2.0.0",

    "tasks": [

        {

            "label": "createDirs",

            "type": "shell",

            "command": "${workspaceRoot}/scripts/prepare.bat",

            "promptOnClose": false,

            "presentation": {

                "echo": true,

                "reveal": "always",

                "focus": false,

                "panel": "shared",

                "showReuseMessage": true,

                "clear": true

            }

        }

    ]

}
Create another file under the scripts folder named "prepare.bat" with the following contents:
@echo off


cd %HOMEPATH%\fuzzy

rd /S /Q .cloudfoundry

rd /S /Q .profile.d

rd /S /Q %HOMEPATH%\python-buildpack\fuzzy-temp

mkdir %HOMEPATH%\fuzzy\.cloudfoundry\0

mkdir %HOMEPATH%\fuzzy\.profile.d

mkdir %HOMEPATH%\python-buildpack\fuzzy-temp
Download the python certificate
The launch configuration uses PIP_CERT environment variable and it needs to point to a local certificate file. In Windows environment we must download this file manually from this link.
Open the link from your browser and right click on the file entitled "Cert Autoridad Certificación Raíz: ACCV Raíz 1" and use the "Save as..." function. Save the file on your %HOMEPATH% with the name "ca-certificates.crt" or adapt the launch.json to make the environment variable PIP_CERT point it to the correct file name.
Debug view in Windows
Once you start the debug configuration "Launch" you should see the terminal window open to run the batch file. Click on the debug console when the debugger stops at the line with a break-point:

And the debug session should go the same way:

Using the custom buildpack
Once you've added your changes via git to your forked repository, you can use it the same way as described on my blog Python with packages depending on Numpy.
Enjoy!
- SAP Managed Tags:
- SAP BTP, Cloud Foundry runtime and environment
Labels:
You must be a registered user to add a comment. If you've already registered, sign in. Otherwise, register and sign in.
Labels in this area
-
ABAP CDS Views - CDC (Change Data Capture)
2 -
AI
1 -
Analyze Workload Data
1 -
BTP
1 -
Business and IT Integration
2 -
Business application stu
1 -
Business Technology Platform
1 -
Business Trends
1,661 -
Business Trends
87 -
CAP
1 -
cf
1 -
Cloud Foundry
1 -
Confluent
1 -
Customer COE Basics and Fundamentals
1 -
Customer COE Latest and Greatest
3 -
Customer Data Browser app
1 -
Data Analysis Tool
1 -
data migration
1 -
data transfer
1 -
Datasphere
2 -
Event Information
1,400 -
Event Information
64 -
Expert
1 -
Expert Insights
178 -
Expert Insights
273 -
General
1 -
Google cloud
1 -
Google Next'24
1 -
Kafka
1 -
Life at SAP
784 -
Life at SAP
11 -
Migrate your Data App
1 -
MTA
1 -
Network Performance Analysis
1 -
NodeJS
1 -
PDF
1 -
POC
1 -
Product Updates
4,577 -
Product Updates
324 -
Replication Flow
1 -
RisewithSAP
1 -
SAP BTP
1 -
SAP BTP Cloud Foundry
1 -
SAP Cloud ALM
1 -
SAP Cloud Application Programming Model
1 -
SAP Datasphere
2 -
SAP S4HANA Cloud
1 -
SAP S4HANA Migration Cockpit
1 -
Technology Updates
6,886 -
Technology Updates
402 -
Workload Fluctuations
1
Related Content
- Capture Your Own Workload Statistics in the ABAP Environment in the Cloud in Technology Blogs by SAP
- Usage of Custom Destination Service in BTP, ABAP Environment in Technology Blogs by Members
- Custom Fiori Catalogs are not available in Technology Q&A
- Top Picks: Innovations Highlights from SAP Business Technology Platform (Q1/2024) in Technology Blogs by SAP
- Flexible Workflow for PR in Technology Q&A
Top kudoed authors
| User | Count |
|---|---|
| 12 | |
| 9 | |
| 8 | |
| 7 | |
| 7 | |
| 6 | |
| 6 | |
| 6 | |
| 6 | |
| 4 |