
- SAP Community
- Products and Technology
- Technology
- Technology Blogs by SAP
- 2.SAPUI5 application with ABAP OData Service as ba...
Technology Blogs by SAP
Learn how to extend and personalize SAP applications. Follow the SAP technology blog for insights into SAP BTP, ABAP, SAP Analytics Cloud, SAP HANA, and more.
Turn on suggestions
Auto-suggest helps you quickly narrow down your search results by suggesting possible matches as you type.
Showing results for
former_member18
Explorer
Options
- Subscribe to RSS Feed
- Mark as New
- Mark as Read
- Bookmark
- Subscribe
- Printer Friendly Page
- Report Inappropriate Content
02-19-2019
12:25 PM
Hi Colleagues,
This series of the blogs is to help teams who are going to develop SAPUI5 application in cloud foundry since SAP applications are migrating to the cloud and to be specific cloud foundry rapidly, you can find the below list of blogs with the combinations of development by which you will migrate your current application to cloud foundry or for developing a new application.
The below are the combinations of the development and the links to the blog(All the links will be enabled once it is published).
Let us start with the second use case where we will develop a SAPUI5 application with back-end as ABAP.
Since this is not a static application, you have to develop the SAPUI5 application as Node-js app which acts like an app router and as well as SAPUI5 application
You can use the static SAPUI5 application from this URL(Developed during the first blog)
Step 1:
Let's add service to the application. Open manifest.json and goto "models" section under "sap.ui5" and add your OData Service like below

Step 2:
Add a table in the view1 to display the data from the Features entity set.

Now perform cf push by going to the folder where the manifest.yml file exists via command prompt ( you can see the steps to log-in and cf push in the first blog)
After cf push is done open the application you will see the table with no data.
If you open Developer tools ( F12 (or) Ctrl+Shift+I), you will find 404 calls for the metadata of the service

Because since it is a static application it doesn't know how to route ( It will be checking this in the webapp folder ->if you open entire URL ).
let's convert our app as a dynamic application by creating an app router and create a route to the ABAP system
This is the architecture of the Cloud Foundry to the ABAP system connection.

So we need the below services to connect to the ABAP systems
Let's create the services
Step 3:
Go to your SAP Cloud Platform trial account and navigate to your Cloud Foundry sub-account.
Choose
Fill the below details
Name <backend> - > Mentioned in Figure 1.1 odata URI section.
Type: HTTP
URL: http://server:port
proxyType: OnPremise
You can provide your User name and password of your ABAP system by changing the mode of Authentication to Basic.
If you keep it as NoAuthentication a popup will appear and ask for credentials in UI.
Step 4: -
Cloud connector Setup
Follow the steps in this URL for setting up the configurations for the same destination in Cloud connector to connect the ABAP system. ( In Protocol select HTTPS in the cloud in Step 2 and point 3).
Step 5: Creating Destination Service
Go to your account and choose

On-screen

Skip all optional parameter by pressing the Next button
On the next screen, use as

Step 6: - Creating connectivity Service
Go to space and navigate to.
On-screen

Skip all optional by pressing the Next button
On the next screen, use

Step 7: - Creating an XSUAA service
The application router will use the XSUAA instance to authenticate the user before routing the HTTP request to a defined destination. For more general information, see Authorization and Trust Management in the Cloud Foundry Environment in the official documentation.
Go to your space and navigate to

On screen

Choose

Provide the following parameters and choose
{
"xsappname": "approuter-demo",
"tenant-mode": "dedicated",
"scopes": [
{
"name": "uaa.user",
"description": "UAA"
}
],
"role-templates": [
{
"name": "Token_Exchange",
"description": "UAA",
"scope-references": [
"uaa.user"
]
}
]
}
Note: approuter-demo is the app name you are going to deploy which you can find in your manifest.yml file.


Step 8: Create a package.json with below parameters

Step 9: - Create a file xs-app.json with the below details
Destination field below is an exact name which we provided in Destinations in Cloud Foundry.

Note : authenticationType:xsuaa for localDir is mandatory for your back-end service to load.
The path staticsapui5app/StaticSAPUI5application is your Application component name which you can find in your component.js

Step 10: Create a file manifest.yml with the below details

Services names should be the same as in figure 1.8.4, 1.7.3, 1.6.3
Step 11: - Perform CF push operation
Now when you open your application you will be able to see the application with data from the ABAP system.
The folder structure of the app will look like

Conclusion:-
The above blog explains how you can develop a SAPUI5 application in cloud foundry with ABAP service as a back-end service.
You can find the code here.
This series of the blogs is to help teams who are going to develop SAPUI5 application in cloud foundry since SAP applications are migrating to the cloud and to be specific cloud foundry rapidly, you can find the below list of blogs with the combinations of development by which you will migrate your current application to cloud foundry or for developing a new application.
The below are the combinations of the development and the links to the blog(All the links will be enabled once it is published).
- Simple static HTML/XML or static JSON model based SAPUI5 Applications
- SAPUI5 application with ABAP OData Service as backend
- SAPUI5 application in Fiori Launchpad
- SAPUI5 application with non-ABAP service as a backend
Let us start with the second use case where we will develop a SAPUI5 application with back-end as ABAP.
Since this is not a static application, you have to develop the SAPUI5 application as Node-js app which acts like an app router and as well as SAPUI5 application
You can use the static SAPUI5 application from this URL(Developed during the first blog)
Step 1:
Let's add service to the application. Open manifest.json and goto "models" section under "sap.ui5" and add your OData Service like below
Fig: 1.1
Step 2:
Add a table in the view1 to display the data from the Features entity set.
Fig: 1.2
Now perform cf push by going to the folder where the manifest.yml file exists via command prompt ( you can see the steps to log-in and cf push in the first blog)
After cf push is done open the application you will see the table with no data.
If you open Developer tools ( F12 (or) Ctrl+Shift+I), you will find 404 calls for the metadata of the service
Fig: 1.3
Because since it is a static application it doesn't know how to route ( It will be checking this in the webapp folder ->if you open entire URL ).
let's convert our app as a dynamic application by creating an app router and create a route to the ABAP system
This is the architecture of the Cloud Foundry to the ABAP system connection.
Fig: 1.4
So we need the below services to connect to the ABAP systems
- Destination Service
- To maintain URL mainly for cross-site management also for configuration management.
- Connectivity Service
- Since the ABAP system is behind a firewall you need a connector for the cloud to on-Premise call
- XSUAA
Let's create the services
Step 3:
Go to your SAP Cloud Platform trial account and navigate to your Cloud Foundry sub-account.
Choose
Connectivity| Destinations| New Destination.Fig: 1.5
Fill the below details
Name <backend> - > Mentioned in Figure 1.1 odata URI section.
Type: HTTP
URL: http://server:port
proxyType: OnPremise
You can provide your User name and password of your ABAP system by changing the mode of Authentication to Basic.
If you keep it as NoAuthentication a popup will appear and ask for credentials in UI.
Step 4: -
Cloud connector Setup
Follow the steps in this URL for setting up the configurations for the same destination in Cloud connector to connect the ABAP system. ( In Protocol select HTTPS in the cloud in Step 2 and point 3).
Step 5: Creating Destination Service
Go to your account and choose
Services|.Service Marketplace Filter for dest and choose destination.Fig: 1.6.1
On-screen
Service: destination - Instanceschoose.New InstanceFig: 1.6.2
Skip all optional parameter by pressing the Next button
On the next screen, use as
destination-demo-liteInstance Name and choose.FinishFig: 1.6.3
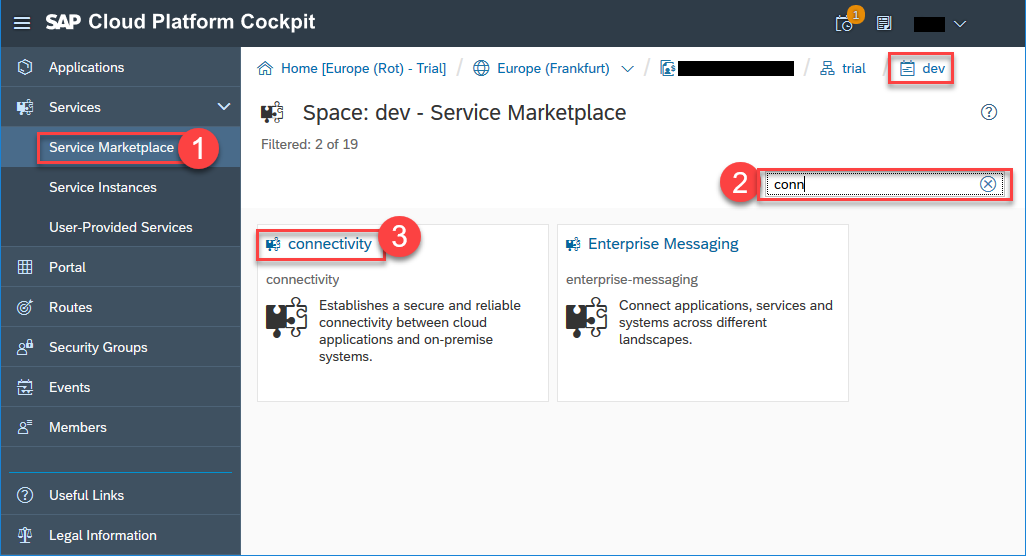
Step 6: - Creating connectivity Service
Go to space and navigate to.
Service Marketplace Filter by conn and choose connectivity.Fig: 1.7.1
On-screen
Service: connectivity - Instances choose New Instance.Fig: 1.7.2
Skip all optional by pressing the Next button
On the next screen, use
connectivity-demo-lite as Instance Name and choose Finish.Fig: 1.7.3
Step 7: - Creating an XSUAA service
The application router will use the XSUAA instance to authenticate the user before routing the HTTP request to a defined destination. For more general information, see Authorization and Trust Management in the Cloud Foundry Environment in the official documentation.
Go to your space and navigate to
Service Marketplace. Filter by Auth and choose Authorization & Trust Management.Fig: 1.8.1
On screen
Service: Authorization & Trust Management - Instances choose New Instance.Fig: 1.8.2
Choose
application as service plan and choose Next.Fig: 1.8.3
Provide the following parameters and choose
Next:{
"xsappname": "approuter-demo",
"tenant-mode": "dedicated",
"scopes": [
{
"name": "uaa.user",
"description": "UAA"
}
],
"role-templates": [
{
"name": "Token_Exchange",
"description": "UAA",
"scope-references": [
"uaa.user"
]
}
]
}
Note: approuter-demo is the app name you are going to deploy which you can find in your manifest.yml file.
Fig: 1.8.4
Fig: 1.8.4
Step 8: Create a package.json with below parameters
Fig: 1.9
Step 9: - Create a file xs-app.json with the below details
- This file is similar to neo-app.json in web-ide used for routing
Destination field below is an exact name which we provided in Destinations in Cloud Foundry.
Fig: 2.0
Note : authenticationType:xsuaa for localDir is mandatory for your back-end service to load.
The path staticsapui5app/StaticSAPUI5application is your Application component name which you can find in your component.js
Fig: 2.1
Step 10: Create a file manifest.yml with the below details
Fig: 2.2
Services names should be the same as in figure 1.8.4, 1.7.3, 1.6.3
Step 11: - Perform CF push operation
Now when you open your application you will be able to see the application with data from the ABAP system.
Fig: 2.3
The folder structure of the app will look like
Fig: 2.4
Conclusion:-
The above blog explains how you can develop a SAPUI5 application in cloud foundry with ABAP service as a back-end service.
You can find the code here.
- SAP Managed Tags:
- ABAP Connectivity,
- ABAP Development,
- Node.js,
- SAPUI5,
- SAP BTP, Cloud Foundry runtime and environment
Labels:
You must be a registered user to add a comment. If you've already registered, sign in. Otherwise, register and sign in.
Labels in this area
-
ABAP CDS Views - CDC (Change Data Capture)
2 -
AI
1 -
Analyze Workload Data
1 -
BTP
1 -
Business and IT Integration
2 -
Business application stu
1 -
Business Technology Platform
1 -
Business Trends
1,658 -
Business Trends
93 -
CAP
1 -
cf
1 -
Cloud Foundry
1 -
Confluent
1 -
Customer COE Basics and Fundamentals
1 -
Customer COE Latest and Greatest
3 -
Customer Data Browser app
1 -
Data Analysis Tool
1 -
data migration
1 -
data transfer
1 -
Datasphere
2 -
Event Information
1,400 -
Event Information
66 -
Expert
1 -
Expert Insights
177 -
Expert Insights
299 -
General
1 -
Google cloud
1 -
Google Next'24
1 -
Kafka
1 -
Life at SAP
780 -
Life at SAP
13 -
Migrate your Data App
1 -
MTA
1 -
Network Performance Analysis
1 -
NodeJS
1 -
PDF
1 -
POC
1 -
Product Updates
4,577 -
Product Updates
344 -
Replication Flow
1 -
RisewithSAP
1 -
SAP BTP
1 -
SAP BTP Cloud Foundry
1 -
SAP Cloud ALM
1 -
SAP Cloud Application Programming Model
1 -
SAP Datasphere
2 -
SAP S4HANA Cloud
1 -
SAP S4HANA Migration Cockpit
1 -
Technology Updates
6,873 -
Technology Updates
423 -
Workload Fluctuations
1
Related Content
- SAP Cloud ALM and Identity Authentication Service (IAS) in Technology Blogs by SAP
- using Already availble XSUAA service to another application giving service broker failed error in Technology Q&A
- Configuring SAP CI/CD pipeline for Deploying ReactJS application in Cloud Foundry in Technology Q&A
- My inbox application with multiple backends(ECC,CRM) configuration Guide in Technology Q&A
- Sorting not working on object Page Item table SAP CAP BTP Fiori elements in Technology Q&A
Top kudoed authors
| User | Count |
|---|---|
| 40 | |
| 25 | |
| 17 | |
| 14 | |
| 8 | |
| 7 | |
| 7 | |
| 7 | |
| 6 | |
| 6 |